Pumpkinferno

I’ve been going to Upper Canada Village since I was a child. It’s a historical recreation of a rural English Canadian village from 1860’s along the St. Lawrence Seaway. Most of the buildings are authentic to the time period, although I don’t think there was ever an actual village on that site — the buildings were moved in from a number of different sources. Needless to say, it’s an educational gold mine. Not surprisingly, it was a popular spot for school field trips, and my parents also took my brother and I there on summer outings. However, back when I was a kid they didn’t have the two lights festivals that they do now (Pumpkinferno for Halloween, and Alight at Night for Christmas). I’m pretty sure they didn’t host the medieval fair in the summer there either. These are all great events, though, even if they’re not exactly time-period-accurate.

Pumpkinferno is an exhibition of 7,000 hand-carved pumpkins along a kilometer-long walking trail. The majority of the pumpkins are artificial, since the exhibition lasts for about a month and no real pumpkin would last that long. There are some real pumpkins painted (and in previous years, carved) by local children on exhibit as well. Back when they used carved ones they had to keep switching them up for new, fresh gourds, which is probably why they switched to painting. I’ve been going to Pumpkinferno since the very first year (five years ago or so), and as my kids got older I started bringing them along as well. This year was Thing 2’s first time attending.

There has been at least one Chinese-style dragon every year (this year there were two). My kids’ first thrilled exclamation was, “Long Ma!”

There was also a rainbow ribbon made of birds (doves?) in the mill pond. Only the top half of the ribbon was actually made of pumpkins; the bottom was a reflection.

Witches danced around a cauldron to a recording of the witches’ chant from Macbeth. These witches seemed more Pratchett-like than Shakespeare-like to me, though.

There was a whole section of famous paintings recreated in pumpkins. The most recognizable, of course, was the Mona Lisa. There was also Van Gogh’s self-portrait, Emily Carr’s Haida Totems, Girl with a Pearl Earring, American Gothic, White Pine by A.J. Casson (Group of Seven), and a Frida Kahlo self-portrait.

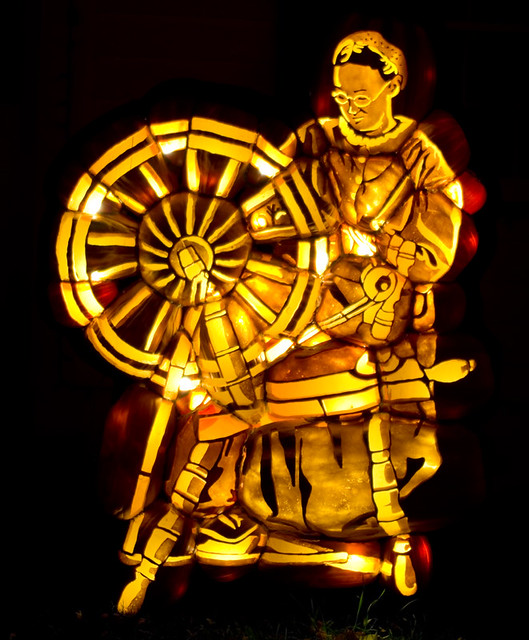
In honour of the village itself, there was an exhibit called the “Upper Canada Village People”, of which there were a schoolteacher, a cheese-maker, a baker, and a spinner.

The Jack-o’-lantern-covered archway to the children’s area is another exhibit that has remained constant (although I believe at least some of the individual pumpkins have changed).

My favourite part this year was the Day of the Dead area, which was actually so large that I couldn’t fit all of it (or even most of it) in one picture. It was colourful and detailed and a general pleasure to behold.

Of course, these aren’t all of the exhibits at Pumpkinferno — they’re just the ones of which I got the best pictures. If you have time before Hallowe’en, I highly recommend a visit. It only runs Thursday through Sunday for the next two weekends, so keep that in mind when you’re planning. Also, the lines for entry can be quite long. I highly recommend buying your tickets online in advance, which means you get to take the quicker and shorter line, and spend more time inside the event.

Bread Machine Baking

I’ve been taking the opportunity to play with my bread machine over the last little while, and not only because there have been some stinking hot days (30°C (86°F) with a humidex of 40°C (104°F) this past Sunday) where I don’t feel like baking in the oven. I’ve picked up a few more books about maximizing the potential of a breadmaker, and I think that the new knowledge I’ve gained, and the new recipes, are really making a difference in the results I’m getting.

For this bread I used the Golden Pumpkin Bread recipe on page 167 of Bread Machine: How to Prepare and Bake the Perfect Loaf by Jennie Shapter (2002), omitting the pumpkin seeds. The nearly-fluorescent orange colour was created by using the homemade pumpkin puree that I canned last fall. Some of the pumpkins that I cooked up after Halloween were white-skinned (probably Casper pumpkins), and their flesh was a more brilliant orange than the usual orange-skinned pumpkins you get around here. I also bought a variety of pumpkin that had skin that was a deep reddish orange, with a very intensely-orange flesh. The resulting bread was lovely and moist while still being light, with a slight tang of pumpkin that goes well with hearty dishes like casseroles and soups.

This loaf, although it doesn’t look spectacularly interesting, but it had a lovely, subtly-sweet flavour. It was based on the Apple Butter Bread recipe found on page 172 of The Complete Guide to Bread Machine Baking from Better Homes and Gardens (1999). To take advantage of my recent batch of strawberry-rhubarb butter (which I will share the recipe for soon), I used that instead of apple butter, and omitted the apple pie spice/allspice. This bread isn’t as moist as the pumpkin bread, but is more moist than your average white or brown bread. As per the cookbook’s suggestion, I have tried it with honey for breakfast, which was absolutely divine. I haven’t tried it as part of a grilled cheese sandwich with cheddar cheese due to my issues with dairy, but I predict that the flavour combination would be amazing.

Last but not least, my favourite bread machine experiment so far has been Marbled Pesto Bread from page 142 of Bread Machine: How to Prepare and Bake the Perfect Loaf. For this bread I used the Roadapple Ranch garlic scape pesto that I wrote about previously. The bread recipe required using the machine’s dough cycle, which means that the bread is then baked in the oven. It’s the economical version of using a stand mixer for bread dough, really, except that it also proofs the dough. The dough is rolled up kind of like a jelly roll, but with pesto instead of jelly. The final results were delicious! My husband has not stopped raving about this bread since I made it — and I’m pretty sure he ate most of the loaf. We didn’t serve this bread with anything; it was perfectly good all on its own, even without butter. I’m definitely making this one again once the days cool down a bit so I don’t roast myself by using the oven.

Dairy-Free Pumpkin Spice Cashew Spread Recipe

I’m still working through a batch of pumpkin puree that I thawed and then didn’t end up needing. One of my favourite pumpkin-based recipes is Pumpkin Spice Cream Cheese Spread by Pinch My Salt. The original recipe is simple — no cooking required, it’s as easy as throwing everything in a blender and pushing a button. Sadly, since I now have to avoid dairy products, any recipe based on cream cheese is out. So I made my own slightly-more-labour-intensive dairy-free version, and I think it tastes just like pumpkin pie.

My first version of this recipe was made with tofu, but that was a wash — despite the spices, it still mostly tasted like beans. My successful version is made with cashews as the base, which means it definitely contains nuts and is not school-safe. That’s okay, my kids can have dairy, I can send them to school with the cream-cheese-based version. My version also doesn’t use premixed pumpkin spice, but instead all of the individual spices that are usually found therein, allowing for a bit more customization. The recipe is vegetarian, and could be made vegan if you source your ingredients right (many brands of sugar, including brown sugar, use bone char as part of the filter process).

I like both versions of the spread as a dip for a freshly-cut-up cold, crisp apple. It also works well as a spread for bagels, toast, or a topping/core for muffins or cupcakes.


Pumpkin spice cashew spread with sliced gala apples

Dairy-Free Pumpkin Spice Cashew Spread
Yields about 1 1/2 cups

Pour into a heat-safe container:
1 cup roasted unsalted cashews
Cover the cashews with boiling water and leave them to sit for a minimum of 1 hour, up to 4 hours. Cashews should be plump and soft after soaking.
Drain water and place cashews in a blender.
Add to the blender:
1/2 tsp salt
1 Tbsp corn starch
3 Tbsp nutritional yeast
6 Tbsp brown sugar
1/4 cup maple syrup
1/2 cup canned pumpkin
1/2 tsp vanilla extract
1 1/2 tsp cinnamon
1/2 tsp ginger
1/4 tsp nutmeg
1/8 tsp cloves
1/8 tsp allspice
1/2 cup water
Blend mixture until smooth.
Pour mixture into a cooking pot. Stirring constantly, cook until the mixture just begins to simmer. This recipe will burn to the bottom of the pot very quickly, so stirring constantly is essential. Once the mixture has reached a simmer, remove it from the heat. Scrape the mixture into a container with a lid that seals, then refrigerate until cooled through. Serve.