French Toast & Maple Syrup

It’s getting near the end of maple syrup season here in Ontario. The sap didn’t run for very long this year, what with the late thaw and the fact that it’s supposed to get up to nearly twenty degrees Celsius by the end of this week. The rising temperatures mean that it’ll be a warm Easter weekend, but it will definitely cut off the sap flow!

I hadn’t really taken advantage of the season to make any of the traditional dishes like pouding chômeur, since I’ve been too busy for much baking lately. But I wanted to make something seasonal, so I settled on French toast with maple syrup.

I whipped up the bread earlier in the day; it’s simply my bread machine fluffy herb bread without the herbs. This creates a light, airy loaf, which is what I prefer for French toast. I added a little bit of vanilla to the whipped eggs, but I didn’t use cinnamon like I normally would so that the syrup was the ingredient that really shone. And it was delicious!

Lactose-Free Grilled Cheese

I’ve felt 1000% better since cutting lactose out of my diet, but cheese is the thing that I miss the most. I can do with vegan milk substitutes most of the time, and there are a number of recipes where dairy really isn’t necessary at all, but cheese is one place that I haven’t found a good substitute. To that end, I’ve been experimenting with all kinds of lactose-free versions, and surprisingly the store and bargain brands seem to be catering most to my needs, which I didn’t expect because they’re also some of the cheapest.

Since the lactose-free pizza turned out so well, I thought that I should try another dish with the new-to-me PC Lactose Free cheese. This time I chose the Lactose-Free Triple Cheddar Shredded Cheese Blend, which I figured would be tangier than the mozzarella. And I have to say that it turned out perfectly. I don’t know what this brand is doing differently than the other lactose-free cheeses I have tried, but this cheese melts well and stays properly gooey as it cools (I find a lot of them end up with a plastic-like consistency unless they’ve melted just moments before). It was a real pleasure to eat and I know I’ll be back for more. And now I really want to try the triple cheddar in Mom’s Homemade Macaroni & Cheese — also using lactose-free milk and margarine instead of butter, of course.

Of course, a good grilled cheese isn’t all about the cheese, although I’d say that it’s more than 50% of the quality of the final product. This grilled cheese was also made on fresh homemade bread — well, bread machine bread, but that still counts! Thing 1 made us some white bread (page 66, Bread Machine: How to Prepare and Bake the Perfect Loaf (Jennie Shapter (2002)). We’ve really had to keep close tabs on the bread machine lately because the cold, dry weather has meant that we generally need up to a quarter cup more liquid per loaf. Basically, when the machine sounds like it’s struggling to knead, it’s time to add more liquid! This has meant that we’ve had to pay attention (and not go out) instead of the usual set-it-and-forget-it, but it’s worth it for easy, fresh bread.

Lactose-Free Pizza

A friend of mine who also has to avoid lactose told me that she’d found a great new product from President’s Choice: Lactose-Free Pizza Mozzarella Shredded Cheese (and they also have a cheddar blend). I was able to find it at a nearby store, too! Then the other day a different friend reminded me that I could use my bread machine to make pizza dough, so I figured that the world was conspiring to have me make some pizza.

Since I’d already tried the Betty Crocker pizza dough recipe, I thought I’d try something different to compare it to. This time I went with the dough from Tomato and Prosciutto Pizza on page 108 of Bread Machine: How to Prepare and Bake the Perfect Loaf (Jennie Shapter, 2002), and I think I like this one better. It’s more of a thick crust and it definitely makes a greater quantity. I’d run out of homemade sauce, so I picked up a jar of Classico Traditional Pizza Sauce, which I had also never tried before and ended up quite liking. Not only did it taste much better than the canned kinds, it also was enough for two pizzas with some left over. I topped the pizza with bacon and ground beef, at Thing 1’s request. And I really liked how it all turned out! I was especially impressed with the lactose-free mozzarella, which remained gooey and stringy even as it cooled. I find that a lot of lactose-free cheeses melt just fine, but they start turning a disturbing plastic-like consistency very quickly. But not this one! This is definitely a dish I’m going to be making again, especially since my pizza dough tossing technique needs a lot of practice.

Socks of Many Colours

In an effort to get an early start on the first of my New Year’s resolutions, I spent a good chunk of this weekend knitting socks. Not just any socks, but socks (well, one sock so far) of many colours. I have a bag of yarn odds and sods of sock yarn that I inherited from a crafty friend when she passed away, as well as many years worth of my own leftovers. I thought that it would be nice to use up this bag, but to do so means that I’m going to have to make some very interestingly-coloured socks.

So far this sock has used six different leftover yarns, and I hope to use one or two more before it’s done. I divided the balls in half by weight and pattern, so the second sock should mostly match — although the colour repeat on some of the yarns is so long that it won’t be perfect. In the end, the pair of socks will be completely unique and hopefully a lot of fun!

I still haven’t decided what I’m going to do with the other leftover sock yarn, of which there is quite a bit. I don’t have the patience to turn it into a blanket, but a shawl is not out of the question. Or maybe a scarf; an infinity scarf might be nice. I haven’t knit a scarf in years. I’ve already made a couple dozen mini sweaters as Christmas ornaments over the last few years, and I’ve run out of people to gift them to. Given how cold my hands get at night when I’m on the computer, I may have to knit a new pair of wrist warmers, though. Hmmmmmm…

In the Knitting Weeds

This morning we discovered that Candy Cane must have gotten into my knitting cupboard, since she was all tangled up in my sock yarn leftovers:

I have to admit that I’m feeling a bit like how Candy Cane looks at the moment. I’m in the knitting weeds, as it were. There are 12 days left until Christmas and I’m only halfway through the second stocking. Granted, most of my holiday shopping and other making is already complete, which is what has been eating into my time, but I was hoping to finish all four stockings in time for Christmas Eve. And much as I love knitting, I’m no speedster like the Yarn Harlot, although I don’t think I have her level of experience either.

And yet I remain sure that I can get it all done, despite not yet having picked out my own yarn. Mine will be the last one knit in any case. I think I can, I think I can…

Bread Experiments

Today we found Candy Cane trying to fit in with the Christmas nesting dolls:

Last week I picked up a “new” (thrifted) bread machine for $7.99 at Value Village. It was exactly the same as my old Black & Decker All-In-One Horizontal Breadmaker, which I had loved so much that I wore it out. I’ve had a couple of second-hand replacements since then, some of which I’ve also worn out and some that I simply haven’t liked. However, none of them had the preheat function, which I didn’t realize I’d miss so much.

You see, the preheat function warms up your ingredients before it begins kneading the dough, which means the bread ends up being lighter and fluffier. The reason for this is that yeast is much more active at warmer temperatures (but not actual hot temperatures, which actually kills it off). Since “yeast farts” (the carbon dioxide emitted when the yeast eats sugar) are what causes bread to rise, warmer temperatures mean fluffier bread. I find that this is especially important when baking in the winter.

I tested out my new-to-me machine with a loaf of pumpernickel bread (page 21, Better Homes and Gardens: The Complete Guide to Bread Machine Baking, 1999). I’d forgotten that this particular recipe usually requires a little extra water (I really should read my own notes), so at first I thought that the motor was struggling. Nope, the dough was just too thick! About an extra 1/3 of a cup of water, added in a drizzle at a time, and it was right as rain.

Another recipe I’ve been trying to perfect is a hard apple cider bread. There are a lot of great ciders around here, and although I’m not a fan of them to drink, I thought they would make for an interesting flavour in a bread. (That’s more or less how I feel about beer, too.) My first attempt in my old bread machine didn’t rise much at all, but tasted quite nice. I put the lack of rising down to the ingredients being too cold, since the yeast is obviously still alive since it’s from the same package as the pumpernickel bread. The second time, I pre-warmed the liquids and used the “new” bread machine with the preheat option, which did help a lot. As you can see from the pulling apart of the crust in the above photo, it definitely did rise. But it’s still not as light and fluffy as I would like, especially in comparison to my beer bread recipe. Perhaps I just need more yeast? I generally only use 2tsp in a loaf this size, but it’s possible that the higher alcohol content of the cider is killing some of my yeast off.

It kneaded together well, though, which makes me think the wet-to-dry ingredient ratio is correct. Also, the crust is a little too brown in spots, which makes me think that there is too much sugar. Cider by its very nature has natural sugars in it, so I may not need any added sugar at all. So this recipe definitely isn’t ready to post yet, but I will do so as soon as I have a satisfactory, repeatable result. Stay tuned!

A Family Sunday

On Saturday morning, we found Candy Cane hiding under the chair in Thing 1’s room, riding a LEGO scooter, playing with the a Vaporeon and a Playmobil pegasus:

And Sunday morning we found her hanging around in the kitchen with Chimpy:

I spent most of that day with my little family decorating the house for Christmas. As of now we’re still not done, but that’s to be expected as we do Christmas almost as big as we do Halloween around here.

Of course, we had to take a break for dinner, which was roll-your-own sushi again at the kids’ request. Since this is a pretty healthy meal, I don’t mind indulging them.

Their rolling skills are getting better, but their knife skills could use a bit of work. Part of their difficulty was the knives we used, though, which could definitely use a sharpening.

One thing we did manage to finish was decorating the tree, which is a real one in our house so it doesn’t stay up all that long. We find three weeks (two weeks before Christmas and one week after) is about as long as the needles will stay on. I know that the kids would be more than happy to have it up in November otherwise, although I’m pretty sure my husband would object.

The addition of the tree and its decorations are, I think, the inspiration for the stuffed Christmas bear to tie Candy Cane to the tracks this morning. Although I do remember learning somewhere that there is actually no damsel-in-distress-tied-to-the-tracks scene in any old movie other than parodies; maybe I saw that on QI? At any rate, the elf is safe enough considering that the train has no batteries. Her predicament didn’t seem to bother the children at all.

Food Mills and Apple Butter

I spent most of a day over the weekend processing the apples we’d picked. It took me that long not because it is a difficult process, but because I had almost forty pounds of fruit to go through. Apples can be kept over the winter in a cool, dry place, so a couple of months in my basement meant that they were still perfectly fine. However, I wanted to turn them into preserves, both for my own pantry and as Christmas gifts.

Back in May I picked up an immaculate second-hand food mill for $7.99, and this was my first chance to try it out. Well, it worked like a charm! No more spending hours and hours peeling and coring my apples before cooking. I just had to cut them in quarters, and then run the lot through the food mill once it was all cooked soft. It saved me so much time. I really wish I’d found a food mill years ago!

Then I cooked the resulting applesauce down with some cinnamon and honey in a slow cooker for about 24 hours, until it had halved in volume. This was just under half of the applesauce that I made; the rest will go in another batch. As you can see, it starts really light-coloured before the cinnamon is stirred in and it starts to oxidize.

This was the end result: just over two litres of apple butter. I’d estimate that about 17lbs of apples was rendered down into these nine tasty little jars. I still have another batch to go, with one medium-sized container of applesauce in the freezer to be used in baked goods over the winter. There are some lovely recipes for applesauce quick breads, yeast breads, and cakes out there that I’d like to try (or re-try)!

Family Sushi Night

One thing we share as a family is that every single one of us loves sushi. However, we do differ as to which one is our favourite — the best bribe ever to use on Thing 1 is salmon nigiri, while Thing 2 is a big fan of a California roll or any maki with shrimp tempura in it, my husband prefers hand rolls (temaki), while I actually like sashimi (just the fish/seafood), possibly with a bowl of rice on the side to fill me up.

That being said, I don’t know why it didn’t occur to me before now to make sushi at home. I used to do it all the time in high school and as a young adult; I actually hosted a few dinner parties where we all rolled our own sushi. However, it is very time consuming for one person to make a family’s worth, and I guess I just set it aside until I thought the kids were old enough to help me out. But the kids are both old enough now to assemble their own soft tacos or burritos, and sushi uses many of roughly the same techniques, so I thought it was time to give it a go.

Last night I made up a big pot of sushi rice and cut up all kinds of toppings: smoked salmon, cooked shrimp, scrambled egg with a bit of mirin mixed in, cucumber, carrots, and avocado. Then I dug out one rolling mat per person and let everyone assemble their own sushi.

The nice thing about making sushi this way is that everyone can have it just how they like it, although probably not as pretty as they’d like it, that comes with a heck of a lot of practice. I find it surprising that a lot of people around here still assume that sushi automatically equals raw fish, when it’s really all about the vinegared rice. You can top it or roll it with just about anything you’d like. You can even avoid fish or even all animal products altogether, although the purists may take objection to that. But let’s be honest, purists aren’t going to be rolling sushi at home with their six-year-old, they’re going to be paying a very skilled professional chef to create the perfect mouthfuls.

I really liked the combination of the saltiness of the smoked salmon with the sweet egg and the crunch of cucumber.

The egg-and-shrimp roll I made could have used a little more punch; perhaps I should pick up some spicy Japanese mayo for next time?

My husband’s rolls generally turned out nicer-looking than mine, except, of course, when I went to take a picture. His egg, cucumber, and shrimp roll tasted pretty good, though.

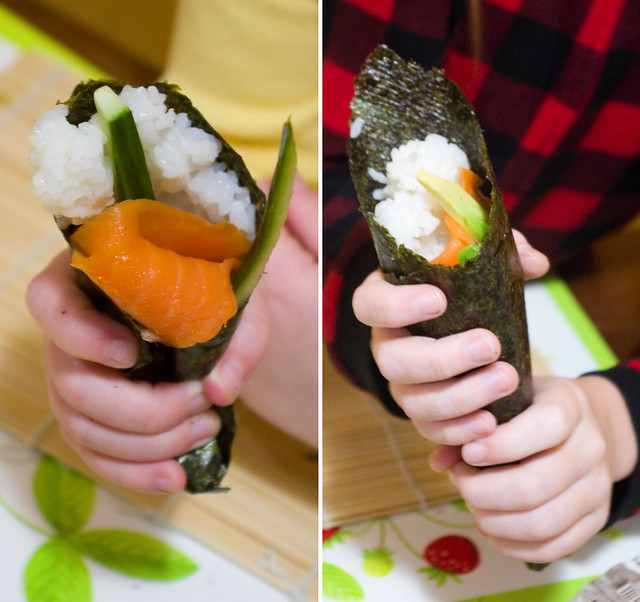
After a couple of messy (if tasty) attempts at maki sushi rolls, the girls tried their hands at hand rolls, which are the closest in assembly to a taco, which is where there experience lies.

We had a really good time making and eating this dinner, and I’m starting to think I should have introduced homemade sushi long before now. I loved watching the kids’ faces light up when I told them that we could actually make sushi at home. Not only that, but it’s a pretty healthy meal that’s infinitely customizable. We are definitely going to do this again, and soon. It needs to become a regular thing in my house again.

Spicy Green Tomato Chutney

I spent most of yesterday evening and well into the night putting up the last of the green tomatoes — not only my own, but a whole bunch of them from a friend’s garden as well. Sadly, I waited a bit too long and some of them had spoiled, but I did have a satisfactory result nonetheless.

That’s twenty 250mL jars of spicy Green Tomato Chutney, the recipe for which can be found on page 208 of The Canadian Living Complete Preserving Book (2012). I’ve made a few versions of this chutney over the years (I believe I have at least four versions in different cookbooks on my shelf, let alone the ones that can be found online), but this is by far my favourite. I was really happy with how it turned out this year! I made it a little hotter than usual by including the jalapeno seeds, but otherwise I kept the recipe the same. I labeled mine as “spicy” this year, and it does have some heat, but given that chutney originates in India, it’s not the spiciest one out there by far. To me, it’s just spicy enough to pack a nice punch.

Chutney is supposed to be savoury and sweet and spicy all at the same time. Preserving says this version is especially good with eggs in the morning, but I would say that it is great on a sandwich or grilled cheese or burger, with cold cheese, with most meats, with roast potatoes or other veggies, as a dip or a glaze… Basically, if you want to take the flavour of anything savoury up a notch, chutney is perfect. And now I have five liters of it, some of which will stay in my pantry, and some of which will become Christmas gifts.