French Toast & Maple Syrup

It’s getting near the end of maple syrup season here in Ontario. The sap didn’t run for very long this year, what with the late thaw and the fact that it’s supposed to get up to nearly twenty degrees Celsius by the end of this week. The rising temperatures mean that it’ll be a warm Easter weekend, but it will definitely cut off the sap flow!

I hadn’t really taken advantage of the season to make any of the traditional dishes like pouding chômeur, since I’ve been too busy for much baking lately. But I wanted to make something seasonal, so I settled on French toast with maple syrup.

I whipped up the bread earlier in the day; it’s simply my bread machine fluffy herb bread without the herbs. This creates a light, airy loaf, which is what I prefer for French toast. I added a little bit of vanilla to the whipped eggs, but I didn’t use cinnamon like I normally would so that the syrup was the ingredient that really shone. And it was delicious!

Lactose-Free Grilled Cheese

I’ve felt 1000% better since cutting lactose out of my diet, but cheese is the thing that I miss the most. I can do with vegan milk substitutes most of the time, and there are a number of recipes where dairy really isn’t necessary at all, but cheese is one place that I haven’t found a good substitute. To that end, I’ve been experimenting with all kinds of lactose-free versions, and surprisingly the store and bargain brands seem to be catering most to my needs, which I didn’t expect because they’re also some of the cheapest.

Since the lactose-free pizza turned out so well, I thought that I should try another dish with the new-to-me PC Lactose Free cheese. This time I chose the Lactose-Free Triple Cheddar Shredded Cheese Blend, which I figured would be tangier than the mozzarella. And I have to say that it turned out perfectly. I don’t know what this brand is doing differently than the other lactose-free cheeses I have tried, but this cheese melts well and stays properly gooey as it cools (I find a lot of them end up with a plastic-like consistency unless they’ve melted just moments before). It was a real pleasure to eat and I know I’ll be back for more. And now I really want to try the triple cheddar in Mom’s Homemade Macaroni & Cheese — also using lactose-free milk and margarine instead of butter, of course.

Of course, a good grilled cheese isn’t all about the cheese, although I’d say that it’s more than 50% of the quality of the final product. This grilled cheese was also made on fresh homemade bread — well, bread machine bread, but that still counts! Thing 1 made us some white bread (page 66, Bread Machine: How to Prepare and Bake the Perfect Loaf (Jennie Shapter (2002)). We’ve really had to keep close tabs on the bread machine lately because the cold, dry weather has meant that we generally need up to a quarter cup more liquid per loaf. Basically, when the machine sounds like it’s struggling to knead, it’s time to add more liquid! This has meant that we’ve had to pay attention (and not go out) instead of the usual set-it-and-forget-it, but it’s worth it for easy, fresh bread.

Lactose-Free Pizza

A friend of mine who also has to avoid lactose told me that she’d found a great new product from President’s Choice: Lactose-Free Pizza Mozzarella Shredded Cheese (and they also have a cheddar blend). I was able to find it at a nearby store, too! Then the other day a different friend reminded me that I could use my bread machine to make pizza dough, so I figured that the world was conspiring to have me make some pizza.

Since I’d already tried the Betty Crocker pizza dough recipe, I thought I’d try something different to compare it to. This time I went with the dough from Tomato and Prosciutto Pizza on page 108 of Bread Machine: How to Prepare and Bake the Perfect Loaf (Jennie Shapter, 2002), and I think I like this one better. It’s more of a thick crust and it definitely makes a greater quantity. I’d run out of homemade sauce, so I picked up a jar of Classico Traditional Pizza Sauce, which I had also never tried before and ended up quite liking. Not only did it taste much better than the canned kinds, it also was enough for two pizzas with some left over. I topped the pizza with bacon and ground beef, at Thing 1’s request. And I really liked how it all turned out! I was especially impressed with the lactose-free mozzarella, which remained gooey and stringy even as it cooled. I find that a lot of lactose-free cheeses melt just fine, but they start turning a disturbing plastic-like consistency very quickly. But not this one! This is definitely a dish I’m going to be making again, especially since my pizza dough tossing technique needs a lot of practice.

Reader Submission: Beer Bread

Sometimes when I write this blog, I get the impression that I’m the only one who ever reads it. I started writing in order to record recipes and record our family’s traditions of food, and later branched out a bit more into some of my other interests, so I honestly didn’t expect too many people to read. At the very least, my kids can look up how to cook their favourite childhood dishes when they’re grown. But still, somtimes it feels a bit like shouting into the void — until I get a bit of positive reinforcement.

So I have a regular reader, although it’d be too much of a stretch to call her “a fan”, since I’ve literally known her my entire life. I mean, my parents named my middle name after her. She is my brother’s godmother. Even so, I’m thrilled that she’s actually reading my blog — and not only that, she’s trying my recipes! She sent me this picture the other day with a note, “I love your beer bread recipe…” (That’s my Bread Machine Beer Bread Recipe, by the way.) As you can see, her machine makes different-shaped loaves than mine — her pan is kind of tall and skinny — but it turned out great! I couldn’t be more pleased.

So if anyone else cooks a recipe that I’ve shared, please feel free to send me pictures of the end results, ask questions, leave comments, what have you. Let me know what you liked or what you’d change. The more feedback I get, the better I can customize my content, and that helps everyone in the long run.

Happy cooking!

Bread Machine Malt Bread Recipe

A while ago, when I first started baking bread, I ran across a recipe that called for malt. It’s not a common ingredient around here, and in my search I learned a lot. The first thing you have to know is that “malt” can mean a number of different things:

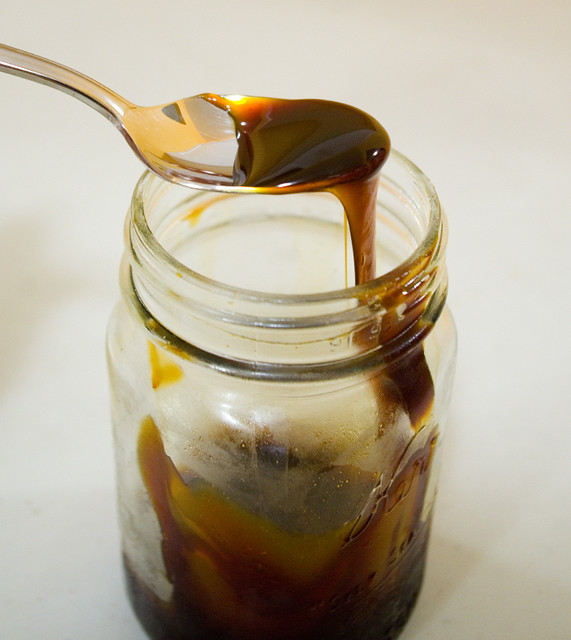
Barley Malt Syrup: a thick syrup that greatly resembles molasses in appearance, which is extracted from sprouted (malted) barley. (Pictured above.) In Canada, this can be found in specialty or high end food stores like Whole Foods. In England, I’m told that it’s as common as molasses is here, and that children will often sneak spoonfuls of the stuff from the pantry.

Malt Extract Powder: An ingredient often used in home brewing, malt extract powder can be derived from sprouted (malted) barley or wheat. (Light dried wheat malt extract pictured.) This can be procured quite cheaply from home brewery supply stores and brew-your-own small breweries.

Malted Milk: A combination of malted barley, wheat flour, and evaporated whole milk, this is the main ingredient that differentiates a “malted” from a “milkshake”. (Not pictured.)

While all of these are all derived, at least in part, from the same process, they are all distinct ingredients in their own right and it will greatly change the outcome of a recipe if you use the wrong one. The problem is that a number of recipes I’ve come across (and ingredient lists on packaging, for that matter) sometimes use the blanket term “malt” for any of the three. This becomes increasingly concerning in the case of allergies/food intolerances or trying to eat strictly vegetarian/vegan.

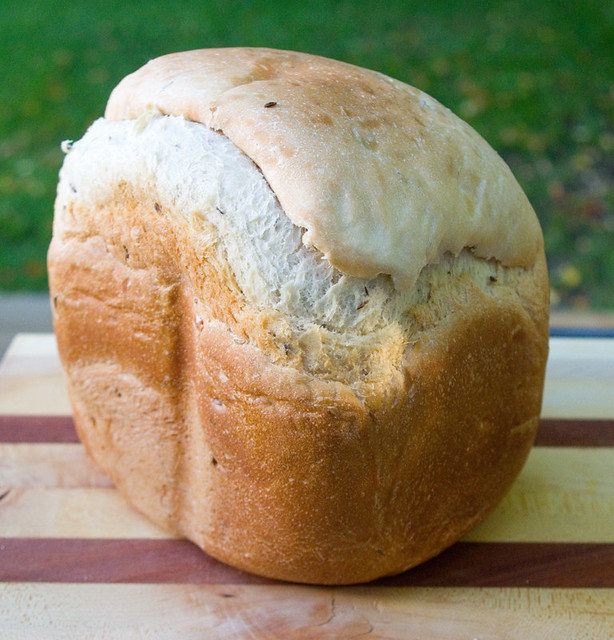
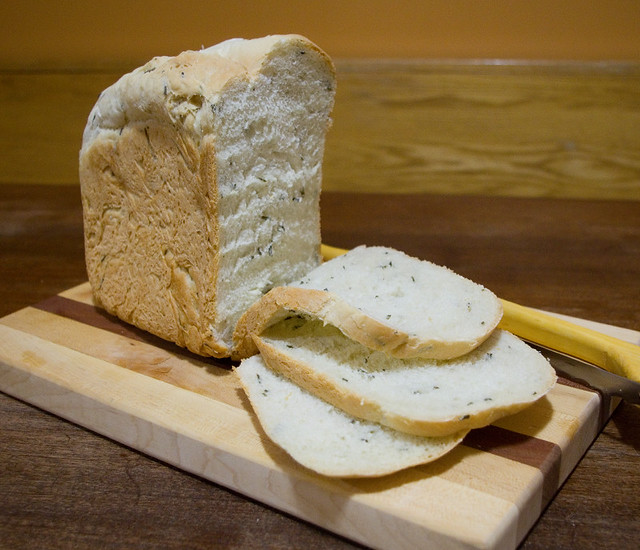
So I learned all of this but still wasn’t able to find a local source for barley malt syrup. Not long later (but after I’d pretty much given up), a friend of mine came across some at a specialty grocery store and picked it up for me. Sadly, I had moved on to non-malt-based recipes by then, and the malt sat in my fridge for quite some time. Skip ahead to last week, when I cleaned out my fridge and realized that my malt was still there — and still good! (I believe it’s like maple syrup in that it’ll last years under ideal conditions.) I put together a bread machine recipe and tested it out a few times, to my family’s happiness. The malt creates a slightly darker loaf and adds a hint of sweetness (but not so much so it’d be called a truly sweet bread).

Side note: This bread can be made vegan, if you use a vegan margarine instead of butter, and use the correct style of malt, which is the barley malt syrup kind, in this case.

Bread Machine Malt Bread
Yields one 2lb loaf

A note about bread machines:
Every bread machine comes with an instruction booklet (most of which are also generally available online) that will specify the order that ingredients should be added. Mine says that liquids should be added first, then flour, then yeast. When preparing this recipe, the instructions for your specific bread machine should take first priority, so if your manual says to add the ingredients in a different order, do so.

Into the bread machine pan, pour:
1 ½ cups water
2 Tbsp barley malt syrup
Over the liquids, pour evenly:
4 cups flour
Into one corner of the pan spoon:
2 Tbsp butter or margarine
Into the other corner of the pan, spoon:
2 tsp salt
Make a divot at the center of the flour. Into the divot, put:
2 tsp yeast

Set the bread machine to the basic/normal/white setting, with a light or medium crust to your preference. Press start. Running this cycle should take about three to four hours, depending on your machine.

Enjoy!

Bread Machine Beer Bread Recipe

I think I’ve finally gotten the beer bread recipe to the point that I feel it’s good enough to share! This bread is customizable based on what kind of beer you choose to use. For this bread I chose to use Lost Craft’s India Pale Ale, which is a nice, light beer with only a 4% alcohol content. But feel free to choose the beer that you like best! A stout will make a much darker, richer bread, while a crisp, light beer will have a much less pronounced taste. You could even use a non-alcoholic beer. Additionally, you can choose to omit the caraway seeds, which do have a strong flavour of their own, so that the beer shines through.

The beer that you choose to use changes what it goes well with. It’s a light fluffy bread no matter the beer, so if you’re going to spread something on top, it’s best to toast it first. With a light ale and caraway seeds, I like it paired with a sharp cheese, deli meats, and/or a touch of mustard. Without the caraway, I have served it with eggs and toast for breakfast, and received quite a few compliments.

Bread Machine Beer Bread
Yields one 2lb loaf

A note about bread machines:
Every bread machine comes with an instruction booklet (most of which are also generally available online) that will specify the order that ingredients should be added. Mine says that liquids should be added first, then flour, then yeast. When preparing this recipe, the instructions for your specific bread machine should take first priority, so if your manual says to add the ingredients in a different order, do so.

Into the bread machine pan, pour:
1 ½ cups India pale ale
2 Tbsp olive oil
Over the liquids, pour evenly:
4 cups flour
Into one corner of the pan spoon:
1 Tbsp sugar
Into the other corner of the pan, spoon:
2 tsp salt
Make a divot at the center of the flour. Into the divot, put:
2 tsp yeast
Over the top of all of the ingredients, sprinkle:
3 tsp caraway seeds

Set the bread machine to the basic/normal/white setting, with a light or medium crust to your preference. Press start. Running this cycle should take about three to four hours, depending on your machine.

It’s as simple as that!

Rockland Community Garage Sale

The whole town of Rockland sets aside the holiday Monday of the Victoria Day Weekend every year for the Rockland Community Garage Sale. The sale centers around the parking lot of the Independant Grocer on Laurier Street, where a flea market pops up for the day while the main store is closed. (I believe the garden center was open, though.) While this is the hub of activity, the sales continue throughout the town and a leisurely walk or drive around will lead you to some scores.

I spent the day out searching for finds with a friend of mine. She’d been going to this sale for many years, and she is the one who alerted me to its existence — I’d never gone before! My friend was hoping that a particular booth with scrapbooking supplies would be there again this year; sadly, we never found that particular vendor. However, we both came away with some fantastic bargains.

Front to back, left to right, I came home with:

– a bag of white Christmas bead garland (free)
– a bag of tiny Christmas balls (free)
– three sets of light-up LED shoelaces ($5 each)
Borderlands for the PS3 ($5 — and yes, somehow I didn’t have the original game)
The Legend of Zelda: Phantom Hourglass for the Nintendo DS ($5)
Pokemon Pearl Version for the Nintendo DS ($5)
Pokemon Diamond for the Nintendo DS ($5)
Percy Jackson and the Olympians: The Lightning Thief for the Nintendo DS ($5)
– a brand new Hogwarts scarf ($3)
– a fish bowl or possibly a candle globe (free)
– a small lunch box ($0.25)
– a bread maker (free — to replace mine, which I’ve worn out)
– Super MasterMind ($2)
– a massive load of glass marbles ($10)
– two pictures ($0.50 each — and I only want the frames to try out Epbot’s frame resizing tutorial)

According to my math, that means that I spent $56.25, which is generally more than I’ll spend in a day of thrifting, but those DS games will be saved for Thing 1’s birthday, so I feel I’m ahead of the game there.

I think my favourite find, I think, was the big bags of marbles. This was a combined purchase from a couple of different sources, but I love the look and weight of them all. I’m determined to teach the girls how to play this summer. I don’t know how they’ve managed to miss it, but although the kids have a double-set marble run that they build regularly, they don’t play the game the way I used to as a kid. I think it’s a good thing to learn, and maybe they can teach it to their friends. Who knows, perhaps I’ll start a classic childhood game fad at their school?

Crock Pot Sloppy Joes

I need to defrost my freezer at some point in the near future, so I’ve been trying to use up the remaining food that I stored there for winter. At the same time, I’m trying to use my slow cooker more often in order to give myself more time to work on ComicCon costumes. A quick Googling for recipes showed me that I had all of the ingredients to make Crock Pot Sloppy Barbecue Beef Sandwiches from The Spruce Eats, or, as my family has always called them, Sloppy Joes — which we’ve always served open-faced, I don’t know why.

Instead of buns, I let my trusty bread machine do most of the work and whipped up some Bread Machine Fluffy Herb Bread, this time using dried rosemary instead of fresh dill. I found that the robustness of the rosemary went really well with the vinegar tang of the Sloppy Joe sauce. If you like crusty buns for this dish, the ends of the loaf are great. Or you can always use the dough setting on your bread machine, then shape the dough into rolls, proof, and bake them in the oven instead. I went the easy route on this one.

As is my wont, I had to alter the meat sauce’s ingredients a bit. I omitted the sweet peppers because I’m not terribly fond of them, and I didn’t have any celery. However, I liked how the recipe had lots of hidden vegetables, so I upped the number of grated carrots to four. I also used about a cup of chopped frozen, thawed rainbow chard stems left over from last year’s garden crop.

Despite all of the changes, this dish turned out really well. The kids hoovered up their dinners and kept saying how much they liked it. I really think that you could add just about any vegetable to this dish if you want, so long as you cut it up small enough that it blends well with the meat and you give it the appropriate amount of time to cook. I will definitely be making this recipe again and I highly recommend it.

Pulled Pork Sandwiches

It was inevitable. At least one of my kids has been sick since Saturday, and I’ve finally come down with whatever they have. Some kind of cold. But everyone needs to eat, so threw some ingredients in a slow-cooker and called it dinner. I’d never made pulled pork before, but a friend of mine taught me the basic technique:

– Cut a cheap cut of pork (in this case, pork loin) into large chunks, removing as much fat as possible.
– Put it in a slow cooker with the entire contents of a 500mL bottle of your barbecue sauce of choice. Stir.
– Cover and cook for four hours on high, until the meat pulls apart easily with a fork.
– Remove the meat from the cooker, pull it apart/shred it with two forks, and then return it to the cooker. Mix the meat back into the sauce.
– Cook for another hour on high.

The end result tastes really good, but it takes very little effort. I served the pulled pork in open-faced sandwiches that I made with homemade dinner rolls. Lest you think that it this took a great deal of effort, I just put the ingredients into the breadmaker and let it do most of the work. I used the Dinner Roll recipe from page 176 of Betty Crocker’s Best Bread Machine Cookbook (1999). Now, once the kneading is done, I did have to form the rolls by hand and bake them in the oven, but it was only about a dozen and a half of rolls, so that didn’t take long. I served the open-faced sandwiches with some of my homemade pickled beets, dilled carrot spears made with some of my monster carrots, and dill pickles. The acidity of the vinegar cut nicely through the sauce of the pulled pork.

We’re not quite at the stage where machines can do all of the cooking for us. However, having the option to just thrown ingredients into a something automated and then leave it ’till it’s done is a saving grace when you’re under the weather.

Bread Machine Fluffy Herb Bread Recipe

I’ve been meaning to post this recipe for a while, but I like to accompany my recipes with a picture, and my family keeps cutting into the loaves before I get a chance to take a photograph! This recipe is for a fluffy, high-rising loaf that stands up well on its own, but really shines when it is speckled generously with fresh or dried herbs. As a bonus, this bread is also dairy-free, nut-free, vegetarian, and can be made vegan with the proper sourcing of ingredients. Because of the herbs, it is a very savoury bread, and pairs well with eggs and meats — especially as toast with dipping eggs, and as sandwich bread for leftover roast or cold cuts.


A 2lb loaf made with rosemary.

Bread Machine Fluffy Herb Bread
Yields one loaf

A note about loaf size:
Quantities for a 1.5lb loaf are in bold, quantities for a 2lb loaf are in bold purple. However, this loaf is very light and fluffy — so it expands a lot. Use the settings for a 1.5lb loaf if your machine goes up to 2lbs; only make a 2lb loaf if your machine has the capacity to make a loaf that is 3lbs or greater.

A note about bread machines:
Every bread machine comes with an instruction booklet (most of which are also generally available online) that will specify the order that ingredients should be added. Mine says that liquids should be added first, then flour, then yeast. When preparing this recipe, the instructions for your specific bread machine should take first priority, so if your manual says to add the ingredients in a different order, do so.

Into the bread machine pan, pour:
1 1/4 cups (1 1/2 cups +3 Tbsp) water
2 Tbsp (2 Tbsp) olive oil
Over the liquids, sprinkle:
3 cups (4 cups) all-purpose flour*
Ensure that the flour covers the liquids entirely.
Into opposite corners of the pan, add:
1 Tbsp (1.5 Tbsp) sugar
1 1/2 tsp (2 tsp) salt
Create a well in the flour at the center of the bread pan, being sure not to go all the way down to the liquid. Into the well, add:
2 tsp (2 tsp) active dry yeast
Over the entire contents of the pan, sprinkle:
2 Tbsp (2 1/2 Tbsp) dried OR 4 Tbsp (5 Tbsp) chopped fresh herb of choice**

Set the bread machine to the basic/normal/white setting, with a light or medium crust to your preference. Press start. Running this cycle should take about four hours.

Remove the bread at the end of the baking cycle. Turn it out of the pan onto a wire rack to cool, making sure that the kneading paddle(s) are removed from the bread. Serve immediately (being careful to cut gently when it is warm), or when cool. Do not wrap the loaf or put it into a container until it is entirely cool, or it will become mushy.

* For a healthier loaf, substitute half of the all-purpose flour for whole-wheat flour. A whole wheat loaf will not rise as high, however.
**Suggestions: rosemary, dill, oregano, basil, chives, thyme, or sage.