Whole Wheat Sesame Seed Bagels

Last night I decided to try to make bagels for the first time. I followed the “Bagels” recipe on page 26 of Baking Bread: Recipes From Around the World for the Complete Home Baker by Audrey Ellison (1995). The book itself is over twenty years old, but it is new to me — a thrift store find. I believe that this is the first recipe I’ve followed from it.


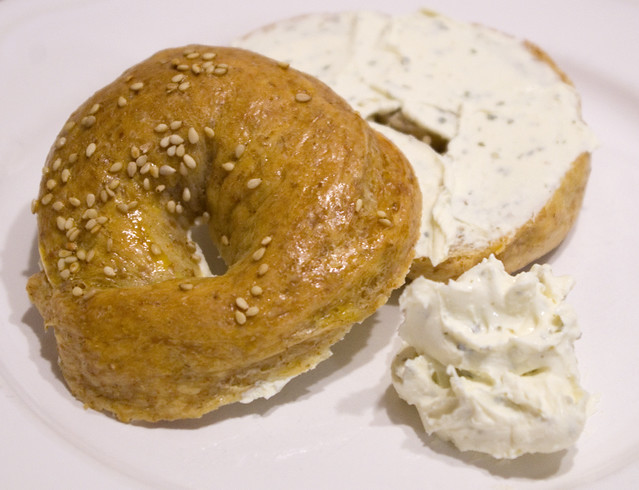
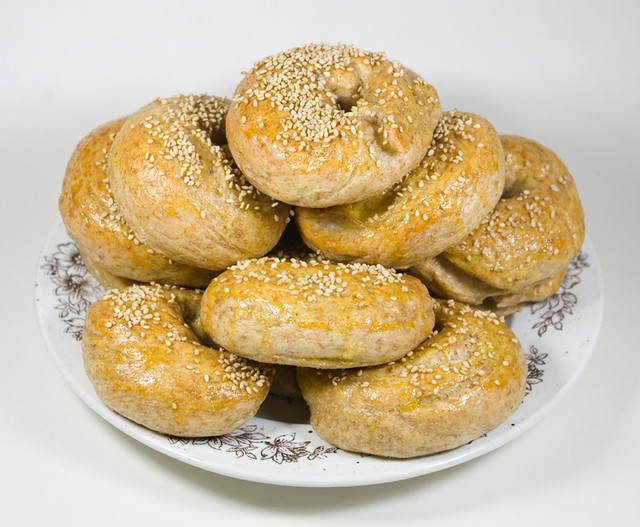
Whole wheat sesame seed bagel with herb and garlic cream cheese.

All in all, I was quite satisfied with how my bagels turned out. They are slightly chewy on the outside and soft on the inside, which is exactly how I like them. They’re also smaller than their store-bought counterparts, perfect to serve my kids, and hey, an adult can always have two. My mother and I both liked them and thought they were worth making again, but my husband is more reticent. He prefers the chewier, denser, Montreal-style bagels. Oh well, more for me!


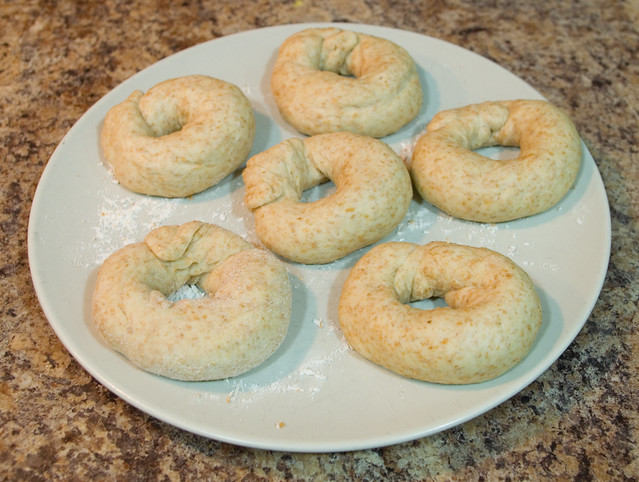
Bagels before the last proof.

I learned a few things when making these bagels. First of all, if I’m going to shape the dough rings by hand (as opposed to extruding them or cutting them, like how they may be done in a factory), I’m going to need to do a better job of pinching together the ends. The instructions even warned that they would need to be firmly attached so that the rings would keep their shape. I thought I’d done it well enough, but apparently not. A number of my bagels were more U-shaped than O-shaped.
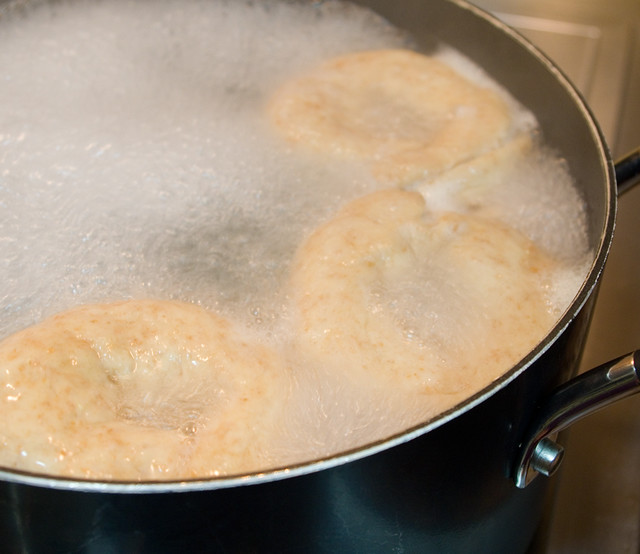

Bagels boiling.

Also, I found out that bagels are boiled before they’re baked. I had no idea. I quickly learned that this is the part where my rings were going to fall apart, though. I’m pretty sure they would have stayed intact if I’d just baked them on a sheet. The reason for boiling before baking is, according to TheKitchn.com:

Boiling breads like bagels and pretzels effectively sets the crust before it goes in the oven. The water doesn’t actually penetrate very far into the bread because the starch on the exterior quickly gels and forms a barrier. Bagels are typically boiled for 30-60 seconds on each side. The longer the boil, the thicker and chewier crust.

In the oven, the fact that the crust is already set means that the bagels don’t rise nearly as much. This is partly what gives bagels their signature dense, chewy interiors. (The other part is using high-protein flour.)


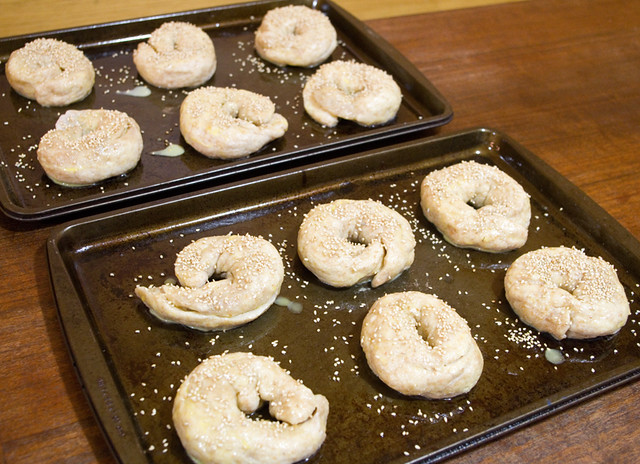
Bagels ready to be baked.

The last thing I learned is that there is an error in the recipe I used. In the first step of the instructions, it says “dissolve the yeast in the water…” However, the only time there’s water in the recipe is to boil the bagels in. I actually measured out the water and added the yeast before I realized that the proportions were all wrong. I checked and double-checked the recipe; nope, I hadn’t read it wrong. It should read, “dissolve the yeast in the warm milk“. I started again with this correction, and everything else went according to plan.

Would I make this recipe again? Definitely! I’d like to try different flavours; I’m partial to all-dressed bagels, and roasted garlic, and onion. It would be interesting to experiment with length of boiling time and protein level in the flour. Perhaps I could learn how to make the chewier, denser bagels that my husband likes best. I’m not too worried if I don’t accomplish that, though. There are some lovely Montreal-style delis and bakeries in this city that I’m perfectly happy to have an excuse to visit.

Moncton Market

Spring has been exceptionally slow coming around these parts this year; we had a snowstorm last Friday, and the forecast is for more snow this coming Friday. Daytime temperatures have been just above freezing, while at night it has been dipping just below zero, so our snowbanks aren’t melting back very quickly. And it’s only a few days until the beginning of April!


A handicraft booth set up outside the Moncton Market building; there are many tables outdoors when the weather is nice.

Despite the weather, it’s technically spring, and spring to me means the start of the farmers’ market season. Technically it’s a little early for that; we’re not getting fresh produce for a little while yet, unless it’s from greenhouses. And yet I find myself thinking about all the great markets I’ve been to, and yearning for a chance to visit them again.


The main hall (Con Simon Memorial Hall) on an unseasonably-cool summer day.

One of my favourite markets to visit while on vacation is the Moncton Market in Moncton, New Brunswick. We seem to end up there on at least one weekend every time we visit the city. It’s not specifically a farmers’ market, although it does have a large selection of fresh local produce (when in season), as well as deli and butcher booths. There is also a food court and a huge number of handicrafts for sale.


Main hall.

The Moncton Market runs all year long, and actually is set up in its own proprietary building that was built in 1995 (although this market has existed, in one form or another, since the late 1800’s). Saturday is market day, but the food court is open all week long for lunch. Due to its downtown location and proximity to office buildings, particularly government offices, there is a brisk lunch business.


Main hall.

In addition to the main hall, there is a second, later-built hall (Festival Place) and a bay area, all of which are packed with vendors and customers on market day. Festival Place is sometimes rented out for other events on non-market days. There is also a culinary center on the premises, although I’ve never seen it in use. Every time I’ve been there, it has been used as a seating area for the food court.


Accordion player in the main hall.


Maple syrup and maple candy are pretty much prerequisites for any Canadian market.

There is often live entertainment throughout the market. There may be a single busker in the main hall, a duo in the secondary hall, and an entire ensemble on the stage outside — so there’s always entertainment. Thing 2 could happily spend her entire trip to the market sucking on a maple lollipop while she watches the performers. Thing 1, on the other hand, would rather hunt down a gourmet cupcake seller. Me, I’m on the lookout for fresh, local food to bring home for dinner.

Of course, part of the fun is to pick up some breakfast or lunch at the market while you are there. I am partial to the fresh-cooked crepes and waffles; the lineup is always long, but the food is cooked fresh to order, and the delicious portions are substantial.


Fruit-covered crepe drizzled with chocolate hazelnut butter, raspberry syrup, and whipped cream. Photo by my mother.


Classic crepe with banana, chocolate hazelnut butter, and whipped cream.


Waffle with berries, apples with cinnamon-sugar, and whipped cream.

Around here, the winter (indoor) version of the Lansdowne Park Ottawa Farmers’ Market runs on Sundays from January 8th to April 30, from 10:00am to 3:00pm, in the Aberdeen Pavilion. There’s nothing specifically stated on their website, but the outdoor summer market usually starts sometime in May. The Cumberland Farmers’ Market has their Spring Market on Saturday April 8th from 9:00am to 3:00, but their main season doesn’t start until mid-June.

I can’t wait for summer market season to start again. Come on, Ottawa… Thaw!

Kappabashi Market Memories

Given how many food photos I take and post, starting long before I began writing this blog, it’s really no wonder that my friends noticed. I was on a real kick for quite some time about noodle soups — especially udon and ramen. So this was a fabulous gift that I received this past Christmas:

Nope, it’s not a bowl of udon with an egg on top (although I’d totally eat that); it’s a miniature that has been made into a key chain. Here’s a better picture for scale:

I don’t use key chains often (I find that they get caught in my pocket), so I think I’ll take off the chain and turn it into a necklace. That would totally fit my sense of style (or lack thereof, you can judge for yourself). If you’re interested in one of your own, I think that my friends ordered it from LittlePinkBox on Etsy. No, I wasn’t snooping for prices, I wanted to see if they had any more!

I took the extreme close up with my new Easy Macro Lens on my cell phone, which was another part of the gift. Do my friends know me or what?

The tiny noodle soup bowl reminds me of my 2005 trip to Japan, specifically the Kappabashi Market in Tokyo, which is easily found by looking for the giant chef’s head statue. It’s a shopping district that caters to restaurateurs and chefs, although so far as I know all of the stores are also open to the public. If you could use it in a restaurant in any way, you can find it there. Chopsticks, lacquer-ware, knives, kitchen gadgets, cutlery, utensils, dishes… You name it. Oh yeah, there are also a few shops that specialize in ultra-realistic fake food.

In Japan, a very common way to advertise a restaurant’s wares is to have replicas of the food that they make set up in rows in the front window, usually alongside small placards that state the name and price. This is an indispensable tool for foreigners like myself who read very little Japanese and have difficulties with a text menu (pointing and saying, “This one please,” works well), but it’s not a marketing tactic aimed specifically at that kind of clientele. It’s just generally an attractive kind of display and effectively attracts customers. I wanted to bring all kinds of this food home as a souvenir, but it was out of my student budget at the time. Perhaps I will be lucky enough to make a return visit.

On Home Cooked Meals vs. Restaurant Food

I enjoy watching food television, not just Food-Network-style how-to or cook-off kinds of shows, but also ones set behind the scenes in restaurants or where culinary explorers travel the world, exploring every kind of local cuisine. The first season of The Mind of a Chef, the one that focused on Chef David Chang, inspired me for months. I also read a lot of books about food and cooking, and watch as many documentaries as I can get my hands on, especially if they’re from the BBC. While I draw a great deal of inspiration from my relentless consumption of media, exposure to so many dedicated professional chefs makes my own skills pale in comparison. I’d say I’m a pretty competent home cook, but I’m no Jamie Oliver.


Grilled cheese with avocado and bacon, made with Nan’s Pan Rolls bread.

This past Friday I finally got my hands on the library’s copy of Anthony Bourdain’s Kitchen Confidential; it was first printed in 2000, but there’s still at least a six-week wait if you put it on hold. I’ve already devoured it, and now I can see what all the fuss is about: it’s one hell of a read. Bourdain writes the same way he speaks, or at least the same way he narrates in his television shows, and it is captivating. I can’t help but read it in his voice. But in all the drug-fueled and alcohol-soaked escapades about which Bourdain writes, one paragraph on page 75 really stood out to me as a home cook:

Unless you’re one of us already, you’ll probably never cook like a professional. And that’s okay. On my day off, I rarely want to eat restaurant food unless I’m looking for new ideas or recipes to steal. What I want to eat is home cooking, somebody’s — anybody’s mother’s or grandmother’s food. A simple pasta pomodoro made with love, a clumsily thrown together tuna casserole, roast beef with Yorkshire pudding, all of this is pure exotica to me, even when I’ve been neck deep all day in filet mignon and herb-infused oils and all the bits of business we do to distinguish restaurant food from what you get at home. My mother-in-law would always apologize before serving dinner when I was in attendance, saying, “This must seem pretty ordinary for a chef…” She had no idea how magical, how reassuring, how pleasurable her simple meat loaf was for me, what a delight even lumpy mashed potatoes were — being, as they were, blessedly devoid of truffles or truffle oil.


Pork belly cooked using Jamie Oliver’s Pork Belly Roast recipe, Guinness Yeast Bread, steamed carrots and corn.

I found it validating that a celebrity chef would place a high value on home cooking (and not just because there’s no truffle oil, I’m sure — although that stuff is available at regular grocery stores now). Professional chefs and home cooks work in vastly different environments, with separate types of audiences and numbers of people to feed. Restaurants cooking and home cooking are two very different beasts. Expectations (outside of the very basic ones like “don’t burn the food”) are not necessarily worse or better, but they are definitely not the same.


Trout with Sable & Rosenfeld Tipsy Teriyaki Sauce, served over Kokuho Rose sushi rice, with a side of steamed asparagus.

There was an episode of Ramsay’s Kitchen Nightmares that stressed the difference between a restaurant chef and a home cook. In the “Fish and Anchor” episode, Gordon Ramsay said:

A fish recipe from one of my cookbooks using monkfish is on the menu board. It’s quite eerie when you see your own food on somebody else’s menu. It’s for the home cook at home, not in a f***ing restaurant.

And later in the same episode, critiquing the chef in the failing restaurant:

His menu’s made up of cookbook recipes designed for home cooks to lovingly slave over. But for one man to try and cook them from scratch for a restaurant is madness. The dishes are just too complicated to be cooked quickly.


Chicken noodle soup (Joy of Cooking, 2006 edition, page 125); cheese, avocado and bacon sandwiches on German beer bread (World Breads: From Pain de Campagne to Paratha, page 19); scrambled eggs with parsley; leftover cheddar cheese, bacon, and Noah Martin summer sausage on the side.

The more I watch and read about the restaurant industry, the more I admire the people who work in it — and the more I realize it’s just not for me. Even if I thought I had the chops, at my age, it’s a little late to start working 16-hour shifts and learning a physically- and mentally- demanding trade. I just have to keep reminding myself that I’m not a professional chef — and that’s perfectly okay! I will learn from all the materials I can gather, and I will put that knowledge towards creating the best food I can for my family and for myself. That’s not always easy either: balancing food quality/nutrition one one hand and budget on the other; finding dishes that everyone in the family likes (or at least that nobody hates); preparing food throughout the stresses and conflicting schedules of family life.

And if a celebrity chef wants to come over for my clumsily-thrown-together tuna casserole or meatloaf with lumpy mashed potatoes, my door is always open. And I promise I’ll hold the truffle oil.

Gingerbread Mouse’s Cookie Recipe

My youngest daughter noticed that there was a gingerbread recipe at the back of her copy of Gingerbread Mouse by Katy Bratun (2007). This picture book would usually be stored away with the Christmas decorations, but it ended up being in regular rotation at story time, so I am loathe to put it away until she loses interest. I had a great deal of success with the chocolate cake recipe at the back of Amelia Bedelia Bakes Off when I tried it last month, so I was optimistic about trying out another recipe from a children’s book. I was not disappointed.

Gingerbread, to me, is usually a tough cookie, able to withstand the stresses of being assembled into a house shape and decorated by little hands. Gingerbread is also a dark, rich brown. Going by these qualifiers, the Gingerbread Mouse cookies weren’t very gingerbread-like at all. They were buttery and delicate, more like a shortbread in texture. They would never stand up to house construction. They were also light brown — coloured by the ginger, cinnamon, and brown sugar, but missing the traditional molasses. They were also absolutely melt-in-your-mouth delicious. I am definitely making them again, but I will use a different recipe if I need to build a gingerbread house.

To me, one of the best things you can eat with a ginger-flavoured cookie is vanilla ice cream or frozen yogurt. One of my favourite things to do after making my way through the maze of the local IKEA is to pick up a box of PEPPARKAKOR ginger thins at the Swedish Food Market and use them to scoop up some of the frozen yogurt that they sell in the bistro just past the checkouts. For dessert after the Sunday dinner that I hosted last night, I served the Gingerbread Mouse cookies alongside store-bought French vanilla ice cream. I’d love to say that I made the ice cream too, but I just don’t have the equipment. And hey, at least it was real ice cream and not a “frozen dairy dessert”.

Ribbed For Her Pleasure Sock Pattern

As with my Minecraft Creeper Blanket Pattern, I wrote this pattern years ago — July of 2007, to be precise. It is actually the first knitting pattern I ever wrote. When I took down my old blog, the patterns went with it, and since then I have had request to re-publish some of my old work.

My Ribbed For Her Pleasure Sock Pattern is a very simple sock that, due to its repetitive nature, is great for working on in front of the TV, while on the bus, or while watching small children. It works well with most sock-weight yarns and showcases self-striping yarns beautifully. This is the updated version from 2011, when I fixed an error in the heel.

Ribbed For Her Pleasure Socks
Adult Women’s Size

Materials
– Two 50g (1.764oz) 152m (166yrd) balls of sock yarn, size 1 super fine
– One set of four size US 3 (3.25mm, UK 10) double point needles

Gauge
– Sock Yarn: 28 stitches and 36 rows = 4″ x 4″ (10cm x10cm) square on US 3 (3.25mm, UK 10) needles

Instructions
– Loosely cast on 60 sts. Divide into 20 sts on 3 needles. Join and work in (K2, P2) ribbing for 1.5″ (3.81cm).

– Work in (P2, K2) for an additional 3.5″ (more or less if taller or shorter socks are desired; make sure you have additional wool if you want taller socks).

Arrange heel sts:

– Slip 6 sts from end of 1st needle onto beginning of 2nd needle, and slip 6 sts from beginning of 3rd needle onto end of 2nd needle. This should give you 14 sts on the 1st needle, 32 sts on the 2nd needle, and 14 sts on the 3rd needle.

– Divide the 32 sts on the 2nd needle onto two needles of 16 sts each and leave for the instep.

– (P2, K2) the 14sts off the first needle onto the 3rd needle. Working on these 28 sts proceed as follows:

– Next row: (WS) K1. P12. P2tog. P12. K1. (27 sts on needle)

Make heel:

– 1st row: (RS) K1. Slip 1. Repeat across row ending row with K1.
– 2nd row: K1. Purl to last stitch. K1.
– Repeat these two rows for 2 inches, ending with 1st row.

Shape heel:

– 1st row: (WS) Slip 1. P14. P2tog. P1. Turn.
– 2nd row: (RS) Slip 1. K5. SL1. K1. PSSO. K1. Turn.
– 3rd row: Slip 1. P6. P2tog. P1. Turn.
– 4th row: Slip 1. K7. SL1. K1. PSSO. K1. Turn.
– 5th row: Slip 1. P8. P2tog. P1. Turn.
– 6th row: Slip 1. K9. SL1. K1. PSSO. K1. Turn.
– 7th row: Slip 1. P10. P2tog. P1. Turn.
– 8th row: Slip 1. K11. SL1. K1. PSSO. K1. Turn.
– 9th row: Slip 1. P12. P2tog. P1. Turn.
– 10th row: Slip 1. K13. SL1. K1. PSSO. K1. Turn.
– 11th row: Slip 1. P14. P2tog. Turn.
– 12th row: Knit. (16 stitches remaining in heel)

Make instep:

– Slip 32 sts for instep onto one needle.

– 1st needle: With RS of work facing and using the heel needle, pick up 13sts. Knit 11 of these sts, then purl 2 of these sts.
– 2nd needle: Slip the two purled stitches from the end of the 1st needle to the beginning of the 2nd needle. (K2, P2) the rest of the way across instep sts.
– 3rd needle: Pick up and knit 13 sts along other side of heel.

– Sts are now divided as: 27-34-13

– Knit 7 sts from beginning of first needle onto end of 3rd needle.

– Sts are now divided as: 20-34-20

– 1st round:
– 1st needle: Knit to last 3 sts. K2 tog. K1.
– 2nd needle: (P2, K2) to the end of needle, ending with P2.
– 3rd needle: K1. Slip 1. K1. psso. Knit to end.

– 2nd round:
– 1st needle: Knit.
– 2nd needle: (P2, K2) to the end of needle, ending with P2.
– 3rd needle: Knit.

– Repeat these two rounds to 13sts on 1st needle, 34 sts on 2nd needle, and 13 sts on 3rd needle (60 sts total).

– Continue knitting as in 2nd round until foot, from picked up sts at heel, measures 5″ (12.7cm). (Alternately, continue knitting until the needles sit at the first knuckle of the big toe when this sock is tried on the foot on which it will be worn.)

Shape toe:

– Slip 2 sts from start of 2nd needle onto end of 1st needle, and slip 2 sts from end of of 2nd needle onto start of 3rd needle. This should give you 15 sts on the 1st needle, 30 sts on the 2nd needle, and 15 sts on the 3rd needle.

– 1st round:
– 1st needle: Knit to last 3 sts. K2tog. K1.
– 2nd needle: K1. Slip 1. K1. psso. Knit to last 3 sts. K2tog. K1.
– 3rd needle: K1. Slip 1. K1. psso. Knit to end.

– 2nd round: Knit.

– Repeat these two rounds until 28 sts remain (divided 7-14-7). Break yarn and graft 2 sets of 14 sts.

Mr. Ubbink’s Crepes Recipe

Crepes are one of the first thing that I learned how to cook without the need for parental supervision. I used to go visit my elementary school best friend almost every second weekend (she’d be over at my house if I wasn’t over at hers), and her father taught us his technique. Crepes do take a bit of practice, and you do have to read the recipe properly — there was one memorable occasion when we read “1/4 teaspoon salt” as “1/4 cup salt”, creating an end product that was highly inedible.


Replica crepes in a Montreal shop window (2005)

By the time I hit high school, it became a tradition to make crepes in the morning whenever I hosted sleepovers. I would make crepes up in bulk when I had a birthday party in order to feed all of my guests breakfast. My friends came to expect it; it was now a tradition!

I still use Mr. Ubbink’s recipe whenever I make crepes, which isn’t as often as when I was a kid, although I do still break them out for special occasions. The recipe is both dependable and flexible, although as with most crepes, flipping them takes a bit of practice. Don’t be discouraged if you make “scrambled” crepes the first few times, since they taste just fine so long as you cook them thoroughly, and they can still be topped as you wish.


Savoury crepe filled with cheddar cheese, Monterrey Jack cheese, and summer sausage; topped with a sunny side up egg and chopped chives

Mr. Ubbink’s Crepes
Yields 4-5 large crepes

In a large bowl, mix together:
1 cup all-purpose flour
1/4 tsp salt
Add to bowl:
1 large egg
1 1/2 cups milk
1 tsp vanilla
Mix all ingredients together with a whisk or a hand mixer. Blend until batter is smooth.

Apply a small amount of cooking spray, butter, or margarine to a large non-stick frying pan. Preheat the pan to medium-high. Pour 1 large ladle-full of crepe mixture into the pan, tilting to spread the batter into a circle that covers the bottom of the pan. Fry until the crepe has darkened in colour and is just starting to show spots of golden brown. Carefully flip the crepe and fry the other side until spots of golden start to appear on that side as well. Repeat until all the batter is gone. This type of crepe is best rolled into a tube, sometimes with fillings such as fresh fruit inside the tube.

If you are making a crepe inside of which you wish to have a melted ingredient such as cheese or chocolate chips, the technique is slightly different (it’s actually a lot like cooking and omelet). Cook the first side, flip, and then add the filling to half of the cooked side. Fold the crepe in half over the filling. Cook until the bottom is slightly golden, flip carefully so that the filling doesn’t fall out, and cook the last side until it is starting to turn golden and the filling has melted. You may need to turn the burner down so that the filled crepe can cook more slowly, allowing the filling to melt without burning the batter.


Sweet crepe filled with fruit salad (Asian pears, strawberries, blueberries, bananas, and grapes) and maple syrup, topped with whipped cream.

Suggested toppings/fillings:

Sweet
berries, fresh cut fruit, drained canned fruit, jam, chocolate chips, syrup, whipped cream, ice cream, nut butter, fruit butter, icing/brown/granulated sugar, marshmallows and chocolate chips, caramel sauce, custard, chopped nuts, apples and cinnamon sugar

Savoury
deli meat, cooked chopped roast meat, fish, plain steamed vegetables, steamed vegetables with a cream sauce, asparagus and cream cheese, salmon and cream cheese and capers, shredded cheese, bacon and eggs, poached eggs and salsa, spinach and feta, avocado and fried mushrooms, canned tuna and mayonnaise and lettuce

Basically, just about anything you could bake into a cookie or put in a sandwich is good in/on a crepe! (They can also be a great vehicle for using up leftovers.)

Hasenpfeffer, Hamburger Kasserolle, and Zucherkuchen

My quest to learn how to successfully prepare at least a few German dishes continues. It has been… Interesting. Lately I’ve met with more failure than success.


Hasenpfeffer served with mashed potatoes and acorn squash with butter and brown sugar.

Over March Break I made Hasenpfeffer (rabbit in wine gravy) from the recipe on page 60 of ‘Round the World Cooking Library: German Cooking by Arne Krüger (1973). It’s a fiddly dish, made all the more so by the fact that I’d never cooked rabbit before. I had eaten rabbit, but I distinctly remember it being gamier. Perhaps the one that I had before was wild-caught, where as the one I used was farm-reared? Whatever the reason, I was expecting more flavour from the meat. However, it was fall-off-the-bone tender and the sauce was quite nice. My only complaint was the saltiness: I double- and triple-checked the recipe, and it called for two tablespoons of salt. I know that when you follow a recipe for the first time you should follow it to the letter, but I should have let my good sense prevail and halved or quartered the salt.

Would I make it again? Only if the rabbit was on sale — it’s really expensive around here, and you don’t get much meat off of one animal. I think the red wine gravy (with less salt) might be nice on chicken or beef, though. It would definitely be worth trying.


Hamburger Kasserolle

This weekend I tried Hamburger Kasserolle (‘Round the World Cooking Library: German Cooking, page 35), which did not go so well. Someone like me who doesn’t speak German may assume that this is a casserole with ground beef in it, but the “Hamburger” in this case means “from Hamburg” — so the protein is actually seafood. First of all, this is a 1970’s book, so like many from the era it calls for frozen or canned versions of at least half of the ingredients, and then adds some rice and a can of cream of mushroom soup. I chose to go with an equivalent amount of fresh ingredients (I really can’t stand canned mushrooms, for example), and I think that went well. This casserole also calls for a rather large amount of seafood, which was nice, but pretty pricey.

I think that the reason I really didn’t like the end product was the artichoke hearts. The recipe calls for them frozen, but I couldn’t find them frozen or canned at any of my local grocery stores. I opted to buy them fresh, but despite pre-cooking them in the microwave and then baking them for half an hour, the artichoke hearts were rubbery and gross. They squeaked between my teeth when I chewed. Not pleasant.

Would I make this one again, even if I got rid of the artichokes? Probably not. I can think of much better ways to prepare seafood, even frozen stuff, than by baking it in cream of mushroom soup.


Zucherkuchen

Last but not least, on Sunday I gave a shot at what I think was my first ever German sweet: Zuckerkuchen (sugar cake) from page 81 of Classic German Baking (2016). I took this book out of the library, but I’m starting to think that I may have to buy a copy of it for myself. Zucherkuchen is a yeasted cake, which is something I’ve never made before — every other cake I’ve made has been leavened with baking powder or soda. It’s a cake that is rich with butter and sugar, but not much else, so I can see how it would appeal to even the pickiest eaters, i.e. most children. It’s denser than most of the cakes I’ve had, somewhere between a cake and a square I think, and it’s cohesive enough that slices can be picked up and eaten with the hands. I was worried that I might not have got it right, but from the writeup in the book and descriptions online, I think I’m actually pretty close.

So would I make this recipe again? Most definitely. And I think my kids would want me to as well.

First Day of Spring Chicken

Today is the first day of spring. It’s also the vernal equinox in the northern hemisphere, which means that the days will be longer than the nights and continue getting longer from now until the summer solstice. The official changing of the seasons is all over my social media, but given that I live in Canada, it seems rather… Optimistic.


My pallet trellis in my back garden.

I totally understand how everyone wants it to be spring; this March went in like a lamb, and was preceded by record-breaking high temperatures in February. It looks like it will go out like a lion, with snow predicted again at the end of this week and the start of next week. For people who aren’t used to this climate, winter seems never-ending. But for those of us who grew up with it, we can see the little hints of spring: the days are regularly are above freezing in the afternoon; snow has melted back from the roads and sunniest areas of yards; snowbanks have compacted so that they’re no longer higher than my head; and we’re starting to actually have humidity in the air again.

It’s at times like this that I really feel for my European (mostly British) ancestors. I recently watched the Historical Farm series from the BBC. What struck home the most about the show was how green things remain in winter; in fact, the show often speaks of winter crops or winter harvests. Nothing grows here in the winter. To a great degree, everything stops when it starts to dip below freezing. I mean, we do still go outside, and our most famous sport, hockey, pretty much requires this kind of weather. But special care must be taken, and a huge part of our lives simply moves indoors. As for the animals, birds fly south, and many creatures hibernate or semi-hibernate. Outside of hunting and fishing, there’s not much you can do to gather food in the winter, which is why preserving is so historically important. (There’s a great food preservation exhibit at the Canadian Agriculture and Food Museum.) Effective food preservation could literally be the difference between life and death. These days, with commercial transport of food from all over the world, we can get fresh food almost as easily in winter as in summer, although supplies can become short in the event of a big snowstorm. Also, some things remain purely seasonal — and at the end of the winter, even the imported food is of lesser quality.

So it’s not truly spring here yet, no matter what the calendar says. Although I have begun to crave fresh spring produce, frozen or truck-ripened imports are all that’s available for now. That doesn’t mean that the food has to be bad, though. Take this roast chicken: it’s staple around our house because it tastes great, but takes very little effort. Basically, a chicken — thawed, giblets and neck removed — is placed in a roasting pan with a rack, then is sprinkled with a mixture of spices. I learned my favourite combination for poultry from my mother, which is:

– parsley
– sage
– rosemary
– thyme
– summer savoury
– garlic powder
– sea salt

This mixture is also great as seasoning for bread stuffing.

The chicken is baked in the oven at 350°F (177°C) for 20 minutes per pound, plus 15 minutes. Keeping the skin on means that it doesn’t have to be basted. The chicken is done when it pulls apart with a fork and has no pink spots.


Baked chicken with chicken skin, mashed potatoes, corn, and baby bok choy.

I generally serve this style of chicken with mashed potatoes and steamed vegetables. Since no part of the meal requires close supervision at all times, it’s the perfect thing for when I have to cook dinner and do something else at the same time, such as help the kids with their homework or supervise bath time.

Saint Patrick’s Day Dinner

This past Friday was Saint Patrick’s Day, and although I baked Guinness Yeast Bread to celebrate, I also needed to plan something for dinner. I thought a hearty Irish stew might be nice. I went through my cookbooks for something appropriate, but I didn’t find anything quite right. I searched the Internet and found a great recipe: Beef and Guinness Stew by Chef John at Allrecipes.com.

It didn’t have nearly as much broth as the stews I’m used to; it was really more like meat and gravy than a stew. That being said, it was absolutely delicious, and went well served atop mashed potatoes. Everyone in my house finished theirs down to the last drop, which is quite the compliment. (Trying to find something that everyone in this house likes is quite challenging.) I mean, it starts with bacon, and the next step is to fry the beef in the bacon fat. There’s your flavour right there. I would definitely make this stew again, probably next time beef roasts go on sale.

I also figured that a special occasion dinner required dessert. I made the cinnamon roll variation of my Dad’s Biscuits recipe. They’re not really Irish, I guess (from what I’ve read, cinnamon rolls were invented in Sweden), but at least the base of the recipe is baking soda biscuits, which is kind of like soda bread… Right? Ah well, there’s no rule that says I have to stick to a theme. Because of the extra sugar in the cinnamon rolls, they brown up very quickly, so don’t expect them to be as light-coloured as the original biscuits. They’re delicious warm from the oven, spread with a dollop of butter or margarine. If you can’t get them fresh, zap them in the microwave for 15 seconds or so to warm them, then butter.