Purple Sweet Potato Bread

A few weeks ago I made one of my semi-regular trips to the Asian supermarket. I greatly enjoy shopping there; so much new stuff to try! I find the fresh fruit and vegetable section particularly appealing, as this is one of the few places in town where some of these foods can be found. On this particular trip, I found purple sweet potatoes — ones that were not just purple-skinned, but also purple-fleshed (I learned my lesson about checking the colour of the flesh before I bought them).

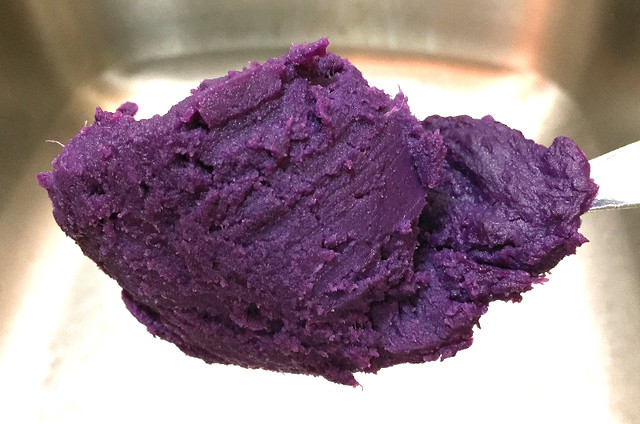
After peeling and boiling, this variety of sweet potato remained a vibrant deep purple. I served it a few times as a side-dish with dinner; it’s definitely not as sweet as the orange version I am most familiar with. I still had a few roots left over, so I decided to bake with them. I chose to use the Pumpkin Bread recipe from the Joy of Cooking (2006 edition, page 628). As per the book, “this loaf can be made with any cooked mashed squash, yams, or sweet potatoes”.

I was really hoping that the fantastic purple would come through, and I was happy to observe it in the batter, although it is diluted somewhat by the other ingredients.

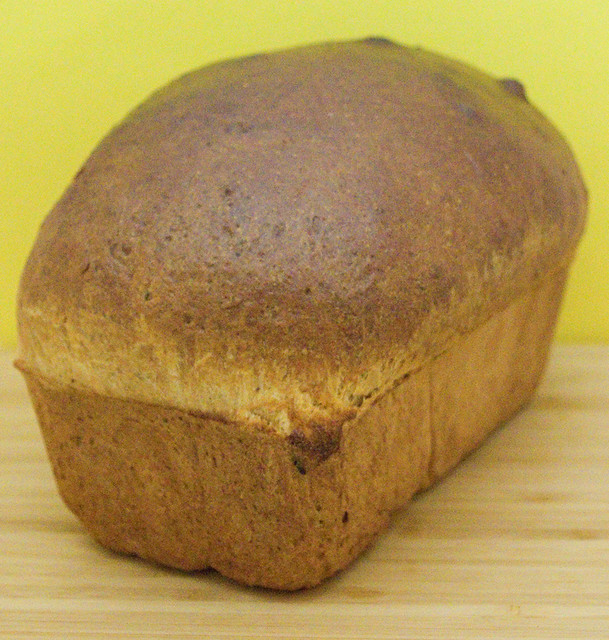
Upon baking, though, I was highly disappointed by the colour. As it cooked, the loaf just turned brown, so much so that it is visually more-or-less indistinguishable from a pumpkin or orange sweet potato loaf. Obviously, some kind of chemical reaction had occurred.

Cracks on the surface of the loaf did reveal an odd green, so I decided to investigate. (I like “investigating” food, since this usually means I get to eat it.)

When sliced, it’s interesting how the outside turned brown, but the inside turned a dark, rotten turquoise. Even though the bread is only an hour or two old, it looked like it had been moldering in a damp cellar for years. Sadly, when I ate this bread, my taste buds and nose warred with my eyes; each slice was delicious and moist, and smelled delicous, but my eyes kept warning me that it was rotten, so I couldn’t enjoy it very much. (I had a similar experience with scrambled eggs turned green with food colouring for a meal of Green Eggs and Ham for a celebration of Dr. Seuss’ birthday on March 2nd a few years ago.)

I found it interesting how each slice different in its green shade, with the ones closest to the heel of the loaf being mostly brown, and the ones closer to the center of the loaf being mostly green, except for the edges.

All in all, this didn’t turn into the purple bread that I was hoping for, but as it stands, sweet potato bread made with purple sweet potatoes does have possibilities as Hallowe’en party food. That’s the one time of year that food that appears rotten while remaining safe and tasty is actually a triumph.

Sushi Bowls Recipe

Sushi bowls are a favourite go-to when I am running short of time to make dinner. Basically, a sushi bowl a bowl half-filled with rice, half-filled with sushi-style toppings. This dish takes as long as the rice takes to cook, so about 25min if you use sushi or basmati rice (much longer if you use brown or wild rice). This is a shortcut to some of the flavours of sushi without taking hours to roll it all up and years to perfect the craft.

Below you’ll find my recipe to make the sushi bowl pictured. Of course, feel free to experiment with the toppings. Vegetarian? Try avocado, cucumber, and mango. Will you eat only California rolls? Try imitation crab meat, cucumber, and avocado. Do you like barbecue? Try barbecue eel, which comes per-prepped at many Asian grocery stores and just requires reheating. Raw fish doesn’t frighten you? Try fresh sashimi-quality salmon, tuna, butterfish, and snapper. Like little bursts of saltiness? Include some tobiko (flying fish roe) or larger salmon roe. Want a little creaminess to your dinner? Drizzle the contents of the bowl with Japanese Kewpie mayonnaise. Prefer a little spice? Drizzle with Japanese spicy mayonnaise. Be creative! You don’t have to prepare this dish the same way twice if you don’t want to.

Sushi Bowls
Yields four adult servings

Rice
In a strainer, rinse until water runs clear:
2 cups sushi rice
Cook rice as per package directions*.

Toppings
While rice is cooking, boil a pot of water, leaving room for:
4 large eggs**
Once the water is at a rolling boil, add the eggs one by one gently to the water, using a spoon. Set a timer for six minutes. Once the time is up, remove the pot directly from the heat and carefully pour out the water. Refill the pot with cold water and wait for the eggs to cool (you may have to replace the water once or twice more to speed the process). Once the eggs are cool, remove them from the water, then peel them and set them aside.
Separately, peel and chop into bite-sized pieces:
2 ripe avocados
1 ripe mango
Wash and cut into bite-sized pieces:
1 small cucumber
Cut up with scissors into small strips:
2 sheets nori (sheets of Japanese seaweed)
Unpackage, wash, and peel if necessary:
16 precooked large shrimp
Open and set aside:
150g package smoked salmon

When the rice is finished cooking, fluff with chopsticks or a fork. Dish the rice evenly into four deep bowls. On top of the rice, into each bowl place:
– 1 soft-boiled egg (cut in half immediately before placing on the rice)
– 1/2 an avocado
– 1/4 of the mango
– 1/4 of the cucumber
– 1/4 of the nori strips
– 4 of the shrimp
– 1/4 of the smoked salmon.
Serve.

*When rice is cooked, you may drizzle it with 2 Tbsp rice vinegar. My kids don’t like the vinegar, so I don’t make it this way when I make it for them, but the vinegar tang will make it taste much more like sushi. (The word “sushi” actually refers to the cooked vinegared rice, *not* raw fish.)
**Soft-boiled eggs may be replaced with scrambled eggs. When you are mixing your eggs, season with 1 Tbsp of mirin (a sweet Japanese rice-wine sauce). This will make the scrambled eggs taste more like the kind that are used in tamago sushi (egg sushi).

P.S. Yes, I know I have more eggs in the picture than I have in the recipe. Of the people in my family, I’m the only one who likes two, so I averaged out the recipe somewhat. If you want more eggs, make more eggs!

Souvenir Yarn

My husband returned last night from a business trip to Den Haag in the Netherlands. Unfortunately I wasn’t able to accompany him, but I was there about ten years ago for a job interview, and I don’t feel as badly about missing out as I would have if it was a place I’d never visited.

When we found out that my husband would be traveling to Den Haag, he asked what I would like him to bring back. “Yarn,” I answered. I’m not a great fan of souvenirs, at least not the kind that will sit on a shelf and collect dust. Practical items are another matter, and I like to think fondly back on my trips whenever I use them. Yarn, for me, is also a great souvenir, especially if I can find something local that is hard-to-get back home. It’s also a great thing to have someone bring back as a gift. I think of the the person who gave the yarn to me when I knit it, as well as when I see the final project worn.


Malabrigo Mechita in 227 Volcan

Now, my husband isn’t a knitter, and he for the most part could care less about nice yarn — although, through exposure to me, he is learning. I am trying to convince him that it’s a good idea to go to a yarn shop employee and say, “My wife is a knitter, I have a budget of $X, she likes local wool and knits a lot of socks, could you please help me find her some yarn as a gift?” Although the employee may have a few more questions to help narrow things down, this will save him an inordinate amount of time wandering through the shelves. Unless his whole plan is to browse because, deep in his heart of hearts, he actually really likes yarn and this is a deeply satisfying experience for him — but I sadly don’t think that’s it.

Before he left, I Googled for a nice shop that was within a reasonable distance of his hotel. He ended up going to Cross & Woods Crafting Parlour. He tells me that he knew I’d like the place as soon as he stepped inside. Not only was it filled with lovely crafting supplies, but there was a table where ladies were sitting and knitting. He overheard them discussing the different ways one could hold one’s needles, how awkward it is to try a different style, and complaining that everyone else’s style is just inherently wrong. Since I’m pretty sure that I’ve had this exact conversation with my knitter friends (indeed, my grandmother and my grandmother-in-law couldn’t watch me knit because it made them want so badly to correct how I was holding my needles), I think I would have fit right in.

Unable to find a yarn that had been produced, spun, or dyed locally that he thought I’d like, my husband instead brought me back Malabrigo Mechita in 227 Volcan. (Malabrigo’s actually from Uruguay.) It is a beautiful soft yarn, although it’s not tough enough for socks, which is my general go-to for thinner yarns. Their website recommends this yarn for “shawls, scarves, garments, accessories, baby and kids items, lace, cables, [and] textured stitches.” I will have to spend some time browsing Ravelry for ideas and that, with a mug of hot cocoa in hand, is my way to spend a perfect winter evening.

Labskaus

On my trip to Hamburg last winter, I ate out often on Lange Reihe, a street with many restaurants not far from my hotel. On one such excursion I stopped in for lunch at Frau Möller (apparently named after the owner’s dog): a local pub that was busy whenever I walked past. I sat at the bar, since the rest of the pub was packed. The waiter was able to provide me with an English menu, thank heavens, because my accent is so bad that I can’t get a native-speaker to understand my small spattering of German.


Frau Möller at Lange Reihe 96, 20099 Hamburg, Germany

One section of the menu was labeled “Hamburg stuff”, which caught my attention immediately. Why visit another country if you’re not willing to try the local dishes? I was intrigued by the entry for labskaus, which had a description of the side-dishes but not the dish itself. I asked the server what it was, but his English failed him and he just shrugged and said, “Labskaus is… Labskaus.” So I had to try it.


Labskaus at Frau Möller

The toppings were two eggs sunny-side up, dill pickles, pickled beets, and rollmops. I’ll confess to never having had rollmops before, but a brief examination revealed that they are a sweet pickled fish (herring, I found out later) wrapped around a cucumber pickle and held together with wooden skewers. But what was underneath the eggs? That, apparently, was the labskaus itself. I feared at first, based on the looks alone, that I’d ordered myself some kind of raw ground meat. But I took a bite, and realized that it couldn’t be. Upon tasting, I could tell it was some kind of meat (corned beef) and potato mixture. But what gave it its characteristic pink hue?

A bit of research back at the hotel when I could use the WiFi informed me that the pink came from pickled beet juice. All of these ingredients preserve well and were commonly available on seafaring vessels, making this dish popular both aboard ship and in coastal cities in Germany, Denmark, Norway and Sweden. The British have a similar dish, a beef stew called lobscouse, which is eaten by sailors and is popular in seaports like Liverpool; it is from this that the slang “Scouse” accent gets its name.


Rollmops available in Canada

When I came back home, I wanted to try to make labskaus for myself, since, as I’ve complained before, there aren’t any German restaurants around here. I decided to try a simple recipe from My Best German Recipes. Sourcing the ingredients was actually a lot harder than making the dish itself. Corned beef can’t be found out of a can for love nor money around here, so canned had to do. But which variety to choose? None of them were German. I read all of the ingredients and eventually settled on the one kind that had no sugar. I thought I’d have to make my own rollmops, but as it turns out you can buy them pre-made in most grocery stores. They even have the same shape of skewer as the ones from Frau Möller.


My labskaus

My final product was definitely edible, but paled in comparison to the ones I had in Hamburg. I would like to try to make this dish again, but this time with corned beef that has never seen a can. I think that this would make all of the difference in the world. I will have to try a specialty butcher, rather than a grocery store. I am not satisfied enough with my first attempt to try it without better meat.

Bread Basket

I’ve been working on my bread-making skills over the last few weeks, much to the happiness of my family; it generally makes the house smell great even when I fail. For these experiments I have been relying predominantly on World Breads: From Pain de Campagne to Paratha by Paul Gayler (2006). It’s not a very long book (it’s subtitled “a small book of good taste”), and I’m determined to make my way through it recipe by recipe.

Broa (Portuguese Country Bread)
World Breads, page 16

This isn’t a kind of yeast bread I’d ever had before, although in texture and flavour it greatly resembled the cornmeal muffins that we eat here around Christmas. To my taste, this recipe needed either a little more sugar or a little more salt… I need more experience to figure out which, but I’m leaning more toward salt, since the recipe (and many other perfectly good ones) don’t call for sugar at all.

Dill and Curd Cheese Bread
World Breads, page 41

This bread was absolutely delicious, needing no tweaking, and I would make it again in a heartbeat. There’s not enough curd cheese (I used ricotta) to make it greasy; rather, it adds a touch of moisture and helps the bread be light and fluffy.

The dill bread recipe makes two loaves, and my family didn’t have a chance to finish it all before it started to go stale. I suppose we could have just toasted the last few slices, but instead I decided to leave them out overnight so they’d become properly hard. Then I put the slices into a plastic zipper bag and crushed the bread in the bag with a rolling pin to make fine bread crumbs. I had a bit of fresh dill left over that needed to be used, so I chopped that and added it to the bread crumbs. I then beat a couple of eggs, dipped the tilapia fillets in the egg, then dipped them into the bread crumb mixture, and fried it all lightly in a drizzle of olive oil in a nonstick pan. I served it with steamed bok choy and penne with pesto, and it was delicious.

Oatmeal Bread
World Breads, page 25

I liked the texture and heft of this bread; it was particularly good for sandwiches. However, this one too was lacking either salt or sugar to my taste, so I will have to adjust the recipe next time to see if that helps.

Seeded Granary Baton
World Breads, page 16

This loaf was full of all the seeds and heavier flour that I love in a breakfast bread, but I planned this bake very badly, as I couldn’t properly enjoy it after having just had dental work done that day. Even so, it was very tasty — I just had to be very careful how I chewed. I like that the grains/seeds can be varied to change the texture and flavour; the original recipe calls for sunflower, pumpkin, and sesame seeds (pepitas), but I would enjoy trying it with all of the interesting seeds that are available at the local bulk store.

White Soda Bread
World Breads, page 12

Wow, did I ever mess up this bread. I didn’t flatten it enough, so the center wasn’t cooked through. I cut the slashes too deep, so the bread opened up like a facehugger egg from Alien. And somehow I made a mistake with the mixing, so that instead of a nice, smooth crust, I ended up with something that strongly resembled cellulite. The flavour, for those parts that were cooked through, was quite nice, so I think I shall try it again with my newly-acquired knowledge of what not to do.

Whole Wheat Bread
Joy of Cooking, 2006 edition, page 599

I was craving a simple whole wheat loaf, so I veered away from my quest to finish all the World Breads recipes. This recipe is from my trusty standby, the Joy of Cooking. The texture and flavour of the loaves was quite nice. However, I discovered that there is a typo in my copy, one that was corrected in the more recent digital edition (which I did finally break down and buy). At the start of the recipe, it says that it should yield three 9″x5″ loaves. Yet at the end of the recipe, it instructs the cook to “allow the dough to rise in a large oiled bowl until doubled, about 1 hour, and once in 2 greased 9 x 5-inch loaf pans until doubled, about 45 minutes”. Basically, it says that the recipe yields both two or three loaves, which is definitely an error. I flipped a coin and went with two loaves, and the end result was that the loaves were huge. I had to cook them for about 15 minutes longer than indicated so that they sounded hollow when I tapped the bottoms. Next time I’ll split it into three loaves — even though the digital version says to make two loaves as well.

Easy Hidden Vegetable Lasagna Recipe

Okay, I’ll admit it. I have a thing for celebrity chefs. Jamie Oliver, Gordon Ramsay, Anthony Bourdain… I watch all of their shows (except the competition-style shows, I’m not a fan of those). Teaching people how to cook? Trying to salvage crappy restaurants? Exploring the world and the foods therein? I enjoy all of that.

One of the most practical outcomes of my binge-watching was finding the recipe and tutorial video for Kerryann’s Hidden Vegetable Pasta Sauce, which was linked to in Jamie Oliver’s recipe for Quick Family Pizza. Tomato sauce isn’t unhealthy in the first place, but I like the idea of hiding extra veggies in there.

That being said, whenever I make the sauce it comes out kind of a brownish-green instead of the orange-red in the videos. I think it’s because the vegetables that you typically buy here in Canada are bigger than their British equivalents. This is something I’ve run into a few times now when I’ve made non-Canadian recipes. It’s fine when the instructions are by weight or volume, but it’s possible to get unintended results if the measurements are by the number of fruit or vegetables. Just based on the size of the produce in the tutorial video, I know the ones I get at the grocery store here are bigger. Maybe they’re a different subspecies here? Or the soil is better? Or, if they’re imports, that we import them from a different source? Whatever the reason, I’d recommend adding more tomato puree and chopped tomatoes to the recipe if you’re cooking this in North America and want a properly red sauce. A few more carrots probably would help add to the base colour as well.

(Also, here courgettes are called zucchini; aubergines are called eggplants; tomato puree in tubes is almost unheard of, but you can get tomato paste in cans; and passata is not a commonly-found ingredient — it’s easier to find cans of chopped tomatoes.)

That being said, no matter the colour of the sauce, it tastes delicious, and my kids gobble it up, so I keep making it. I love that I can make it in huge batches and then freeze it to use again later. I’ve used the Hidden Veg sauce on noodles and on pizza, but I’ve also used it to make a lovely lasagna.

Easy Hidden Vegetable Lasagna
Yields one 11″ x 17″ casserole (8 servings)

Sauce Mixture
Peel and chop:
1 small white onion
1 clove garlic
In a frying pan, heat:
1 tsp olive oil
Cook gently until onions are translucent, being careful not to burn.
Add to frying pan:
1lb ground turkey*
Season meat with:
pinch of salt
With a spatula, break up clumps of ground meat. Cook meat until it is no longer pink in the middle and the outside is lightly browned. Pour off any grease.
Add to frying pan:
2 cups Kerryann’s Hidden Vegetable Pasta Sauce**
Simmer for 10min.

Noodles
While sauce is simmering, cook in a large pot of water according to package directions, until not quite al dente:
6 vegetable or spinach lasagna noodles***
Drain noodles and set aside.

Cheese Mixture
In a mixing bowl, crack and beat:
2 large eggs
To the eggs, add:
250g ricotta cheese
2 cups grated mozzarella cheese
Set cheese mixture aside.

To a 11″ x 17″ (2 quart) casserole, add the ingredients you’ve prepared in the following order, from bottom to top, spreading them evenly over the dish:
– half of sauce mixture
– 3 noodles (slightly overlapping)
– all cheese mixture
– 3 noodles (slightly overlapping)
– half of sauce mixture

Over top of casserole, spread:
1 cup grated mozzarella****
1/3 cup grated Parmesan (fresh or dried)*****

Preheat oven to 350°F (175°C). Bake for 40 minutes. Sauce should be bubbling around edges and cheese topping should be lightly browned.

Serve as is, or with garlic bread and a Cesar salad.

*Lean ground beef may be substituted for turkey.
**Your favourite spaghetti sauce may be substituted for Kerryann’s Hidden Vegetable Pasta Sauce.
***Traditional or whole wheat lasagna noodles may be substituted for vegetable or spinach lasagna noodles.
****Sharp cheddar cheese may be substituted for mozzarella.
*****Fresh-grated Parmesan from the deli will make a smooth top layer, while a dried Parmesan from the pasta aisle (like the Kraft kind) will create a slightly crunchy topping. My family prefers the texture of the latter, but both are tasty.

Sunday Dinner

Yesterday was Sunday, and that meant Sunday Dinner over at my parents’ house, in quasi-British style. It’s not something we do every weekend, but it is a regular enough event. My parents made a lovely roast beef, potatoes and carrots — and of course the always-delicious Yorkshire pudding. Now, I can’t make a tasty roast to save my life (mine are always dry, tasteless, or both), but I wanted to contribute to the meal. I woke up this morning figuring that some baking was in order.

I picked up a copy of Bread for All Seasons (1995) by Beth Hensperger a few days ago at a thrift shop, and I was dying to try out some of the recipes. My choice for dinner was Sweet Potato Cloverleafs (page 114).

The dough isn’t nearly as orange as one might think it should be, and that’s because I didn’t use an orange-fleshed sweet potato, which is usually the most common kind around here. I used a Japanese Murasaki sweet potato, which has purple skin and white flesh. These were mislabeled at the grocery store as purple sweet potatoes — when you label a sweet potato by colour, it’s supposed to be by the colour of the flesh, not by the colour of the skin. I was looking for a sweet potato with purple flesh, like the Okinawa sweet potato (which has tan skin), or the purple-skinned, purple-fleshed variety that I finally found at the local Asian market, which was also labeled “purple sweet potato”.

While I have read complaints that the Murasaki sweet potato is stringy and not at all flavourful, it did its job just fine in the context of these buns, which was to provide moisture. The cloverleafs were light and fluffy, with a hint of orange that cut through the heaviness and grease of a meal of roast and gravy. I’ll definitely be making these again — perhaps with truly purple sweet potatoes, just for the colour.

I thought I should also contribute to dessert. My youngest daughter had taken Amelia Bedelia Bakes Off (2010, Chapters.ca, Amazon.com), and at the back of the book there is a recipe for Amelia Bedelia’s Sheet Cake. (You can find the recipe via Desktop Cookbook.) Well, I didn’t want a sheet cake, but cake batter works just as well for cupcakes. The directions say to mix all the ingredients together with a fork in the baking pan, but I didn’t want to spend all day mixing. I used a plastic bowl and an electric hand mixer instead, and then I doled out the batter into muffin tins.

I found it interesting that this recipe had no animal ingredients, and could even be vegan if you sourced your supplies carefully. Not that I am a vegan, but I do occasionally cook for them. I also thought that the leavening agent was interesting: baking soda and vinegar. I’d never baked a cake with vinegar in it before, but it makes sense that baking soda and vinegar would create the gas necessary to cause the batter to rise.

I ended up with 24 cupcakes, and I had to bake them for 20 minutes for them to be cooked through. The cupcakes were a very dark brown, almost black; they are so dark that my hubby thought I might have burned them, even though they are totally soft. I’m not sure if the deep colour is caused by the kind of cocoa I used, or if it’s just because there’s 2/3 cups cocoa in there. It may be a combination of both factors. I don’t think my kids would complain if I tested the theory and made them again with a different kind of cocoa. They were a pretty solid hit.

Joy of Cooking

If I had to recommend only one cookbook, it would be the Joy of Cooking (available via Chapters.ca, Amazon.ca, and Amazon.com, and now there’s even an an app for that). This cookbook has been around since 1931 and it remains an indespensable resource. I like to give it as a sending-off or housewarming gift for young adults setting up their first place. I always keep an eye out for extra copies at thrift stores and garage sales — and although it’s not a common find (most people keep theirs even if they’re decluttering), it has been in print for eigty-six years now so there are many copies out there. My mother has the 1981 edition, which is the copy I grew up with, and after I moved out on my own I bought a 75th anniversary edition (2006).


Fast Whole Wheat Bread.

Over the last decade or so, secure in what I thought was a decent grasp of the basics, I was often tempted away from my Joy of Cooking by the Internet, library books, and my own fairly substantial collection of cookbooks. It’s just been in this last year or so that I’ve gone back to using it on a regular basis, mostly because I am determined to learn new techniques and recipes in order to break free from the slog of same-old, same-old. What I know off by heart about cooking is only a small fraction of this book. When I decided to learn how to bake my own bread (which, quite frankly, I found intimidating), I went back to my trusty standbyes.


Fast Whole Wheat Bread with homemade apple butter.

The first bread I tried from the Joy of Cooking was Fast Whole Wheat Bread (page 599, 2006 edition). It wasn’t nearly as intimidating as I’d feared. I think for health’s sake I’d like something with a higher ratio of whole wheat flour to white flour, but I have no complaints about the taste or the texture of the bread. It was quickly devoured with homemade apple and pumpkin butters, mostly by my children. (Although, let’s be honest, my parents love it when I try out new recipes, because they generally get to try some as well.)

My mother had also mentioned that she’d been craving lemon poppyseed bread, and so, emboldened by my success with the bread, I whipped up the Lemon Poppy Seed Muffins (page 635, 2006 edition). I didn’t have any fresh lemons, so I substituted lemon juice, and they turned out delicious anyway.

Now that I’ve been using the Joy of Cooking more often again, I think I may invest in a digital copy (which contains the entire 2006 edition and then some). I love my hard copy, but I think being able to refer to it quickly while grocery shopping would be extremely useful. Just last week I found ostrich and boar on sale at the grocery store, and I had to Google how to cook them. Ostrich is on page 453 and boar is on page 530 in the edition I own, as it turns out.

Minecraft Creeper Blanket

I originally posted about my Minecraft Creeper Blanket on my old blog back in 2013. I written anything new for that blog for years, and I just assumed nobody had looked at it in equally as long. As it turns out, someone had been trying to follow the pattern I’d posted — and then I took it down! So I am re-posting my old entry. I plan on doing this with more of my old work, subject to requests, so if there’s an old post you’d like to see, just ask.

On July 16th, 2012, I almost lost my little brother to a house fire. The fire started in the room where he was trying to sleep away a flu, and he was lucky to get out alive and relatvely unhurt; he suffered some mild burns and smoke inhalaton. My parents, of course, threw a couple of things in a suitcase and started the drive to Halifax to take care of my brother in the hospital (he was there for almost a week) and then help him once he was out. With two young children at home, I couldn’t manage a 16-hour drive and indefinite hotel stay on practially no notice, but it didn’t mean that I didn’t want to be there. He’s my baby brother, man. I couldn’t just sit on my hands and do nothing. As it became more and more obvious that, between the fire damage and the water damage from puttng the fire out, my brother had lost just about everything, I started to wonder if there was anything I could make for him. Sure, the insurance should pay to replace most of the essentials, but what about those personal touches? That’s where the idea for this blanket was born.

For those not into such things, the blanket pattern is based on the face of a Creeper, which is a bad guy in the game Minecraft. I chose the design simply because I know that my brother loves the game. Perhaps I should have played the game before I knit the blanket, because I found out that the whole point of this villain isn’t so much that it kills your character (there is minimal penalty in this game for dying), but that it destroys the creations that you’ve spent a long time building. You know, like a house. I swear I didn’t know this before I knit the blanket. This doesn’t seem to bother my brother much, or maybe he takes it as ironic. At least I hope so…

This is what a Creeper looks like in game:


Source: D+PAD

It took me six months of knitting to finish the blanket. At first I thought it would be ready for my brother’s birthday, then Christmas… In the end, it was a delayed Christmas present that I gave him in February. I swear I tried to make the Christmas deadline, but I still had at least 25 squares to go by the time December 25th rolled around. I mean, it took me almost a month to sew all 100 squares together. I now have a HUGE respect for anyone who undertakes this kind of project on a regular basis. My hat is off to you, sir or madam.


It’s amazing how all that work folds up into such a small package.

Here is the pattern that I designed if you’d like to try to knit the blanket yourself. I knit it as simple stockinette stitch squares, cast on 25 stitches and knit until they were square. This makes a blanket that is big enough to generously cover a single bed, or barely cover a double. I’d give you exact dimensions, but the blanket is already with my brother in Halifax. I tried to find an acrylic yarn (brother has pets, it has to be easily washable) with as many shades of green as possible to make the Creeper appear authentic. This is the best selection I could find.

The legend as follows:

Minecraft Creeper Blanket

Yarn: Loops & Threads Impeccable yarn from Michaels
Needle Size: 5 mm (8 US)
BL = Black (01040), 20 squares (2 balls)
TG = True Grey (01044), 11 squares (1 ball)
F = Fern (01222), 17 squares (2 balls)
FO = Forest (01243), 20 squares (2 balls)
G = Grass (01223), 10 squares (1 ball)
DF = Deep Forest (01242), 10 squares (1 ball)
SF = Soft Fern, (01221), 12 squares (2 balls)
Square Total: 100 squares, approx. 1200g
Border: 2 rows of single crochet around edge in Forest (01243), approx. 50g (1 ball)
Total yarn required: 11 balls

If you try this pattern yourself or if you need more information before you give it a shot, please let me know!

Valentine’s Day Cookies: Cookie Monster’s Famous Cookie Dough

My girls wanted to bring cookies for their classes for Valentine’s Day yesterday, so that meant breaking out the recipe for Cookie Monster’s Famous Cookie Dough. This is a recipe that I’ve been using since I was a child — actually, that’s probably what we were cooking in the first picture of my introduction post. In my post-childhood but pre-Internet days, my family lost the recipe, but these days the recipe can be found online via TheKitchn.com.


This dough isn’t just for Valentine’s Day; in this photo we were using the recipe for Christmas cookies.

According to my research online, apparently the recipe first appeared in Big Bird’s Busy Book in 1975, which is not where I found it. Family photos reveal that we had The Sesame Street Treasury: Volume 1 (1983), on which the first part of the recipe is printed on page 6. Presumably the cooking instructions are in a later volume. The recipe was also printed The Sesame Street Library: Volume 1 (1978), with the basic recipe on page 7 and the baking instructions on page 26, under the title Cookie Monster’s Shape Cookies.


Heart cookies before baking.

I was lucky enough to snag both a copy of Vol. 1 of the Treasury and the Library a few weeks ago from a thrift shop. There were a few more volumes there, including The Sesame Street Treasury: Volume 5, which I clearly remember reading as a child. This volume has Cookie Monster’s Cookie Faces on page 27. This is a continuance of the Famous Cookie Dough recipe and also contains baking instructions.


Heart cookies after baking.

This recipe is very forgiving and, as such, is a great recipe to do with children. The dough can be rolled and re-rolled with impunity as the kids cut out the shapes. For fluffiest results, refrigerate the prepared cookies on a baking pan for an hour or more before baking. If you do so, you may need to add a minute or two to the cooking time so that they are done all the way through.


My girls painting their Christmas cookies two years ago.

One thing you may note is not in the original recipe is the coloured glaze — although that’s clearly what I was painting on in my childhood photo. (TheKitchn.com recommends sprinkling them with sugar before baking, which would be good too.) I’m not exactly sure why we started painting the cookies. Perhaps the instructions were in another volume of the Treasury that I haven’t yet found as an adult? The “paint” is very simple: for each colour, separate an egg into two bowls or small containers. Mix a couple of drops of different food colouring with each part of the egg, and then paint onto the cookie before baking. I find that the yolk makes the most saturated colours, but since it has a yellow base it’s hard to get colours like blue (which will mix to create green). Adding a few more drops of food colouring can help “overpower” the yellow. (If for whatever reason you can’t use food colouring, natural colours work as well. For example, a few drops of beet juice can yield an amazing colour.)

Painting the cookies was my favourite part of the process as a child, and is my kids’ favourite part as well. As a bonus, glaze doesn’t make nearly as much of a mess as icing when the kids eat the cookies. Do keep in mind that the glaze will crack when baking because the cookies do expand, so there’s no point in being too precise. Save the fine detail for fancy cookies that are iced after they’re baked.