Teddy Bear Birthday Cake

When I was eight years old, my mother threw me a teddy bear birthday party. I hadn’t thought about it in years, but it suddenly came to mind when I was perusing the used book sale at the public library. There, on the shelf, was a discontinued copy of A Piece of Cake: Fun and Easy Theme Parties for Children (Gwenn Boechler, 1987), which pretty much had my birthday party pictured on the front.

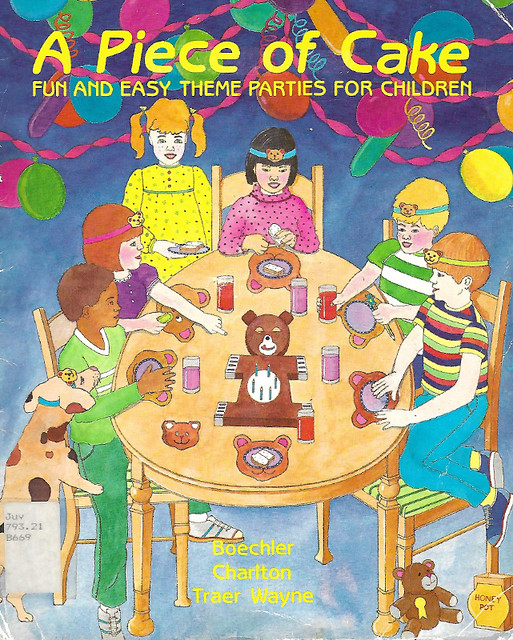
We decorated those headbands (which the book calls party hats). We made teddy bear paper-bag puppets. We ate that cake.

I love it when I find books like this! Books that contain patterns or recipes for things I remember doing or gifts I remember receiving as a child. It doesn’t happen often, but I think that’s why I treasure it so much when I am lucky enough to stumble upon them.

The highlight of the birthday party was, I think, the teddy bear cake. I know my mother baked me a cake for every birthday until I was a teen (at which point she either made me a blueberry cream cheese flan, or I baked my own cake), sometimes two if my actual birthday and my birthday party ended up being too far apart. Although I do have vague recollections of rainbow sprinkles, I honestly couldn’t tell you anything specific about the cakes Mom baked, except on this year. I remember looking at the instructions for how to put it together. I remember icing the cake. I remember that the candies we used for the claws had black licorice centers, like a Good & Plenty. I remember that the nose and tongue were Smarties.

On the whole, what I remember the most is being so proud of this awesome cake — which is funny, because my mom, unbeknownst to me, thought that it was a terrible failure. No part of it turned out the way she wanted it to. According to her, making this cake was what convinced her that she had no talent whatsoever at cooking. But to me, it was a triumph.

(I heartily disagree with the idea that Mom can’t cook, by the way. Who do you think is responsible for all of those lovely Sunday dinners?)

I guess it just goes to show you that children perceive the world completely differently than adults do. We can all be so critical of ourselves and our work. But a child doesn’t notice if a cake slumps to one side, or if it’s store-bought cake mix, or if the decorations don’t turn out quite as intended. What they remember — especially if you cook together — is the pride of accomplishment. Maybe us adults could use a hit of that in our day-to-day life. There’s nothing wrong with striving to do better, but there’s also nothing wrong with being proud of your work. If it makes someone happy, that’s perfection enough.

Hot Cross Buns

I find myself extremely happy that it’s not my responsibility to cook the formal Easter dinner this year, since my whole household, myself included, is still sick with a nasty cold. I did manage to haul my butt out of bed on to prepare hot cross buns in time for Good Friday. I think that’s the limit of my abilities at the moment.

For those not familiar with the hot cross bun, they’re basically a slightly sweet, spiced bun that studded with black currants and topped with an “X” or “+”, depending on which way you look at it. The Good Friday holiday for Christians is the commemoration of the death of Jesus upon the cross; the cross on the bun is said to represent the crucifixion, which is why hot cross buns are traditionally served on that day.

I used the “Hot Cross Buns” recipe on page 37 of Baking Bread: Recipes From Around the World for the Complete Home Baker by Audrey Ellison (1995). Unfortunately, I was not terribly impressed by the recipe. First of all, it calls for “shortcrust pastry leftovers for crosses”, without explaining the quantities or techniques necessary. Since I hadn’t made any pastry recently, I went with the second option of “a simple paste [made] from 2 tablespoonfuls each of flour and water”. That ended up being much too runny. I increased the flour to 3 Tbsp, and even then I had to pipe on the crosses because the mixture was so loose.

Additionally, either the cooking time was too long or the temperature was too high, since my first batch was burned by the time I went to check up on it by the minimum recommended time. I double-checked that the temperature on the oven was as instructed after the burned ones came out, and it was correct. So I’m not sure what went on there.

Maybe it’s because I’m sick and have no patience, but this particular recipe ended up being a huge pain in the neck. But at least I have homemade hot cross buns for breakfast, which I think makes it worth it.

Cake Pops

After the confetti cupcake disaster on Saturday night, a friend of mine suggested that I use the broken/misshapen homemade cupcakes to make cake pops. Despite my disappointment, I had saved the cupcakes — they still tasted great! So I gave it a go.

I had never made cake pops before, and honestly I had no idea how it was done. Based on the gadgets I’d seen in the stores, I thought you cooked them as little spherical cakes, kind of like a doughnut hole. After my friend’s suggestion I Googled, and what do you know? Cake pops are essentially cake meatballs.

I followed the How To Make Cake Pops Easily tutorial on Divas Can Cook, and the further into it I got, the more like meatballs they seemed. The colours of the cake I was using didn’t help; it really reminded me of ground poultry. Basically, you take a cake (your “meat” and “spices” and “filler”), crumble it (i.e. grind it up), mix it with a bit of frosting as a binding agent (the “eggs”), and shape it into balls. I’ve made enough meatballs that once I realized the similarities, muscle memory pretty much took over. Once I got to the decorating stage, though, it was new territory.

They’re definitely not perfect cake pops. They’re not spherical, the chocolate coating is sometimes lumpy, and the sprinkles aren’t artfully arranged. And forget fancy decorating; I just don’t have the skills to make them into flowers or Christmas balls or Easter eggs. But they’re a darned sight better than the cupcakes I started with. I consider this a success, especially for a first try.

To be honest, the kindergarten kids who are going to eat them are going to smear them all over their faces and clothes anyway. It doesn’t matter that the chocolate is hard, they’ll find a way.

Confetti Cupcakes

Yesterday was Thing 2’s birthday party — not her birthday itself, which is unluckily squished in between Christmas and New Year’s, but her party. With all of the other affairs going on that time of year, her celebration with friends gets pushed back to the late winter or early spring. As a family we make a big fuss of her on her actual birthday, but this way she gets to pick the date of her party for a time when she can feel special in her own right, and not just “squeezed in”.

So the plan this year, as per her request, was to make confetti cupcakes, the ones with multicoloured sprinkles mixed directly into the batter.

I found the Homemade Funfetti Cake recipe on Sally’s Baking Addiction, which called for a lot of sprinkles. 2/3 of a cup of sprinkles — and I doubled the recipe. I basically emptied out all the multicoloured sprinkles in my stash into one measuring cup.

So many sprinkles! Perfect, I thought, for what Thing 2 wanted. Sadly, it didn’t work out.

It’s hard to tell from this picture since by this point the cupcakes were all piled on top of each other after they were cooled, but almost all of the cupcakes stuck to the muffin pans and left huge chunks of themselves behind. And yes, I used non-stick muffin pans and sprayed them with cooking spray.

Those few cupcakes that didn’t joined their broken brethren in falling apart ended up slowly deflating and collapsing, as Eddie Izzard would put it, “like a flan in a cupboard”. They all just… Fell. They were too soft and refused to hold their shape. When the first pan came out like this, I thought perhaps they weren’t cooked the whole way through, but upon testing they were definitely done. They even tasted good! I baked the second pan for a few minutes longer than the first, thinking perhaps it was a problem with my oven. But I checked the internal temperature with a secondary thermometer, and it was spot-on. Either I messed up somewhere (did I forget an ingredient or something?), or there’s something up with the recipe. Perhaps there are just too many sprinkles? They’re structurally sound when cold, but when they melt, they’re sugary mush.

At this point it was 11:00pm the night before the party, and I was something on par with the Great Cake Disaster of my 16th birthday (pictured above). In retrospect, that one was caused by not levelling my cakes. The weather was also too hot (30°C or so) and humid (and us with no air conditioning) for the chocolate buttercream frosting to keep the cake from sliding over. My friends referred to it as the “Leaning Tower of Poo”. At least the flavour was okay.

I ran out to the only 24-hour grocery store around here and grabbed myself a box of Duncan Hines Confetti White Cupcake Mix, along with a package of Reynolds StayBrite Easy Release Baking Cups. No way was my second batch of cupcakes going to fail! And I needed to get some sleep before party day.

As promised by the packaging, the Confetti Cups went off without a hitch. They released easily from the baking cups, they didn’t fall, and they were done in record time. I also made them with the “lower fat recipe” on the back of the box, which didn’t seem to affect the cupcakes at all, except nutritionally. Taste-wise, the Homemade Funfetti Cupcakes were definitely better (quite yummy, actually), since the Confetti Cups had that boxed-cake-mix tang. But I needed and end product that would hold up structurally.

A couple of weeks ago I picked up some little kits from the grocery store to add to our stash assortment of cake decorations. The cupcake above was decorated mostly with the Twinkle Baker Décor Deco Bonbon Little Kittens set.

For the kids who aren’t interested in cutesy stuff, I also picked up the Twinkle Baker Decor Deco Bonbons Friends kit. Given the age of the kids at the party, I have no idea why I assumed that they would decorate their cupcakes more-or-less the same way as on the packaging. I should know better by now.

The creature above was one of my favourite of the guests’ creations. She showed it off to me, and then promptly ate its face off.

And this last one was Thing 2’s cupcake. You can usually tell which one is hers by the incorporation of Halloween-y elements. Like mother, like daughter, I guess.

So happy birthday (party) to my beloved Thing 2! I hope you take away fond memories of this day, and that the rest of your year is fabulous.

Maple Bacon Cornbread

Continuing this week’s theme of maple dishes, last night I tried out the Buttermilk Maple Cornbread with Flax recipe on page 43 of Anita Stewart’s Canada (2008). A number of the recipes I have used lately have come from this book, which I am greatly enjoying. I need to return it to the library shortly, so I have to optimize my use! Now that I’ve baked this cornbread, I have used every maple-based recipe in the book, with the sole exception of the crepe recipe on page 17. Between the buckwheat pancakes and the crepes I’ve made lately, I just didn’t feel the need to make yet another style of pancake.

The cornbread is only lightly sweetened with maple syrup, so the flavour is much more subtle than something like a pouding chômeur. Despite the syrup content, it is not a dessert quick bread; it would actually be a great accompaniment to roasted or barbecued meats, especially saucy ones. The top is sprinkled with chopped crispy bacon pieces, adding little bursts of extra flavour, although I think this bread would be great without the topping as well.

I almost burned the cornbread while baking it; I was warned by the smell, and I got it out of the oven just in time. My timer for the minimum recommended time hadn’t even gone off yet! I think that the blame for that can be placed upon my oven, which, as I’ve complained before, has been giving me issues when it comes to even, predictable heating. A new oven may be required sooner rather than later, although I shudder at the expense. I hope that I can make it last at least until the end of the summer at least, since I don’t use it much at all once the weather gets scorching.

I also cooked my corn bread in a glass dish instead of the cast-iron skillet specified by the recipe. Why? Because I’ve only got the one cast-iron pan, and it was too small. I think it turned out fine, considering. I believe that the use of cast iron is more tradition than anything else. However, using a preheated cast iron pan may create a crispy bottom crust on the cornbread that I was unable to achieve with a glass baking dish.

Whole Wheat Sesame Seed Bagels

Last night I decided to try to make bagels for the first time. I followed the “Bagels” recipe on page 26 of Baking Bread: Recipes From Around the World for the Complete Home Baker by Audrey Ellison (1995). The book itself is over twenty years old, but it is new to me — a thrift store find. I believe that this is the first recipe I’ve followed from it.


Whole wheat sesame seed bagel with herb and garlic cream cheese.

All in all, I was quite satisfied with how my bagels turned out. They are slightly chewy on the outside and soft on the inside, which is exactly how I like them. They’re also smaller than their store-bought counterparts, perfect to serve my kids, and hey, an adult can always have two. My mother and I both liked them and thought they were worth making again, but my husband is more reticent. He prefers the chewier, denser, Montreal-style bagels. Oh well, more for me!


Bagels before the last proof.

I learned a few things when making these bagels. First of all, if I’m going to shape the dough rings by hand (as opposed to extruding them or cutting them, like how they may be done in a factory), I’m going to need to do a better job of pinching together the ends. The instructions even warned that they would need to be firmly attached so that the rings would keep their shape. I thought I’d done it well enough, but apparently not. A number of my bagels were more U-shaped than O-shaped.


Bagels boiling.

Also, I found out that bagels are boiled before they’re baked. I had no idea. I quickly learned that this is the part where my rings were going to fall apart, though. I’m pretty sure they would have stayed intact if I’d just baked them on a sheet. The reason for boiling before baking is, according to TheKitchn.com:

Boiling breads like bagels and pretzels effectively sets the crust before it goes in the oven. The water doesn’t actually penetrate very far into the bread because the starch on the exterior quickly gels and forms a barrier. Bagels are typically boiled for 30-60 seconds on each side. The longer the boil, the thicker and chewier crust.

In the oven, the fact that the crust is already set means that the bagels don’t rise nearly as much. This is partly what gives bagels their signature dense, chewy interiors. (The other part is using high-protein flour.)


Bagels ready to be baked.

The last thing I learned is that there is an error in the recipe I used. In the first step of the instructions, it says “dissolve the yeast in the water…” However, the only time there’s water in the recipe is to boil the bagels in. I actually measured out the water and added the yeast before I realized that the proportions were all wrong. I checked and double-checked the recipe; nope, I hadn’t read it wrong. It should read, “dissolve the yeast in the warm milk“. I started again with this correction, and everything else went according to plan.

Would I make this recipe again? Definitely! I’d like to try different flavours; I’m partial to all-dressed bagels, and roasted garlic, and onion. It would be interesting to experiment with length of boiling time and protein level in the flour. Perhaps I could learn how to make the chewier, denser bagels that my husband likes best. I’m not too worried if I don’t accomplish that, though. There are some lovely Montreal-style delis and bakeries in this city that I’m perfectly happy to have an excuse to visit.

Gingerbread Mouse’s Cookie Recipe

My youngest daughter noticed that there was a gingerbread recipe at the back of her copy of Gingerbread Mouse by Katy Bratun (2007). This picture book would usually be stored away with the Christmas decorations, but it ended up being in regular rotation at story time, so I am loathe to put it away until she loses interest. I had a great deal of success with the chocolate cake recipe at the back of Amelia Bedelia Bakes Off when I tried it last month, so I was optimistic about trying out another recipe from a children’s book. I was not disappointed.

Gingerbread, to me, is usually a tough cookie, able to withstand the stresses of being assembled into a house shape and decorated by little hands. Gingerbread is also a dark, rich brown. Going by these qualifiers, the Gingerbread Mouse cookies weren’t very gingerbread-like at all. They were buttery and delicate, more like a shortbread in texture. They would never stand up to house construction. They were also light brown — coloured by the ginger, cinnamon, and brown sugar, but missing the traditional molasses. They were also absolutely melt-in-your-mouth delicious. I am definitely making them again, but I will use a different recipe if I need to build a gingerbread house.

To me, one of the best things you can eat with a ginger-flavoured cookie is vanilla ice cream or frozen yogurt. One of my favourite things to do after making my way through the maze of the local IKEA is to pick up a box of PEPPARKAKOR ginger thins at the Swedish Food Market and use them to scoop up some of the frozen yogurt that they sell in the bistro just past the checkouts. For dessert after the Sunday dinner that I hosted last night, I served the Gingerbread Mouse cookies alongside store-bought French vanilla ice cream. I’d love to say that I made the ice cream too, but I just don’t have the equipment. And hey, at least it was real ice cream and not a “frozen dairy dessert”.

Hasenpfeffer, Hamburger Kasserolle, and Zucherkuchen

My quest to learn how to successfully prepare at least a few German dishes continues. It has been… Interesting. Lately I’ve met with more failure than success.


Hasenpfeffer served with mashed potatoes and acorn squash with butter and brown sugar.

Over March Break I made Hasenpfeffer (rabbit in wine gravy) from the recipe on page 60 of ‘Round the World Cooking Library: German Cooking by Arne Krüger (1973). It’s a fiddly dish, made all the more so by the fact that I’d never cooked rabbit before. I had eaten rabbit, but I distinctly remember it being gamier. Perhaps the one that I had before was wild-caught, where as the one I used was farm-reared? Whatever the reason, I was expecting more flavour from the meat. However, it was fall-off-the-bone tender and the sauce was quite nice. My only complaint was the saltiness: I double- and triple-checked the recipe, and it called for two tablespoons of salt. I know that when you follow a recipe for the first time you should follow it to the letter, but I should have let my good sense prevail and halved or quartered the salt.

Would I make it again? Only if the rabbit was on sale — it’s really expensive around here, and you don’t get much meat off of one animal. I think the red wine gravy (with less salt) might be nice on chicken or beef, though. It would definitely be worth trying.


Hamburger Kasserolle

This weekend I tried Hamburger Kasserolle (‘Round the World Cooking Library: German Cooking, page 35), which did not go so well. Someone like me who doesn’t speak German may assume that this is a casserole with ground beef in it, but the “Hamburger” in this case means “from Hamburg” — so the protein is actually seafood. First of all, this is a 1970’s book, so like many from the era it calls for frozen or canned versions of at least half of the ingredients, and then adds some rice and a can of cream of mushroom soup. I chose to go with an equivalent amount of fresh ingredients (I really can’t stand canned mushrooms, for example), and I think that went well. This casserole also calls for a rather large amount of seafood, which was nice, but pretty pricey.

I think that the reason I really didn’t like the end product was the artichoke hearts. The recipe calls for them frozen, but I couldn’t find them frozen or canned at any of my local grocery stores. I opted to buy them fresh, but despite pre-cooking them in the microwave and then baking them for half an hour, the artichoke hearts were rubbery and gross. They squeaked between my teeth when I chewed. Not pleasant.

Would I make this one again, even if I got rid of the artichokes? Probably not. I can think of much better ways to prepare seafood, even frozen stuff, than by baking it in cream of mushroom soup.


Zucherkuchen

Last but not least, on Sunday I gave a shot at what I think was my first ever German sweet: Zuckerkuchen (sugar cake) from page 81 of Classic German Baking (2016). I took this book out of the library, but I’m starting to think that I may have to buy a copy of it for myself. Zucherkuchen is a yeasted cake, which is something I’ve never made before — every other cake I’ve made has been leavened with baking powder or soda. It’s a cake that is rich with butter and sugar, but not much else, so I can see how it would appeal to even the pickiest eaters, i.e. most children. It’s denser than most of the cakes I’ve had, somewhere between a cake and a square I think, and it’s cohesive enough that slices can be picked up and eaten with the hands. I was worried that I might not have got it right, but from the writeup in the book and descriptions online, I think I’m actually pretty close.

So would I make this recipe again? Most definitely. And I think my kids would want me to as well.

Saint Patrick’s Day Dinner

This past Friday was Saint Patrick’s Day, and although I baked Guinness Yeast Bread to celebrate, I also needed to plan something for dinner. I thought a hearty Irish stew might be nice. I went through my cookbooks for something appropriate, but I didn’t find anything quite right. I searched the Internet and found a great recipe: Beef and Guinness Stew by Chef John at Allrecipes.com.

It didn’t have nearly as much broth as the stews I’m used to; it was really more like meat and gravy than a stew. That being said, it was absolutely delicious, and went well served atop mashed potatoes. Everyone in my house finished theirs down to the last drop, which is quite the compliment. (Trying to find something that everyone in this house likes is quite challenging.) I mean, it starts with bacon, and the next step is to fry the beef in the bacon fat. There’s your flavour right there. I would definitely make this stew again, probably next time beef roasts go on sale.

I also figured that a special occasion dinner required dessert. I made the cinnamon roll variation of my Dad’s Biscuits recipe. They’re not really Irish, I guess (from what I’ve read, cinnamon rolls were invented in Sweden), but at least the base of the recipe is baking soda biscuits, which is kind of like soda bread… Right? Ah well, there’s no rule that says I have to stick to a theme. Because of the extra sugar in the cinnamon rolls, they brown up very quickly, so don’t expect them to be as light-coloured as the original biscuits. They’re delicious warm from the oven, spread with a dollop of butter or margarine. If you can’t get them fresh, zap them in the microwave for 15 seconds or so to warm them, then butter.

Guinness Yeast Bread Recipe

March 17th is Saint Patrick’s Day, which to be honest isn’t observed very seriously in this neck of the woods. However, since I do have some Irish blood in me, I thought it might be nice to cook up a dinner that reflects (some of) my roots. Irish stew sounded great, since it’s more or less my default stew anyway. To go along with dinner, I wanted to make some Guinness bread. I searched my recipe books and online to find a recipe, and what I found was leavened with baking soda. Although I know that this is traditional, I’m not a big fan of the flavour of baking soda, so I turned my hand to creating my own, yeast-leavened recipe.

This is a very dark bread, more akin to what Maritimers call brown bread (coloured by molasses) than what is called brown bread on the Prairies (whole wheat bread). The Guinness adds a natural yeasty flavour and a rich colour. The recipe includes oatmeal, so these loaves are very dense and filling. This bread is delicious served with cheese, sausages, sliced lunch meats, and hearty stews.

Guinness Yeast Bread
Yields 2 loaves

In a large bowl, mix together:
1 cup (125g) large-flake oatmeal
1 1/2 cups 2% milk
Cover and leave to soak for 4 hours in the fridge.
Add to the bowl:
one 500mL can of Guinness beer, warmed to between 120ºF to 130ºF (49ºC to 54ºC)
2 Tbsp cooking molasses
In a second bowl, stir together:
4.5 cups (600g) all purpose whole wheat flour
10g quick-rise instant yeast
1 tsp salt
Add dry ingredients to wet ingredients. Stir together until well combined.
Gradually incorporate:
4 1/2 cups (500g) bread flour

Turn out dough onto a lightly floured surface and knead by hand for about 8 minutes. When kneaded, the dough should be smooth and elastic, but not sticky. If dough is sticky, add bread flour 1 Tbsp at a time until stickiness abates.

Oil a large mixing bowl. Form the dough into a ball and place it in the bowl. Cover the bowl with a clean, damp tea towel. Place the bowl in a warm, dry area with no drafts. Allow the dough to rise until double, about 1 hour.

Punch down the dough. Grease two 9.5″x5.5″ loaf tins. Divide the dough into two equal-sized portions. Cover the pans with a clean, damp tea towel and allow to rise again until double, about 1 hour.

Lightly spritz the loaves with:
water
Dust the loaves with:
1 Tbsp large-flake oatmeal

Preheat oven to 450ºF (232ºC). Bake loaves for 10 minutes. Turn heat down to 350ºF (177ºC) and bake for about 30 to 40 minutes more. Check to see if the bread is done by removing a loaf from the pan and tapping it on the bottom. When cooked through, it should make a hollow sound. Remove both loaves from the pans immediately and place them on a wire cooling rack.

Guinness yeast bread can be eaten immediately, but it keeps well for up to a week if wrapped in a clean plastic bag. Make sure they are wrapped up only after totally cool, or they will go soggy.