Happy Easter!

Yesterday was Easter Sunday, which we celebrate around our house with Easter baskets for the kids from Mom and Dad and chocolate eggs hidden around the house by the Easter bunny.

Thing 1 particularly liked her Star Wars book pillow from Audin Roy Boutique.

Thing 2 really loved her Gudetama pillow, which I picked up at Ottawa Geek Market.

And the two of them spent most of the day eating chocolate eggs and making creations out of their brand new Makedo Cardboard Building System, which is so much fun that I have a set of my own.

I hope you all had a wonderful Easter weekend too!

613flea Saturday April 20th

It’s finally time for the Easter weekend edition of 613flea! I’ll be there as usual with my latest and greatest vintage housewares and kitchenware finds.

You can find me in pretty much the same spot as last month, a little bit left of the north door (the far left door on the long side of the building if you’re coming in from Bank Street).

Looking forward to seeing you there!

“New” Vintage Pyrex, Easter Edition

I’m super excited about the Easter edition of 613flea coming up this Saturday because I’ve managed to source some absolutely fabulous “new” vintage Pyrex! It’s all beautiful, and some of it has become quite rare.

1957-1966 Gooseberry Chip & Dip Cinderella Bowls

Pink Pyrex is highly prized because there weren’t all that many patterns released in this popular colour.

1957-1968 Butterprint Casseroles

Butterprint is an extremely popular design, so much so that when Pyrex released their modern “Vintage Charm” line, one of the most common is quite obviously an updated version of this pattern.

1958 Balloons Cinderella Bowl

The Balloons pattern is extremely rare; it was only released for the one year, so there weren’t many of them made. This has made it a highly sought-after collector’s item.

1960-1961 Golden Grapes Chip & Dip Cinderella Bowls

Golden Grapes is unusual because the design was printed on delphite blue rather than the more common opal ware. The gold colour actually comes from real gold, which means that these dishes, like any containing metal, are not microwave safe. (All of the other vintage Pyrex dishes without metal are microwave, oven, fridge, and freezer safe.)

1963-1967 Town and Country Casserole

The Town and Country kitchenware was available as a large mix-and-match series, which is why so many of them survive to this day. They’re not as rare as some of their older counterparts, but they remain colourful and versatile.

1972-1981 Butterfly Gold Mixing Bowls

With Butterfly Gold we start getting into colours and patterns that I remember from my childhood; many people who had children around my age would have received kitchenware in this pattern as a wedding gift.

1978-1983 Woodland Cinderella Bowl

The Woodland pattern is less common than the Butterfly Gold, although they’re from the same era.

As an aside, this was a battle I was constantly fighting while trying to get these photos: my cat really likes my light box. I’m not sure why I was surprised, as it was both warm from the lights and, well, it’s a box. I use a long exposure because the lights aren’t all that powerful, which is usually fine since the dishes don’t move, but it does mean that the cat interrupts with a blur.

1980’s Pyrex Checks & Cherries Bowls

Last but not least, I have these lovely Checks & Cherries bowls, which are probably the most recent items in my collection. I love the vibrant colours! This pattern is also very rare, although more so in the US than in Canada.

I’ve wrapped all of this Pyrex carefully and loaded it into boxes, ready to bring to the flea market on Saturday. I can’t wait! My favourite part of markets is when someone finds that one piece they’ve been looking for for what seems like forever. It’s so satisfying to see peoples’ faces light up with enthusiasm. It really makes my day!

Easter Celebrations

Our family’s Easter celebrations can happen any time over the long weekend, to coordinate with peoples’ schedules. Barring illness (we’ve had a couple of spring bugs work their way through our family over Easter, so those years nobody much cared about chocolate), though, the Easter Bunny visits after the kids go to bed on Easter Eve, so that there are gifts for the children to find first thing on Easter Sunday.

In our family, the Easter Bunny hides chocolate eggs around the main level of the house, but Easter baskets are put together by Mom and Dad. Although it may look like a lot of stuff, it’s generally dollar-store or thrift-store finds (except for the Skip-It-like toys this year). The downside is that sometimes the gifts aren’t of the highest quality, like the Crazy Eggs (Eights) deck from the dollar store that was entirely spades… Hmm, manufacturer’s flaw much? The toy I thought was the coolest was the Sew Science kits, which provided the materials and instructions for the kids to make their own sewn circuits that really light up. Super cool! I think the kids were most enthused about the K’Nex kits, though.

This year Hubby and I got little Easter baskets as well, although this isn’t always the case. Hubby’s basket was filled with his favourites: Farm Boy fresh jujubes, Twizzlers Nibs, Ferrero Rocher chocolates, and Sweet Tarts. I got a big bag of Whopper Robin Eggs, sock yarn, and a cute Peeps lunch box.

Easter afternoon is basically time for everyone to eat chocolate, the kids to play with their new toys, and the adults to prep for dinner. I baked an apple pie using the crust from page 73 of The All-New Purity Cook Book (Elizabeth Driver, 2001), as usual, and the filling from page 678 of the Joy of Cooking (Rombauer & Becker, 2006 edition).

I was actually excited to be able to use my new-to-me Tupperware 12″ Pie Taker for the first time in order to bring the pie to my parents’ place. I was so happy to find this because I usually transport my pies in Ziploc bags, but the top of the bags have a bad habit of getting stuck to the top of the pie. The Tupperware worked much better!

I made hot cross buns again this year (page 37, Baking Bread: Recipes From Around the World for the Complete Home Baker by Audrey Ellison (1995)). I think they turned out much better than last year’s, but I’d forgotten that last year I burned the first batch cooking them at the recommended temperature for the recommended time. I almost made the same mistake again! Luckily, I got them out just in time. I think they should take 12 minutes to bake, max (instead of the recommended 15 to 20 minutes in the book). This year I also used the glaze after baking, and boy was it sweet and sticky! The kids seemed to like it, though.

Mom put on her traditional turkey spread for our family of four, my parents, and their good friends Mrs. and Mr. B. (I guess the more traditional roast would be lamb, but Mom doesn’t like it and since she’s the cook, what she says goes. Mom gave us all the choice between pork and turkey, and we chose turkey.) It was delicious! It included roast turkey, stuffing, mashed potatoes, squash casserole with walnuts, Brussels sprouts, gravy, and… Oh, what am I missing?

That’s right, everybody’s favourite part: Dad’s famous Yorkshire pudding! Dad only used to make this for roast beef meals, and then he’d only make a single batch. In the last few years we’ve managed to persuade him that any roast meat with gravy needs to be paired with Yorkshire pudding, and that a double batch in the bare minimum quantity. They never, ever go to waste.

Of course, my mom set the table with seasonally-appropriate cloth napkins and adorable napkin rings.

I wanted to say thanks again to Mom and Dad for hosting such a delicious meal! And I hope that you all had a lovely Easter — or, for those who don’t celebrate the holiday, a fantastic long weekend!

Happy Easter!

I hope that everyone is having a safe and happy Easter long weekend. It hasn’t been terribly spring-like here yet, with lots of snow still on the ground, but a least we have had lots of chocolate to compensate!

(Those are Whopper Robin Eggs, by the way. The most addictive Easter chocolates known to man, in my personal opinion.)

Happy Easter!

Seasonal School Snacks

I mentioned in my last post that since it’s in season, I wanted to do more cooking with maple syrup over the next little while. Well, after reading a book about kids learning to cook, Thing 1 has been bugging me to make fruit leather with her. Since fruit leather is just pureed fruit that has been dried, I figured why not? Also, it’s a great way to use up an overabundance of fresh fruit (not really a problem here in the spring) or the fruit that you’d forgotten about in the freezer (more of an issue of mine right now).

My parents actually used to make fruit leather and dried fruit for my brother and I when we were kids. This was the era of the Fruit Roll-Up, but my brother’s sensitivity to corn (and hence corn syrup) made most versions of this store-bought snack inadvisable. Actually, the dehydrator that I’m using now is exactly the same one we used when I was a kid; my parents let me have it when they realized they hadn’t used it since my brother and I moved out.

The instructions for the dehydrator recommend that if you’re going to use a sweetener when making fruit leather, you should “use corn syrup, honey or fruit juice instead of granulated sugar which tends to crystallize”. We’ve discovered that maple syrup actually makes a great, all-natural sweetener for fruit leather that does not crystallize — and it adds a lovely flavour as well.

As an aside, if you don’t have a dehydrator, you can make fruit leather in the oven by drying it out at 200°F (93°C) for eight hours or so… But a dehydrator is a much smaller machine and uses a lot less electricity, so if you’re going to make fruit leather often, I’d recommend buying a purpose-built machine.

This is also the week leading up to Easter, which in our family means at the very minimum it’s time to dye some eggs! The kids like to take hard-boiled eggs to school in their lunches, so I made up a dozen for the week.

I used food colouring to dye the eggs vibrant, food-safe colours. There are all kinds of kits out there for dyeing and decorating Easter eggs, but a lot of them aren’t intended for consumption afterwards, so I like to stick with food colouring. The kids may decorate more eggs over the long weekend, though, and those will probably be with paint and glitter. They might be old enough to blow out the eggs to create permanent ornaments this year. Well, I know that Thing 1 is, but Thing 2 is not always as gentle as her big sister… And empty eggshells are mighty easy to smash.

The nice thing about blowing out eggs for decorating is that you can save the yolks and whites and make lovely scrambled eggs, or breakfast burritos, or tamagoyaki (either by itself or in sushi), or egg drop soup. This way, no part of the egg would be wasted. I have to admit, wasting food is a pet peeve of mine. Sometimes it can’t be avoided, but all efforts should be made not to, you know?

Hot Cross Buns

I find myself extremely happy that it’s not my responsibility to cook the formal Easter dinner this year, since my whole household, myself included, is still sick with a nasty cold. I did manage to haul my butt out of bed on to prepare hot cross buns in time for Good Friday. I think that’s the limit of my abilities at the moment.

For those not familiar with the hot cross bun, they’re basically a slightly sweet, spiced bun that studded with black currants and topped with an “X” or “+”, depending on which way you look at it. The Good Friday holiday for Christians is the commemoration of the death of Jesus upon the cross; the cross on the bun is said to represent the crucifixion, which is why hot cross buns are traditionally served on that day.

I used the “Hot Cross Buns” recipe on page 37 of Baking Bread: Recipes From Around the World for the Complete Home Baker by Audrey Ellison (1995). Unfortunately, I was not terribly impressed by the recipe. First of all, it calls for “shortcrust pastry leftovers for crosses”, without explaining the quantities or techniques necessary. Since I hadn’t made any pastry recently, I went with the second option of “a simple paste [made] from 2 tablespoonfuls each of flour and water”. That ended up being much too runny. I increased the flour to 3 Tbsp, and even then I had to pipe on the crosses because the mixture was so loose.

Additionally, either the cooking time was too long or the temperature was too high, since my first batch was burned by the time I went to check up on it by the minimum recommended time. I double-checked that the temperature on the oven was as instructed after the burned ones came out, and it was correct. So I’m not sure what went on there.

Maybe it’s because I’m sick and have no patience, but this particular recipe ended up being a huge pain in the neck. But at least I have homemade hot cross buns for breakfast, which I think makes it worth it.

Cake Pops

After the confetti cupcake disaster on Saturday night, a friend of mine suggested that I use the broken/misshapen homemade cupcakes to make cake pops. Despite my disappointment, I had saved the cupcakes — they still tasted great! So I gave it a go.

I had never made cake pops before, and honestly I had no idea how it was done. Based on the gadgets I’d seen in the stores, I thought you cooked them as little spherical cakes, kind of like a doughnut hole. After my friend’s suggestion I Googled, and what do you know? Cake pops are essentially cake meatballs.

I followed the How To Make Cake Pops Easily tutorial on Divas Can Cook, and the further into it I got, the more like meatballs they seemed. The colours of the cake I was using didn’t help; it really reminded me of ground poultry. Basically, you take a cake (your “meat” and “spices” and “filler”), crumble it (i.e. grind it up), mix it with a bit of frosting as a binding agent (the “eggs”), and shape it into balls. I’ve made enough meatballs that once I realized the similarities, muscle memory pretty much took over. Once I got to the decorating stage, though, it was new territory.

They’re definitely not perfect cake pops. They’re not spherical, the chocolate coating is sometimes lumpy, and the sprinkles aren’t artfully arranged. And forget fancy decorating; I just don’t have the skills to make them into flowers or Christmas balls or Easter eggs. But they’re a darned sight better than the cupcakes I started with. I consider this a success, especially for a first try.

To be honest, the kindergarten kids who are going to eat them are going to smear them all over their faces and clothes anyway. It doesn’t matter that the chocolate is hard, they’ll find a way.

Recycled Crayons Tutorial

Back in Girl Guides, we recycled our crayons by melting them in the microwave or in a double boiler, then pouring the different colours in layers into muffin tins (waiting for the wax to cool a bit between layers so they didn’t mix). I wanted to do something a little simpler than that with my kids yesterday — since they are younger than I was when first did this craft, I wanted a process that involved less handling of molten wax. However, this is still an activity that is done with kids, as opposed to setting them up and letting them go.

Recycled Crayons

Supplies Needed:
– old crayons
– molded cookie pans OR silicon molds rated for use in an oven OR muffin tins
– flat cookie pans
– utility knife
– large, heavy knife OR clear zipper bag and hammer
– cutting board

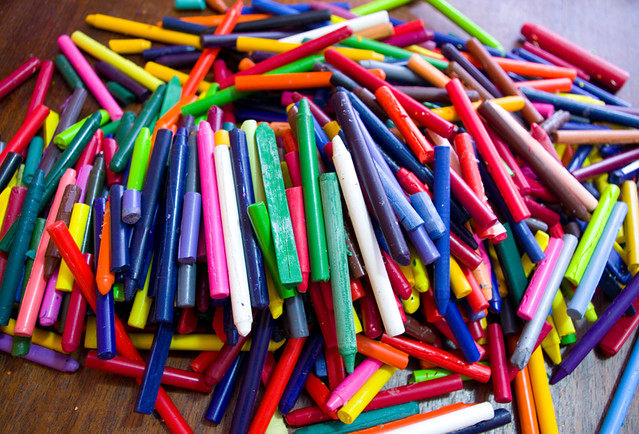
1. Sort through the kids’ crayons and separate out the old, broken ones, along with the ones that just don’t colour well.

2. Remove the paper wrappers from the crayons. The labels can be peeled off with your fingernails. However, the quickest way is to run the blade of a utility knife lightly down the paper to slit it, then peel it off. When I was doing it with my kids, I would cut the paper, and they would take it off.

3. Sort the crayons by colour.

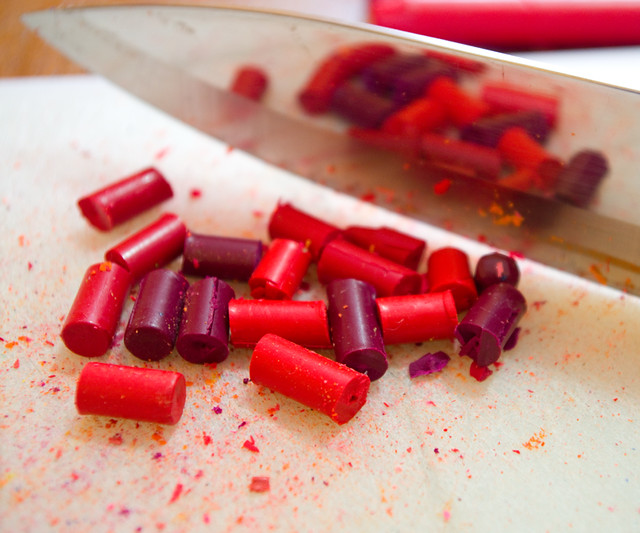
4. Protect the work surface with a cutting board, then use the large knife to chop up the crayons into chunks that are approximately 1cm (0.4″) long. Sharp knives should be handled by an adult. Alternately, put each colour of crayon into a clear zipper bag, seal the bag, and smash the crayons into large chunks with a hammer. This may damage the surface underneath and will be noisy, so I suggest working on a concrete surface with a cutting board over top, and using ear protection.

5. Fill the molded cookie pans or silicon molds or muffin tins with the chunks of crayon. The molds should be almost overflowing, as the air pockets between crayon chunks will be filled as they melt. To create colour-coordinated crayons, fill each compartment with different shades of the same colour. To create more contrast, add chunks of coordinating colours. Be careful not to mix too many colours, though, as the colours will mix and they may turn an unlovely brown.

6. Preheat the oven to 200°F (93°C) (the oven temperature needs to be low so that the wax doesn’t catch fire). Put the crayon-filled molds on top of the flat cookie pans for support; this is especially important if using silicone molds, which are flexible. Anything to do with the oven should be done by an adult.

7. Bake until crayon chunks are thoroughly melted, 15 to 30 minutes, checking every 5 minutes after first 15 minutes is up to see if there are still any lumps. Remove trays carefully from oven, being careful not to spill the wax.

8. Cool the recycled crayons thoroughly before removing them from the molds. To make removing them easier, place them in the freezer (or anywhere outside in winter in Canada, so long as it’s protected from precipitation) until thoroughly chilled. Wax shrinks when it gets cold, so it will pull away from the sides of the mold and slide out more easily.

When I made these candles, I used three different kinds of molds:

– metal, nonstick Wilton PEEPS Bunny Shaped Cookie Pans ($3.00 each at the dollar store), which released easily
– a silicone Wilton PEEPS Chicks and Bunnies Treat Mold ($4.00 each at the dollar store), which released with a little more difficulty, but cleanly
– a silicone flower-shaped IKEA PLASTIS Ice Cube Tray ($1.99 at IKEA), which stuck to the wax, obscured detail, and were very difficult to remove

All in all, I much preferred the metal pans to the silicone versions.

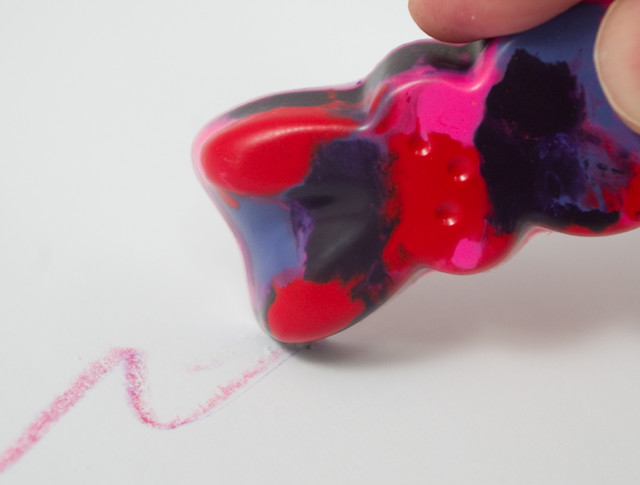
We packaged these crayons up into little spring-themed bags and put them aside until the week before Easter to give out at school. Of course, we had to leave a few out for the kids to colour with right away, too.

Booboo Bunnies and Chicks Tutorial

It’s day two of March Break, and it’s still much too cold for this time of year. That means more crafts with the kiddos! Today’s craft was booboo bunnies and chicks, for which I have created a brief tutorial. They’re really very simple.

You may be wondering why are they called “booboo” animals. Well, it’s because the hole in the back of the animals caused by a loop in the fabric makes a great place to tuck an ice cube. The ice cube can then be applied to a child’s booboo without it getting their hands cold, and without it dripping all over the place. As an added bonus, the cuteness of the animal distracts the child from their injury. But don’t think that this is their only use! The hole in the back makes for a great place to stash an Easter candy; I’ve seen them made with beach towels so that one of those jumbo Kinder Eggs can fit inside. I’ve also seen them used as a creative way to present washcloths at a baby shower.

Booboo Bunny

Supplies Needed:
– one facecloth or dish cloth (without a pattern is best)
– 12″ of thin ribbon
– one pink pompom
– one white pompom
– two small googly eyes (with button shanks if you plan to sew them on)
– glue gun and glue OR needle and coordinating thread
– sharp scissors

1. Trim tags off of the cloth, if there are any.

2. Starting at one corner, roll the cloth diagonally until you have a tube.

3. Keeping the tube rolled tightly, fold it in half.


Top view.


Side view.

4. Keeping the tube rolled tightly, fold the open ends of the tube backwards. Secure by tying the ribbon tightly around the cloth, about 2/3 of the way along.

5. Tie the ribbon into a bow. Trim the ends with the scissors.

6. Using the hot glue gun, stick the two halves of the face securely together (otherwise it will look like a bum). Glue the eyes, nose, and tail to the bunny. Alternatively, sew the face together, and sew on the eyes, nose and tail. Sewing is the preferred method if you plan on using the cloth for other purposes at a later date.


Bunnicula Booboo Bunny

Don’t forget, booboo bunnies can be any colour of the rainbow! I just made white ones because that is the easiest colour of face cloth to find (and the cheapest). Don’t be afraid to experiment with decorating the bunnies, either. Above I added some glued-on felt “fangs” and used red googly eyes to create a “Bunnicula”, after a creature from a favourite childhood book. Be creative!

Booboo Chick

Supplies Needed:
– one facecloth or dish cloth (without a pattern is best)
– 12″ of thin ribbon
– scraps of yellow felt
– two small googly eyes (with button shanks if you plan to sew them on)
– glue gun and glue OR needle and coordinating thread
– sharp scissors

1. to 3. Follow steps 1-3 of the Booboo Bunny tutorial.

4. Instead of folding the cloth roll back on itself, fold it to either side, creating an “M” shape. Secure by tying the ribbon tightly around the cloth, about 2/3 of the way up.

5. Cut out scraps of felt for the beak and feet, proportionate to the size of the cloth that you are using.

6. Glue both sides of the head together, then glue on the felt pieces and googly eyes. Alternatively, sew the face together, and sew on the eyes, beak, and feet.

Once again, be creative! A chick easily turns into a penguin if you use a black cloth.

Bunnies and chicks! Now you’re all set for spring.