Hot Cross Buns

I find myself extremely happy that it’s not my responsibility to cook the formal Easter dinner this year, since my whole household, myself included, is still sick with a nasty cold. I did manage to haul my butt out of bed on to prepare hot cross buns in time for Good Friday. I think that’s the limit of my abilities at the moment.

For those not familiar with the hot cross bun, they’re basically a slightly sweet, spiced bun that studded with black currants and topped with an “X” or “+”, depending on which way you look at it. The Good Friday holiday for Christians is the commemoration of the death of Jesus upon the cross; the cross on the bun is said to represent the crucifixion, which is why hot cross buns are traditionally served on that day.

I used the “Hot Cross Buns” recipe on page 37 of Baking Bread: Recipes From Around the World for the Complete Home Baker by Audrey Ellison (1995). Unfortunately, I was not terribly impressed by the recipe. First of all, it calls for “shortcrust pastry leftovers for crosses”, without explaining the quantities or techniques necessary. Since I hadn’t made any pastry recently, I went with the second option of “a simple paste [made] from 2 tablespoonfuls each of flour and water”. That ended up being much too runny. I increased the flour to 3 Tbsp, and even then I had to pipe on the crosses because the mixture was so loose.

Additionally, either the cooking time was too long or the temperature was too high, since my first batch was burned by the time I went to check up on it by the minimum recommended time. I double-checked that the temperature on the oven was as instructed after the burned ones came out, and it was correct. So I’m not sure what went on there.

Maybe it’s because I’m sick and have no patience, but this particular recipe ended up being a huge pain in the neck. But at least I have homemade hot cross buns for breakfast, which I think makes it worth it.

Maple Bacon Cornbread

Continuing this week’s theme of maple dishes, last night I tried out the Buttermilk Maple Cornbread with Flax recipe on page 43 of Anita Stewart’s Canada (2008). A number of the recipes I have used lately have come from this book, which I am greatly enjoying. I need to return it to the library shortly, so I have to optimize my use! Now that I’ve baked this cornbread, I have used every maple-based recipe in the book, with the sole exception of the crepe recipe on page 17. Between the buckwheat pancakes and the crepes I’ve made lately, I just didn’t feel the need to make yet another style of pancake.

The cornbread is only lightly sweetened with maple syrup, so the flavour is much more subtle than something like a pouding chômeur. Despite the syrup content, it is not a dessert quick bread; it would actually be a great accompaniment to roasted or barbecued meats, especially saucy ones. The top is sprinkled with chopped crispy bacon pieces, adding little bursts of extra flavour, although I think this bread would be great without the topping as well.

I almost burned the cornbread while baking it; I was warned by the smell, and I got it out of the oven just in time. My timer for the minimum recommended time hadn’t even gone off yet! I think that the blame for that can be placed upon my oven, which, as I’ve complained before, has been giving me issues when it comes to even, predictable heating. A new oven may be required sooner rather than later, although I shudder at the expense. I hope that I can make it last at least until the end of the summer at least, since I don’t use it much at all once the weather gets scorching.

I also cooked my corn bread in a glass dish instead of the cast-iron skillet specified by the recipe. Why? Because I’ve only got the one cast-iron pan, and it was too small. I think it turned out fine, considering. I believe that the use of cast iron is more tradition than anything else. However, using a preheated cast iron pan may create a crispy bottom crust on the cornbread that I was unable to achieve with a glass baking dish.

Whole Wheat Sesame Seed Bagels

Last night I decided to try to make bagels for the first time. I followed the “Bagels” recipe on page 26 of Baking Bread: Recipes From Around the World for the Complete Home Baker by Audrey Ellison (1995). The book itself is over twenty years old, but it is new to me — a thrift store find. I believe that this is the first recipe I’ve followed from it.


Whole wheat sesame seed bagel with herb and garlic cream cheese.

All in all, I was quite satisfied with how my bagels turned out. They are slightly chewy on the outside and soft on the inside, which is exactly how I like them. They’re also smaller than their store-bought counterparts, perfect to serve my kids, and hey, an adult can always have two. My mother and I both liked them and thought they were worth making again, but my husband is more reticent. He prefers the chewier, denser, Montreal-style bagels. Oh well, more for me!


Bagels before the last proof.

I learned a few things when making these bagels. First of all, if I’m going to shape the dough rings by hand (as opposed to extruding them or cutting them, like how they may be done in a factory), I’m going to need to do a better job of pinching together the ends. The instructions even warned that they would need to be firmly attached so that the rings would keep their shape. I thought I’d done it well enough, but apparently not. A number of my bagels were more U-shaped than O-shaped.


Bagels boiling.

Also, I found out that bagels are boiled before they’re baked. I had no idea. I quickly learned that this is the part where my rings were going to fall apart, though. I’m pretty sure they would have stayed intact if I’d just baked them on a sheet. The reason for boiling before baking is, according to TheKitchn.com:

Boiling breads like bagels and pretzels effectively sets the crust before it goes in the oven. The water doesn’t actually penetrate very far into the bread because the starch on the exterior quickly gels and forms a barrier. Bagels are typically boiled for 30-60 seconds on each side. The longer the boil, the thicker and chewier crust.

In the oven, the fact that the crust is already set means that the bagels don’t rise nearly as much. This is partly what gives bagels their signature dense, chewy interiors. (The other part is using high-protein flour.)


Bagels ready to be baked.

The last thing I learned is that there is an error in the recipe I used. In the first step of the instructions, it says “dissolve the yeast in the water…” However, the only time there’s water in the recipe is to boil the bagels in. I actually measured out the water and added the yeast before I realized that the proportions were all wrong. I checked and double-checked the recipe; nope, I hadn’t read it wrong. It should read, “dissolve the yeast in the warm milk“. I started again with this correction, and everything else went according to plan.

Would I make this recipe again? Definitely! I’d like to try different flavours; I’m partial to all-dressed bagels, and roasted garlic, and onion. It would be interesting to experiment with length of boiling time and protein level in the flour. Perhaps I could learn how to make the chewier, denser bagels that my husband likes best. I’m not too worried if I don’t accomplish that, though. There are some lovely Montreal-style delis and bakeries in this city that I’m perfectly happy to have an excuse to visit.

Guinness Yeast Bread Recipe

March 17th is Saint Patrick’s Day, which to be honest isn’t observed very seriously in this neck of the woods. However, since I do have some Irish blood in me, I thought it might be nice to cook up a dinner that reflects (some of) my roots. Irish stew sounded great, since it’s more or less my default stew anyway. To go along with dinner, I wanted to make some Guinness bread. I searched my recipe books and online to find a recipe, and what I found was leavened with baking soda. Although I know that this is traditional, I’m not a big fan of the flavour of baking soda, so I turned my hand to creating my own, yeast-leavened recipe.

This is a very dark bread, more akin to what Maritimers call brown bread (coloured by molasses) than what is called brown bread on the Prairies (whole wheat bread). The Guinness adds a natural yeasty flavour and a rich colour. The recipe includes oatmeal, so these loaves are very dense and filling. This bread is delicious served with cheese, sausages, sliced lunch meats, and hearty stews.

Guinness Yeast Bread
Yields 2 loaves

In a large bowl, mix together:
1 cup (125g) large-flake oatmeal
1 1/2 cups 2% milk
Cover and leave to soak for 4 hours in the fridge.
Add to the bowl:
one 500mL can of Guinness beer, warmed to between 120ºF to 130ºF (49ºC to 54ºC)
2 Tbsp cooking molasses
In a second bowl, stir together:
4.5 cups (600g) all purpose whole wheat flour
10g quick-rise instant yeast
1 tsp salt
Add dry ingredients to wet ingredients. Stir together until well combined.
Gradually incorporate:
4 1/2 cups (500g) bread flour

Turn out dough onto a lightly floured surface and knead by hand for about 8 minutes. When kneaded, the dough should be smooth and elastic, but not sticky. If dough is sticky, add bread flour 1 Tbsp at a time until stickiness abates.

Oil a large mixing bowl. Form the dough into a ball and place it in the bowl. Cover the bowl with a clean, damp tea towel. Place the bowl in a warm, dry area with no drafts. Allow the dough to rise until double, about 1 hour.

Punch down the dough. Grease two 9.5″x5.5″ loaf tins. Divide the dough into two equal-sized portions. Cover the pans with a clean, damp tea towel and allow to rise again until double, about 1 hour.

Lightly spritz the loaves with:
water
Dust the loaves with:
1 Tbsp large-flake oatmeal

Preheat oven to 450ºF (232ºC). Bake loaves for 10 minutes. Turn heat down to 350ºF (177ºC) and bake for about 30 to 40 minutes more. Check to see if the bread is done by removing a loaf from the pan and tapping it on the bottom. When cooked through, it should make a hollow sound. Remove both loaves from the pans immediately and place them on a wire cooling rack.

Guinness yeast bread can be eaten immediately, but it keeps well for up to a week if wrapped in a clean plastic bag. Make sure they are wrapped up only after totally cool, or they will go soggy.

Nan’s Pan Rolls Recipe

I’ve mentioned before that I regret not asking my grandmother for copies of her recipes; honestly, I felt like that indomitable old lady was too tough to die, until the very day that she passed away. As I grew up, I did less and less cooking with her — she would cook for me or I for her, but rarely did we cook together anymore. It became all that much more difficult once my attention (and hers as well) was focused on my children. I didn’t realize that it would be something I missed so much.


White pan rolls straight out of the oven.

In Nan’s memory, I’ve been trying to recreate her famous pan roll recipe. Whenever we were in town, or she was visiting us, Nan was always the one to cook Sunday dinner (which was always understood to mean “roast beef dinner”). Her fresh rolls were an integral part of that meal, and came to be considered by all the family as the proper accompaniment. She would start the dough and leave it to rise before she left for church in the morning, then punch it down and form the rolls immediately upon returning home. It was a Sunday ritual.


White flour pan rolls after the second rise.

To me, pan rolls should be squished as tightly as possible into their pan so that, when they rise, they rise upward and become tall and skinny once they are pulled away from their fellows. They should be yeasty, but not too fluffy, and fairly filling. They should be golden on top, crispy around the edges, and soft (but not raw) in the middle. With this recipe, I think I’ve made them as close to what Nan made as I possibly can.


White pan rolls after the second rise.

Nan’s Pan Rolls
Yields 35 rolls

In a large bowl, mix together:
4 1/2 cups (500g) all-purpose flour*
2 packages (14g) quick-rise instant yeast
2 1/2 tsp salt
Add to the dry ingredients:
3 cups very warm water (120ºF to 130ºF)
2 large eggs
1/4 cup (4 Tbsp) lard, melted
Stir by hand until mixture is more-or-less smooth.
Gradually mix in:
4 1/2 cups (500g) all-purpose flour
If the dough starts to become tough to knead, do not add any more flour. When flour is fully incorporated, dough should be smooth and elastic, but not sticky. If dough is sticky, add all-purpose flour 1 Tbsp at a time until stickiness abates.


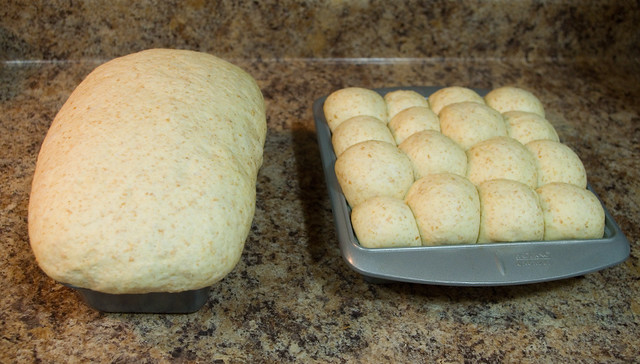
Whole wheat dough divided in half and made half into pan rolls, half into a loaf of bread, after the second rise.

Turn out dough onto a lightly floured surface and knead by hand for about 8 minutes. Oil a large mixing bowl. Form the dough into a ball and place it in the bowl. Cover the bowl with a clean, damp tea towel. Place the bowl in a warm, dry area with no drafts. Allow the dough to rise until double, about 1 hour.

Punch down the dough. Grease a 9″x13″ cake pan. Divide the dough into 35 approximately equal-sized portions. Form the portions into balls and place them in lines closely together to fill up the cake pan.** Cover the pan with a clean, damp tea towel and allow to rise again until double, about 1 hour.


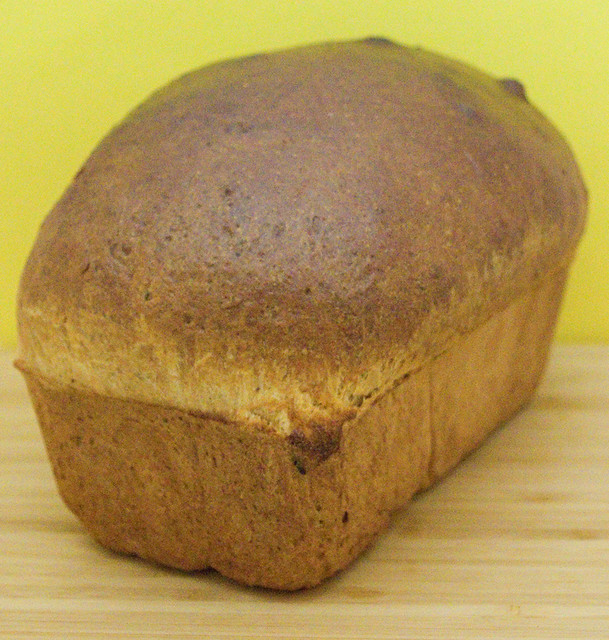
Whole wheat loaf after baking.

Preheat your oven to 450ºF (232ºC). Bake rolls for 10 minutes. Turn heat down to 350ºF (177ºC) and bake for about 20 minutes more. Check to see if they are done by removing the rolls all in one piece from the pan and tapping them on the bottom. When cooked through, they should make a hollow sound. Remove the rolls from the pan immediately and place them on a wire cooling rack.

To create the glossy shine on top of the rolls, use waxed paper to pick up:
1/2 to 1 Tbsp cold butter
Rub the tops of the rolls with the butter, keeping the waxed paper between the butter and your hand.

Nan’s pan rolls taste best when served immediately; to keep them at their freshest, pull them apart only when they are about to be eaten. These rolls will keep for three or four days if wrapped in a clean plastic bag. Make sure they are wrapped up only after totally cool, or they will go soggy.


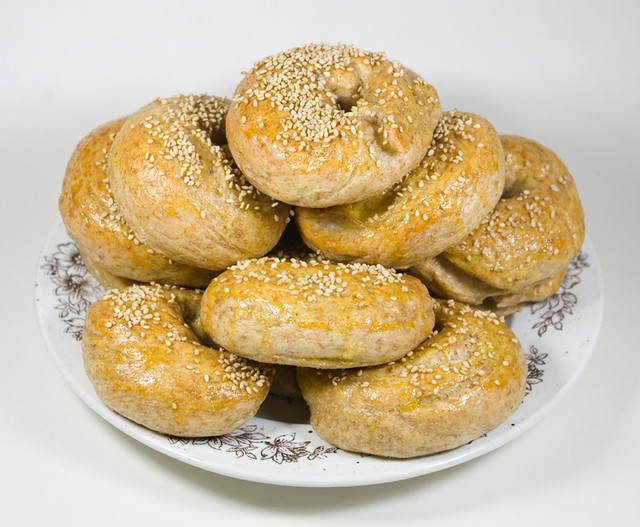
Whole wheat pan rolls being pulled apart by my temporarily-tattooed Thing 1.

*For whole wheat bread, replace the first 4 1/2 cups of all-purpose flour with all-purpose whole wheat flour.

**Alternately, this recipe makes two good-sized loaves of bread. I used a slightly too-small loaf pan to create a “mushroom-top” loaf; if you want your loaf to have smoother sides, use a pan that is at least 9.5″x5.5″. You could also make three smaller loaves in smaller loaf pans instead of two big ones. Allow the loaves to have a second rise as per pan roll instructions. Be careful of cooking times if you change the shape of the end product. Bread loaves will take 10min at 450ºF (232ºC), and then they must be turned down to 350ºF (177ºC). However, how long they stay in at 350ºF depends on the size of loaves you make. When in doubt, bake for less time and check often to see if they’re done.

English Muffins

I love English muffins, and not because I am of British ancestry. English muffins aren’t English at all, really; the dish as we know it today was developed by Samuel Bath Thomas in New York City in the late 1800’s. However Thomas, who came from England, did base his recipe on the yeast-leavened muffins sold door-to-door in his home country, back before most people had ovens in their homes. Those were the kind of muffins that they were talking about in the song “Do You Know the Muffin Man”. In England they are just called “muffins”, and are differentiated from quick bread muffins by context.

Thomas English muffins are still sold in the United States today, but so far as I can tell aren’t distributed in Canada. So the English muffins we have here are imitations of an American product, which is in itself an imitation of a British product. I’m sure we’re not getting the most authentic muffin experience here.

So a couple of weekends ago I decided to take a stab at making my own English muffins. The first thing I had to do was make sure I had the correct equipment. Until I tried to make them, I didn’t know that English muffins weren’t baked; I discovered that I would needed a griddle (which is why they’re sometimes called “griddle muffins”).

My stove is a bit atypical. It it a hand-me-down from family who were upgrading, but it was a very fancy model (Jenn-Air F121-C) thirty years ago when it was new. Each side of the stove-top can be removed and switched out; there are simple electric burner panels, a ceramic cook-top panel, a grill panel, and a griddle panel. Although all of these extras came with the stove, I had only ever used the electric burners, so switching for the griddle was an interesting experience, seeing as the stove’s user manual disappeared ages ago.

Another piece of equipment I needed was English muffin rings… Which I didn’t have, and would have been hard to find on a Sunday morning when most stores were closed. So I chose a recipe that made a more cohesive muffin and didn’t need the rings: How To Make English Muffins from TheKitchn.com

The muffins were tasty, but I wasn’t a hundred percent satisfied with the internal texture. My muffins rose nicely, but solidly, and as such were missing the large nooks and crannies that are, to me, the signature characteristic of a proper English muffin. I’m not sure if that was a problem with the recipe or with my technique. I did the quick version of the recipe and started it that morning. TheKitchen.com says that the starter can ferment overnight and the dough can be left to rise for up to three days in the fridge, so perhaps I will try it that way next time. If I still don’t get the texture I’m looking for, I’ll invest in the English muffin rings and try a different recipe.

That being said, the muffins that I made were definitely edible, and I don’t think the batch even lasted the day. I served them with bacon, cheese, and a fried egg for lunch, and they were eaten spread with elderberry jam as snacks in the evening. My family obviously isn’t nearly as critical of my end results as I am, since they have asked me to make them again soon.

Purple Sweet Potato Bread

A few weeks ago I made one of my semi-regular trips to the Asian supermarket. I greatly enjoy shopping there; so much new stuff to try! I find the fresh fruit and vegetable section particularly appealing, as this is one of the few places in town where some of these foods can be found. On this particular trip, I found purple sweet potatoes — ones that were not just purple-skinned, but also purple-fleshed (I learned my lesson about checking the colour of the flesh before I bought them).

After peeling and boiling, this variety of sweet potato remained a vibrant deep purple. I served it a few times as a side-dish with dinner; it’s definitely not as sweet as the orange version I am most familiar with. I still had a few roots left over, so I decided to bake with them. I chose to use the Pumpkin Bread recipe from the Joy of Cooking (2006 edition, page 628). As per the book, “this loaf can be made with any cooked mashed squash, yams, or sweet potatoes”.

I was really hoping that the fantastic purple would come through, and I was happy to observe it in the batter, although it is diluted somewhat by the other ingredients.

Upon baking, though, I was highly disappointed by the colour. As it cooked, the loaf just turned brown, so much so that it is visually more-or-less indistinguishable from a pumpkin or orange sweet potato loaf. Obviously, some kind of chemical reaction had occurred.

Cracks on the surface of the loaf did reveal an odd green, so I decided to investigate. (I like “investigating” food, since this usually means I get to eat it.)

When sliced, it’s interesting how the outside turned brown, but the inside turned a dark, rotten turquoise. Even though the bread is only an hour or two old, it looked like it had been moldering in a damp cellar for years. Sadly, when I ate this bread, my taste buds and nose warred with my eyes; each slice was delicious and moist, and smelled delicous, but my eyes kept warning me that it was rotten, so I couldn’t enjoy it very much. (I had a similar experience with scrambled eggs turned green with food colouring for a meal of Green Eggs and Ham for a celebration of Dr. Seuss’ birthday on March 2nd a few years ago.)

I found it interesting how each slice different in its green shade, with the ones closest to the heel of the loaf being mostly brown, and the ones closer to the center of the loaf being mostly green, except for the edges.

All in all, this didn’t turn into the purple bread that I was hoping for, but as it stands, sweet potato bread made with purple sweet potatoes does have possibilities as Hallowe’en party food. That’s the one time of year that food that appears rotten while remaining safe and tasty is actually a triumph.

Bread Basket

I’ve been working on my bread-making skills over the last few weeks, much to the happiness of my family; it generally makes the house smell great even when I fail. For these experiments I have been relying predominantly on World Breads: From Pain de Campagne to Paratha by Paul Gayler (2006). It’s not a very long book (it’s subtitled “a small book of good taste”), and I’m determined to make my way through it recipe by recipe.

Broa (Portuguese Country Bread)
World Breads, page 16

This isn’t a kind of yeast bread I’d ever had before, although in texture and flavour it greatly resembled the cornmeal muffins that we eat here around Christmas. To my taste, this recipe needed either a little more sugar or a little more salt… I need more experience to figure out which, but I’m leaning more toward salt, since the recipe (and many other perfectly good ones) don’t call for sugar at all.

Dill and Curd Cheese Bread
World Breads, page 41

This bread was absolutely delicious, needing no tweaking, and I would make it again in a heartbeat. There’s not enough curd cheese (I used ricotta) to make it greasy; rather, it adds a touch of moisture and helps the bread be light and fluffy.

The dill bread recipe makes two loaves, and my family didn’t have a chance to finish it all before it started to go stale. I suppose we could have just toasted the last few slices, but instead I decided to leave them out overnight so they’d become properly hard. Then I put the slices into a plastic zipper bag and crushed the bread in the bag with a rolling pin to make fine bread crumbs. I had a bit of fresh dill left over that needed to be used, so I chopped that and added it to the bread crumbs. I then beat a couple of eggs, dipped the tilapia fillets in the egg, then dipped them into the bread crumb mixture, and fried it all lightly in a drizzle of olive oil in a nonstick pan. I served it with steamed bok choy and penne with pesto, and it was delicious.

Oatmeal Bread
World Breads, page 25

I liked the texture and heft of this bread; it was particularly good for sandwiches. However, this one too was lacking either salt or sugar to my taste, so I will have to adjust the recipe next time to see if that helps.

Seeded Granary Baton
World Breads, page 16

This loaf was full of all the seeds and heavier flour that I love in a breakfast bread, but I planned this bake very badly, as I couldn’t properly enjoy it after having just had dental work done that day. Even so, it was very tasty — I just had to be very careful how I chewed. I like that the grains/seeds can be varied to change the texture and flavour; the original recipe calls for sunflower, pumpkin, and sesame seeds (pepitas), but I would enjoy trying it with all of the interesting seeds that are available at the local bulk store.

White Soda Bread
World Breads, page 12

Wow, did I ever mess up this bread. I didn’t flatten it enough, so the center wasn’t cooked through. I cut the slashes too deep, so the bread opened up like a facehugger egg from Alien. And somehow I made a mistake with the mixing, so that instead of a nice, smooth crust, I ended up with something that strongly resembled cellulite. The flavour, for those parts that were cooked through, was quite nice, so I think I shall try it again with my newly-acquired knowledge of what not to do.

Whole Wheat Bread
Joy of Cooking, 2006 edition, page 599

I was craving a simple whole wheat loaf, so I veered away from my quest to finish all the World Breads recipes. This recipe is from my trusty standby, the Joy of Cooking. The texture and flavour of the loaves was quite nice. However, I discovered that there is a typo in my copy, one that was corrected in the more recent digital edition (which I did finally break down and buy). At the start of the recipe, it says that it should yield three 9″x5″ loaves. Yet at the end of the recipe, it instructs the cook to “allow the dough to rise in a large oiled bowl until doubled, about 1 hour, and once in 2 greased 9 x 5-inch loaf pans until doubled, about 45 minutes”. Basically, it says that the recipe yields both two or three loaves, which is definitely an error. I flipped a coin and went with two loaves, and the end result was that the loaves were huge. I had to cook them for about 15 minutes longer than indicated so that they sounded hollow when I tapped the bottoms. Next time I’ll split it into three loaves — even though the digital version says to make two loaves as well.

Joy of Cooking

If I had to recommend only one cookbook, it would be the Joy of Cooking (available via Chapters.ca, Amazon.ca, and Amazon.com, and now there’s even an an app for that). This cookbook has been around since 1931 and it remains an indespensable resource. I like to give it as a sending-off or housewarming gift for young adults setting up their first place. I always keep an eye out for extra copies at thrift stores and garage sales — and although it’s not a common find (most people keep theirs even if they’re decluttering), it has been in print for eigty-six years now so there are many copies out there. My mother has the 1981 edition, which is the copy I grew up with, and after I moved out on my own I bought a 75th anniversary edition (2006).


Fast Whole Wheat Bread.

Over the last decade or so, secure in what I thought was a decent grasp of the basics, I was often tempted away from my Joy of Cooking by the Internet, library books, and my own fairly substantial collection of cookbooks. It’s just been in this last year or so that I’ve gone back to using it on a regular basis, mostly because I am determined to learn new techniques and recipes in order to break free from the slog of same-old, same-old. What I know off by heart about cooking is only a small fraction of this book. When I decided to learn how to bake my own bread (which, quite frankly, I found intimidating), I went back to my trusty standbyes.


Fast Whole Wheat Bread with homemade apple butter.

The first bread I tried from the Joy of Cooking was Fast Whole Wheat Bread (page 599, 2006 edition). It wasn’t nearly as intimidating as I’d feared. I think for health’s sake I’d like something with a higher ratio of whole wheat flour to white flour, but I have no complaints about the taste or the texture of the bread. It was quickly devoured with homemade apple and pumpkin butters, mostly by my children. (Although, let’s be honest, my parents love it when I try out new recipes, because they generally get to try some as well.)

My mother had also mentioned that she’d been craving lemon poppyseed bread, and so, emboldened by my success with the bread, I whipped up the Lemon Poppy Seed Muffins (page 635, 2006 edition). I didn’t have any fresh lemons, so I substituted lemon juice, and they turned out delicious anyway.

Now that I’ve been using the Joy of Cooking more often again, I think I may invest in a digital copy (which contains the entire 2006 edition and then some). I love my hard copy, but I think being able to refer to it quickly while grocery shopping would be extremely useful. Just last week I found ostrich and boar on sale at the grocery store, and I had to Google how to cook them. Ostrich is on page 453 and boar is on page 530 in the edition I own, as it turns out.

World Breads: German Beer Bread

Last winter I had the chance to visit Hamburg, Germany for a week while my husband was there on business. My husband’s mother’s side of the family is German (although not from the Hamburg area), and I thought it would be a great chance to experience first-hand the culture in which she was raised. After all, my children share that side of the family’s German heritage. One day they will want to know more about where they come from, and I think it’ll be better if I know a bit more about it myself.


Cream of mushroom soup in a bread bowl.

One of the things I loved about Germany was the food. German food has a really bad reputation, if you ask me. Yes, it was hearty fare, but I was there in the winter and I found it hit the spot after wandering around in the cold. I especially liked the proliferation of bakeries. They seem to be on every corner, and they all serve delicious food. I especially liked Nur Hier (which translates to “only here” according to Google). There was a Schanzenbäckerei (“bows bakery”?) across the street from my hotel, which was great convenience-wise, but I made a point of walking further to Nur Hier because their food was that much tastier.


Nur Hier at Lange Reihe 48, 20099 Hamburg, Germany

Of course, when I got back home to Canada, there weren’t any good German bakeries to be had. No German bakeries in Ottawa at all, so far as I can tell. Although the local grocery store has a few varieties of German bread, it’s nothing compared to the fresh café fare that I enjoyed overseas. So I decided to try my hand at making my own bread. I picked up World Breads: From Pain de Campagne to Paratha by Paul Gayler (2006) at a thrift shop on a whim a while back, and inside (page 19) there’s a recipe for German Beer Bread.


German Beer Bread (Beer Brot)

It turned out pretty well considering it was the first proper loaf of bread I’d ever made on my own. Sure, it wasn’t symmetrical, but it was tasty and paired well with lunch meats and cheese. It’s a light rye with caraway seeds, which is more or less what I’d buy at the grocery store, but so much fresher because it’s homemade. Baking it also made my house smell absolutely wonderful. This is one recipe that I know I’ll be making again.