Reader Submission: Beer Bread

Sometimes when I write this blog, I get the impression that I’m the only one who ever reads it. I started writing in order to record recipes and record our family’s traditions of food, and later branched out a bit more into some of my other interests, so I honestly didn’t expect too many people to read. At the very least, my kids can look up how to cook their favourite childhood dishes when they’re grown. But still, somtimes it feels a bit like shouting into the void — until I get a bit of positive reinforcement.

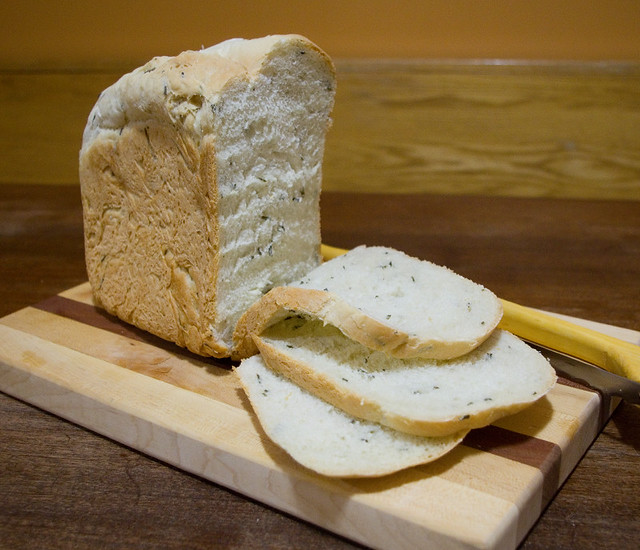
So I have a regular reader, although it’d be too much of a stretch to call her “a fan”, since I’ve literally known her my entire life. I mean, my parents named my middle name after her. She is my brother’s godmother. Even so, I’m thrilled that she’s actually reading my blog — and not only that, she’s trying my recipes! She sent me this picture the other day with a note, “I love your beer bread recipe…” (That’s my Bread Machine Beer Bread Recipe, by the way.) As you can see, her machine makes different-shaped loaves than mine — her pan is kind of tall and skinny — but it turned out great! I couldn’t be more pleased.

So if anyone else cooks a recipe that I’ve shared, please feel free to send me pictures of the end results, ask questions, leave comments, what have you. Let me know what you liked or what you’d change. The more feedback I get, the better I can customize my content, and that helps everyone in the long run.

Happy cooking!

Steak and Bannock

We’ve been having some real problems with power outages in our area lately. It seems like whenever we have a storm or a particularly hot day, the part of the grid that I live in goes down, often for hours. It’s particularly frustrating because a few streets over, who have infrastructure that was put in at the same time as where I live, there won’t even be a glitch.

Such was the case last night when I came home from a grocery run with the kiddos after school. There was a thunder and lightning storm, but there were no issues at the store, so I didn’t think anything of it. Lo and behold, when I returned home we had no power, and apparently we hadn’t for at least an hour. Well, that changed my dinner plans drastically! I’d been planning on making pasta with homemade pesto, but without a burner upon which to boil the water, that was out. (Honestly, I’m starting to think that our next barbecue should be the kind with a burner on the side, since this happens so often.) So I rummaged through the day’s purchases and found something that could easily be cooked on the gas barbecue (I couldn’t use the wood pellet one since the auger is electrically driven).

Luckily I’d picked up a pack of steaks that I’d planned to marinade for the next day’s meal. There was a really good special, and the inch-thick steaks were cheaper by the pound than medium ground beef. So I threw them on the grill with a dusting of Montreal steak spice, and cooked them low and slow (about 300 to 320F) for about an hour, so they’d be done all the way through without burning.

But what to do for a side dish? I had no bread made; I was out of potatoes and corn; rice and pasta were right out because I couldn’t use the stove. But suddenly my Girl Guide training popped into my head: what about bannock? Granted, we’d always made bannock by twisting the dough around a stick and cooking it over the campfire, but traditionally it was made on a griddle or a flat stone. A cast iron pan on a gas barbecue isn’t that much different, right?

It turns out that I was absolutely correct! A perfectly decent bannock can be made this way, and honestly it’s not very difficult. I used the recipe I’d learned years ago from The Golden Book of Camping and Camp Crafts (1959), which was my father’s book before me and was one of my favourite resources for techniques as a Girl Guide. (This recipe just so happens to be vegan/vegetarian so long as you use a vegetable oil such as canola oil as your fat, which I admit wasn’t a huge factor when pairing with steak, but it would have been useful if I’d had a vegan guest.) I preheated my grill to 325F, since I was cooking the steak in there anyway. I basically treated the bannock like a big, slow pancake: cook for 10min or so with the lid closed, open the lid and flip the dough, and then close the lid to cook for another 10min or so. I stayed outside with the bannock and checked on it often because I really wasn’t sure how long it would take — except when it started to rain again. The heat wasn’t terribly consistent, especially with the rain cooling the whole thing down at one point, but it still turned out quite well. Basically, it was just a giant biscuit that I didn’t have to run the oven to make — which makes me think I’ll be making it on future hot days where I don’t want to have to cook indoors.

The steak was done to perfection, by the way. It was melt-in-your mouth. Not too shabby for an improvised meal cooked without electricity!

Slow Cooker Caribbean Lobster Bisque Recipe

About four years ago I had the opportunity to try PC Jammin’ Jamaican Lobster Bisque, which is a frozen entree that was created by Winslow Taylor of Mississauga, Ontario for the PC Recipe to Riches contest. I loved it! It was creamy and filling with just the right amount of bite. Sadly, this frozen dinner didn’t stay on the shelves long, and it has been years since it’s been in production, I think. So a I did some research and some testing, and I came up with what I consider to be a really nice non-dairy Caribbean-style lobster bisque that you can make in a slow cooker. I originally posted this recipe in my old blog a few years back, but I’ve had the chance to refine it somewhat since then. Enjoy!

Slow Cooker Caribbean Lobster Bisque

In a frying pan, gently heat:
1 Tbsp olive oil
To the oil, add:
1 white onion, chopped
2 cloves of garlic, finely minced
Saute until the onions are clear. Stir often so that they do not brown. Put sauteed items in slow cooker.
Add to slow cooker:
4 cups reduced-sodium chicken broth
3 cups pumpkin* puree**
6 Roma tomatoes, peeled, de-seeded & chopped
1 tsp black pepper
1 tsp salt***
1 tsp paprika****
4 sprigs fresh thyme
1/2 tsp Scotch Bonnet hot pepper sauce*****
With a large sharp knife, cut off the fan part at the bottom of:
4 lobster tails****** (totaling 400g or more)
Reserve the remaining meaty parts of the lobster tails for later.
Add the fan part of the lobster tails to the crock pot. Stir. Cover and cook in the slow cooker for 6 hours on low.
Remove and discard lobster tail ends & thyme. Using a blender or food processor, puree the soup until it has an even, creamy consistency. Put the soup back in the slow cooker, and add the reserved meaty parts of the lobster tail. Stir, cover, and cook for about 45min to 1hr, or until lobster shells are pink and meat is cooked through. Remove remaining lobster from the slow cooker and let it cool until it is comfortable to handle.
While the lobster is cooling, stir into the slow cooker:
1 can (400mL) coconut milk
Remove lobster flesh from the shells. Discard shells. Chop lobster flesh into small bite-sized pieces and add to the slow cooker. Stir.
Optionally, garnish each serving with:
a sprinkle of fresh cilantro or parsley, chopped

This bisque is delicious as an appetizer or as a lunch. It freezes well; I like to freeze it in single-sized portions so that I can take it along with me for work lunches. It goes well with crusty bread and strong cheese.

Notes:
* Equal quantities of winter squash puree such as butternut, calabaza, or Hubbard squash may be substituted.
** When I can my own squash, it comes out much more watery than the commercial canned versions. If you are using a thicker canned squash, add enough water to the mixture in the slow cooker so that it has the consistency of a thinner cream soup. This amount will vary depending on the consistency of the puree.
*** If you use regular chicken broth instead of the reduced-sodium version called for in this recipe, omit the salt. If you use homemade chicken broth with no salt at all, add an extra 1 tsp salt.
**** If you can get it, smoked paprika adds an extra layer of flavour to this recipe. Otherwise, regular paprika will do.
***** I used the Scotch Bonnet hot pepper sauce made by Grace (which is available at most grocery stores around here), but you can use the one of your choice. My original recipe called for 4 tsp of this sauce, but it ended up too hot for anyone in my family except me. If you like your food spicy, add a little more than 2 tsp. If you aren’t that fond of spice, cut it down to 1 tsp for a tiny bit of a bite. If you don’t like spice at all, you can omit the sauce altogether for a mild bisque redolent with coconut – although if you do this, I’d recommend adding more thyme.
****** I have used lobster tails to make this soup, I have also done it with satisfactory results with other (cheaper) parts of the crustacean, like the claws. Just set aside the bigger, meatier parts for the last step of cooking, and use the smaller, mostly-shell parts for the slow-cooking stage to add flavour. Remember to take any parts with shell out before you blend!

Bread Machine Fluffy Herb Bread Recipe

I’ve been meaning to post this recipe for a while, but I like to accompany my recipes with a picture, and my family keeps cutting into the loaves before I get a chance to take a photograph! This recipe is for a fluffy, high-rising loaf that stands up well on its own, but really shines when it is speckled generously with fresh or dried herbs. As a bonus, this bread is also dairy-free, nut-free, vegetarian, and can be made vegan with the proper sourcing of ingredients. Because of the herbs, it is a very savoury bread, and pairs well with eggs and meats — especially as toast with dipping eggs, and as sandwich bread for leftover roast or cold cuts.


A 2lb loaf made with rosemary.

Bread Machine Fluffy Herb Bread
Yields one loaf

A note about loaf size:
Quantities for a 1.5lb loaf are in bold, quantities for a 2lb loaf are in bold purple. However, this loaf is very light and fluffy — so it expands a lot. Use the settings for a 1.5lb loaf if your machine goes up to 2lbs; only make a 2lb loaf if your machine has the capacity to make a loaf that is 3lbs or greater.

A note about bread machines:
Every bread machine comes with an instruction booklet (most of which are also generally available online) that will specify the order that ingredients should be added. Mine says that liquids should be added first, then flour, then yeast. When preparing this recipe, the instructions for your specific bread machine should take first priority, so if your manual says to add the ingredients in a different order, do so.

Into the bread machine pan, pour:
1 1/4 cups (1 1/2 cups +3 Tbsp) water
2 Tbsp (2 Tbsp) olive oil
Over the liquids, sprinkle:
3 cups (4 cups) all-purpose flour*
Ensure that the flour covers the liquids entirely.
Into opposite corners of the pan, add:
1 Tbsp (1.5 Tbsp) sugar
1 1/2 tsp (2 tsp) salt
Create a well in the flour at the center of the bread pan, being sure not to go all the way down to the liquid. Into the well, add:
2 tsp (2 tsp) active dry yeast
Over the entire contents of the pan, sprinkle:
2 Tbsp (2 1/2 Tbsp) dried OR 4 Tbsp (5 Tbsp) chopped fresh herb of choice**

Set the bread machine to the basic/normal/white setting, with a light or medium crust to your preference. Press start. Running this cycle should take about four hours.

Remove the bread at the end of the baking cycle. Turn it out of the pan onto a wire rack to cool, making sure that the kneading paddle(s) are removed from the bread. Serve immediately (being careful to cut gently when it is warm), or when cool. Do not wrap the loaf or put it into a container until it is entirely cool, or it will become mushy.

* For a healthier loaf, substitute half of the all-purpose flour for whole-wheat flour. A whole wheat loaf will not rise as high, however.
**Suggestions: rosemary, dill, oregano, basil, chives, thyme, or sage.