Royal Palace of Madrid

Like many tourists, one of my first stops during my visit to Spain was the Royal Palace of Madrid (“Palacio Real de Madrid” in Spanish). I actually visited twice on consecutive days, because I underestimated how long it would take to properly appreciate all of the exhibits and I wanted to give this beautiful complex the attention it deserved.

The Royal Palace is located right in the middle of the old city; buildings that are commercial on the ground floor and apartments (or sometimes hotels) above are separated only by a road and the public parks such as the Plaza de Oriente and Jardines de Sabatini. This means that you can get a good look at the palace even from outside of the gates. It’s possible to look right inside the Plaza de Armeria (the main courtyard) from the publicly-accessible area between the Catedral de la Almudena and the palace. The throne room is on the second floor right above the central doors, and looks over the courtyard and at the cathedral.

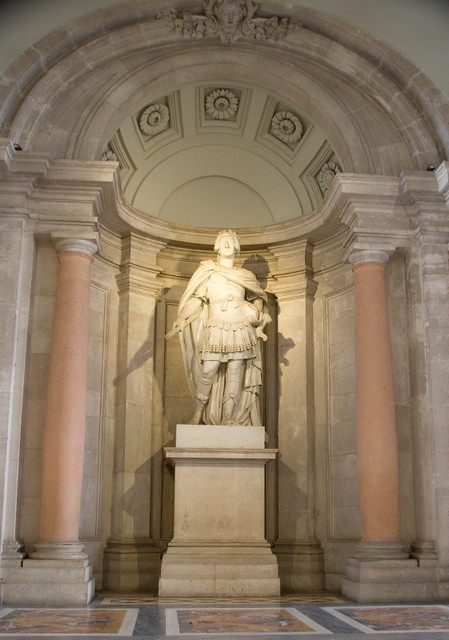
This is the statue of Charles III at the base of the grand staircase.

And this is the grand staircase from above, with a statue of Charles IV at the center. It is, quite simply, awe-inspiring in its grandeur.

On ceiling above the grand staircase (and, indeed, most of the ceilings inside the palace) is a fresco. As this is probably the biggest single room that I saw, I’d venture to guess that it’s also the largest fresco. It is by Corrado Giaquinto and depicts Religion Protected by Spain (although I have to admit I had to look that up after the fact, I was so gobsmacked by the palace that I forgot less-consequential things like artists and titles).

After this, though, I have very few photos of the palace, since there were only a few areas where photos were allowed. Suffice it to say that it is an exercise in opulence and incredible attention to detail. Also on the palace grounds is the armory, which contains fantastic examples of full plate armour (for men, children, and horses) alongside swords, crossbows, and other weapons. Most of the items on display belonged to royalty or upper nobility, so they are beautifully detailed as well. Of course I wasn’t allowed to take photos in there either.

One place that photography was allowed was an extra to the basic tour that I just had to go see: the royal kitchens. They are absolutely huge, which makes sense because they once played host to hundreds of people working at hot, sweaty, tiring jobs that eventually produced all of the food that royalty and nobility at the palace ate. Above is a selection of the kinds of copper and glass molds that were in use.

A wooden work table with the more delicate tools for preparing and decorating the foods prepared in the molds.

The station for washing vegetables.

The pastry station with its marble counter top for keeping the pastry dough cool (much as we still use marble rolling pins or rolling pins filled with cold water for the same purpose today — it keeps the lard or butter from melting, which makes the dough flaky).

Prep table in the room with the main ovens and stoves. The big rack in the background holds all of the different kinds of spits for roasting above the massive fireplace.

The stoves used wood as fuel and the smoke was vented through pipes that ran under the floor, which kept them from having to have overhead chimneys. I’m not sure how they managed to get the chimneys to draw correctly; apparently it was quite the feat of engineering. Notice the high ceilings for air flow; the kitchens were in the basement and the windows that light it and allow for air circulation are at ground level.

Here you can see another of the massive cast-iron stove/ovens, with the fireplace for spit-roasting in the background.

Back when these kitchens were in use, they were often written about by visitors who were impressed by how much work it took to feed the upper classes in the manner to which they were accustomed. They also wrote about how the kitchens ran like a well-oiled machine, or they compared it to a military operation. I personally have a hard time imagining the monumental task it must have been to make these kitchens anything but absolute chaos. My hat is off to the generations of people who worked here.

A Taste of Lebanon

When I was a kid, my mother liked to tell me the story of how she and my father met some of their friends back in the day. You see, Mom and Dad didn’t go to university directly after finishing high school; Dad earned a college diploma first, and Mom worked for a while. This meant that they were a few years older (and hopefully more mature) than most of their classmates. Not only that, but they had gotten married before they started university as well, which was (and I think still is) extremely unusual. This combination of factors meant that they didn’t really fit in with a lot of their peers. However, there was an extremely small community of international students attending the university at the time, and a lot of them were also older, and few were even married couples. My parents naturally fell in with this group of students and they became great friends. This meant that my parents (who are both white and from not only small towns, but military small towns) learned a lot about a number of international cultures and foods when otherwise they probably wouldn’t have done so.

A number of their friends were from Lebanon, and one of them (or possible a few of them, I may be misremembering) wanted to help publish a Lebanese cookbook to be sold in Canada. It was to include a lot of dishes that were common knowledge in Lebanon, but were considered “unusual” and “exotic” at the time throughout most of Canada. My parents got to be the testers for a lot of these dishes, since the authors were trying to tailor the recipes to a wider audience. Always enthusiastic about trying new foods, my parents were very happy guinea pigs.

Now, I think that A Taste of Lebanon: Cooking Today the Lebanese Way (Mary Salloum, 1983) is the book that this eventually became. My father bought my mother a copy for Christmas the year it first came out. My parents used that book regularly until it was passed down to me a few years ago when I started to show a greater interest in cooking.

Imagine my surprise, then, to stumble upon a brand new copy of this book at the Mid-East Food Centre; I didn’t realize that it was still in print! Not bad, considering it’s been more than 35 years. A quick search online revealed that it’s also available online as well. I would definitely highly recommend getting a copy of this book if you’re interested in Lebanese cooking even a little bit. As a bonus, it is a Canadian publication, so it focuses on ingredients that are actually available here.

Finding this book still for sale prompted me to go back to my own copy and make one of the easiest of the recipes therein: hommous bi tahini, i.e. chick pea dip with sesame seed paste. You can buy a large variety of types of hummus in just about every chain grocery store these days, since it’s considered healthy and trendy now. But when I was a kid my parents had to make it for us. Actually, since it’s a no-cook recipe (all you need is a blender), it makes a lot of sense to make your own hummus if you can.

I based the prices here on the everyday listings found on the Superstore website; you could probably find a lot of these ingredients even cheaper if you shop the sales.

Suraj chick peas @ $0.88 for a 540mL can = $0.88
Alkanater tahina @ $8.58 for 907ml, 60ml used = $0.57
Rooster Garlic @ $0.58 for 3 bulbs with 10 cloves each, 1 clove used = $0.02
Windsor iodized table salt @ $1.28 for 1kg, 2.84g used = $0.004
No Name lemon juice @ $2.48 for 946ml, 60ml used = $0.16

Total cost for 1 batch = $1.634

Now compare that to the pre-made prices, which start at $3.47 for a comparable amount, and go up to about $5.00 for the fancier stuff. That’s a pretty big saving if you make it yourself, and it’ll add up if you’re the kind of person who eats it regularly!

Now, my favourite way to eat hummus is on fresh pita bread — and one of the next recipes on my list is pita bread itself, which is also in this cookbook. But I know a lot of health-conscious people prefer it as a veggie dip, as it’s great with sliced sweet peppers, carrots, or celery. (Of course, it’s vegetarian, vegan, and gluten-free too — not that these dietary trends were even on the radar of this classic food.) A Taste of Lebanon recommends that hummus and pita be served with any fish recipe, baked kibbi, tabouli, barbequed chicken, or shish kabob. It is truly one of the most versatile dishes I have ever made.

Resolutions

1. Crafting

This is a two-part resolution. Firstly, I’d like to use up the materials I have purchased over the years, and/or use recycled or thrifted materials whenever possible.

Secondly, I’d like to participate in more group or community projects, like Mochimochi Land’s Let’s Knit a Ball Pit — ideally using materials previously specified. The ball pit will be a part of Vogue Knitting LIVE in New York City, and once the event is over they will be donated to the American Foundation for Children with AIDS. I contributed the two knitted balls in the photo above to this project, and I really enjoyed it! I hope that they arrive in time. I’d like to keep the ball rolling, as it were, and donate my time and skills to other events, even if it’s something as simple as hats for the newborn babies at the local children’s hospital.

2. Environmental

I would like to try to decrease our household’s reliance on single-use plastic, and to continue to reuse, repurpose, and recycle. To me, that doesn’t mean being rid of plastics entirely; actually, I think it would be rather wasteful to completely be rid of the plastics we do have, just to buy all new replacements in another material. Rather, I’d like to commit to using recycled plastics, either post-consumer recycled commercial products, or finding a new home for second-hand plastic products, like the lunch boxes above that I bought at a thrift store.

3. In the Kitchen

I want to expand my cooking knowledge, skills, and style — while at the same time trying to keep it reasonably healthy. I think I’ve been stuck in a bit of a rut lately, and I want to do better! To that end, I have purchased even more second-hand cookbooks that I’m not only going to try out, but that I’m going to read through for ideas. At Thing 1’s request, I am looking into more Japanese food:

Sushi by Ryuichi Yoshii (1998)
The Japanese Kitchen by Kimiko Barber (2004)
Ten-Minute Bento by Megumi Fujii (2007)

Of all of the books that I have thrifted lately, I think I am most excited about The Japanese Kitchen, which helps break down and de-mystify each ingredient, and Ten Minute Bento, which is all about quick and easy (and I think will become a favourite cookbook to pull out to prep dinner on busy weeknights). There is a lot about Japanese cooking that I don’t know, but these books look like they’ll really help me get a better grasp on it.

In a more general vein, I have also picked up:

Gordon Ramsay’s Passion for Flavour by Gordon Ramsay (1996)
Deliciously Dairy Free: Fresh and Simple Lactose-Free Recipes for Healthy Eating Every Day by Lesley Waters (2015)
Gourmet Meals in Crappy Little Kitchens by Jennifer Schaertl (2010)
More Bread Machine Magic by Linda Rehberg and Lois Conway (1997)
Jamie Oliver’s FoodTube Presents: The Cake Book by Cupcake Jemma (2014)
Cocktails for Book Lovers by Tessa Smith McGovern (2014)

Now, some of these, like the cupcake book and the cocktail book, are just for fun — but shouldn’t cooking be fun? The dairy-free one and the one about cooking in small kitchens (and I have to say, that title grabbed my attention) are probably the ones I’d use the most, though. Yet every cookbook is a kind of inspiration for me, even if I don’t try a single dish.

4. Business

I think that it’s time for my business to expand from flea markets to online. I think I will start with local sales, since a lot of my products are both heavy and quite breakable. I just don’t know that it would be cost-effective to try to ship vintage Pyrex or, heaven forbid, cast iron cookware. But vintage Tupperware is both hardy and light enough to make the trip! I think that this expansion will challenge my photography skills (since product photography is quite different than casual snaps) and my organization skills. I’m also looking at how to make it all as environmentally-sound as possible; I especially don’t want to package items in styrofoam, bubble wrap, or air-filled bags, since they’re all single-use plastic. I’m looking into wool and straw and other biodegradable options. People shipped things without breaking them long before plastic was invented, so there have to be options. The question is, can I keep it cost-effective? Challenges, challenges!

So what are your resolutions for the New Year?

Kitchen Gifts

Of course, because my friends and family know that I enjoy spending time in the kitchen, a lot of my Christmas gifts this year centered around that.

One of my friends gifted me with some delicious Chex Party Mix and a lovely loaf of Makivnyk (a Ukrainian style poppy seed tea roll) from the Black Walnut Bakery. Oh, and Thing 1 gave me the Chocolate Chip Cookie Mix In A Jar that she’d made, thus ensuring that she would get to eat some of them too.

I also acquired a number of cookbooks over the holidays, some as gifts, others from thrift stores or as bargain books.

The Perfect Pie Book by Anne Marshall, 1984 (thrifted)
Hershey’s 1934 Cookbook, Hershey Chocolate Company, 1971 (thrifted)
Anita Stewart’s Canada by Anita Stewart, 2008 (thrifted — and I’ve wanted my own copy for quite a while)
Bread! Simple and Satisfying Recipes for Your Bread Machine by Kathrun Hawkins, 2006 ($4.00 at Dollarama)
Pumpkin Butternut & Squash by Elsa Petersen-Schepelern, 2000 (gift)

My parents gave me an Instant Pot and a handmade apron, my brother gave me a copy of Jamie Cooks Italy (since I’m a huge Jamie Oliver fan), and a friend gave me a Paderno tamagoyaki pan.

I can’t wait to try out all of my new toys!

It’s Beginning to Look a Lot Like…

It feels like the Christmas season is finally in full swing! Now that my last market of the season is complete, I can actually concentrate on our family celebrations at home.

I introduced you last year to our household’s Elf on the Shelf, who was named Candy Cane by my kids. As she does every year, Candy Cane showed up on the first day of December, along with the advent calendars.

On December 1st, Candy Cane appeared on the family room mantle, bringing with her a suitcase overflowing with tiny outfits.

On December 2nd, she hid away in our old china cabinet and tried on her outfits in front of my grandmother’s antique hand mirror.

On December 3rd, she spent time in the kitchen making hot chocolate.

And today, December 4th, she absconded with some of the kids’ LEGOs, including some minifigs from their advent calendar, and played with them by the window.

In addition to hunting for Candy Cane every morning, an essential element of this part of the season is making Christmas gifts. I was thrilled last week when Thing 1 came back from Guides with this lovely mason jar full of chocolate chip cookie mix. Each member of the troupe learned about following a recipe and got to measure out and package their own ingredients. I thought it was a great learning experience, and the girls had a lot of fun! (You can find the recipe on Very Best Baking if you want to make one of these jars yourself.)

Thing 1’s experience with making the cookie mix made me think. I do all kinds of canning, so why am I not making dried mixes in jars as well? These aren’t just good Christmas presents, they’re fantastic for teacher appreciation, housewarmings, new parents, sick friends, poor students and young adults moving out for the first time… I already have two books that devote a large portion of their contents to the subject: Company’s Coming: Gifts from the Kitchen (Jean Paré, 2001) and Jazzy Jars: Glorious Gift Ideas (Marie Browning, 2002), and as someone who makes preserves I have lots and lots of jars, so why am I not using them? I honestly think it’s because I have too much choice (I know, not the most horrible thing overall), and I’m having a hard time narrowing it down.

So my question is this: what is your favourite recipe for a dry mix in a jar?

Pumpkin-centric Weekend

It seems like I spent the majority of my time over this past weekend dealing with pumpkins. On Friday night I cooked up all three of my orange jack-o-lanterns (I had two white ones as well, but they had white flesh and a melon-like consistency, so I decided they probably wouldn’t cook up well with the more traditional kind). Even without the white pumpkins, I think I will have enough to last me for a while.

This is all going into the freezer for now, but a good quantity of it will become pumpkin butter as soon as I deal with the other fresh food in my fridge that I have to put up. I did a lot better this year with regards to processing my pumpkin in a timely manner, since I only got to it at the start of December. I mean, it hadn’t spoiled, but I was definitely running slow. I didn’t have a lot of leeway this year since the gourds were already carved, and once the innards are exposed to the air they can go bad pretty quickly.


Photo by Karen Turnbull

Then on Saturday I headed out to Metcalfe where the South Tower Armouring Guild was hosting their annual Great Pumpkin Massacre. Basically, sword handling enthusiasts get together with their weapons and take turns using them on pumpkins, which are bought by the truckload after Halloween. People also bring along their Halloween pumpkins and carved jack-o-lanterns. All kinds of weapons are used in the “massacre”: swords, axes, knives, maces, sledgehammers, machetes… No projectile weapons, though! Everybody just hangs out and has fun practicing their technique and/or venting their frustrations in a safe environment on some inanimate gourds. It may sound silly to some, but it’s a heck of a lot of fun.

Looking back through my photos I realized that I’ve actually been attending this event for eleven years! The above photo was taken by a good friend of mine back in 2009, on a year when the weather was much nicer. I didn’t even bring my camera this year because it was raining and I didn’t want to chance getting it wet. (And yes, the sword I’m holding in the picture is taller than I am. It belongs to a much taller person. Yes, I can wield it. No, I cannot wield it well.)

Although I took the above photo of a friend of mine in 2014, it’s a better representation of the weather we had yesterday — and everyone was even more bundled up than this! And muddy. Very, very muddy. It was very cold and wet, with wind that just drove the moist, cold air right through your warm woollies. We still had a good time, but it would have been better if the weather had been lovely and sunny like it was on Sunday.

Pumpkin Massacre 2018 Slo-Mo

As you can see, despite the weather the pumpkin horde met their demise. I think that this year’s weapon of choice was the sledgehammer, specifically because it makes the pumpkins splat so nicely.

I’d like to say a big thank you to STAG for hosting and coordinating this event every year. It has been one of the highlights of my autumn for eleven years now.

Too Many Tomatoes

It’s that time of year again when everything seems to be ripe at once and it’s physically impossible to eat it all before it goes bad. Case in point: my tomatoes. I grow predominantly cherry tomatoes, although a friend did give me one black tomato plant that has done very well this year. I just find cherry tomatoes to be more flavourful than most of the larger varieties. And I plant tonnes, since I know that I’ll want to include them in a number of preserves come fall.

Case in point: this is what I brought in from the garden the other day. I think that these tomatoes, and probably the onions as well, will soon become spaghetti sauce. I might even go for the healthy veggie tomato sauce I made last year, and include the eggplant that should be ripe in a few days. (I had a lovely huge one ready to go, and then an animal go to it. Figures.)

At the same time, I had a few small radishes, the last of the cucumbers (the vines were starting to die back), and a few potatoes that were beginning to poke through the surface of the dirt. Something needs to be done with all of this produce before it rots!

The first step for me is to make at least one dinner with the fresh ingredients. I barbecued some chicken thighs with my usual spice mix (parsley, sage, rosemary, thyme, garlic powder, and sea salt), and cooked up some of the potatoes on the grill at the same time. I know that they look very similar post-grill, but the difference was immediately apparent once they were cut open. I added some cherry tomatoes and sliced radishes as a veggie once everything else was cooked. It was a very simple meal, but it was both tasty and easy to prepare — which I needed after spending a couple of hours in the garden!

Double Chocolate Triforce Cake

Thing 1’s birthday was over the weekend, which of course meant that we had to bake a cake. Since, in my experience, kids love baking cakes, Thing 1 and Thing 2 helped. I also believe that even if it doesn’t turn out perfectly, kids really do benefit from cooking with their parents.

Thing 1 requested a “chocolate Zelda cake with chocolate icing”. Since I am not known for my beautiful cakes (my 16th birthday cake being a great example of my skills), I decided to keep it as simple as possible. We used the tried-and-true Amelia Bedelia’s Sheet Cake recipe, which is found at the back of the story book Amelia Bedelia Bakes Off (Herman Parish, 2010). (You can also find the recipe via Desktop Cookbook.) This makes a very rich, moist, dark chocolate cake — which, as a bonus, is tree-nut and peanut free, and can be made vegan (which is great when you have to make cupcakes for school, FYI).


It’s dangerous to go alone! Take this.

The kids had gone to bed by the time the cake was cool enough to ice, so it was my turn. I used the Chocolate Satin Frosting recipe from page 796 of the Joy of Cooking (Rombauer & Becker, 2006 edition). This recipe is ridiculously easy — since it’s mostly made in a blender or food processor, it’s only slightly more difficult than cracking open a can of pre-made frosting from the grocery store. It’s also a very dark chocolate icing, almost bitter, which is perfect for my little chocolate lover.

I made the Triforce design using a stencil. I went low-tech and drew the pattern with a pencil and ruler on a piece of card stock, then cut it out with scissors. Then I simply held the stencil very closely over the icing and sprinkled on the sugar. The result wasn’t completely perfect, but Thing 1 knew what it was supposed to be. As an added bonus, the coloured sugar added a lovely crunchy topping.

So happy birthday to my fabulous firstborn! I love you so much.

Algonquin Park Camping: Day 3

Day 3 of camping at Achray Campground dawned clear and sunny — the only truly summery day of our trip.

We strung up as many lines as we could to try and get everything to dry before we went home. I think it was a little bit futile, especially since the bottoms of the tents were pretty soaked.

We started the day with bacon and pancakes (Aunt Jemima Complete Buttermilk Pancake Mix) for everyone for breakfast.

I could only make one pancake at a time, but I just kept cooking until everybody was stuffed.

Then Thing 1 and I tool a walk along the lake shore while my husband and Thing 2 cleaned up.

There were a bunch of canoes pulled up on the beach, some of them day rentals, others belonging to people who had come in from the park interior. Some campers had cut their trip short due to the forest fires encroaching on their planned routes.

On our walk, we saw all kinds of small wildlife: frogs, tadpoles, and everything in between, minnows, small fish (but bigger than minnows), and even a water snake no thicker around than a pencil.

When we returned, Thing 1 and Thing 2 got changed into their bathing suits to play in the shallows while my husband and I struck camp. With the water only being knee-deep for at least a hundred feet, it was a perfect playground — and with our campsite being so close to the water, we didn’t have to worry the kids would be unsupervised.

After everyone was thoroughly cooled down in the lake, it was time for some hot chocolate and reading time as we tried to use up our camp fuel (an attempt which proved to be futile in the end).

We packed up the last of our gear and drove away from Achray, but it wasn’t long before we reached the entrance point to the Barron Canyon Trail (which is only 1.5km long, but is at a pretty steep pitch most of the time).

My husband had hiked this trail as a child, and he really really wanted us to see it too. The canyon is 100m (328′) deep at this point, and the top of the trail provides a fantastic view for miles around. It also is a straight drop down with no railings, which is a little bit vertigo-inducing. I kept a death grip on Thing 2’s hand whenever she even remotely neared the edge, since she has a bad habit of not taking safety warnings seriously. Heck, there’s even a sign at the beginning of the trail that reads, “Caution: This trail visits a cliff. Please keep children under control at all times.”

Thing 2 was very happy to sit for this photo, though, since she could see the Barron Canyon expanse without me freaking out (it’s further back than it looks).

I honestly didn’t know that we had terrain like this anywhere near home. It’s difficult to get an accurate impression of scale in photos.

Thing 1 was my husband’s responsibility, but her cautious nature meant that she didn’t tend to walk too close to the edge on her own. Actually, to get the best view she and my husband crawled on their bellies so that they could peek over the edge safely.

The best representation of scale I could get is when a canoe passed us by at the bottom of the canyon. That little line in the water is four people in a big fiberglass canoe.

It was a fantastic way to end a thoroughly enjoyable trip!

Algonquin Park Camping: Day 2

Day 2 of camping at at the Achray Campground on Grand Lake in Algonquin Provincial Park dawned rainy, but the precipitation quickly moved on. This left us with clouds in the morning, a brief rainstorm in the afternoon, and a mix of sun and clouds for the afternoon and evening. Unfortunately, there was never much of a breeze, so nothing we brought with us really dried out, but we had fun anyway.

The day began with cooking bacon, eggs, and toast (with bread machine bread baked in advance of our trip) on the old Coleman camp stove. I am particularly fond of the camp toaster, which was always my favourite part of the setup as a child.

It was a hearty and delicious way to start the day!

After cleanup we headed out to the lake, which is where we spent the majority of our day.

The shallow, sandy beaches meant that the kids were quite content to play and explore for hours.

We found teeny tiny catfish (at most an inch and a half long) in the weedy shallows, where they were industriously cleaning the lake bed.

There were also tonnes of tadpoles in every stage of becoming frogs — some had no legs, some had two, some had four, and some were basically frogs with tails — alongside full-grown frogs. A few swam by us while we were swimming, while others stuck to the weedier or rockier areas.

I honestly think that our favourite part of the day was all of the tiny minnows that swam around our feet and nibbled on our toes while we waded in the shallows. Video of that will have to wait until I can get it off of my other camera, but I think it’ll be what the kids remember the most from this trip.

When we headed away from the water we found wild raspberries, which was an unexpected and tasty treat.

I cooked dinner over the single-burner backpacking stove, since the old Coleman decided to act up for a bit. I basically made tuna noodle casserole, but with frozen corn instead of canned, and canned salmon instead of tuna. Also, having no oven, I couldn’t bake the dish.

I don’t think that my alterations improved the dish any; without the potato chips topping and baking to combine the flavours, it was pretty bland. I should at least have grated some cheese on top, but I didn’t think of it. But it was warm and filling and we were sitting somewhere dry, which sometimes is all you can ask for when camping. As a bonus, the only perishable ingredient was the frozen corn, which in its turn helped keep the other food cold.

Also, did I mention that there were butterflies? Well, there were a lot of butterflies. The monarchs in the area really like the milkweed blossoms, which were just coming out of bloom, and milkweed was everywhere. Apparently these monarchs are endangered, but you’d never know it from how plentiful they were around our little corner of the park.