Lobster Tails

I went to the grocery store yesterday to pick up eggs and milk (the two perishable foods we go through the fastest in our household), I popped over to the meat and seafood counters to see if anything tempted me for dinner. As it turned out, they actually had rock lobster tails on for a reasonable price — or at least what I’d consider to be reasonable compared to the ridiculous price that beef has gone up to lately. Lobster in my budget is extremely rare, so I had to pick up enough for dinner.

I followed the instructions from Maine Lobster Now and I was impressed with how quick and easy it was. (Most of the lobster I get these days is the much cheaper frozen claws from T&T to make Carribbean lobster bisque.) The girls were a little intimidated by the shell — they’ve had lobster as often as I could afford to serve it, but I don’t think they’d ever had to deal with cracking their own before. I don’t blame them, since even to me the tail looks a heck of a lot like a giant wood louse! Luckily I’ve been to a fair number of lobster boils in my day and, as per the instructions, the meat actually was very easy to remove once it was cooked.

I served the lobster with steamed asparagus, baby-cut carrots, and baby potatoes, all cooked very easily in the microwave. All in all this meal took me about 25 minutes to make, which is good because I was (as usual) running late. One thing I missed out on was garlic butter to drizzle on the lobster, which I do regret, but it was pretty darned good anyway.

Finger Foods

Yesterday Mother Nature decided to prove, once again, that she reigns supreme by throwing a rare (but not unheard-of) snowstorm at us a good week into April. I feel very lucky that I hadn’t had the snow tires taken off of my car yet — unlike my poor parents. I was so happy the other day when I realized that I could see grass peeking through the snow in the back yard, making progress even from last week when I broke out the barbecue. As of halfway through yesterday afternoon, the view out my back door looked like this:

It did continue snowing throughout the rest of the day, although it was only lightly and hence didn’t accumulate all that much. I feel so much worse for my friends and family in Atlantic Canada who are supposed to get double the snowfall that we did! There’s a reason that we don’t plant our gardens here before the Victoria Day weekend at the end of may, and it isn’t just fear of frost.

In addition to the depressing weather, I still am suffering from a nasty cold, so yesterday’s supper had to be warm, filling, and easy. I thought that some tasty finger foods were in order. Much to my surprise, there was a great deal at one of the nearby grocery stores on zucchini this week, which doesn’t usually happen quite this early. I am left to surmise that places further south that have actually progressed through spring are having a bumper crop this year. So I decided to make some baked Panko zucchini sticks, which the kids love but haven’t had since the end of last summer. I thawed some Costco chicken wings and threw them in the oven, and while the were baking I threw together the zucchini sticks. Since the two dishes are cooked at the same temperature, for the last 15 minutes or so of cooking time I transferred the chicken to the top rack and cooked the zucchini on the bottom. This way both dishes were done at exactly the same time and could be served right away.

I think I’m about done with winter, by the way. It’s only two weeks until Easter; will Santa have to ferry the Easter Bunny to us in his sleigh?

Tuna Steak

A while back I picked up a four-pack of frozen tuna steaks at Food Basics for about $10.00, which is a really reasonable price around here. Now, I know that frozen fish can be hit or miss, but around here a lot of the stuff you find at the fish counter is previously frozen anyway (it’s usually noted only in the tiniest of print), so I figured I’d give it a shot. I followed Jamie Oliver’s tutorial for How to Cook Tuna Steak, which I’ve had great success with before. I figured it would be a good idea to keep the methodology the same if I wanted to test a different product, only changing the one variable and all that. See, teachers, I did learn something in science class!

I am happy to report that it turned out really well! I’d say it was easily as good as the tuna steaks I’ve previously bought from the fish counter. Now, the stuff from the counter probably doesn’t compare favorably to fresh, but unless I want to spend an exorbitant sum to get stuff flown in from the ocean, it’s probably the best I’m going to get. After all, we are landlocked here — the closest ocean (the Atlantic) is almost 500km away! (And that’s if you go to Maine — it’s more than double that to stay in Canada.)

The rub on the tuna is salt, pepper, coriander seeds, and fennel seeds, all ground together with a mortar and pestle. I served the fish over sticky rice, along with garlic shrimp, steamed asparagus, and steamed edamame. Overall it was a lovely, fresh-tasting dinner, and I look forward to having it again.

Strawberry Pi Pie Cat Toy Tutorial

March Break didn’t really turn out as planned. A tickle in my throat at the flea market on Saturday turned into a full-blown chest cold by Sunday; Monday through Thursday I spent most of my time between decongestant doses with a hot barley bag over my face to decrease the pressure in my sinuses. The rest of the family didn’t fare much better, with my husband missing work and the only reason the kids didn’t miss school being that it was already a holiday. All of our plans for outings and most of the fun things to do at home went straight down the toilet.

However, I had made myself a promise of one thing I was going to do over the break: find a rescue kitty who would fit well into our home. This was not a spontaneous decision, since my husband finally agreed that it was time for a new cat since Christmas (our previous cats passed away of extreme old age over ten years ago). But we also knew that we were going to be in Madrid in February, and we didn’t think it was fair to adopt a cat and then go away for ten days just as it was settling in.

So over the March Break I visited the Humane Society as well as many of their Pet Adoption Locations. While I think I petted and cuddled every cat who was willing (which is honestly a nice way to spend your time anyway), it wasn’t until right before closing on Wednesday night that I found Fizzgig (originally named Violet).

Fizzgig is a female 9-month old brown tabby with green eyes who is very curious about the world around her. She is a little bit shy, but deals well with our boisterous, noisy family.

So, in honour of the new member of our household, I thought that a cat toy craft was in order. Since March 14th is Pi Day, a pie-shaped toy seemed particularly fitting! If you don’t have a cat who would have any use for this toy, it also makes fun play food for a child.

Strawberry Pi Pie Cat Toy

Materials:

– 1 sheet of tan felt
– coordinating tan thread
– red embroidery thread
– polyester stuffing
– OPTIONAL: dried catnip

Supplies Needed:

– sewing needle
– scissors
– circular item (to trace)
– pencil

1. Using a circular glass or container about 7cm in diameter, trace a circle on your felt.

2. Cut out the circle and a strip of felt about 2cm wide. The strip should be an inch or two longer than the circumference of the circle. The easiest way to determine the circumference without math is to wrap the felt around the bottom of the glass/container you used to to make the circle.

3. Using coordinating thread, whip stitch the long edge of the strip of fabric to the circumference of the circle.

4. Overlap the ends of the long strip, and then trim off the excess so that they only overlap by about half a centimeter. Whip stitch along the exterior edge to join the strip into a circle.

5. Using your stitched portions as a guide, draw a rough circle about 1cm larger all the way around than the original base. Cut it out.

6. Turn the circle over so that the marked pieces are on the bottom. Draw the symbol for Pi π in pencil at the center of the “top crust” you just cut out.

7. Using red embroidery thread and your favourite stitch (I am a fan of the split stitch, which is #3 in this article), embroider over the pencil markings you have made for the Pi symbol.

8. Using a large whip stitch (which will result in the fabric bunching around the edge to create the “crimped edge” of the top crust), sew the top crust to the rest of the pie. When the crust is about 3/4 of the way attached, stuff the pie with polyester stuffing and, if you so choose, a little bit of dried catnip. Then finish stitching the pie closed.

Your strawberry pi pie cat toy should be ready to go! We didn’t use catnip for ours, but Fizzgig likes it just the same. Her favourite thing to do is bat it down the stairs and then go chase after it. I tried to get a picture of her playing with it, but this was the best that I could do — she’s basically just a motion blur at this age!

Yarn Dolls Tutorial

Yarn dolls are something that I used to make all the time as a kid; once again, I believe I learned how to make them in Girl Guides. I realized that I hadn’t made any with my own children yet when Thing 1 came home from Guides the other night with the beginnings of her own yarn doll in the works. Thing 2 hadn’t had a chance to make them yet, so I thought I’d dig out my solid-colour yarns left over from previous projects and let them get at creating.

If you’re not the kind of person who’d have yarn scraps around the house, don’t despair! There are lots of very cheap yarns available, even from the dollar store. But before you head there I might recommend hitting the local thrift shop. There you can usually find orphaned balls of yarn for a fraction of the price of buying new, and it keeps a previously-loved item from going to a landfill.

Yarn Dolls

Materials:

– yarn
– OPTIONAL: googly eyes, beads, buttons, scrap fabric, etc.

Supplies Needed:

– book, binder, folder, or piece of stiff cardboard
– scissors
– OPTIONAL: glue, needle, thread

1. Get your yarn, book, and a pair of scissors. I chose a stack of file folders for 8″x10″ pages because they were about the right size for the size of doll that I wanted to make. However, you can really use any size of book or even a piece of cardboard. Since it’s just going to hold the yarn, you don’t have to worry about damaging it.

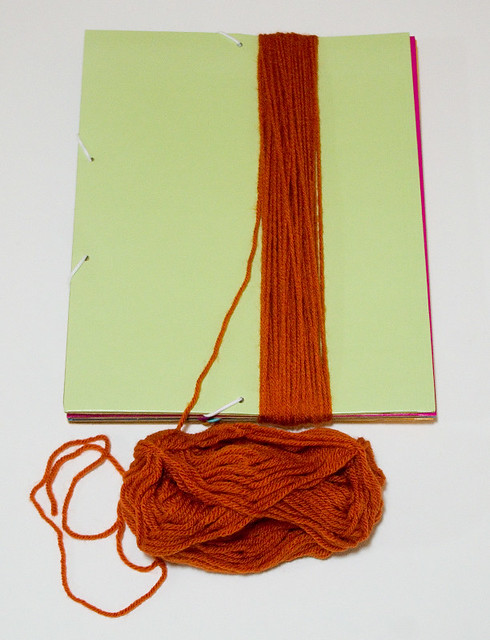
2. Wrap the yarn around the book until you have created a thick hank. How much yarn you use depends entirely on how big you want the doll to be and what size of book you use. Feel free to experiment! There really isn’t any “right way” to do it. Then cut the yarn off of the ball.

3. Cut a piece of yarn that is a little bit more than twice as long as the book. Thread the piece of yarn under the hank and tie it tightly with a double knot.

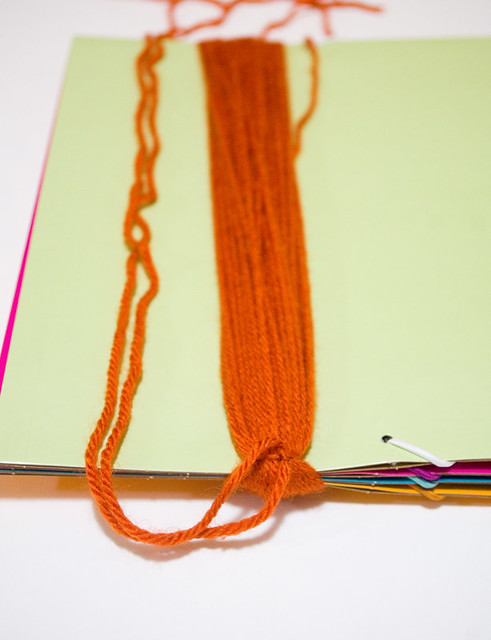
4. Slide the hank off of the book. Pass the piece of yarn that you used in step 3 through the center of the hank again and tie another double knot for reinforcement. Turn the hank inside-out so that the knots are on the inside. Smooth the piece of yarn so that it is now part of the hank.

5. Cut another piece of yarn that is a little bit more than twice as long as the book. Wrap this yarn tightly around where you will want the neck of the doll to be, then tie it tightly with a double knot. Wrap the yarn around one more time and tie it again for reinforcement. Smooth the yarn into the hank.

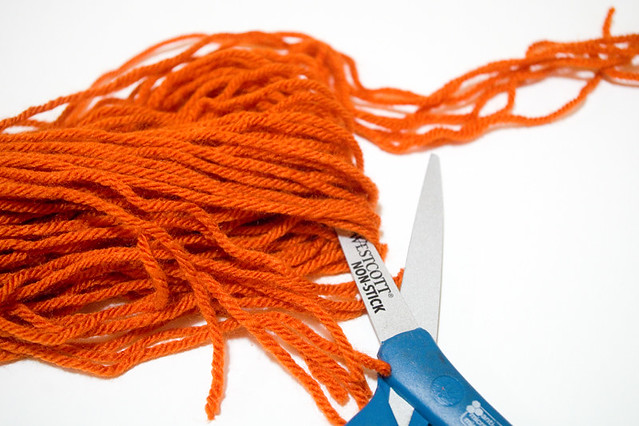
6. Holding the yarn taut, snip the loops at the bottom of the hank (opposite from the head you have created). Trim the excess yarn so that it is roughly the same length.

7. Separate roughly a third of the yarn to create the arms (1/6 of the yarn per arm). For thicker arms, separate a little bit more.

8. Cut another piece of yarn that is a little bit more than twice as long as the book. Tie that yarn to create the waist, using the same technique as at the neck.

9. Braid the arms, double-tying the wrists tightly with scraps of yarn. Divide the bottom of section of yarn in half and braid it to create the legs. Double-tie the yarn tightly around the ankles.

10. Trim off the excess yarn on the hands and feet.

At this point your yarn doll is technically done, but if you feel that it is too plain, that’s where the optional decorations come in! You can:

– add googly eyes or beads or buttons for eyes,
– tie on more yarn as hair,
– sew scrap fabric for clothing,
– tie on artificial butterfly or dragonfly wings to create fairies
– twist a pipe cleaner into a halo and tie on a big lace bow as “wings” to make an angel
– make tiny yarn dolls to hang from earrings or necklaces
– make small yarn dolls in festive colours to use as Christmas ornaments

Exercise your creativity!

There are a couple of basic variations on this kind of doll that are useful to know. The first is the “dress” version, which basically omits braiding the legs to create a skirt. You may note that the arms of this doll are tied instead of braided, which is a much quicker way to do it; this is great for younger children who may have limited patience or braiding skill. It should be noted that this version requires a shorter length of yarn (i.e. a smaller book) due to the lack of braiding.

Also, for a simple snowman, use white yarn and tie it all together at the bottom to create a “snowball” instead of legs.

A great Halloween version of a yarn doll stops at Step 6, and requires only the addition of googly eyes to become a ghost. This is probably the simplest version possible, which is perfect if you want to make a bunch of them and hang them as decorations.

Have fun!

Leftover Stew

Yesterday was a toss-up for reasons not to send the kids to school: on the one hand, it was a snow day, and on the other, they were both sick anyway. So I kept dinner simple and made a stew out of all of the leftover bits and pieces I had in the fridge. Honestly, a traditional stew (at least the way I learned it) is a bit of whatever you’ve got around anyway, so it seems fitting.

The stew contained beef, onions, garlic, carrots, baby potatoes, celery, homemade beef broth, store-bought beef broth, pearl barley, red wine, fresh thyme, fresh sage, a bay leaf, and salt. I whipped it up in the Instant Pot in about 45mins, including preheating/venting time. It wasn’t the best stew I have ever made, but it was tasty, hearty, warm, and went down easily for those with sore throats. I’ll consider it a win.

Hearty Hamburger Soup

The plague, aka the nasty cold with a sore throat and a cough that has been going around, hit our house hard this week. While I am desperately trying to fend it off, Thing 2 and my husband have succumbed, and Thing 1 is starting to show symptoms. It’s also been ridiculously (if seasonally) cold the last few days, averaging about -35°C (-31°F) at night with the wind chill. All of this together means that the best thing for everyone to eat is a nice, hearty soup.

So last night I made Hearty Hamburger Soup in my Instant Pot. It’s actually a stove top recipe, but it’s easy enough to adapt; I just did all the sautéing in the cooker, drained off the fat, added the rest of the ingredients and then pressure cooked for 30min. This is a dish that I’ve been meaning to make for years, and the ingredients are generally the kind of thing I have stocked in my pantry and freezer. I’m told that my aunt makes a killer version of this dish, but I haven’t been able to wheedle her recipe away from her. The Allrecipes version was quite nice, though. I made the accompanying bread earlier that day in the bread machine; it was Egg-Enriched White Loaf on page 67 of Bread Machine: How to Prepare and Bake the Perfect Loaf by Jennie Shapter (2002).

A Taste of Lebanon

When I was a kid, my mother liked to tell me the story of how she and my father met some of their friends back in the day. You see, Mom and Dad didn’t go to university directly after finishing high school; Dad earned a college diploma first, and Mom worked for a while. This meant that they were a few years older (and hopefully more mature) than most of their classmates. Not only that, but they had gotten married before they started university as well, which was (and I think still is) extremely unusual. This combination of factors meant that they didn’t really fit in with a lot of their peers. However, there was an extremely small community of international students attending the university at the time, and a lot of them were also older, and few were even married couples. My parents naturally fell in with this group of students and they became great friends. This meant that my parents (who are both white and from not only small towns, but military small towns) learned a lot about a number of international cultures and foods when otherwise they probably wouldn’t have done so.

A number of their friends were from Lebanon, and one of them (or possible a few of them, I may be misremembering) wanted to help publish a Lebanese cookbook to be sold in Canada. It was to include a lot of dishes that were common knowledge in Lebanon, but were considered “unusual” and “exotic” at the time throughout most of Canada. My parents got to be the testers for a lot of these dishes, since the authors were trying to tailor the recipes to a wider audience. Always enthusiastic about trying new foods, my parents were very happy guinea pigs.

Now, I think that A Taste of Lebanon: Cooking Today the Lebanese Way (Mary Salloum, 1983) is the book that this eventually became. My father bought my mother a copy for Christmas the year it first came out. My parents used that book regularly until it was passed down to me a few years ago when I started to show a greater interest in cooking.

Imagine my surprise, then, to stumble upon a brand new copy of this book at the Mid-East Food Centre; I didn’t realize that it was still in print! Not bad, considering it’s been more than 35 years. A quick search online revealed that it’s also available online as well. I would definitely highly recommend getting a copy of this book if you’re interested in Lebanese cooking even a little bit. As a bonus, it is a Canadian publication, so it focuses on ingredients that are actually available here.

Finding this book still for sale prompted me to go back to my own copy and make one of the easiest of the recipes therein: hommous bi tahini, i.e. chick pea dip with sesame seed paste. You can buy a large variety of types of hummus in just about every chain grocery store these days, since it’s considered healthy and trendy now. But when I was a kid my parents had to make it for us. Actually, since it’s a no-cook recipe (all you need is a blender), it makes a lot of sense to make your own hummus if you can.

I based the prices here on the everyday listings found on the Superstore website; you could probably find a lot of these ingredients even cheaper if you shop the sales.

Suraj chick peas @ $0.88 for a 540mL can = $0.88
Alkanater tahina @ $8.58 for 907ml, 60ml used = $0.57
Rooster Garlic @ $0.58 for 3 bulbs with 10 cloves each, 1 clove used = $0.02
Windsor iodized table salt @ $1.28 for 1kg, 2.84g used = $0.004
No Name lemon juice @ $2.48 for 946ml, 60ml used = $0.16

Total cost for 1 batch = $1.634

Now compare that to the pre-made prices, which start at $3.47 for a comparable amount, and go up to about $5.00 for the fancier stuff. That’s a pretty big saving if you make it yourself, and it’ll add up if you’re the kind of person who eats it regularly!

Now, my favourite way to eat hummus is on fresh pita bread — and one of the next recipes on my list is pita bread itself, which is also in this cookbook. But I know a lot of health-conscious people prefer it as a veggie dip, as it’s great with sliced sweet peppers, carrots, or celery. (Of course, it’s vegetarian, vegan, and gluten-free too — not that these dietary trends were even on the radar of this classic food.) A Taste of Lebanon recommends that hummus and pita be served with any fish recipe, baked kibbi, tabouli, barbequed chicken, or shish kabob. It is truly one of the most versatile dishes I have ever made.

Grilled Cheese & Orange Slices

I’ve been so busy prepping for my biggest market event of the season that I haven’t been able to set aside the time to cook anything fancy. But we’ve all still gotta eat!

Dinner last night was grilled cheese on homemade bread (my usual go-to of bread machine herb bread without the herbs) and orange slices. Of course, the ones I made for me were with lactose-free cheese; instead of the usual cheddar I had a rather nice Gouda, which was a nice change.

I’m looking forward to the holiday market season being over so I can spend more time cooking — especially cooking for Christmas!

The Nightmare Before Christmas Garage

Halloween is all over but for the consumption of vast quantities of candy. Due to rainy weather, we didn’t get as many trick-or-treaters as I thought we would this year, so we have boxes of full-sized candy bars on top of what the kids accumulated. I think I’m going to have to Google “things to make with leftover Halloween candy”.

Of course, after Halloween there’s also lots of cleaning up and packing away to do, but before I get to that I’d like to share my favourite part of this year’s decorations: the Nightmare Before Christmas garage.

You see, this year marks the 25th anniversary of one of my favourite movies (and Thing 2’s all-time fave so far), The Nightmare Before Christmas. I thought that part of my outdoor decor should definitely reflect this fact. I purchased the little Jack Skellington inflatable on the right, and the larger one on the left was a generous gift from a friend. I made the Oogie Boogie “moon” light cover out of a plastic platter, a black Bristol board cut-out, and a yellow light bulb. The “hill” on the garage door was just more Bristol board taped on and cut out in the desired shape, with breaks and slight overlaps between the panels so I could still open and close the door. Honestly, it wasn’t terribly difficult, but I was really happy with it all in all.

As for actual costumes the day of, I wore my Robin Hood: Men in Tights costume during the day, and my Discworld Death to take my kids trick-or-treating at night. Death was very well received by most, although he did frighten a few little ones (he’s enormous, after all). I really did enjoy chasing the teenagers. The kids wore their Borderlands 2 costumes, and they were thrilled when a few people even knew who they were supposed to be.

I’d say that it was a pretty great Halloween.