Teapot Herbs

A couple of months ago I was in the middle of selling a lovely Sadler “Brown Betty” teapot to a customer. I had already made the sale, had cash in hand, and was just wrapping it up in paper for safe transit. We were chatting while I packaged, and she said, “Oh, I have a teapot just like this at home, but I dropped the lid and smashed it. I just had to get a replacement.” To which I replied, “Oh yes, it’s always the lids that go first.”

And then I dropped the lid.

Of course, it fell straight down onto the concrete floor and smashed into tiny little pieces. The customer and I stared at each other mutely for a moment, and then I asked her, “So… Do you want the brown and green one instead?”

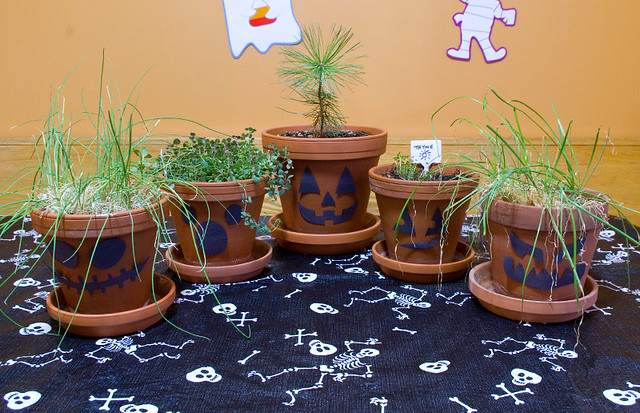
So I returned home that day with a pretty little teapot with lots of life left in it, but that is unsalable because of a lack of lid. “What am I going to do with this?” I thought. But then it occurred to me that Mother’s Day was coming up, and that my mother loves tea, so maybe I could make her something? I ended up using the teapot as a little herb planter. I planted basil inside, two different varieties.

Mom liked the gift so much that I’ve started hunting down lidless teapots to use as planters for different herbs. So far I’ve found her a metal one that obviously used to be used on an open fire, and one of those vibrantly-painted ones that’s a tea-for-one set with a pot on the top and a matching cup on the bottom. I think that after a while we’ll have a full-fledged herb garden, possibly even branching out to flowers or seasonal arrangements after a while. It really pleases me that we now have a use for these otherwise-unusable items — and now the hunt is on for more teapots to rescue. This should be fun!

Mystery Plants

Victoria Day long weekend (more commonly known as May Two-Four) is this coming weekend, which is usually the time when most people in this neck of the woods start plating their garden for summer. Mine isn’t quite ready to be planted yet. The one along the fence line needs cleaning out, added soil, and sheep manure fertilizer; the one near the house may be partially dug up so as to do some work on the foundation. Even if that wasn’t the case, I’ll be at Russell Flea all day Saturday and I’m hoping to hit the Rockland Community Garage Sale on Monday. (Yes, Monday — apparently they hold it on the holiday Monday every year.) So I wouldn’t have much time to garden this weekend in any case. I’ll try to get as much possible done next week instead.

Since I wasn’t sure how much of my garden I was going to be able to plant this year, I didn’t bother starting plants indoors for a change. Once I know how many I’ll need, I’ll just buy seedlings from a local nursery. However, I do have a few items sunning themselves on my window shelves. One of the gifts that I got from Thing 2 for Mother’s Day this year was a cute little bee plant pot made from a recycled aluminum can. When I received it, it was filled with soil and, I was assured, a few seeds.

And the seeds have sprouted! I am probably way too excited about this, but plant gifts from children often aren’t in the best shape by the time they arrive home, so their survival was not assured. I have no idea what kind of plant this will end up being, so I don’t know how much to water it or if it’s a sun or shade plant, so… Fingers crossed?

(And yes, I know that my photo is kind of hazy, like a femme fatale in an old film noir movie. I’m not sure if the lens/mirrors need cleaning or if there is something wrong with my camera/lens since I kind of dropped it on Saturday at the con. I have to give it a good once-over; I’m really hoping it’s just dirty!)

Cleaning Enameled Cast Iron

I picked up a box of old, used kitchenware a while back, and buried down deep at the bottom was what looked like an enameled cast iron casserole dish. It was in pretty rough shape.

The inside wasn’t too badly off; there seemed to be some staining, but no chips or pits in the coating. The outside, however, was a mess:

My best guess is that the previous owner(s) had regularly cleaned the inside where food would actually touch, but were lackadaisical at best about cleaning the exterior. There was a brand name on the bottom, but it was so covered in gunk that I couldn’t quite make it out. But it seemed like a solid piece, so I decided to give cleaning it up a shot.

(I was also going to write about two vintage Pyrex dishes from the same box that had cleaned up really nicely with a lot of elbow grease, but yesterday I managed to bump into them and send them crashing to the floor. They hit each other on the way down and shattered into teeny tiny little pieces. They were only Cornflower Blue dishes, probably about 30 to 40 years old and not terribly rare, but after all that work I was — and still am — rather pissed off that I made such a stupid mistake. Anyway, that’s why there are Pyrex casseroles in that photo as well.)

One of the suggestions that I found online was to coat the piece in a paste of baking soda and lemon or lime juice, so I tried that first. If nothing else, it smelled nicer than any other cleaner I tried!

It actually made a pretty good dent in polishing up the interior.

However, it didn’t have the penetrating power to get a the worst of the exterior’s years of caked-on grease. I’m going to keep this technique in my arsenal for future reference, though, since it did do wonders for the areas where the damage wasn’t so bad, like on the outside of the lid.

The next tip I tried was to soak the pot overnight in a solution of two parts water to one part vinegar. This made so little difference that I didn’t even bother taking a picture. It was just a waste of time.

My friend suggested that I fill the sink with water and add two dishwasher pods, which did end up being the technique I was looking for. Even so, I had to soak for 12 hours, give it a scrub, change the water, and then return it to soak. This technique took three days, but just look how it turned out!

While it was soaking, I was finally able to get a good look at the logo. It’s a Nomar braiser, and my research dates it from the late 1960’s to early 1970’s:

At some point Nomar was bought out by Staub, which is a competitor of Le Creuset. Apparently, back when they went by the Nomar name, the brand was an even stronger competitor. And Le Creuset is the be-all and end-all of cast iron ware these days!

My roaster holds about 2.5L, which puts it between Le Creuset’s 1.5L and 3.5L braisers… Which retail for $200 and $340 CAD, respectively. So my piece old Nomar was definitely worth the work I put into it!

And I have to say, it’s awfully pretty.

Jack-o’-Lantern Herb Pots

I grow most of my indoor plants (and some of my outdoor ones) in terracotta pots a) because I like the look of them, and b) because they’re inexpensive. I generally have a row of herbs growing in a window planter all year long. I was looking for a way to spruce them up for Halloween on the cheap.

I came up with this quick craft — and I do mean quick, as in it took me less than ten minutes to decorate five pots. There are all kinds of tutorials out there for how to paint or draw on terracotta pots to make them look like Jack-o’-lanterns, which is simplified by the pots already conveniently being orange. I wanted something a little less permanent, since I didn’t want to have to re-pot my herbs for every holiday.

I took a sheet of black construction paper and cut it out freehand into the appropriate shapes. If you’re not comfortable drawing or cutting freehand, you can always Google “Jack-o’-lantern face template” and either trace one of those designs or print it and cut it out. I then stuck the pieces onto the pot with tape. Any tape will work, but for something so temporary I prefer to use painter’s tape (any brand), which isn’t meant to stick forever and rarely leaves any sticky residue behind.

I really like how they all turned out! The plants in the pots make fun “hair” for the Jack-o’-lantern faces, which tickles my kids to no end. Those plants are, left to right: chives, oregano, baby pine tree (okay, technically not an herb; this craft will honestly work with any kind of plant, I just like how quickly and thickly herbs grow), thyme, and garlic chives.

I think that this craft cost me maybe a quarter? Of course, I already had the potted plants. If you don’t have that, the pots generally run only a few dollars for the smaller sizes (they’re generally available at dollar stores and at WalMart all year round), and you can pick up a small pot of herbs for only a few dollars more at your local grocery store or garden center. As a bonus, after Halloween you can use the herbs in your cooking.