613flea Saturday April 20th

It’s finally time for the Easter weekend edition of 613flea! I’ll be there as usual with my latest and greatest vintage housewares and kitchenware finds.

You can find me in pretty much the same spot as last month, a little bit left of the north door (the far left door on the long side of the building if you’re coming in from Bank Street).

Looking forward to seeing you there!

“New” Vintage Pyrex, Easter Edition

I’m super excited about the Easter edition of 613flea coming up this Saturday because I’ve managed to source some absolutely fabulous “new” vintage Pyrex! It’s all beautiful, and some of it has become quite rare.

1957-1966 Gooseberry Chip & Dip Cinderella Bowls

Pink Pyrex is highly prized because there weren’t all that many patterns released in this popular colour.

1957-1968 Butterprint Casseroles

Butterprint is an extremely popular design, so much so that when Pyrex released their modern “Vintage Charm” line, one of the most common is quite obviously an updated version of this pattern.

1958 Balloons Cinderella Bowl

The Balloons pattern is extremely rare; it was only released for the one year, so there weren’t many of them made. This has made it a highly sought-after collector’s item.

1960-1961 Golden Grapes Chip & Dip Cinderella Bowls

Golden Grapes is unusual because the design was printed on delphite blue rather than the more common opal ware. The gold colour actually comes from real gold, which means that these dishes, like any containing metal, are not microwave safe. (All of the other vintage Pyrex dishes without metal are microwave, oven, fridge, and freezer safe.)

1963-1967 Town and Country Casserole

The Town and Country kitchenware was available as a large mix-and-match series, which is why so many of them survive to this day. They’re not as rare as some of their older counterparts, but they remain colourful and versatile.

1972-1981 Butterfly Gold Mixing Bowls

With Butterfly Gold we start getting into colours and patterns that I remember from my childhood; many people who had children around my age would have received kitchenware in this pattern as a wedding gift.

1978-1983 Woodland Cinderella Bowl

The Woodland pattern is less common than the Butterfly Gold, although they’re from the same era.

As an aside, this was a battle I was constantly fighting while trying to get these photos: my cat really likes my light box. I’m not sure why I was surprised, as it was both warm from the lights and, well, it’s a box. I use a long exposure because the lights aren’t all that powerful, which is usually fine since the dishes don’t move, but it does mean that the cat interrupts with a blur.

1980’s Pyrex Checks & Cherries Bowls

Last but not least, I have these lovely Checks & Cherries bowls, which are probably the most recent items in my collection. I love the vibrant colours! This pattern is also very rare, although more so in the US than in Canada.

I’ve wrapped all of this Pyrex carefully and loaded it into boxes, ready to bring to the flea market on Saturday. I can’t wait! My favourite part of markets is when someone finds that one piece they’ve been looking for for what seems like forever. It’s so satisfying to see peoples’ faces light up with enthusiasm. It really makes my day!

Shades of Green Vintage Pyrex

I’m really happy to say that I’ll be at the April 20th edition of 613flea at Lansdowne Park! It was kind of touch-and-go there for a while because I missed the vendor application date. I got really sick with yet another sinus cold that week, and it just plain old slipped my mind. That’s one of the downsides to working for yourself: if you get sick, there’s nobody to fill in for you. Luckily the organizers of the market were able to squeeze me in, so I’ll be there with bells on!

The April market happens to fall on the Saturday of Easter weekend, which means everybody will be thinking spring, so I thought I should focus my attention on some of the more colourful items I could bring along. It turns out that I have a number of new-to-me green pieces!

I’m particularly fond of the way that the green shades gradually from light to darker on this large 1971-1972 Cinderella bowl in the pattern “Green Dot-Squares”.

The Spring Blossom pattern ran for quite a bit longer, from 1972-1979, and I think that’s why so many people of my generation have happy memories of it at their parents’ or grandparents’ house.

This nesting set of Cinderella mixing bowls in coordinating shades of green is also from the early 1970’s, although in my research I haven’t yet been able to narrow it down to a specific year.

These coordinating casserole dishes look great together, but I know they’re not all from the same decade. The top one, which is a vibrant lime green even though the photo doesn’t do it justice, began being manufactured in 1952 and continued into the 1960’s. The greenish-yellow and olive, though, were also made in the 1970’s to coordinate with the mixing bowls.

I have to admit, I rather enjoy researching new patterns and styles, although sometimes I don’t get the most precise results.

613flea Saturday March 9th

It’s finally that time again! This Saturday will be my first market of the season, and since I haven’t had a show in like three months I have so much new stuff to share. But first, the layout has changed a bit from last year, although I’m happy to say that I have a corner booth (perfect for my preferred layout) that is near where you could find me last year.

I’m still on the northwest side of the building, just a little further from the centre doors.

Since this is the March market and hence the one closest to Saint Patrick’s Day, I thought I’d showcase some of my green pieces.

These stacking Pyrex mixing bowls are from the 1980’s; this style remains a pretty constant favourite.

These Hazel-Atlas bowls have a lovely green ivy print.

This rather large oval casserole dish is from the 1972-1978 Pyrex Spring Blossom Green collection.

This is my most vibrantly green piece — although it’s only this bright under UV light. Granted, it’s still a lovely green otherwise. It’s Depression glass; this type is also known as uranium glass because a tiny bit of uranium in the mix is what gives it its colour. It’s also known as Vaseline glass in some places, but while all uranium glass may be called Vaseline glass due to its colour, all Vaseline glass may not be called uranium glass because it doesn’t all contain uranium. Don’t worry, there’s not enough uranium there for it to be dangerous; it’s no worse than eating a banana.

Hope to see you at 613flea!

“New” Vintage Pyrex Casserole Dishes

I know I’ve been posting so many pics lately of my “new” vintage pieces that I’m preparing for the upcoming market season, but I’m so hyped! I’ve found so many cool things that I can’t wait to share with you all. For example:

I’ve featured the Daisy pattern (1969-1970) on my blog before, but this is the first time I’ve had a casserole with the clear lid. It was also printed in the same pattern on a white lid during the same run.

The Early American pattern (1962-1971) was also called Early Canadian; the pattern is the same, but it was named differently for the different markets. It came in multiple colourways, and all of featured designs printed in 22-karat gold. Since microwave ovens only started to become affordable for home use in the early 1970’s, and common beginning in the 1980’s, the company wasn’t able to foresee the issues surrounding metal decoration for dishes. Therefore, as with all Pyrex dishes with gold designs, this one isn’t microwave safe — but it is still good for fridge, freezer, and oven.

The Wheat pattern, from 1978, is a little more versatile than its fancier brethren, since the non-metallic screen-printed design is microwave-safe.

Last but not least, I found two versions of the Market Garden print (1971-1982), which remains as colourful and detailed as the day they were printed. These dishes were labelled as JAJ pyrex, which means they were made before 1973, since Pyrex made in England was only labelled as such between 1921 and 1973; after that it would have been labelled Pyrex England, when the company changed hands. I do find that there is quite a stylistic difference between the dishes made by the American and English subsidiaries of the company. Overall, the ones with American or shared designs tend to be plainer and simpler. However, many of the ones released solely in England are much more complicated, often with multiple colours, finer lines, and designs that are closer to photos than line drawings. Which one is better is entirely a matter of personal preference, though; functionally, they all work just as well.

“New” Vintage Tupperware

I just received the email confirming that I’ve been accepted to the 613flea on March 9th — only three Saturdays away. Sadly, this means I’ll be missing the market this coming Saturday, February 23rd, as I have schedule conflicts that day. Even so, I’m really exited, and I have so many “new” items that I can’t wait to show!

A perennial favourite is the Tuperware Pick-A-Deli; it’s so popular that they still make them new (although the colours have changed over the years). I believe that they started making this design as early as the late 1960’s, although I’ve had a hard time finding a firm date on that one. It’s really great for storing pickles in vinegar, fruit in juice or syrup, pickled eggs in brine, carrot or celery sticks in water — just about any solid food that you’d generally store in a liquid, really. The trick is the strainer with the handle, which lets you lift the solids out of the liquids easily without making a mess.

Tupperware pitchers (or, as we called them in our household, juice jugs) are also very popular, and they’ve come in many shapes and sizes over the years. Variations on this look are still available new as well! For people of my generation, there’s something about the older styles that conjures childhood memories of Kool-Aid or frozen juices from concentrate, served in matching tumblers in the summertime.

This last one, now, made me laugh when I found it. I never knew that Tupperware paired up with Blockbuster to make popcorn bowls. I’d guess that this happened sometime in the 90’s, when now-defunct Blockbuster was at its most popular. Apparently this kind of promotion ran more than once, since now that I’ve known what to Google, I discovered that they also came with a “Blockbuster Music” logo. It’s essentially a 26-cup Fix-N-Mix bowl with different branding, which was originally intended to throw your salad fixings inside, add some dressing, and then close the lid to mix it all together. It could still be used for the same, but I have a feeling that the Blockbuster version was marketed to put popcorn in, add butter, salt, and/or other seasonings, and then close and shake to mix. How else were you supposed to use a large plastic mixing bowl to “make it a Blockbuster night”?

Resolutions

1. Crafting

This is a two-part resolution. Firstly, I’d like to use up the materials I have purchased over the years, and/or use recycled or thrifted materials whenever possible.

Secondly, I’d like to participate in more group or community projects, like Mochimochi Land’s Let’s Knit a Ball Pit — ideally using materials previously specified. The ball pit will be a part of Vogue Knitting LIVE in New York City, and once the event is over they will be donated to the American Foundation for Children with AIDS. I contributed the two knitted balls in the photo above to this project, and I really enjoyed it! I hope that they arrive in time. I’d like to keep the ball rolling, as it were, and donate my time and skills to other events, even if it’s something as simple as hats for the newborn babies at the local children’s hospital.

2. Environmental

I would like to try to decrease our household’s reliance on single-use plastic, and to continue to reuse, repurpose, and recycle. To me, that doesn’t mean being rid of plastics entirely; actually, I think it would be rather wasteful to completely be rid of the plastics we do have, just to buy all new replacements in another material. Rather, I’d like to commit to using recycled plastics, either post-consumer recycled commercial products, or finding a new home for second-hand plastic products, like the lunch boxes above that I bought at a thrift store.

3. In the Kitchen

I want to expand my cooking knowledge, skills, and style — while at the same time trying to keep it reasonably healthy. I think I’ve been stuck in a bit of a rut lately, and I want to do better! To that end, I have purchased even more second-hand cookbooks that I’m not only going to try out, but that I’m going to read through for ideas. At Thing 1’s request, I am looking into more Japanese food:

Sushi by Ryuichi Yoshii (1998)
The Japanese Kitchen by Kimiko Barber (2004)
Ten-Minute Bento by Megumi Fujii (2007)

Of all of the books that I have thrifted lately, I think I am most excited about The Japanese Kitchen, which helps break down and de-mystify each ingredient, and Ten Minute Bento, which is all about quick and easy (and I think will become a favourite cookbook to pull out to prep dinner on busy weeknights). There is a lot about Japanese cooking that I don’t know, but these books look like they’ll really help me get a better grasp on it.

In a more general vein, I have also picked up:

Gordon Ramsay’s Passion for Flavour by Gordon Ramsay (1996)
Deliciously Dairy Free: Fresh and Simple Lactose-Free Recipes for Healthy Eating Every Day by Lesley Waters (2015)
Gourmet Meals in Crappy Little Kitchens by Jennifer Schaertl (2010)
More Bread Machine Magic by Linda Rehberg and Lois Conway (1997)
Jamie Oliver’s FoodTube Presents: The Cake Book by Cupcake Jemma (2014)
Cocktails for Book Lovers by Tessa Smith McGovern (2014)

Now, some of these, like the cupcake book and the cocktail book, are just for fun — but shouldn’t cooking be fun? The dairy-free one and the one about cooking in small kitchens (and I have to say, that title grabbed my attention) are probably the ones I’d use the most, though. Yet every cookbook is a kind of inspiration for me, even if I don’t try a single dish.

4. Business

I think that it’s time for my business to expand from flea markets to online. I think I will start with local sales, since a lot of my products are both heavy and quite breakable. I just don’t know that it would be cost-effective to try to ship vintage Pyrex or, heaven forbid, cast iron cookware. But vintage Tupperware is both hardy and light enough to make the trip! I think that this expansion will challenge my photography skills (since product photography is quite different than casual snaps) and my organization skills. I’m also looking at how to make it all as environmentally-sound as possible; I especially don’t want to package items in styrofoam, bubble wrap, or air-filled bags, since they’re all single-use plastic. I’m looking into wool and straw and other biodegradable options. People shipped things without breaking them long before plastic was invented, so there have to be options. The question is, can I keep it cost-effective? Challenges, challenges!

So what are your resolutions for the New Year?

Portable Cutlery Set Tutorial

Recently, a video about a sea turtle that had to have a plastic straw removed from its nose went viral on the Internet. So powerful was the suffering of the poor animal in this video that it sparked plastic straw bans in many cities. As much as I appreciated the sentiment behind this move, my personal opinion is that it treats a symptom rather than the underlying disease. For example, to reduce plastic straw use, some restaurants redesigned the lids of their disposable cups — but continued distributing single-use plastic lids that could not be easily recycled. Bans also left many people with disabilities in a tight spot, since they have no options but to use disposable straws. Plastic straw bans don’t help any of the old straws already out there to get recycled instead of going into landfills — and according to this site it takes 100 to 500 years for a plastic straw to decompose. It doesn’t address recycling policies that keep plastics from being properly recycled in the first place. And once the furor raised by the video died down, a lot of people — and more importantly, a lot of companies — went back to single-use plastics without a second thought. As it stands right now, 89% of plastic is not recycled in Canada.

So I asked myself, what can I do? Well, I personally I can stop using plastic straws whenever possible, that’s a given. But in all of the viral-video-fueled excitement for people to buy their own personal reusable straws to use with their takeout food, I think a lot of people forgot about the disposable cutlery that goes hand with those straws. While personal cutlery sets have been available for years (and are especially popular with those who camp), and they’re definitely better than disposable, I think it’s possible to do better. Why? Because these are generally made with new materials.

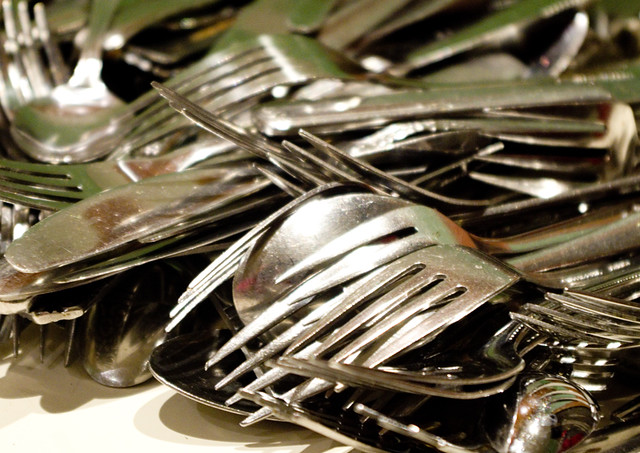
If you go out to any thrift store you will find that there is lots of perfectly good, used, stainless-steel cutlery that can have a second life as a portable cutlery set. Not only that, it’s generally quite affordable! When I buy vintage kitchenware for my market stall, it often comes with old cutlery thrown in; a lot of people don’t see its value. But all it needs is a recycled travel case to put it in so it can be thrown in a purse, briefcase, backpack, desk drawer, or lunch box.

I made up a bunch of these sets and brought them with me to the 613Christmas this past weekend. However, I think it’s more important to encourage everyone to use them than it is for me to make a profit, so I thought I’d share a tutorial online. It is very basic and can even be hand-sewn if desired. Of course, if you are a master sewer, you can probably make something even nicer, and I encourage you to do so! Experiment! Use even tinier scraps of fabric and quilt them together in incredible designs! Knit a case! Crochet! There’s no limit to the techniques you can use. What’s most important, to me, is that your materials be recycled — not only the cutlery, but also the textiles.

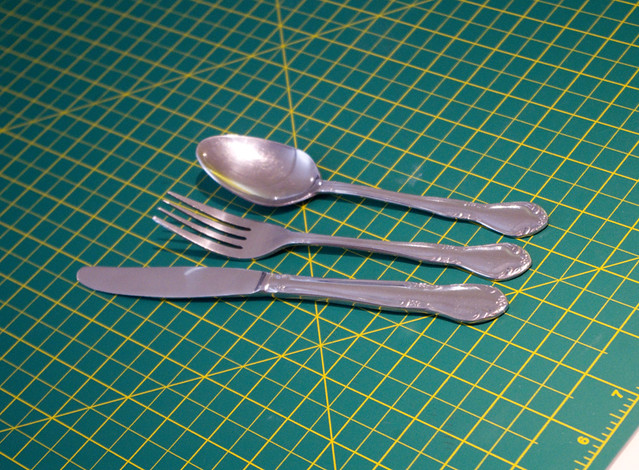
So your first step is to pick your cutlery. If you’re lucky they will all be from the same set, but they really don’t have to be. I recommend the basics of a knife, fork, and spoon, but you can also include a steak knife (although probably not if it’s to be brought to school), reusable chopsticks, and a reusable straw.

Secondly, you’ll need a piece of fabric, preferably recycled. It can come from old clothing, bedding, or draperies, but another good resource (if you don’t sew much yourself) is a friend or family member who sews, who will inevitably have lots of scraps and remnants that they just can’t bear to throw out, but would be happy to see used.

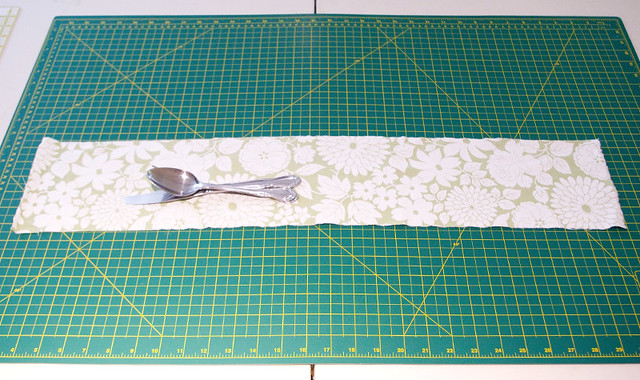
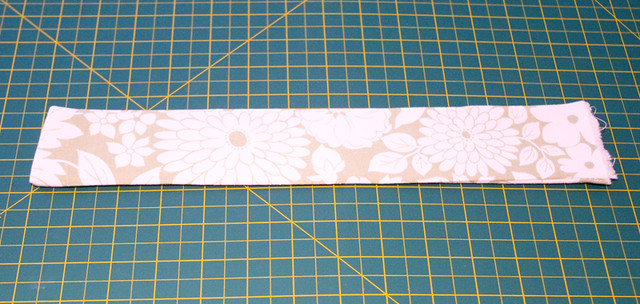
Cut a piece of fabric that, when the fabric is folded in half length-wise, is at least 6″ longer than your longest piece of cutlery. Width-wise, you want it to be twice as wide as the widest piece of cutlery, plus 4″ or so to allow for the depth of the deepest piece. I found that a 30″ x 6″ strip of fabric was adequate to comfortably accommodate every style of cutlery that I tried.

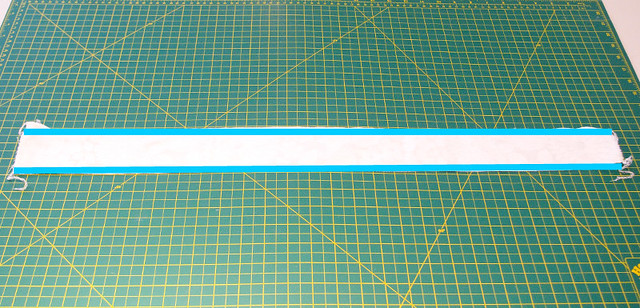
Fold the fabric in half so that it is long and skinny; in the case of our demo, it became 30″ x 3″. Make sure that the wrong side of the fabric faces out. Sew a seam with half of a centimeter of seam allowance around the two longest edges. Alternately, you can serge the edges, which is what I did. (Seams indicated by blue lines in the photo above.)

Turn the tube you have made halfway inside-right, so that the right side of the fabric is visible on the outside. The tube will now be half as long as when you started (15″). Press flat.

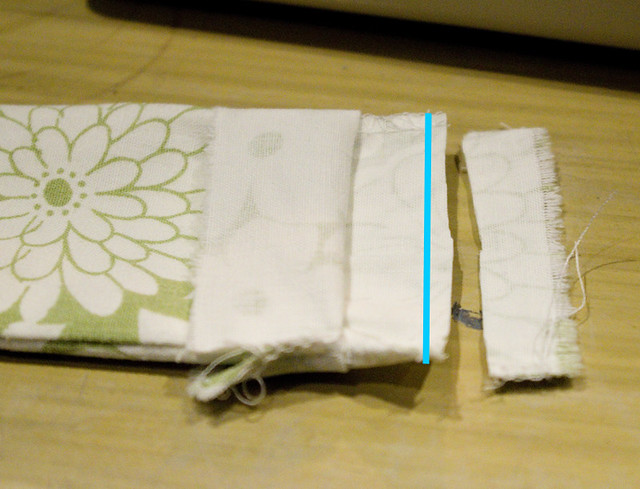
On the unfinished end, fold the top layer back about 4″. Sew a seam on the inside layer about 1″ into the fabric, as per the blue line in the photo. Leaving an allowance of about half a centimeter, cut off the excess fabric at the end.

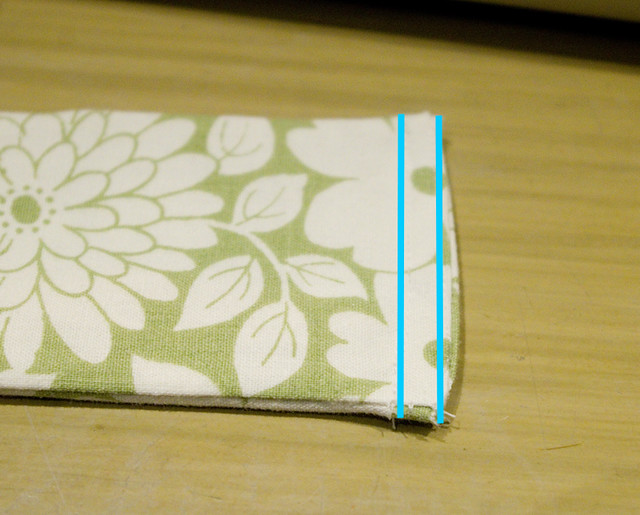
Fold the top layer back so that it lies flat. Fold the two unfinished edges of the top layer inside the tube, and stitch the end of the tube closed as close to the edge as possible (blue line on the right). Making sure to catch the inside layer, sew a second seam parallel to the first, about half a centimeter further in (blue line on the left).

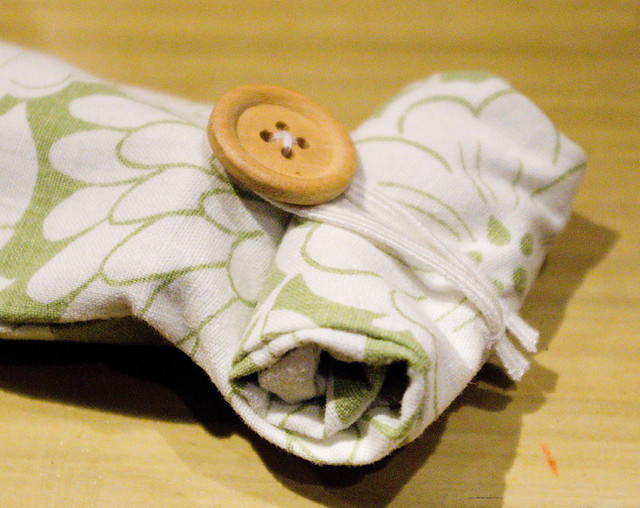
Insert your longest piece of cutlery (usually the knife) into the tube, making sure it goes all the way to the bottom. On the middle of one side of the tube, mark a spot 1″ down from the top of the knife; sew a button on there, making sure to sew it only to one side of the tube. On the other side of the tube, mark a spot 1/2″ from the top of the knife; sew a loop of elastic onto this spot. The length of the elastic will depend on the level of stretch and how big the button is, so it may take a bit of experimentation.

Insert all cutlery pieces in the tube, roll the top closed, and loop the elastic over the button to secure it.

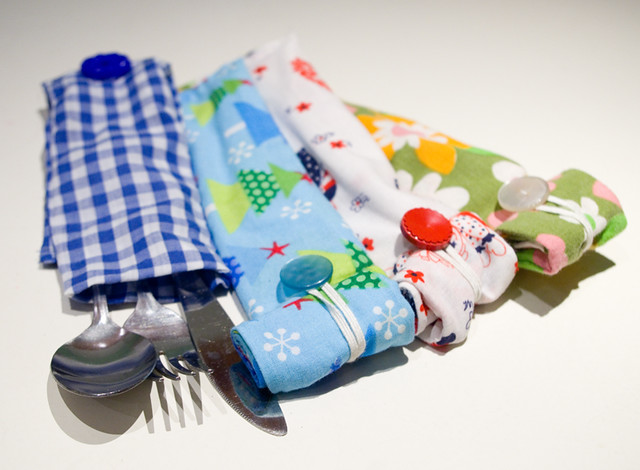
There you have it, your own personal recycled portable cutlery set. Make them for your friends and family this holiday season! They make great stocking stuffers and teacher appreciation gifts. And after many years of hard use, when the cutlery does finally wear out and the bag falls apart, the steel is recyclable and many fabrics are biodegradable. Even if you chose a synthetic fabric, it’s better that it be reused instead of going directly in the trash. Perhaps only the button (depending on the kind you chose) will end up in the garbage at the end of life of your portable cutlery set — and with any luck by then our recycling programs will accept them too.

613Christmas Saturday December 1st

Tomorrow is 613Chrismtas, 613flea’s once-a-year Christmas event, and I couldn’t be more excited to be participating! It’s my biggest market of the year, and even the weather is predicted to cooperate.

I have so much new stuff to bring that I can’t photograph it all. My bins for vintage Pyrex and Tupperware are overflowing, and I have a whole bunch of beautiful Blue Mountain Pottery that are waiting to be shown off. I’m enlisting my husband to help me set up so that I can bring a third table to fit it all (usually I only have two tables and lug it all myself). It means that my booth will look a little different than usual, but that’s so I can bring all of my very best “new” stuff!

There is a change of venue for this market: it’s at the much larger (and better-heated) Carleton University Fieldhouse. I’ll be more or less in the middle, in booth 808.

I’m happy to be able to say that I’ve upgraded my Square card reader for this event, so I’ll be able to take debit cards, Apple Pay, and Google Pay, as well as the usual credit cards and cash. The new machine makes it so easy!

So please pop by and say hi, even if vintage kitchenware isn’t your thing. I’m always excited to meet people who read my blog.

Cleaning Coloured Pyrex

At my last flea market, one of the other vendors (a lovely lady selling the most fabulous knitwear) asked me how I get my Pyrex so clean and shiny. She’d had some issues keeping hers looking its best, and was wondering if I had any tips or tricks. I kind of brushed it off with an, “Oh, I just wash it!” But later I thought about it and realized that I really do have a process that I use. I thought I would share it here so that I can help other collectors.

For the purpose of demonstration, I’ll use the two pieces that came into my possession recently. The top one is a JAJ Pyrex casserole in the Market Garden pattern from 1971. (James A. Jobling’s company produced Pyrex in England from 1921 through 1973, when the patent rights reverted to Corning; after this point, the “Pyrex England” backstamp was used.) The bottom is a rectangular casserole from 1956 by the American Pyrex division in the Snowflake pattern, which is the very first pattern that was ever screen printed onto Pyrex. Given the age and condition of these pieces, I really want to keep the designs intact. Most importantly, when I got them there were no chips or nicks, which is something even the best cleaning can’t fix!

To be honest, these dishes aren’t in the worst condition of the ones that have come into my collection; some good examples of how bad it can get are in my old Cleaning Glass post. As is quite common, the inside of the casseroles were in pretty good shape, since people are most picky about keeping the parts that touch their food in the best shape, but the bottoms were worse off. But do not despair if you see this brown residue on a dish that you want, since it will totally come off with a bit of work!

One of the most important things I can say about cleaning old coloured Pyrex, whether it be solid-colour or screen-printed, is not to put it in the dishwasher. They won’t warp or chip in there — after all, they’re meant for the oven and even the oldest are safe for the microwave if there’s no metallic trim. However, the harsh chemicals and high heat of the dishwasher can fade or even completely erase the beautiful colours over time, so I really would recommend avoiding it! Of course, modern Pyrex and Corningware are dishwasher-safe, so if you’re not sure of the age of a piece, look for the stamp on the bottom that labels it as such.

On the Market Garden piece, the worse part was where food debris had collected in the edge around the rim. This is usually really hard to get out, but I have a technique for that which works for most dishes.

When cleaning coloured Pyrex, one of the things you want to avoid the most is heavy-duty scrubbing. So, no highly abrasive cleaning powders or scouring pads! (Although I’m quite enamoured of Lee Valley’s stainless-steel chain mail scrubber, which is great for cast iron, it would utterly ruin a Pyrex dish.) So your best bet is to fill up a sink with hot water and a generous helping of dish soap, and then let that sit overnight. Yes, the same technique for tackling the roasting pan from the Christmas turkey works with Pyrex, but why wouldn’t it?

When it comes time to scrub the dishes in the soapy water, I like to use the double-sided cleaning sponges with the green scrubber. I find that they’re generally abrasive enough to get rid of stains, yet not abrasive enough to remove designs (unless you scrub for a really long time — always be careful!).

And here you can see my secret weapon: bamboo skewers. They’re perfect for getting into tiny little areas that accumulate grime, but because they’re so breakable it’s really difficult to scratch the finish with them. The wide end of the skewer can even be used to concentrate your effort on areas with a thick layer of baked-on grease; I used them to great effect on my enameled cast-iron pan. As a bonus, they’re not strong enough to go through the enamel on cast-iron either (on which you also don’t want to use anything too abrasive lest you damage the finish).

I was lucky this time in that the Snowflake dish came completely clean with this treatment, even though it looked like it was in the worst shape. So I only had to do the next step on the Market Garden piece: a paste of baking soda and lemon or lime juice. The juice is acidic and the baking soda is slightly abrasive, which makes for a perfect cleaning combination. I left the past on overnight to dry, then added more lemon juice to scrub off the stains the next morning. Then, for a super-shiny finish, I gave it one more good wash in dish soap and water.

Sometimes, with dishes in really rough shape, you have to repeat these steps a few times. One other thing you can try, although only as a last resort, is a sink full of hot water and a single dishwasher detergent packet, left to sit overnight. I only do this when the dishes have resisted every other cleaning method, because the detergent is really harsh and concentrated. But I much prefer using one of the packets instead of giving up altogether! However, this time I didn’t have to resort to such drastic measures.

So here are my cleaning results:

Pristine bottom surfaces.

Edges like new.

And interiors from which you’d be happy to serve any guest.

So next time you see an old Pyrex piece that’s a bit worse for wear, don’t automatically discard it because of the amount of work that’d be involved bringing it up to snuff. It may take a couple of rounds of soaking, but it can look like new again without all that much elbow grease!