Guinness Yeast Bread Recipe

March 17th is Saint Patrick’s Day, which to be honest isn’t observed very seriously in this neck of the woods. However, since I do have some Irish blood in me, I thought it might be nice to cook up a dinner that reflects (some of) my roots. Irish stew sounded great, since it’s more or less my default stew anyway. To go along with dinner, I wanted to make some Guinness bread. I searched my recipe books and online to find a recipe, and what I found was leavened with baking soda. Although I know that this is traditional, I’m not a big fan of the flavour of baking soda, so I turned my hand to creating my own, yeast-leavened recipe.

This is a very dark bread, more akin to what Maritimers call brown bread (coloured by molasses) than what is called brown bread on the Prairies (whole wheat bread). The Guinness adds a natural yeasty flavour and a rich colour. The recipe includes oatmeal, so these loaves are very dense and filling. This bread is delicious served with cheese, sausages, sliced lunch meats, and hearty stews.

Guinness Yeast Bread
Yields 2 loaves

In a large bowl, mix together:
1 cup (125g) large-flake oatmeal
1 1/2 cups 2% milk
Cover and leave to soak for 4 hours in the fridge.
Add to the bowl:
one 500mL can of Guinness beer, warmed to between 120ºF to 130ºF (49ºC to 54ºC)
2 Tbsp cooking molasses
In a second bowl, stir together:
4.5 cups (600g) all purpose whole wheat flour
10g quick-rise instant yeast
1 tsp salt
Add dry ingredients to wet ingredients. Stir together until well combined.
Gradually incorporate:
4 1/2 cups (500g) bread flour

Turn out dough onto a lightly floured surface and knead by hand for about 8 minutes. When kneaded, the dough should be smooth and elastic, but not sticky. If dough is sticky, add bread flour 1 Tbsp at a time until stickiness abates.

Oil a large mixing bowl. Form the dough into a ball and place it in the bowl. Cover the bowl with a clean, damp tea towel. Place the bowl in a warm, dry area with no drafts. Allow the dough to rise until double, about 1 hour.

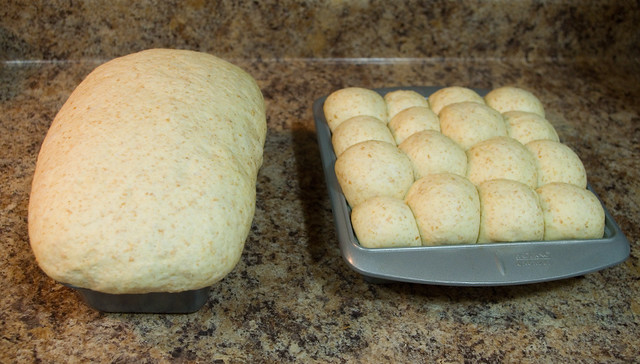
Punch down the dough. Grease two 9.5″x5.5″ loaf tins. Divide the dough into two equal-sized portions. Cover the pans with a clean, damp tea towel and allow to rise again until double, about 1 hour.

Lightly spritz the loaves with:
water
Dust the loaves with:
1 Tbsp large-flake oatmeal

Preheat oven to 450ºF (232ºC). Bake loaves for 10 minutes. Turn heat down to 350ºF (177ºC) and bake for about 30 to 40 minutes more. Check to see if the bread is done by removing a loaf from the pan and tapping it on the bottom. When cooked through, it should make a hollow sound. Remove both loaves from the pans immediately and place them on a wire cooling rack.

Guinness yeast bread can be eaten immediately, but it keeps well for up to a week if wrapped in a clean plastic bag. Make sure they are wrapped up only after totally cool, or they will go soggy.

Sock Chibi-Totoro & Snowgie Tutorial

One of the standards of children’s crafts is sock creatures, usually starting with puppets and moving on to more complicated projects from there. Sock creatures can be cheap, quick, and easy, which is exactly what you need with kids who can be easily frustrated when learning a new skill. As a bonus, basic sewing is something that everyone should learn, and sock creatures are a great way to teach sewing without it even seeming like a lesson.

I have made tutorials for two simple sock creatures based on characters from popular children’s movies. The first is Chibi-Totoro, who is the smallest of three adorable forest spirits from the 1988 movie My Neighbor Totoro. The second is a tiny snowman created by snow queen Elsa called a Snowgie, from the 2015 short Frozen Fever (which takes place in the same world as Disney’s Frozen).


Chibi-Totoro

Sock Chibi-Totoro Stuffie

Supplies Needed:
– one white sock
– 2 safety eyes or black buttons
– scraps of tan or peach felt
– polyester stuffing
– sewing needle
– white thread
– sewing scissors

1. Lay the sock on a flat surface.

2. Using sewing scissors, cut the sock as per the above photo. Discard the ankle and the toe, or save scraps for another project.

3. Turn the remaining piece of fabric sideways, so that the heel (which will be the tail) is at the back. Cut a deep vee into the top of the sock. The actual measurements of the vee will depend on the size of sock you use.

4. Whip-stitch the top of the vee closed; this will become the ears.

5. Turn the sock inside-out to hide the seam and to make the Chibi-Totoro as fluffy as possible. Attach safety eyes or sew on buttons.

6. Stuff the creature with polyester stuffing. Sew the bottom closed using an invisible closing seam; this will also ensure that the seam lies mostly flat.

7. Take a large stitch across the back of the stuffie where you want the join between the tail and the body to be. Pull the stitch tight and tie off, hiding the ends inside the body.

8. Cut out little clawed feet out of the felt and stitch them to the bottom of the body.

9. I discovered that my Chibi-Totoro would not stay up because its tail went down too far, so I took a big stitch from the back of the body to the top of the tail and pulled tight. This decreased the angle between body and tail so that the stuffie would stand up on its own.

Now your simple Chibi-Totoro stuffie is ready to be played with!


Snowgie

Sock Snowgie Stuffie

Supplies Needed:
– two white sock
– 2 safety eyes or black buttons
– scraps of dark blue and white felt
– polyester stuffing
– sewing needle
– white thread
– sewing scissors

1. Lay one sock on a flat surface.

2. Using sewing scissors, cut the sock as per the above photo. Discard the ankle and the toe, or save scraps for another project

3. Do a running stitch around one end of the tube, then pull tight and tie off.

4. Turn tube inside out so that fluffiest side is on the outside. Attach safety eyes or sew on buttons. Stuff the creature with polyester stuffing.

5. Gather the bottom of the tube together and sew tightly closed. Don’t worry if this isn’t perfect, as it will be hidden by the feet.

6. Wrap a doubled piece of thread around the middle of the tube and tie tightly, creating a head and a body.

7. Cut two rough circles out of the widest part of the second sock. These will become the feet.

8. Stitch a running stitch around the edge of one foot, fuzziest side of the fabric facing out. Stuff the foot. Pull the running stitch as tight as possible and tie off. Repeat for second foot. Sew both feet onto the bottom of the body of the stuffie.

9. Cut mouth and teeth out of felt scraps and sew onto face of stuffie. Your Snowgie is now complete!

Recycled Crayons Tutorial

Back in Girl Guides, we recycled our crayons by melting them in the microwave or in a double boiler, then pouring the different colours in layers into muffin tins (waiting for the wax to cool a bit between layers so they didn’t mix). I wanted to do something a little simpler than that with my kids yesterday — since they are younger than I was when first did this craft, I wanted a process that involved less handling of molten wax. However, this is still an activity that is done with kids, as opposed to setting them up and letting them go.

Recycled Crayons

Supplies Needed:
– old crayons
– molded cookie pans OR silicon molds rated for use in an oven OR muffin tins
– flat cookie pans
– utility knife
– large, heavy knife OR clear zipper bag and hammer
– cutting board

1. Sort through the kids’ crayons and separate out the old, broken ones, along with the ones that just don’t colour well.

2. Remove the paper wrappers from the crayons. The labels can be peeled off with your fingernails. However, the quickest way is to run the blade of a utility knife lightly down the paper to slit it, then peel it off. When I was doing it with my kids, I would cut the paper, and they would take it off.

3. Sort the crayons by colour.

4. Protect the work surface with a cutting board, then use the large knife to chop up the crayons into chunks that are approximately 1cm (0.4″) long. Sharp knives should be handled by an adult. Alternately, put each colour of crayon into a clear zipper bag, seal the bag, and smash the crayons into large chunks with a hammer. This may damage the surface underneath and will be noisy, so I suggest working on a concrete surface with a cutting board over top, and using ear protection.

5. Fill the molded cookie pans or silicon molds or muffin tins with the chunks of crayon. The molds should be almost overflowing, as the air pockets between crayon chunks will be filled as they melt. To create colour-coordinated crayons, fill each compartment with different shades of the same colour. To create more contrast, add chunks of coordinating colours. Be careful not to mix too many colours, though, as the colours will mix and they may turn an unlovely brown.

6. Preheat the oven to 200°F (93°C) (the oven temperature needs to be low so that the wax doesn’t catch fire). Put the crayon-filled molds on top of the flat cookie pans for support; this is especially important if using silicone molds, which are flexible. Anything to do with the oven should be done by an adult.

7. Bake until crayon chunks are thoroughly melted, 15 to 30 minutes, checking every 5 minutes after first 15 minutes is up to see if there are still any lumps. Remove trays carefully from oven, being careful not to spill the wax.

8. Cool the recycled crayons thoroughly before removing them from the molds. To make removing them easier, place them in the freezer (or anywhere outside in winter in Canada, so long as it’s protected from precipitation) until thoroughly chilled. Wax shrinks when it gets cold, so it will pull away from the sides of the mold and slide out more easily.

When I made these candles, I used three different kinds of molds:

– metal, nonstick Wilton PEEPS Bunny Shaped Cookie Pans ($3.00 each at the dollar store), which released easily
– a silicone Wilton PEEPS Chicks and Bunnies Treat Mold ($4.00 each at the dollar store), which released with a little more difficulty, but cleanly
– a silicone flower-shaped IKEA PLASTIS Ice Cube Tray ($1.99 at IKEA), which stuck to the wax, obscured detail, and were very difficult to remove

All in all, I much preferred the metal pans to the silicone versions.

We packaged these crayons up into little spring-themed bags and put them aside until the week before Easter to give out at school. Of course, we had to leave a few out for the kids to colour with right away, too.

Booboo Bunnies and Chicks Tutorial

It’s day two of March Break, and it’s still much too cold for this time of year. That means more crafts with the kiddos! Today’s craft was booboo bunnies and chicks, for which I have created a brief tutorial. They’re really very simple.

You may be wondering why are they called “booboo” animals. Well, it’s because the hole in the back of the animals caused by a loop in the fabric makes a great place to tuck an ice cube. The ice cube can then be applied to a child’s booboo without it getting their hands cold, and without it dripping all over the place. As an added bonus, the cuteness of the animal distracts the child from their injury. But don’t think that this is their only use! The hole in the back makes for a great place to stash an Easter candy; I’ve seen them made with beach towels so that one of those jumbo Kinder Eggs can fit inside. I’ve also seen them used as a creative way to present washcloths at a baby shower.

Booboo Bunny

Supplies Needed:
– one facecloth or dish cloth (without a pattern is best)
– 12″ of thin ribbon
– one pink pompom
– one white pompom
– two small googly eyes (with button shanks if you plan to sew them on)
– glue gun and glue OR needle and coordinating thread
– sharp scissors

1. Trim tags off of the cloth, if there are any.

2. Starting at one corner, roll the cloth diagonally until you have a tube.

3. Keeping the tube rolled tightly, fold it in half.


Top view.


Side view.

4. Keeping the tube rolled tightly, fold the open ends of the tube backwards. Secure by tying the ribbon tightly around the cloth, about 2/3 of the way along.

5. Tie the ribbon into a bow. Trim the ends with the scissors.

6. Using the hot glue gun, stick the two halves of the face securely together (otherwise it will look like a bum). Glue the eyes, nose, and tail to the bunny. Alternatively, sew the face together, and sew on the eyes, nose and tail. Sewing is the preferred method if you plan on using the cloth for other purposes at a later date.


Bunnicula Booboo Bunny

Don’t forget, booboo bunnies can be any colour of the rainbow! I just made white ones because that is the easiest colour of face cloth to find (and the cheapest). Don’t be afraid to experiment with decorating the bunnies, either. Above I added some glued-on felt “fangs” and used red googly eyes to create a “Bunnicula”, after a creature from a favourite childhood book. Be creative!

Booboo Chick

Supplies Needed:
– one facecloth or dish cloth (without a pattern is best)
– 12″ of thin ribbon
– scraps of yellow felt
– two small googly eyes (with button shanks if you plan to sew them on)
– glue gun and glue OR needle and coordinating thread
– sharp scissors

1. to 3. Follow steps 1-3 of the Booboo Bunny tutorial.

4. Instead of folding the cloth roll back on itself, fold it to either side, creating an “M” shape. Secure by tying the ribbon tightly around the cloth, about 2/3 of the way up.

5. Cut out scraps of felt for the beak and feet, proportionate to the size of the cloth that you are using.

6. Glue both sides of the head together, then glue on the felt pieces and googly eyes. Alternatively, sew the face together, and sew on the eyes, beak, and feet.

Once again, be creative! A chick easily turns into a penguin if you use a black cloth.

Bunnies and chicks! Now you’re all set for spring.

Beginner Books Tutorial

March Break is here for those of us with kids in the English public school system in Ontario, and that means that many of us who aren’t going away on vacation are scrambling to find something for our kids to do. Usually that means digging out the bikes for the first rides of the year, or pulling on the rain boots to go puddle jumping. Well, not this year. This year has been one of the coldest months of March on record (it was about -30°C (-22°F) with the wind chill last night), following a record-breaking warm February. That means all the snow melted a bit, then turned to ice, and isn’t good for winter fun — when we want to brave the cold at all. Hence, we are planning a lot of indoor activities

Around here there are indoor play places and child-friendly museums open year-round; rec centers have special events planned; most businesses have something going on to entertain the kids. But one thing that having a huge chunk of the under-fourteen demographic off school all at the same time means is that everything is packed. So in our house we choose to make our own fun rather than wait in line or squeeze through the masses.

With that in mind, here is a tutorial for one of my kids’ favourite crafts: beginner books. There are two versions: one for the younger crowd, which only requires mastery of a pair of scissors and a blunt darning needle, and a slightly fancier one that requires more sophisticated tools, a bit of patience, and more adult supervision.

Basic Book

Supplies Needed:
– one piece of 12″ x 9″ (30.5cm x 22.9cm) coloured construction paper
– 5 to 7 pieces of 8.5″ x 11″ (21.6cm x 27.9cm) blank paper (recycled or GOOS (good on one side) is fine)
– 24″ (61cm) yarn or string
– scissors
– blunt-tipped darning needle with large hole
– art supplies for decorating front cover of book, if desired

1. Put your construction paper and blank paper on a flat surface.

2. Fold the construction paper in half. Fold the stack of blank paper in half. Place the blank paper inside the construction paper.

3. Using the scissors, cut five small slits along the folded edge of the booklet. For best results, work from the center out. Make sure that the slits go through all of the papers.

4. Thread the darning needle with the wool. Starting at inside of the the center slit and leaving about a 3″ (7.6cm) tail behind, start stitching in one direction (it doesn’t matter which).

5. When you reach the slit closest to the edge, wrap the yarn around the edge and come back up through the same hole, then continue stitching in the reverse direction. Make sure to tug the yarn snug, but not so tight that it crinkles the paper.

6. When you get to the other end of the book, wrap the yarn around the edge as you did for the opposite end, and continue stitching.

7. Stitching this way should eventually bring you back to the center of the book on the inside. Keeping the yarn snug, but once again not so snug that it wrinkles the paper, tie a double or triple knot in the yarn. Trim the yarn to about 1/2″ (1.25cm) long.

8. If desired, decorate the cover of the book, as per the first photo. Your book is done and ready to be filled!

Fancy Book


Finished fancy book using dollar store contact paper.

Supplies Needed:
– thin cardboard from a cereal box or other packaging
– self-adhesive peel-and-stick contact paper or laminate, OR wrapping paper/wallpaper, spray adhesive, and a glue stick
– 5 to 7 pieces of 8.5″ x 11″ (21.6cm x 27.9cm) blank paper (recycled or GOOS (good on one side) is fine)
– 36″ (91cm) thin ribbon
– 2 large-bore beads
– blunt-tipped darning needle with large hole
– scissors
– pen
– utility knife
– hammer
– 5 nails
– scrap wood

1. Trim the largest flat part of your cereal box until it is rectangular.

2. Trim your contact/wrapping/wall paper until it is 1″ larger all around than the cardboard.

3. Peel the backing off of the contact paper and adhere it carefully to the outside of the cardboard, pressing out air bubbles as you go. If you are using wrapping/wall paper, go outside and spray the cardboard with spray adhesive. (The spraying should be done by an adult.) Come back inside and place the sticky side of the cardboard on the back of the wrapping/wall paper. With any kind of paper, fold the excess to the inside of the box and trim the corners. If using wrapping/wall paper, stick the excess to the cardboard using a glue stick.

4. Using a pen, draw a line down the center of the interior of the cover where the spine will be. Then use a utility knife to score the line, being careful not to cut through the paper. (Cutting with sharp knives should be done by an adult.)

5. Fold the cover in half along the scored line.

6. If necessary, trim your blank paper so that it is about 1/2″ (1.25cm) smaller all the way around than the cover. Fold the blank paper in half and line it up with the center of the cover.

7. Place the scrap wood under the spine of the book. Using the hammer and being very careful to keep the pages from moving, tap the nails through the blank paper and the cover all at once. For best results, work from the center out. Remove the nails.


Finished fancy book using IKEA wrapping paper.

8. With the same technique as the basic book but starting at the bottom of the book, sew the spine together using the darning needle. Leave the tail much longer this time as ornamentation. To secure the ribbon, tie into a double knot at the bottom of the book. Thread one bead on each end of the ribbon and knot underneath to add a bit of pizzazz. Your book is done!

Optionally, you can use a glue stick to stick the first page to the inside of the front cover, and the last page to the inside of the back cover. This will create a more finished look.

I hope that your kids enjoy this craft as much as mine do!

German Cuisine Inspiration

A lot of my inspiration for learning how to cook “gut bürgerliche Küche” comes from my trip last year to Hamburg, since I wasn’t exposed to much German cuisine when I was growing up. Hamburg is a port city, and as such a lot of their food features ingredients from both the sea and from their trading partners. What North Americans may consider to be traditional German food tends to be Bavarian, which is both further inland and further south — and much different in both ingredients and flavour.

Of course, since we were staying in hotels, we never had a chance for a truly home-cooked meal. But I thought I would put the photos of some of my meals up here to act as future inspiration in my personal challenge to become more competent at cooking German food.


Breakfast at Dat Backhus, Lange Reihe 29, 20099 Hamburg, Germany. What I believe was smoked salmon and pickled egg on a half of a bun. There was some kind of mayonnaise concoction between the fish and the bread.


My dinner at a German pub on Lange Reihe. I had breaded and fried fish, fries, and a salad.


My husband’s dinner at the German pub. He had sausage and gravy, mashed potatoes, and sauerkraut.


Breakfast at Stadt Backerei (City Bakery), Lange Reihe 52, 20099 Hamburg, Germany. The bun on the left held a mix of salad shrimp and mayonnaise. The one on the right was scrambled eggs and bacon.


My husband’s fish in cream sauce at a restaurant right off of the pier and Landungsbrücken station.


My fried fish sampler and salad at the same restaurant.


My meatloaf (possibly Leberkäse?) that I ate at a restaurant in Berlin. Honestly, this was the only dish that I truly disliked during my trip. It tasted over-preserved and reminded me way too much of canned meat.


My husband, on the other hand, ordered pork knuckle from the same restaurant in Berlin, and it was absolutely delicious. I want one of my own sometime!


Hamburg Pho at Pho Duc, Steindamm 103, 20099 Hamburg, Germany. The noodles are wider than I am used to for pho. What makes it a Hamburg specialty? Apparently beef meatballs, fresh beef, and braised beef slices. It was very tasty.


My steak and potato dinner on my last night of the trip was at a higher-end restaurant, and it was delicious, although I don’t think it really counts as typical German food. I believe the restaurant was actually Mediterranean.

Beginner’s German Cooking

My husband and I have been married for almost ten years now, and we have been together for fifteen. For all of that time, I have been the primary cook in the house. So I hope you can understand how surprised I was when my husband complained a month or so ago that I have made all kinds of foods based in my Canadian and British heritage, but I never cooked anything from his German background except the occasional bratwurst. This was the first time he’d requested German food in the fifteen years we have been together. I really wish he’d said something sooner. New cuisine has a learning curve!


Königsberg Meatballs from page 70 of Grandma’s German Cookbook by Linn Schmidt & Birgit Hamm (2012). Delicious and very filling. Served here with boiled potato cubes.

Now, I love trying new dishes, that’s not the problem. It’s just that I had never cooked anything specifically German before. (This was before my experimentation with labskaus.) I asked my mother-in-law if she could suggest any books or other resources that might help; she gave me her extra copy of her favourite German cookbook, ‘Round the World Cooking Library: German Cooking by Arne Krüger (1973). From the introduction:

“A word that the Germans themselves use to describe many aspects of German life is “gründlich”, meaning solid. Like most national characteristics, the German reputation for extreme thoroughness and heavyhanded seriousness has been exaggerated. But no one — and particularly not the Germans themselves — would deny the German passion for organizing everything down to the smallest detail, or their profound distrust of improvisation. This applies not only to their cars and cameras, but to their cooking as well. German cooking may not possess the fantasy and imagination of Italian cooking, or the delicate refinements of French cooking, but this does not mean that German cooking is bad. On the contrary. German home cooking (which the Germans call “gut bürgerliche Küche”, or good plain cooking) is honest, down-to-earth, simple and substantial; it is perfectly in tune with the earnest spirit of German life.”

(As an aside, I ran “gut bürgerliche Küche” through Babelfish, and it came back with “good middle class cuisine”, which seems close enough.)


Chicken Stroganoff from page 78 of The German Kitchen: Traditional Recipes, Regional Favorites by Christopher and Catherine Knuth (2013). Quite tasty. I thought stroganoff was a Russian dish, but in this book it was presented as German, so what do I know? Served here with brown rice and steamed white & orange sweet potato cubes.

While German Cooking has been a great resource, I needed to read up further. I scoured my local library for German cookbooks and put a whole stack of them on reserve when they weren’t immediately available. I’ve read and reread them a number of times. I’ve tried out a few of the dishes and I think I am starting to get a rough grasp on them. I think the hardest part so far has been finding the proper ingredients. One bread recipe, for example, called for (among other ingredients) spelt flour and malt powder. I was finally able to find the spelt flour in a health food shop, but the malt powder eluded me for some time. I eventually went to a brew-your-own-beer place, which did have wheat malt powder for sale. I never did find barley malt powder, which I’m told is the standard in Europe. Also, sometimes the malt is sweet, and is sold in a syrup that is eaten the same way one would eat molasses here. Is there a powdered version of this syrup, like how you can get maple sugar? If there is, I haven’t seen it. Which kind of malt powder did they mean? It’s probably perfectly obvious to someone who has made this these dishes before, but for a beginner in German cuisine… I’m just not conversant with all the variations of the ingredients. But I am learning!

Nan’s Pan Rolls Recipe

I’ve mentioned before that I regret not asking my grandmother for copies of her recipes; honestly, I felt like that indomitable old lady was too tough to die, until the very day that she passed away. As I grew up, I did less and less cooking with her — she would cook for me or I for her, but rarely did we cook together anymore. It became all that much more difficult once my attention (and hers as well) was focused on my children. I didn’t realize that it would be something I missed so much.


White pan rolls straight out of the oven.

In Nan’s memory, I’ve been trying to recreate her famous pan roll recipe. Whenever we were in town, or she was visiting us, Nan was always the one to cook Sunday dinner (which was always understood to mean “roast beef dinner”). Her fresh rolls were an integral part of that meal, and came to be considered by all the family as the proper accompaniment. She would start the dough and leave it to rise before she left for church in the morning, then punch it down and form the rolls immediately upon returning home. It was a Sunday ritual.


White flour pan rolls after the second rise.

To me, pan rolls should be squished as tightly as possible into their pan so that, when they rise, they rise upward and become tall and skinny once they are pulled away from their fellows. They should be yeasty, but not too fluffy, and fairly filling. They should be golden on top, crispy around the edges, and soft (but not raw) in the middle. With this recipe, I think I’ve made them as close to what Nan made as I possibly can.


White pan rolls after the second rise.

Nan’s Pan Rolls
Yields 35 rolls

In a large bowl, mix together:
4 1/2 cups (500g) all-purpose flour*
2 packages (14g) quick-rise instant yeast
2 1/2 tsp salt
Add to the dry ingredients:
3 cups very warm water (120ºF to 130ºF)
2 large eggs
1/4 cup (4 Tbsp) lard, melted
Stir by hand until mixture is more-or-less smooth.
Gradually mix in:
4 1/2 cups (500g) all-purpose flour
If the dough starts to become tough to knead, do not add any more flour. When flour is fully incorporated, dough should be smooth and elastic, but not sticky. If dough is sticky, add all-purpose flour 1 Tbsp at a time until stickiness abates.


Whole wheat dough divided in half and made half into pan rolls, half into a loaf of bread, after the second rise.

Turn out dough onto a lightly floured surface and knead by hand for about 8 minutes. Oil a large mixing bowl. Form the dough into a ball and place it in the bowl. Cover the bowl with a clean, damp tea towel. Place the bowl in a warm, dry area with no drafts. Allow the dough to rise until double, about 1 hour.

Punch down the dough. Grease a 9″x13″ cake pan. Divide the dough into 35 approximately equal-sized portions. Form the portions into balls and place them in lines closely together to fill up the cake pan.** Cover the pan with a clean, damp tea towel and allow to rise again until double, about 1 hour.


Whole wheat loaf after baking.

Preheat your oven to 450ºF (232ºC). Bake rolls for 10 minutes. Turn heat down to 350ºF (177ºC) and bake for about 20 minutes more. Check to see if they are done by removing the rolls all in one piece from the pan and tapping them on the bottom. When cooked through, they should make a hollow sound. Remove the rolls from the pan immediately and place them on a wire cooling rack.

To create the glossy shine on top of the rolls, use waxed paper to pick up:
1/2 to 1 Tbsp cold butter
Rub the tops of the rolls with the butter, keeping the waxed paper between the butter and your hand.

Nan’s pan rolls taste best when served immediately; to keep them at their freshest, pull them apart only when they are about to be eaten. These rolls will keep for three or four days if wrapped in a clean plastic bag. Make sure they are wrapped up only after totally cool, or they will go soggy.


Whole wheat pan rolls being pulled apart by my temporarily-tattooed Thing 1.

*For whole wheat bread, replace the first 4 1/2 cups of all-purpose flour with all-purpose whole wheat flour.

**Alternately, this recipe makes two good-sized loaves of bread. I used a slightly too-small loaf pan to create a “mushroom-top” loaf; if you want your loaf to have smoother sides, use a pan that is at least 9.5″x5.5″. You could also make three smaller loaves in smaller loaf pans instead of two big ones. Allow the loaves to have a second rise as per pan roll instructions. Be careful of cooking times if you change the shape of the end product. Bread loaves will take 10min at 450ºF (232ºC), and then they must be turned down to 350ºF (177ºC). However, how long they stay in at 350ºF depends on the size of loaves you make. When in doubt, bake for less time and check often to see if they’re done.

Chicken Noodle Soup

Back in high school, before the Internet was really a thing and email had only just caught on, I had a pen pal from Japan. I would spend hours composing letters to her, trying desperately to form coherent sentences with an extraordinarily limited grasp of the Japanese language. Her letters, written for the most part in English, showed her struggle with a new language as well. Even so, we communicated fairly well without being able to rely on body language, tone of voice, or facial expression (if at a fairly low grade level). That is, until I mentioned chicken noodle soup.

My pen-pal wrote that she had been suffering through a cold, and I made an offhand comment in my reply along the lines of, “Make sure you have your chicken noodle soup!” Her reply was sheer confusion. These days she would have Googled it on her smartphone, but that wasn’t an option back then. What was so special about chicken noodle soup?


Chicken noodle soup made with ditalini noodles, with a bacon and avocado sandwich on homemade German Beer Bread (World Breads: From Pain de Campagne to Paratha, page 19).

To be honest, the chicken noodle soup that I had when I was growing up wasn’t special at all. It came from a can if I was lucky; it would be plopped as a gelatinous tube of goo into a pot with a couple of cans of water, then stirred until smooth and heated until warmed through. If I was unlucky, or if we were camping, we had the dried soup mix instead. I have to admit that I didn’t really like either of these options, and it’s not because I don’t like instant soups. I use cream of mushroom soup in a number of recipes, and dried onion soup mix is a key ingredient in a great chip dip. I thought that I just didn’t like chicken noodle soup. (This didn’t stop me from having it when I was sick, though. Also being pampered by my mom, drinking flat ginger ale, burrowing under a pile of blankets on the couch to watch bad daytime TV, and draping my head with a towel then holding it over a bowl of hot water to let the steam clear my sinuses.)


Chicken noodle soup made with ditalini noodles and a few more spices, with a chicken salad, cheddar cheese, and spinach sandwiches on homemade Nan’s Pan Rolls, and navel orange slices on the side.

Then, last week I had a crock pot full of chicken bones simmering away for broth, and I thought to myself, “Why not?” I had never made chicken noodle soup from scratch before. I knew that if I didn’t end up liking it, the rest of the family likes the canned version, so it probably wouldn’t go to waste. I followed the Chicken Noodle Soup recipe on page 125 of the Joy of Cooking (2006 edition). And you know what? I actually quite liked it. Homemade doesn’t taste much like the canned stuff at all.

I was happy enough with the recipe that I made soup and sandwiches again yesterday after having to pick my daughter up sick from school. The jury’s out on whether this soup has any true health benefits, but it’s warm and comforting and easy on the stomach, so it’s good to eat when you’re not feeling well. It’s not much more difficult to turn into a meal than the canned stuff, either — so long as you have some broth in the freezer (which I almost always do).

Did I ever properly explain the chicken noodle soup tradition to my Japanese pen pal? Knowing my grasp of the language, probably not. I did try. I even sent her a package of the dried stuff and gave my best shot at translating the directions. Should she ever come to Canada, I think I’d like her to try my homemade version. Then she might understand why, to many Canadians, chicken noodle soup is a true comfort food.

English Muffins

I love English muffins, and not because I am of British ancestry. English muffins aren’t English at all, really; the dish as we know it today was developed by Samuel Bath Thomas in New York City in the late 1800’s. However Thomas, who came from England, did base his recipe on the yeast-leavened muffins sold door-to-door in his home country, back before most people had ovens in their homes. Those were the kind of muffins that they were talking about in the song “Do You Know the Muffin Man”. In England they are just called “muffins”, and are differentiated from quick bread muffins by context.

Thomas English muffins are still sold in the United States today, but so far as I can tell aren’t distributed in Canada. So the English muffins we have here are imitations of an American product, which is in itself an imitation of a British product. I’m sure we’re not getting the most authentic muffin experience here.

So a couple of weekends ago I decided to take a stab at making my own English muffins. The first thing I had to do was make sure I had the correct equipment. Until I tried to make them, I didn’t know that English muffins weren’t baked; I discovered that I would needed a griddle (which is why they’re sometimes called “griddle muffins”).

My stove is a bit atypical. It it a hand-me-down from family who were upgrading, but it was a very fancy model (Jenn-Air F121-C) thirty years ago when it was new. Each side of the stove-top can be removed and switched out; there are simple electric burner panels, a ceramic cook-top panel, a grill panel, and a griddle panel. Although all of these extras came with the stove, I had only ever used the electric burners, so switching for the griddle was an interesting experience, seeing as the stove’s user manual disappeared ages ago.

Another piece of equipment I needed was English muffin rings… Which I didn’t have, and would have been hard to find on a Sunday morning when most stores were closed. So I chose a recipe that made a more cohesive muffin and didn’t need the rings: How To Make English Muffins from TheKitchn.com

The muffins were tasty, but I wasn’t a hundred percent satisfied with the internal texture. My muffins rose nicely, but solidly, and as such were missing the large nooks and crannies that are, to me, the signature characteristic of a proper English muffin. I’m not sure if that was a problem with the recipe or with my technique. I did the quick version of the recipe and started it that morning. TheKitchen.com says that the starter can ferment overnight and the dough can be left to rise for up to three days in the fridge, so perhaps I will try it that way next time. If I still don’t get the texture I’m looking for, I’ll invest in the English muffin rings and try a different recipe.

That being said, the muffins that I made were definitely edible, and I don’t think the batch even lasted the day. I served them with bacon, cheese, and a fried egg for lunch, and they were eaten spread with elderberry jam as snacks in the evening. My family obviously isn’t nearly as critical of my end results as I am, since they have asked me to make them again soon.