Jack-o’-Lantern Herb Pots

I grow most of my indoor plants (and some of my outdoor ones) in terracotta pots a) because I like the look of them, and b) because they’re inexpensive. I generally have a row of herbs growing in a window planter all year long. I was looking for a way to spruce them up for Halloween on the cheap.

I came up with this quick craft — and I do mean quick, as in it took me less than ten minutes to decorate five pots. There are all kinds of tutorials out there for how to paint or draw on terracotta pots to make them look like Jack-o’-lanterns, which is simplified by the pots already conveniently being orange. I wanted something a little less permanent, since I didn’t want to have to re-pot my herbs for every holiday.

I took a sheet of black construction paper and cut it out freehand into the appropriate shapes. If you’re not comfortable drawing or cutting freehand, you can always Google “Jack-o’-lantern face template” and either trace one of those designs or print it and cut it out. I then stuck the pieces onto the pot with tape. Any tape will work, but for something so temporary I prefer to use painter’s tape (any brand), which isn’t meant to stick forever and rarely leaves any sticky residue behind.

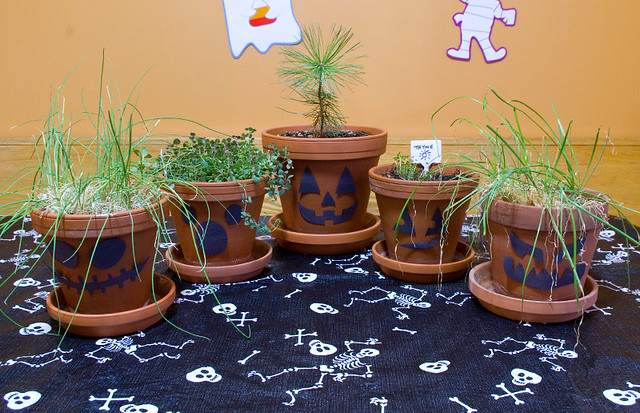
I really like how they all turned out! The plants in the pots make fun “hair” for the Jack-o’-lantern faces, which tickles my kids to no end. Those plants are, left to right: chives, oregano, baby pine tree (okay, technically not an herb; this craft will honestly work with any kind of plant, I just like how quickly and thickly herbs grow), thyme, and garlic chives.

I think that this craft cost me maybe a quarter? Of course, I already had the potted plants. If you don’t have that, the pots generally run only a few dollars for the smaller sizes (they’re generally available at dollar stores and at WalMart all year round), and you can pick up a small pot of herbs for only a few dollars more at your local grocery store or garden center. As a bonus, after Halloween you can use the herbs in your cooking.

Warm, Hearty Suppers for Chilly Days

With my backlog of canning to do and a whole lot of events, parties, and decorating happening before Hallowe’en, I haven’t been making too many complicated meals lately. Now that the temperature has finally dropped (last night it dipped below freezing), that means that I’ve been trying to make hearty suppers that don’t take too much advanced preparation.


Sloppy Joes with a side of acorn squash with butter and brown sugar.

Believe it or not, I’d never made Sloppy Joes before. It’s just not something we ever ate as a family. The closest we’d get would be open- or closed-faced sandwiches of chopped up bits of leftover beef, pork, or chicken, smothered in leftover gravy. But I’d taken the Amish Community Cookbook (2017) out of the library, and I wanted to try at least one recipe from it before I had to return it. I didn’t think that Sloppy Joes were a particularly Amish dish, but there was an uncomplicated recipe on page 63, so I gave it a shot. It was really good! I had my parents over for dinner and they liked it too. My mom pointed out that the sauce is actually a lot like the one she uses for slow-cooker pulled pork, and I have to agree (keeping in mind that I love pulled pork too).


Curry butternut soup with Dad’s biscuits.

The other night I needed something I could put together quickly, so I dug through my freezer and thawed out a couple of containers of curry butternut squash soup. I’m pretty sure that my mom made this dish and shared it with me, because I certainly don’t remember making it. The label was dated December 2016, though, so it might just be time making me forget. My husband pointed out that the labels were in his writing and the containers were our own, which indicates that I’d made the soup, but I think it’s just as plausible that I had to return my mom’s original container. Either way, I don’t know what the recipe was for this one (another one of those pre-blog things), but it was perfect for a cold fall evening. The biscuits I served alongside were Dad’s Biscuits, which I whipped up in about the same amount of time it took to thaw the soup on the stove.

Since we already had some steaming fresh biscuits, I cracked open the jar of mirabelle plum jam that my friend made from the fruit of her neighbour’s plum tree. I spread the jam generously on biscuits as dessert. My mouth is watering just thinking about that it. My friend was a little worried about the set, thinking that it would be a little bit too runny, but I thought it was perfect.


Leftover chicken ramen.

Despite the flowers (a hostess gift from my honorary aunt), this dish was anything but fancy. I made up some ramen using turkey broth (made from the bones of the Thanksgiving turkey) flavoured with a dash of Memmi Noodle Soup Base. I topped the noodles with leftover rotisserie chicken, soft-boiled eggs, and steamed carrots. My family added masago (capelin roe) and dried shrimp to their tastes. It was hearty, filling, and good for what ails you — especially if what ails you is the cold that seems to be going around right now. I’ve always found that steamy bowls of soup help clear out the sinuses.

Cottage Supper

Supper at the cottage is always an informal affair. We often come to the table in bathing suits (if we’re not freezing after coming out of the lake), or wrapped up in sweaters and woolly socks when the evening turns chilly.

Food is often served directly from the stove, but this day we were feeling especially fancy, so we placed on the table in the dishes they were cooked in.

The main part of this dinner was an easy dish that my family has always tongue-in-cheek called “slop”. Basically, you fry up some onions and garlic (or in this case, garlic scapes), add ground beef (or a ground beef/ground chicken/ground turkey mixture, depending on what we have on hand), frying until browned. Drain off the grease, add a can of cream of mushroom soup, and a can of water. Optionally, you may add cooked frozen vegetables to the mixture at this point. Boil down the soup mixture until it has the consistency of a thick gravy. Serve the meat mixture over mashed potatoes or rice.

This time we served slop with a number of vegetables on the side; I had cherry tomatoes with basil, topped with goat cheese, as well as steamed spinach. We also served Brussels sprouts and broccoli, both steamed.

Ketchup Chip Chicken & Canada Day Rice Krispies Squares

It’s a hectic time of year, what with the kids’ end of school and all of the events that that entails, and all of the preparation for Canada’s 150th. So last night I focused on easy, stress-free food.

For dinner I whipped up some ketchup chip chicken, rice, and sliced gala apples. I’d read somewhere that it’s possible to use crushed potato chips as breading, and apparently ketchup chips are only available in Canada, so I combined the ideas for this celebration-themed meal. To bread the chicken thighs, I first dredged them in flour, then dipped them in beaten eggs, and then finally rolled them in ketchup chip crumbs. About 40min in the oven at at 350°F (175°C) on an oiled broiler pan, and it was done. While the chicken was cooking, I steamed my rice and chopped up my apples, and dinner was complete.

Not surprisingly, if you use potato chips as a breading, the final product ends up tasting like the flavour of chips you choose. The smell of this chicken strongly reminded me of hot dogs; perhaps the smell I associate with hot dogs is really that of warm ketchup and vinegar. The chips provide a nice crunch that I think would work equally well on the barbecue or, if you’re feeling really decadent, deep fried.

I also had to make up treats for my kids’ school Canada Day celebration, so I went with the time-honoured last-minute classic of Rice Krispies Squares using the microwave version of the recipe found on the box (and online). I used maple-flavoured marshmallows instead of regular ones for a more Canadian twist.

To make the treats look more appropriate for the holiday, I sprinkled them with red and white sprinkles. The presentation wasn’t all it could have been, but I wanted to use recyclable dishes so that I didn’t have to worry about the kids breaking them or not bringing them home. After making these squares, I kind of felt like the woman in the old Rice Krispies commercial, except I definitely haven’t had the chance to indulge in a good book!

Shepherd’s Pie Recipe

There is a lot of contention out there as to what makes a good shepherd’s pie. I distinctly remember an episode of Kitchen Nightmares where Gordon Ramsay laid into the chef because the restaurant’s shepherd’s pie contained beef instead of lamb. I didn’t actually discover that this dish is supposed to have lamb in it until about five years ago. Apparently “cottage pie” is what you call it when it’s made with beef. The dish that we called shepherd’s pie that I grew up with was always made with beef because my mother prefers it that way. I never thought to question it.

As the vegetable part of this casserole, I use corn (sweet corn, not maize), although I understand it is more traditional to use peas. I never made this dish for my British Nan, but at one time she refused to eat corn as it was “cattle feed” and believed it to be beneath her. Now, Nan lived more of her life in Canada than she did in England, so she may have relaxed her point of view somewhat, but I’ve heard this sentiment echoed by her visiting relatives. I don’t know if this is a wide-spread belief or one restricted to my family. At any rate, corn is not traditionally part of this dish.

Lastly, I structure my dish more as a casserole and less as an actual pie. Traditionally, the “crust” of the pie is supposed to be the mashed potatoes, but a quick Googling shows me that I’m not alone in putting the potatoes on top.


When the dish is served, you should be able to see the strata of meat & gravy, veggies, potato, and cheese.

Shepherd’s Pie
Serves 6-8

Peel and cut into large chunks:
8-10 (about 1Kg (2.2lbs)) medium white-fleshed potatoes*
Place the potatoes into a large cooking pot. Fill pot with water until there is an inch covering the potatoes. Bring the pot to a boil, then turn it down to a simmer. Cook potatoes until they can easily be pierced with a fork.
While the potatoes are cooking, in a non-stick frying pan heat:
1 Tbsp olive oil
Add to the oil:
1 small yellow onion (yields about 100g (3.5oz))
2 cloves garlic**
Cook on medium heat until onions are translucent with light brown edges.
To the onion mixture, add:
700g ground lamb***
Turn up the heat to medium-high and cook the lamb until it is lightly browned, regularly draining the grease.
To the meat mixture, add:
1 can of cream of mushroom soup****
1 can of water
Stir until soup is smooth. Bring the mixture to a boil, then turn down the heat and simmer gently until soup has almost reduced back to its original canned consistency.
While the meat and gravy are simmering, drain the potatoes. To the potatoes add:
2 Tbsp butter or margarine
2 Tbsp 2% milk
Whip or mash the potatoes until smooth.
Preheat the oven to 350°F (175°C)
Spread the meat and gravy mixture evenly on the bottom of a casserole dish. On top of this, pour evenly:
2 cups frozen corn
Spread the mashed potatoes evenly on top of the frozen corn. On top of the potatoes, sprinkle:
1 to 1 1/2 cups loosely-packed grated cheddar cheese
Bake casserole at 350°F (175°C) for 25 to 30 minutes, or until cheese is melted and sauce bubbles up around the edges of the potatoes.
Serve with a side of steamed vegetables, if desired.


It’s difficult to scoop portions that don’t fall apart if you bake this dish in a round casserole. If you want perfectly rectangular servings, bake it in a rectangular dish and serve in slices.

*This dish works really well with leftover mashed potatoes, so if you have enough left over from a previous meal, skip the potato preparation steps. If the potatoes are cold, a slightly longer cooking time may be in order.
**1 tsp garlic powder may be substituted for garlic cloves; however, the powder should be sprinkled over the ground meat instead of cooked with the onions.
***Meat may instead be 50%/50% ground lamb/ground beef, ground lamb/ground chicken, ground lamb/ground turkey, or any one of these meats by itself. Keep in mind that without any lamb, the flavour will not be nearly as strong.
****I like Campbell’s Cream of Cremini & Shiitake Mushroom, but any cream of mushroom soup will do. If you are averse to the texture of mushrooms in your food, run the cream of mushroom soup and water through a blender until smooth before adding them to the meat.

Spring Edition Rice Krispies Squares

My family has come down with the dreaded annual spring cold. All four of us stayed home yesterday with fevers, sore throats, headaches, and stuffy, runny noses. So I have more-or-less been subsisting on:

Smoothies. Specifically, banana-strawberry smoothies. I know serving rustic drinks in mason jars is trendy at the moment, but that’s not why I do it: this kind of lid is also infinitely practical. We’ve suspended the “no drinks outside of the kitchen” rule while everybody is sick, since I’m happy when I can get any calories into the kids at all. I can give drink containers like these to them without worrying as much that they’ll spill sticky beverages everywhere. As a bonus, I bought the lids on clearance back when Target was going out of business in Canada, so they were quite cheap. I always have jars around anyway, since I do a fair amount of canning come the end of summer. Win/win, really.


Spring Edition green and blue Rice Krispies

So yes, about the Kellogg’s Rice Krispies squares. Tomorrow is the last day before Easter weekend, and my kids wanted to bring treats in for their classes. For Thing 2, that means cake pops to eat and recycled crayons to bring home. Thing 1 has some spring-themed erasers and pencils to give to her class, but we didn’t have enough cake pops to share. Well, I honestly didn’t feel like doing anything too complicated last night, so Rice Krispies squares it was.

I had purchased the Spring Edition green and blue Rice Krispies cereal a few weeks ago with the intention of making egg-shaped treats like I’ve seen in a number of tutorial videos. It would be fun to do with the kids! If, of course, the kids hadn’t gotten sick. So instead I waited for the munchkins to go to bed, and then made the microwave version of the recipe clipped from the inside of a Rice Krispies box. I was a little worried that they wouldn’t turn out, since I have in the past burned the marshmallows (when using the stove-top variation) and somehow made rock-hard squares that had to be binned because you could potentially chip a tooth on them. I’m happy to report that this time they turned out fine. Good thing, too, because I do not have the energy for another desperate late-night grocery run this week.

I just hope that Thing 1 and Thing 2 are well enough to go into school. I am well-prepared, so that almost guarantees that they’ll need to stay home.

First Day of Spring Chicken

Today is the first day of spring. It’s also the vernal equinox in the northern hemisphere, which means that the days will be longer than the nights and continue getting longer from now until the summer solstice. The official changing of the seasons is all over my social media, but given that I live in Canada, it seems rather… Optimistic.


My pallet trellis in my back garden.

I totally understand how everyone wants it to be spring; this March went in like a lamb, and was preceded by record-breaking high temperatures in February. It looks like it will go out like a lion, with snow predicted again at the end of this week and the start of next week. For people who aren’t used to this climate, winter seems never-ending. But for those of us who grew up with it, we can see the little hints of spring: the days are regularly are above freezing in the afternoon; snow has melted back from the roads and sunniest areas of yards; snowbanks have compacted so that they’re no longer higher than my head; and we’re starting to actually have humidity in the air again.

It’s at times like this that I really feel for my European (mostly British) ancestors. I recently watched the Historical Farm series from the BBC. What struck home the most about the show was how green things remain in winter; in fact, the show often speaks of winter crops or winter harvests. Nothing grows here in the winter. To a great degree, everything stops when it starts to dip below freezing. I mean, we do still go outside, and our most famous sport, hockey, pretty much requires this kind of weather. But special care must be taken, and a huge part of our lives simply moves indoors. As for the animals, birds fly south, and many creatures hibernate or semi-hibernate. Outside of hunting and fishing, there’s not much you can do to gather food in the winter, which is why preserving is so historically important. (There’s a great food preservation exhibit at the Canadian Agriculture and Food Museum.) Effective food preservation could literally be the difference between life and death. These days, with commercial transport of food from all over the world, we can get fresh food almost as easily in winter as in summer, although supplies can become short in the event of a big snowstorm. Also, some things remain purely seasonal — and at the end of the winter, even the imported food is of lesser quality.

So it’s not truly spring here yet, no matter what the calendar says. Although I have begun to crave fresh spring produce, frozen or truck-ripened imports are all that’s available for now. That doesn’t mean that the food has to be bad, though. Take this roast chicken: it’s staple around our house because it tastes great, but takes very little effort. Basically, a chicken — thawed, giblets and neck removed — is placed in a roasting pan with a rack, then is sprinkled with a mixture of spices. I learned my favourite combination for poultry from my mother, which is:

– parsley
– sage
– rosemary
– thyme
– summer savoury
– garlic powder
– sea salt

This mixture is also great as seasoning for bread stuffing.

The chicken is baked in the oven at 350°F (177°C) for 20 minutes per pound, plus 15 minutes. Keeping the skin on means that it doesn’t have to be basted. The chicken is done when it pulls apart with a fork and has no pink spots.


Baked chicken with chicken skin, mashed potatoes, corn, and baby bok choy.

I generally serve this style of chicken with mashed potatoes and steamed vegetables. Since no part of the meal requires close supervision at all times, it’s the perfect thing for when I have to cook dinner and do something else at the same time, such as help the kids with their homework or supervise bath time.

Sock Chibi-Totoro & Snowgie Tutorial

One of the standards of children’s crafts is sock creatures, usually starting with puppets and moving on to more complicated projects from there. Sock creatures can be cheap, quick, and easy, which is exactly what you need with kids who can be easily frustrated when learning a new skill. As a bonus, basic sewing is something that everyone should learn, and sock creatures are a great way to teach sewing without it even seeming like a lesson.

I have made tutorials for two simple sock creatures based on characters from popular children’s movies. The first is Chibi-Totoro, who is the smallest of three adorable forest spirits from the 1988 movie My Neighbor Totoro. The second is a tiny snowman created by snow queen Elsa called a Snowgie, from the 2015 short Frozen Fever (which takes place in the same world as Disney’s Frozen).


Chibi-Totoro

Sock Chibi-Totoro Stuffie

Supplies Needed:
– one white sock
– 2 safety eyes or black buttons
– scraps of tan or peach felt
– polyester stuffing
– sewing needle
– white thread
– sewing scissors

1. Lay the sock on a flat surface.

2. Using sewing scissors, cut the sock as per the above photo. Discard the ankle and the toe, or save scraps for another project.

3. Turn the remaining piece of fabric sideways, so that the heel (which will be the tail) is at the back. Cut a deep vee into the top of the sock. The actual measurements of the vee will depend on the size of sock you use.

4. Whip-stitch the top of the vee closed; this will become the ears.

5. Turn the sock inside-out to hide the seam and to make the Chibi-Totoro as fluffy as possible. Attach safety eyes or sew on buttons.

6. Stuff the creature with polyester stuffing. Sew the bottom closed using an invisible closing seam; this will also ensure that the seam lies mostly flat.

7. Take a large stitch across the back of the stuffie where you want the join between the tail and the body to be. Pull the stitch tight and tie off, hiding the ends inside the body.

8. Cut out little clawed feet out of the felt and stitch them to the bottom of the body.

9. I discovered that my Chibi-Totoro would not stay up because its tail went down too far, so I took a big stitch from the back of the body to the top of the tail and pulled tight. This decreased the angle between body and tail so that the stuffie would stand up on its own.

Now your simple Chibi-Totoro stuffie is ready to be played with!


Snowgie

Sock Snowgie Stuffie

Supplies Needed:
– two white sock
– 2 safety eyes or black buttons
– scraps of dark blue and white felt
– polyester stuffing
– sewing needle
– white thread
– sewing scissors

1. Lay one sock on a flat surface.

2. Using sewing scissors, cut the sock as per the above photo. Discard the ankle and the toe, or save scraps for another project

3. Do a running stitch around one end of the tube, then pull tight and tie off.

4. Turn tube inside out so that fluffiest side is on the outside. Attach safety eyes or sew on buttons. Stuff the creature with polyester stuffing.

5. Gather the bottom of the tube together and sew tightly closed. Don’t worry if this isn’t perfect, as it will be hidden by the feet.

6. Wrap a doubled piece of thread around the middle of the tube and tie tightly, creating a head and a body.

7. Cut two rough circles out of the widest part of the second sock. These will become the feet.

8. Stitch a running stitch around the edge of one foot, fuzziest side of the fabric facing out. Stuff the foot. Pull the running stitch as tight as possible and tie off. Repeat for second foot. Sew both feet onto the bottom of the body of the stuffie.

9. Cut mouth and teeth out of felt scraps and sew onto face of stuffie. Your Snowgie is now complete!

Recycled Crayons Tutorial

Back in Girl Guides, we recycled our crayons by melting them in the microwave or in a double boiler, then pouring the different colours in layers into muffin tins (waiting for the wax to cool a bit between layers so they didn’t mix). I wanted to do something a little simpler than that with my kids yesterday — since they are younger than I was when first did this craft, I wanted a process that involved less handling of molten wax. However, this is still an activity that is done with kids, as opposed to setting them up and letting them go.

Recycled Crayons

Supplies Needed:
– old crayons
– molded cookie pans OR silicon molds rated for use in an oven OR muffin tins
– flat cookie pans
– utility knife
– large, heavy knife OR clear zipper bag and hammer
– cutting board

1. Sort through the kids’ crayons and separate out the old, broken ones, along with the ones that just don’t colour well.

2. Remove the paper wrappers from the crayons. The labels can be peeled off with your fingernails. However, the quickest way is to run the blade of a utility knife lightly down the paper to slit it, then peel it off. When I was doing it with my kids, I would cut the paper, and they would take it off.

3. Sort the crayons by colour.

4. Protect the work surface with a cutting board, then use the large knife to chop up the crayons into chunks that are approximately 1cm (0.4″) long. Sharp knives should be handled by an adult. Alternately, put each colour of crayon into a clear zipper bag, seal the bag, and smash the crayons into large chunks with a hammer. This may damage the surface underneath and will be noisy, so I suggest working on a concrete surface with a cutting board over top, and using ear protection.

5. Fill the molded cookie pans or silicon molds or muffin tins with the chunks of crayon. The molds should be almost overflowing, as the air pockets between crayon chunks will be filled as they melt. To create colour-coordinated crayons, fill each compartment with different shades of the same colour. To create more contrast, add chunks of coordinating colours. Be careful not to mix too many colours, though, as the colours will mix and they may turn an unlovely brown.

6. Preheat the oven to 200°F (93°C) (the oven temperature needs to be low so that the wax doesn’t catch fire). Put the crayon-filled molds on top of the flat cookie pans for support; this is especially important if using silicone molds, which are flexible. Anything to do with the oven should be done by an adult.

7. Bake until crayon chunks are thoroughly melted, 15 to 30 minutes, checking every 5 minutes after first 15 minutes is up to see if there are still any lumps. Remove trays carefully from oven, being careful not to spill the wax.

8. Cool the recycled crayons thoroughly before removing them from the molds. To make removing them easier, place them in the freezer (or anywhere outside in winter in Canada, so long as it’s protected from precipitation) until thoroughly chilled. Wax shrinks when it gets cold, so it will pull away from the sides of the mold and slide out more easily.

When I made these candles, I used three different kinds of molds:

– metal, nonstick Wilton PEEPS Bunny Shaped Cookie Pans ($3.00 each at the dollar store), which released easily
– a silicone Wilton PEEPS Chicks and Bunnies Treat Mold ($4.00 each at the dollar store), which released with a little more difficulty, but cleanly
– a silicone flower-shaped IKEA PLASTIS Ice Cube Tray ($1.99 at IKEA), which stuck to the wax, obscured detail, and were very difficult to remove

All in all, I much preferred the metal pans to the silicone versions.

We packaged these crayons up into little spring-themed bags and put them aside until the week before Easter to give out at school. Of course, we had to leave a few out for the kids to colour with right away, too.

Booboo Bunnies and Chicks Tutorial

It’s day two of March Break, and it’s still much too cold for this time of year. That means more crafts with the kiddos! Today’s craft was booboo bunnies and chicks, for which I have created a brief tutorial. They’re really very simple.

You may be wondering why are they called “booboo” animals. Well, it’s because the hole in the back of the animals caused by a loop in the fabric makes a great place to tuck an ice cube. The ice cube can then be applied to a child’s booboo without it getting their hands cold, and without it dripping all over the place. As an added bonus, the cuteness of the animal distracts the child from their injury. But don’t think that this is their only use! The hole in the back makes for a great place to stash an Easter candy; I’ve seen them made with beach towels so that one of those jumbo Kinder Eggs can fit inside. I’ve also seen them used as a creative way to present washcloths at a baby shower.

Booboo Bunny

Supplies Needed:
– one facecloth or dish cloth (without a pattern is best)
– 12″ of thin ribbon
– one pink pompom
– one white pompom
– two small googly eyes (with button shanks if you plan to sew them on)
– glue gun and glue OR needle and coordinating thread
– sharp scissors

1. Trim tags off of the cloth, if there are any.

2. Starting at one corner, roll the cloth diagonally until you have a tube.

3. Keeping the tube rolled tightly, fold it in half.


Top view.


Side view.

4. Keeping the tube rolled tightly, fold the open ends of the tube backwards. Secure by tying the ribbon tightly around the cloth, about 2/3 of the way along.

5. Tie the ribbon into a bow. Trim the ends with the scissors.

6. Using the hot glue gun, stick the two halves of the face securely together (otherwise it will look like a bum). Glue the eyes, nose, and tail to the bunny. Alternatively, sew the face together, and sew on the eyes, nose and tail. Sewing is the preferred method if you plan on using the cloth for other purposes at a later date.


Bunnicula Booboo Bunny

Don’t forget, booboo bunnies can be any colour of the rainbow! I just made white ones because that is the easiest colour of face cloth to find (and the cheapest). Don’t be afraid to experiment with decorating the bunnies, either. Above I added some glued-on felt “fangs” and used red googly eyes to create a “Bunnicula”, after a creature from a favourite childhood book. Be creative!

Booboo Chick

Supplies Needed:
– one facecloth or dish cloth (without a pattern is best)
– 12″ of thin ribbon
– scraps of yellow felt
– two small googly eyes (with button shanks if you plan to sew them on)
– glue gun and glue OR needle and coordinating thread
– sharp scissors

1. to 3. Follow steps 1-3 of the Booboo Bunny tutorial.

4. Instead of folding the cloth roll back on itself, fold it to either side, creating an “M” shape. Secure by tying the ribbon tightly around the cloth, about 2/3 of the way up.

5. Cut out scraps of felt for the beak and feet, proportionate to the size of the cloth that you are using.

6. Glue both sides of the head together, then glue on the felt pieces and googly eyes. Alternatively, sew the face together, and sew on the eyes, beak, and feet.

Once again, be creative! A chick easily turns into a penguin if you use a black cloth.

Bunnies and chicks! Now you’re all set for spring.