This morning marks Candy Cane’s last day at our house. She always perches in the Christmas Tree on Christmas Day.

From my family to yours, we hope that you have a safe, healthy, and very merry Christmas!


This morning marks Candy Cane’s last day at our house. She always perches in the Christmas Tree on Christmas Day.
From my family to yours, we hope that you have a safe, healthy, and very merry Christmas!
Candy Cane was found checking out the music box on top of the china cabinet in the living room this morning.

(Please ignore the fact that the elf is out of focus. I didn’t notice until after she had moved to her next location.)

More importantly, I managed to get all of the Christmas stockings done! It only took every spare minute of my time for a number of weeks. Left to right, they belong to Thing 2, Thing 1, my husband, and me. I finished the last one (mine) during my husband’s family’s Christmas Eve get-together, which meant that it was done with only a few hours to spare before it was hung in preparation for Santa’s arrival… But it was done!
Merry Christmas!
This weekend we found Candy Cane sleighing down the side of the staircase:

And petting the reindeer in the Little People Christmas train:

This morning we found her taking pictures of the family as they walked down the stairs:

Yesterday was a very busy day filled with Christmas visits, Christmas shopping with a good friend, and knitting (I’m finally on Stocking #3). All that didn’t leave me with much time to cook, but I didn’t want to eat out, so I compromised with some quick fixes from the grocery store.

That’s pork schnitzel from the butcher section; I’ve had schnitzel before, even had it in Germany, but I’ve never had the pre-made pork version from the grocery store. I didn’t have high hopes, but it wasn’t half bad! In an effort to keep in quick and simple, I served it with eggs over easy and a prepackaged spinach salad with clementine wedges, strawberries, cucumber, goat cheese crumbles, and sliced almonds. Overall, it was quicker than ordering takeout, and also both cheaper and healthier!
Today we found Candy Cane trying to fit in with the Christmas nesting dolls:

Last week I picked up a “new” (thrifted) bread machine for $7.99 at Value Village. It was exactly the same as my old Black & Decker All-In-One Horizontal Breadmaker, which I had loved so much that I wore it out. I’ve had a couple of second-hand replacements since then, some of which I’ve also worn out and some that I simply haven’t liked. However, none of them had the preheat function, which I didn’t realize I’d miss so much.
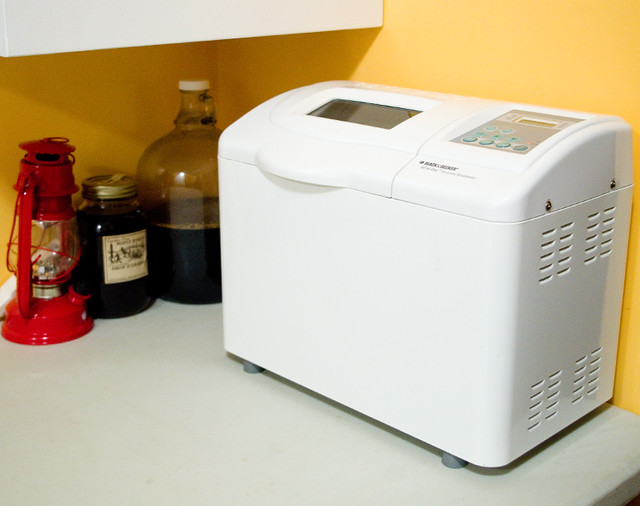
You see, the preheat function warms up your ingredients before it begins kneading the dough, which means the bread ends up being lighter and fluffier. The reason for this is that yeast is much more active at warmer temperatures (but not actual hot temperatures, which actually kills it off). Since “yeast farts” (the carbon dioxide emitted when the yeast eats sugar) are what causes bread to rise, warmer temperatures mean fluffier bread. I find that this is especially important when baking in the winter.

I tested out my new-to-me machine with a loaf of pumpernickel bread (page 21, Better Homes and Gardens: The Complete Guide to Bread Machine Baking, 1999). I’d forgotten that this particular recipe usually requires a little extra water (I really should read my own notes), so at first I thought that the motor was struggling. Nope, the dough was just too thick! About an extra 1/3 of a cup of water, added in a drizzle at a time, and it was right as rain.

Another recipe I’ve been trying to perfect is a hard apple cider bread. There are a lot of great ciders around here, and although I’m not a fan of them to drink, I thought they would make for an interesting flavour in a bread. (That’s more or less how I feel about beer, too.) My first attempt in my old bread machine didn’t rise much at all, but tasted quite nice. I put the lack of rising down to the ingredients being too cold, since the yeast is obviously still alive since it’s from the same package as the pumpernickel bread. The second time, I pre-warmed the liquids and used the “new” bread machine with the preheat option, which did help a lot. As you can see from the pulling apart of the crust in the above photo, it definitely did rise. But it’s still not as light and fluffy as I would like, especially in comparison to my beer bread recipe. Perhaps I just need more yeast? I generally only use 2tsp in a loaf this size, but it’s possible that the higher alcohol content of the cider is killing some of my yeast off.
It kneaded together well, though, which makes me think the wet-to-dry ingredient ratio is correct. Also, the crust is a little too brown in spots, which makes me think that there is too much sugar. Cider by its very nature has natural sugars in it, so I may not need any added sugar at all. So this recipe definitely isn’t ready to post yet, but I will do so as soon as I have a satisfactory, repeatable result. Stay tuned!
I apologize for the delay in today’s post! We have been experiencing technical difficulties with our Internet connection (mostly with our router), so I couldn’t get my entry from the computer to the blog.
This morning we found Candy Cane in the big box of Christmas books that makes an appearance every holiday season. It seems that she really likes to read – not unlike the other members of this family. Today’s choice was “Twas the Night Before Christmas” by Clement C Moore.

Tonight for dinner, at my husband’s request, I whipped up some Red Lobster Cheddar Bay Biscuits. We’ve been a big fan of these biscuits for years, even if, in my personal opinion, they’re not quite as good as Dad’s Biscuits.

They always taste so good fresh out of the oven (although personally I find they don’t store well). As a bonus, they are really easy to make, and the cooking directions are extremely clear. The cheddar that I used was lactose-free, as usual, which I find doesn’t affect either the taste or consistency.

I served the biscuits with my standard chicken thighs (roasted in the oven with a sprinkle of parsley, sage, rosemary, thyme, summer savoury, garlic powder, and salt). As a veggie we had steamed acorn squash that I cooked in the microwave and sprinkled with a little bit of brown sugar. Dinner definitely wasn’t anything fancy, but it was exactly what my family asked for.
On Saturday morning, we found Candy Cane hiding under the chair in Thing 1’s room, riding a LEGO scooter, playing with the a Vaporeon and a Playmobil pegasus:

And Sunday morning we found her hanging around in the kitchen with Chimpy:

I spent most of that day with my little family decorating the house for Christmas. As of now we’re still not done, but that’s to be expected as we do Christmas almost as big as we do Halloween around here.

Of course, we had to take a break for dinner, which was roll-your-own sushi again at the kids’ request. Since this is a pretty healthy meal, I don’t mind indulging them.


Their rolling skills are getting better, but their knife skills could use a bit of work. Part of their difficulty was the knives we used, though, which could definitely use a sharpening.

One thing we did manage to finish was decorating the tree, which is a real one in our house so it doesn’t stay up all that long. We find three weeks (two weeks before Christmas and one week after) is about as long as the needles will stay on. I know that the kids would be more than happy to have it up in November otherwise, although I’m pretty sure my husband would object.

The addition of the tree and its decorations are, I think, the inspiration for the stuffed Christmas bear to tie Candy Cane to the tracks this morning. Although I do remember learning somewhere that there is actually no damsel-in-distress-tied-to-the-tracks scene in any old movie other than parodies; maybe I saw that on QI? At any rate, the elf is safe enough considering that the train has no batteries. Her predicament didn’t seem to bother the children at all.
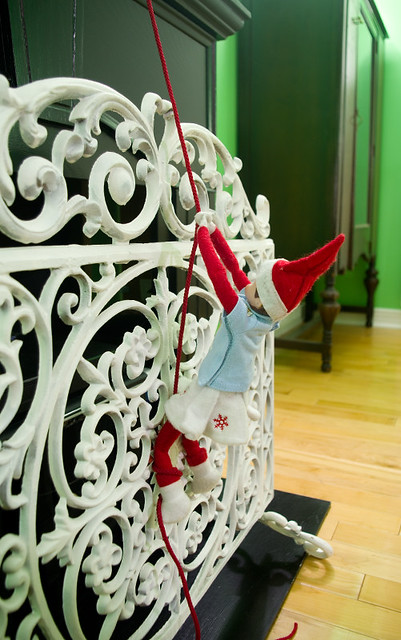
This morning we found Candy Cane rappelling over the fireplace grate!
Last night for dinner I really wanted to try out a baby panda onigiri set I bought at a Goodwill in New Jersey in the fall. To be clear, that’s rice balls in the shape of baby pandas, not containing baby pandas.
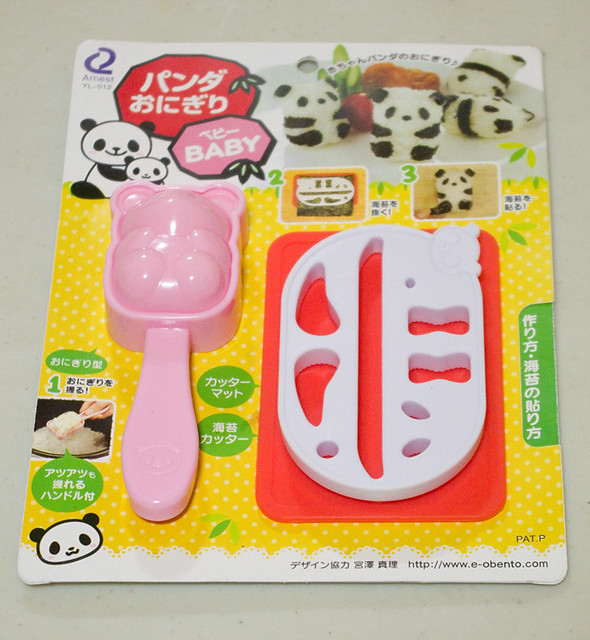
I’d been wanting to try the fancier rice balls for a while now, but it’s hard to find the molds around here unless you want to import them, which can be prohibitively expensive. But this set was only $1.99, and it was still new in the package, which was a perfect combination for me.
Basically, you cook up your sticky rice, scoop it into the mold (the front and the back are both shaped), and then press it really firmly together. Then you place a sheet of nori between the white cutter and the flexible red board, and press down really firmly to punch out the shapes. You can then apply the nori shapes to the formed rice, sometimes using a dab of water to make the seaweed stick properly. This kit even makes little nori tails for their tiny rice butts! Now, there were a whole lot more instructions written on the back in Japanese, and I have at best a kindergartner’s grasp of written Japanese (probably worse, actually), so I mostly went with the little pictures on the front.
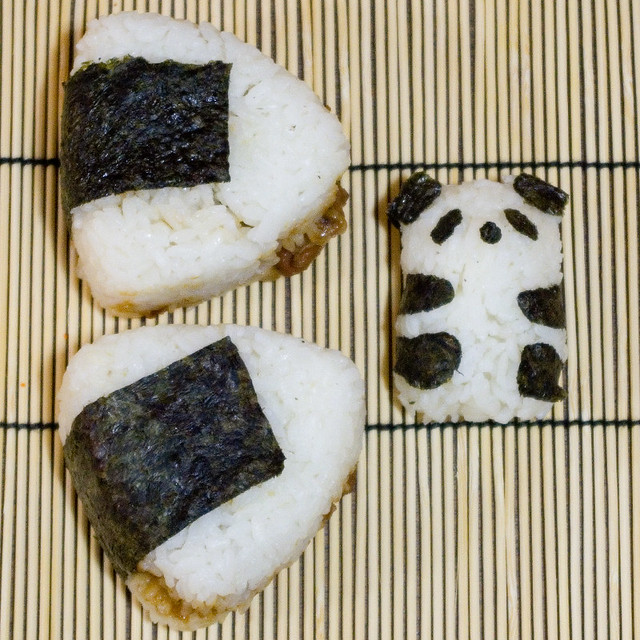
Despite not having a lot to go on, I think my baby panda onigiri turned out pretty cute, especially for a first try! I served them alongside onigiri made in my triangular mold, which I stuffed with teriyaki chicken. (The chicken is the brown stuff sticking out of the rice in the above photo; it looks a little weird but it hasn’t gone off, I swear.) I think I added a little too much sauce to the chicken, as it was a bit salty. I also learned for future reference that I’ll need to shred the chicken more finely if I want the rice balls to stay intact. It’s a learning process, but it’s one I’m greatly enjoying!
We found Candy Cane checking out the books on Thing 2’s bookshelf this morning:

Today I decided to make a beer advent calendar for the husbeast at his request, even though we’re already a few days into December. (What can I say, I am running behind in a few things.) I’d seen them advertised online, but they’re not available commercially anywhere around here that I’d seen. I’ve also seen them for wine and for little airline bottles of liquor. I honestly think the best thing would be to build a divided wooden case with 24 little hinged doors on the top and reuse it year to year, much like some of the older traditional advent calendars (only larger). However, I’ve totally run out of time for that, so I went for a cheaper, quicker alternative.

I started with twenty-four different beers, which conveniently fit into a standard flat. Now, a proper box with those little cardboard dividers would have been optimal, but those only tend to be available for bottles. Because I didn’t have a proper box, I needed a second empty flat.

Using a craft knife, I cut about 1/2cm in around the edge of the box. It doesn’t have to be perfect, since it will be hidden.

Then I put the cardboard ring I’d created around the top of the cans of beer.

Next I wrapped the case of beer like a gift. I normally would hide my seams along the bottom of the gift, but since I couldn’t turn it all upside down without it all falling apart, I put the seam along one side instead.

Using a Sharpie and a ruler, I drew a grid above the cans of beer. I could feel the edges of the cans through the paper, so I could easily figure out where the lines should go. Then I randomly numbered the grid from 1 to 24.

My husband tried opening the advent calendar at first by punching holes in the paper, but it tore too easily into the other sections. We found that the best bet is to use a craft knife or scissors to cut a hole a little smaller than the grid markings, so as to keep the paper from disintegrating.
Once the calendar is opened, it’s possible to see the kinds of beer from the side of the case, or to displace everything inside by picking it up. This can be solved by making a cardboard grid and putting it inside the box before the cans. But if you’re not too picky, it works just fine — and my husband, for one, is too happy with his calendar to really care.
Thing the First:

This morning we found Candy Cane in the kitchen, sitting on the clock that usually sits under a glass dome above the cabinets.
Thing the Second:

With twenty days to go, I finally finished knitting the Vero Shawl (Rose Bower colourway) for my aunt who is always cold — and who I am pretty sure doesn’t read this blog. It will go in the mail tomorrow and will hopefully arrive on her doorstep before Christmas.
Thing the Third:

I have started on the family’s Christmas stockings. The first one, for Thing 2, is closer to the end than to the start, although there seems to be an awful lot of yarn left to go. I’m knitting this one in hand-dyed Fleece Artist Blue-Faced Leicester Aran (100% wool) in what I believe is the Red Fox colourway. I bought this yarn years ago as part of the Elmira flap hat and fingerless glove set; I knit the hat (which I still love — Ravelry pattern entry here), but I never got around to the gloves. Since this is Thing 2’s favourite colour palette, I figured the yarn would make a lovely Christmas stocking instead.
Thing the Fourth:

I made pancakes and apples for dinner yesterday. I’ve been trying to use up ingredients we already have in the pantry, and there was some pancake mix in there left over from the summer (not sure if it was from camping or the cottage). Paired with some chopped apples and with a drizzle of maple syrup on top, it made a lovely meal!
It feels like the Christmas season is finally in full swing! Now that my last market of the season is complete, I can actually concentrate on our family celebrations at home.
I introduced you last year to our household’s Elf on the Shelf, who was named Candy Cane by my kids. As she does every year, Candy Cane showed up on the first day of December, along with the advent calendars.

On December 1st, Candy Cane appeared on the family room mantle, bringing with her a suitcase overflowing with tiny outfits.

On December 2nd, she hid away in our old china cabinet and tried on her outfits in front of my grandmother’s antique hand mirror.

On December 3rd, she spent time in the kitchen making hot chocolate.

And today, December 4th, she absconded with some of the kids’ LEGOs, including some minifigs from their advent calendar, and played with them by the window.

In addition to hunting for Candy Cane every morning, an essential element of this part of the season is making Christmas gifts. I was thrilled last week when Thing 1 came back from Guides with this lovely mason jar full of chocolate chip cookie mix. Each member of the troupe learned about following a recipe and got to measure out and package their own ingredients. I thought it was a great learning experience, and the girls had a lot of fun! (You can find the recipe on Very Best Baking if you want to make one of these jars yourself.)
Thing 1’s experience with making the cookie mix made me think. I do all kinds of canning, so why am I not making dried mixes in jars as well? These aren’t just good Christmas presents, they’re fantastic for teacher appreciation, housewarmings, new parents, sick friends, poor students and young adults moving out for the first time… I already have two books that devote a large portion of their contents to the subject: Company’s Coming: Gifts from the Kitchen (Jean Paré, 2001) and Jazzy Jars: Glorious Gift Ideas (Marie Browning, 2002), and as someone who makes preserves I have lots and lots of jars, so why am I not using them? I honestly think it’s because I have too much choice (I know, not the most horrible thing overall), and I’m having a hard time narrowing it down.
So my question is this: what is your favourite recipe for a dry mix in a jar?
