Salmon Cheese Tamagoyaki & Rice

This past Saturday I had what seemed like a houseful of people over for dinner. Okay, there were seven people in comparison to our normal four, not exactly a party, but still more than usual. I didn’t have anything taken out of the freezer, I decided to make everyone tamagoyaki on rice. Ever since I got my Japanese omelet pan for Christmas, they’ve become a go-to meal when I want something relatively simple and healthy.

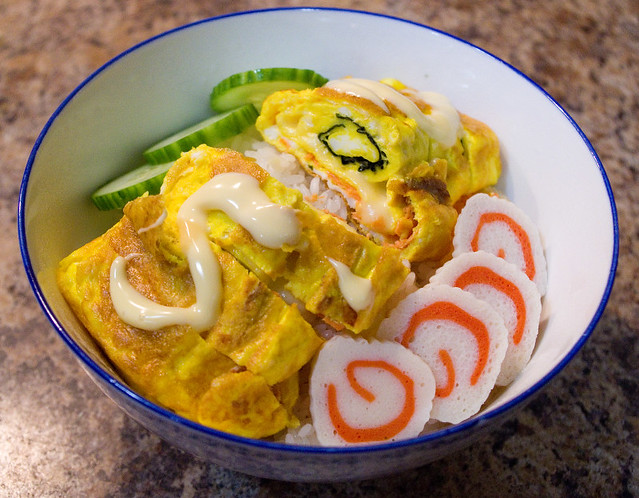
This time I had smoked salmon in the fridge, so I added ingredients between each layer of egg: nori, cheese, and smoked salmon. The kind of salmon that I had automatically comes sliced in very thin, flexible sheets, so it’s perfect for this kind of thing. I really liked this addition and I think I will do it again in the future! I served the omelets with slices of naruto fish cake and cucumbers on the side, and a squirt of Japanese mayonnaise on top (if the diners wanted these additions).

Should I do this again, though, I’ll have to plan at least a little bit better. I didn’t make enough rice the first time so I had to make a second batch, and I realized that I was short of eggs about halfway through and had to send my brother-in-law out to get some. And if I’m planning on making this many tamagoyaki in a row again, I’m definitely going to have to pick up a second pan!

Nori Cheese Tamagoyaki & Rice

Since the stew the night before took a while to prepare — not so much the cooking, but all of the chopping and cutting — I thought that last night I would make something a bit more simple. I wanted to continue testing out (okay, playing with) my new Instant Pot, so I used it to make a batch of basmati rice. I used the instructions for rice that I found on page 51 of The Ultimate Instant Pot Cookbook (Coco Morante, 2018). I’ve made basmati rice about a million times on the stove and I’ve got it pretty much down to a science, but I wanted to see how the new cooker would compare. I don’t think it takes any less time once you take into account the preheating and the recommended-for-best-results ten minutes on Keep Warm after cooking, but it is pretty darned easy. Unlike the stove top version, I can more or less just set it and forget it, so I can see why a lot of people like this feature. I think I need to test it with some of the trickier varieties, like wild rice or sticky rice, before I am 100% convinced.

The topping for the rice was another attempt at Nori Cheese Tamagoyaki (video here). While this dish invariably comes out tasting excellent, I’m still working on the technique. I find that rolling the nori and egg are fine, but the cheese makes it tricky and it wants so badly to fall apart. Ah well, practice makes perfect. This time I topped it with Japanese mayo and masago (seasoned capelin caviar), as per the recipe, and I think that this transforms the omelette flavour-wise from a breakfast to a supper dish. Given the family’s rave reviews, this is definitely going to be a regular part of our diet, so I think that I’ll get all the practice I need!

Eggs

I thought that yesterday would be a good time to start trying out Christmas presents, and I used up almost a dozen eggs doing so.

First I had to try out my tamagoyaki pan. I used the fillings from Tasty’s Nori Cheese Tamagoyaki recipe (video here), but I wanted to see how it would taste without the mayonnaise and tobiko toppings. I only ended up using one sheet each of nori and dairy-free havarti cheese because I was having a hard enough time rolling it as it was. I think I made each layer too thick, so I’ll try it with less egg per layer next time. Despite the loose, messy look of the omelet, my husband and children thought it was delicious! I rather liked it as well. As you can see in the picture, the cheese inside was nice and gooey, which I think was a big selling point. I think I’ll have to make it as a proper meal in the near future. I’ll need to practice with a basic, filling-free tamagoyaki for sushi as well.

Next I broke out the Instant Pot, first to read the instruction manual, and then to give it an initial test run as per the instructions. I was a little nervous to use it at first, since it is indeed a pressure cooker, and as I’ve stated before I find them a bit intimidating. It’s that evil sound of steam hissing out of them at velocity, I think, and photos like this one of what happens when a pressure cooker doesn’t vent properly. I found that the Instant Pot is much quieter and less scary than my traditional pressure cooker, which is enormous and I generally only use for canning things anyway.

I did take a tip from BuzzFeed and popped a half dozen eggs into the pot while I was doing the initial test run. With a two minute cook time (plus preheat) and a quick pressure release once the timer was done, the eggs turned out perfectly cooked! So this tip is definitely confirmed. Now, my usual method is directly from the Joy of Cooking: put large eggs in a pot, cover with cold water, bring to a boil, then remove the pot from the heat and let it sit covered for 17 minutes. While this has unfailingly yielded perfect hard-boiled eggs, the Instant Pot is definitely faster, even with preheating time. I am pretty darned impressed.

I guess I need to make a proper meal using my Instant Pot soon then, don’t I?

Baby Panda Onigiri

This morning we found Candy Cane rappelling over the fireplace grate!

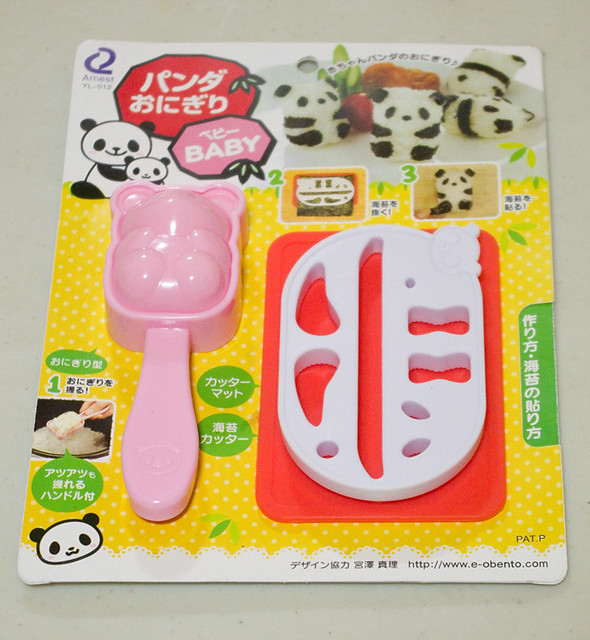
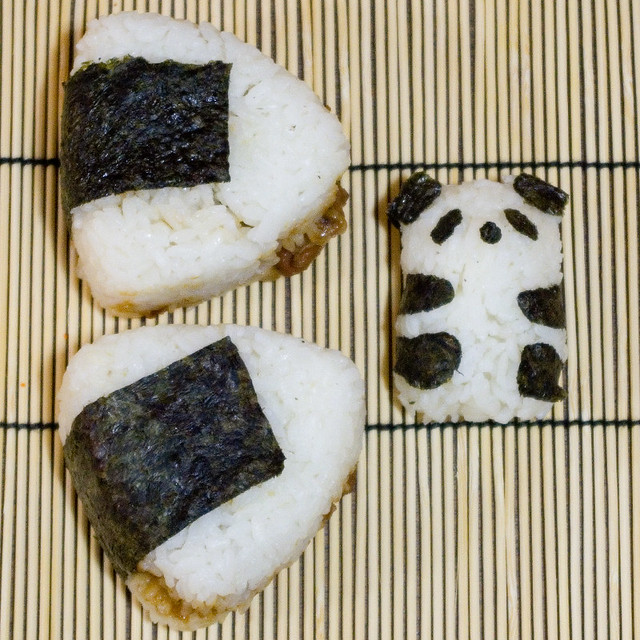
Last night for dinner I really wanted to try out a baby panda onigiri set I bought at a Goodwill in New Jersey in the fall. To be clear, that’s rice balls in the shape of baby pandas, not containing baby pandas.

I’d been wanting to try the fancier rice balls for a while now, but it’s hard to find the molds around here unless you want to import them, which can be prohibitively expensive. But this set was only $1.99, and it was still new in the package, which was a perfect combination for me.

Basically, you cook up your sticky rice, scoop it into the mold (the front and the back are both shaped), and then press it really firmly together. Then you place a sheet of nori between the white cutter and the flexible red board, and press down really firmly to punch out the shapes. You can then apply the nori shapes to the formed rice, sometimes using a dab of water to make the seaweed stick properly. This kit even makes little nori tails for their tiny rice butts! Now, there were a whole lot more instructions written on the back in Japanese, and I have at best a kindergartner’s grasp of written Japanese (probably worse, actually), so I mostly went with the little pictures on the front.

Despite not having a lot to go on, I think my baby panda onigiri turned out pretty cute, especially for a first try! I served them alongside onigiri made in my triangular mold, which I stuffed with teriyaki chicken. (The chicken is the brown stuff sticking out of the rice in the above photo; it looks a little weird but it hasn’t gone off, I swear.) I think I added a little too much sauce to the chicken, as it was a bit salty. I also learned for future reference that I’ll need to shred the chicken more finely if I want the rice balls to stay intact. It’s a learning process, but it’s one I’m greatly enjoying!

Family Sushi Night

One thing we share as a family is that every single one of us loves sushi. However, we do differ as to which one is our favourite — the best bribe ever to use on Thing 1 is salmon nigiri, while Thing 2 is a big fan of a California roll or any maki with shrimp tempura in it, my husband prefers hand rolls (temaki), while I actually like sashimi (just the fish/seafood), possibly with a bowl of rice on the side to fill me up.

That being said, I don’t know why it didn’t occur to me before now to make sushi at home. I used to do it all the time in high school and as a young adult; I actually hosted a few dinner parties where we all rolled our own sushi. However, it is very time consuming for one person to make a family’s worth, and I guess I just set it aside until I thought the kids were old enough to help me out. But the kids are both old enough now to assemble their own soft tacos or burritos, and sushi uses many of roughly the same techniques, so I thought it was time to give it a go.

Last night I made up a big pot of sushi rice and cut up all kinds of toppings: smoked salmon, cooked shrimp, scrambled egg with a bit of mirin mixed in, cucumber, carrots, and avocado. Then I dug out one rolling mat per person and let everyone assemble their own sushi.

The nice thing about making sushi this way is that everyone can have it just how they like it, although probably not as pretty as they’d like it, that comes with a heck of a lot of practice. I find it surprising that a lot of people around here still assume that sushi automatically equals raw fish, when it’s really all about the vinegared rice. You can top it or roll it with just about anything you’d like. You can even avoid fish or even all animal products altogether, although the purists may take objection to that. But let’s be honest, purists aren’t going to be rolling sushi at home with their six-year-old, they’re going to be paying a very skilled professional chef to create the perfect mouthfuls.

I really liked the combination of the saltiness of the smoked salmon with the sweet egg and the crunch of cucumber.

The egg-and-shrimp roll I made could have used a little more punch; perhaps I should pick up some spicy Japanese mayo for next time?

My husband’s rolls generally turned out nicer-looking than mine, except, of course, when I went to take a picture. His egg, cucumber, and shrimp roll tasted pretty good, though.
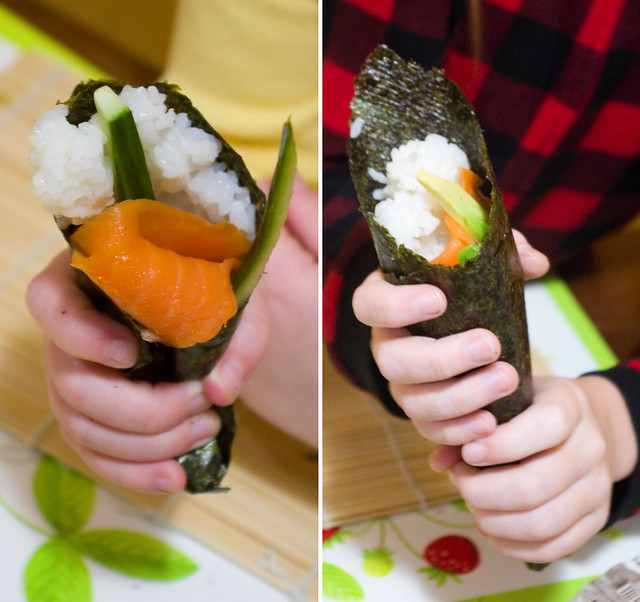
After a couple of messy (if tasty) attempts at maki sushi rolls, the girls tried their hands at hand rolls, which are the closest in assembly to a taco, which is where there experience lies.

We had a really good time making and eating this dinner, and I’m starting to think I should have introduced homemade sushi long before now. I loved watching the kids’ faces light up when I told them that we could actually make sushi at home. Not only that, but it’s a pretty healthy meal that’s infinitely customizable. We are definitely going to do this again, and soon. It needs to become a regular thing in my house again.

Cool Dinner

Last night I figured that we needed a cool, refreshing dinner to help combat the heat. To this end, I boiled up what was frankly way too much sushi rice and made some onigiri like I had eaten so regularly in Japan. I wrote a bit about this dish when I tried making pork belly onigiri, and doing so really made me crave the simple version. It’s fresh and clean-tasting, and it’s served cold, so you can whip it up during the cooler part of the day (or the night before), refrigerate, and serve it when it gets warmer.

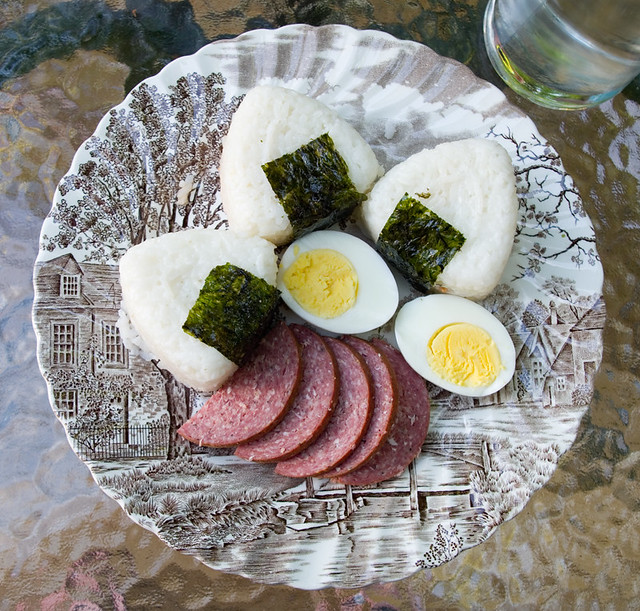
I used a onigiri press like this one (which I bought at T&T for less than ten dollars, so don’t let the online price tag fool you). Of course, you can totally form rice balls by hand, a press just makes it less messy and keeps each one looking more or less identical. A press also makes it so much easier to put a filling inside the rice ball. I used canned salmon with a dash of mayonnaise (Japanese Kewpie mayo would have been best, but I didn’t have any on hand and substituted regular old Hellmann’s). For a bit more of a pop of flavour, I also added a few drops of liquid hickory smoke. We always have some of that stuff in the pantry because it makes a canned salmon sandwich absolutely divine, so I figured it would do the same to the onigiri.

I served the onigiri with halved hard-boiled eggs (also cold and prepared in advance) and some local summer sausage from the farmers’ market. I know that’s not how it would traditionally be served, but I wasn’t trying for accuracy here, I just wanted a nice, cool dinner that we could eat comfortably with our hands while we sat out on the porch. This would also have made a great picnic.

Sun Noodle Brand Instant Shoyu Ramen

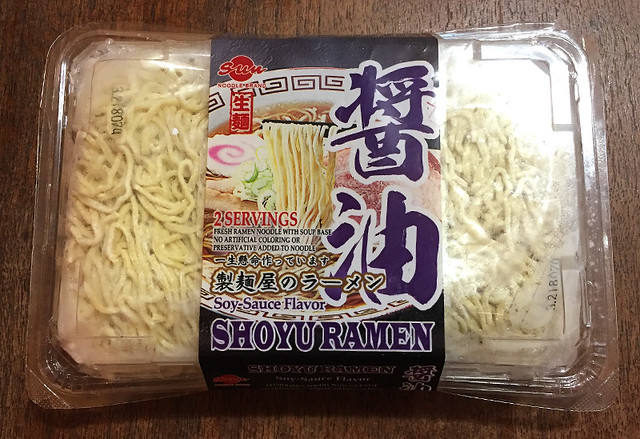
My trip to T&T last week resulted in me bringing home a whole load of new things I wanted to try, of course. The first one that I broke out was Sun Noodle Brand Instant Shoyu Ramen. It’s about $6.50 per frozen package, but each one serves two, so even though it’s not as cheap as the dried, instant stuff, it’s still a pretty darned affordable meal.

I’ve had shoyu broth, which is predominantly chicken and soy sauce flavoured, in Japan, and at Ichiko Ramen (formerly Ginza Ramen), and I’ve made it at home as well. (The fantastic — and easy! — homemade soup base recipe can be found on page 8 of Simply Ramen by Amy Kimoto-Kahn (2016) or at easypeasyjapanesey.com.) Although I’m by no means an expert, I think that I can at least tell what shoyu ramen is supposed to taste like, for the most part.

The package only contains the noodles and the broth, though; the instructions on the back of the package recommend adding your favourite toppings. I needed to make a quick meal, so I went with what we had in the fridge/freezer/pantry: soft-boiled eggs, narutomaki, enoki mushrooms, dried shrimp, and nori.

The verdict on this quick dinner was pretty positive. Sure, it’s not as good as homemade, and definitely not as good as restaurant fare. But it’s miles better than the dried instant kind. The noodles have a better consistency, which in the case of ramen means that they’re chewier (dried ones have a tendency to be soggy when cooked). The broth had more depth of flavour, although the one complaint I did get is that it was a little bit too salty. That might have been because of the dried shrimp, which are quite salty in and of themselves. Usually I add them to my homemade broths, which are very low in salt, and that works well, but they may not be a great combination with packaged stuff. It also could have been because I didn’t water down the broth enough. The instructions gave a range of the amount of water you could use, and then said “to taste”, so I guess our “to taste” is a little more watery than the official directions.

That being said, they were definitely good enough to try again! Maybe I’ll switch up the toppings next time; we could definitely have used more vegetables that night.