Christmas Dinner

Christmas dinner is traditionally hosted by my parents. It used to be served on Christmas Day, but after the gigantic breakfast that often lasts until lunch, it seemed kind of overkill. A few years ago by consensus we moved it to Boxing Day, and it has just made everything so much more relaxed.

One of the things that I love about Christmas at my parents’ house is how their brilliantly-lit tree fills up the front window. From the street outside, as you’re pulling in to the driveway, it really welcomes you in. While my parents do have lights strung up outside, the tree outshines them all. I’m told that there are 600 or more lights on there. To compare, our tree only has 200 lights, and it seems positively dim by comparison.

Mom is generally the one who is responsible for the roast turkey dinner, although Dad’s specialty is the Yorkshire pudding. They used to only serve Yorkshire pudding with roast beef dinners, but enough pestering by my brother and I (and then by my kids) over the years convinced them that they were appropriate to any meal served with gravy. Mom’s turkey dinner this year included stuffing, whipped potatoes, mashed potatoes almondine, carrots glazed in my carrot jam, squash with orange juice and walnuts, and of course lots of gravy. It was all delicious! My contribution to the meal was dessert: homemade apple and dairy-free pumpkin pies, baked in advance and reheated in the oven. It always seems a shame to me that a meal that takes all day to make can be scarfed down so quickly, but there is always lots of chatting after the meal as we all digest.

A Family Sunday

On Saturday morning, we found Candy Cane hiding under the chair in Thing 1’s room, riding a LEGO scooter, playing with the a Vaporeon and a Playmobil pegasus:

And Sunday morning we found her hanging around in the kitchen with Chimpy:

I spent most of that day with my little family decorating the house for Christmas. As of now we’re still not done, but that’s to be expected as we do Christmas almost as big as we do Halloween around here.

Of course, we had to take a break for dinner, which was roll-your-own sushi again at the kids’ request. Since this is a pretty healthy meal, I don’t mind indulging them.

Their rolling skills are getting better, but their knife skills could use a bit of work. Part of their difficulty was the knives we used, though, which could definitely use a sharpening.

One thing we did manage to finish was decorating the tree, which is a real one in our house so it doesn’t stay up all that long. We find three weeks (two weeks before Christmas and one week after) is about as long as the needles will stay on. I know that the kids would be more than happy to have it up in November otherwise, although I’m pretty sure my husband would object.

The addition of the tree and its decorations are, I think, the inspiration for the stuffed Christmas bear to tie Candy Cane to the tracks this morning. Although I do remember learning somewhere that there is actually no damsel-in-distress-tied-to-the-tracks scene in any old movie other than parodies; maybe I saw that on QI? At any rate, the elf is safe enough considering that the train has no batteries. Her predicament didn’t seem to bother the children at all.

The Nightmare Before Christmas Garage

Halloween is all over but for the consumption of vast quantities of candy. Due to rainy weather, we didn’t get as many trick-or-treaters as I thought we would this year, so we have boxes of full-sized candy bars on top of what the kids accumulated. I think I’m going to have to Google “things to make with leftover Halloween candy”.

Of course, after Halloween there’s also lots of cleaning up and packing away to do, but before I get to that I’d like to share my favourite part of this year’s decorations: the Nightmare Before Christmas garage.

You see, this year marks the 25th anniversary of one of my favourite movies (and Thing 2’s all-time fave so far), The Nightmare Before Christmas. I thought that part of my outdoor decor should definitely reflect this fact. I purchased the little Jack Skellington inflatable on the right, and the larger one on the left was a generous gift from a friend. I made the Oogie Boogie “moon” light cover out of a plastic platter, a black Bristol board cut-out, and a yellow light bulb. The “hill” on the garage door was just more Bristol board taped on and cut out in the desired shape, with breaks and slight overlaps between the panels so I could still open and close the door. Honestly, it wasn’t terribly difficult, but I was really happy with it all in all.

As for actual costumes the day of, I wore my Robin Hood: Men in Tights costume during the day, and my Discworld Death to take my kids trick-or-treating at night. Death was very well received by most, although he did frighten a few little ones (he’s enormous, after all). I really did enjoy chasing the teenagers. The kids wore their Borderlands 2 costumes, and they were thrilled when a few people even knew who they were supposed to be.

I’d say that it was a pretty great Halloween.

Salt Dough Creations

A friend of mine bought me a copy of the Better Homes and Gardens Treasury of Christmas Crafts & Foods for Christmas, and leafing through the project ideas therein brought back many memories of the kinds of crafts that I did when I was growing up. One of the ones that stood out the most was the salt dough Christmas ornaments. Although I never made any in the patterns suggested by this book, I did make some simple ones through Brownies and Guides, and I had a lovely little girl in a red dress as part of my ornament collection until she eventually fell apart. I thought that my kids might enjoy playing with dough that becomes a permanent creation for a change. (If your kids would basically like to do the same exercise but come away with something that they can eat, I would highly recommend Cookie Monster’s Famous Cookie Dough instead.)


Rolling out the dough and cutting it out with cookie cutters and Play Doh cutters.

I did my due Googling, and I discovered that although the style of ornament that people make has changed a bit over the years (especially when it comes to the choice of colours used), the actual technique remains the same. Multiple books and many sources on the Net stick to the basic recipe of:

– 2 cups flour
– 1 cup salt
– 1 cup water

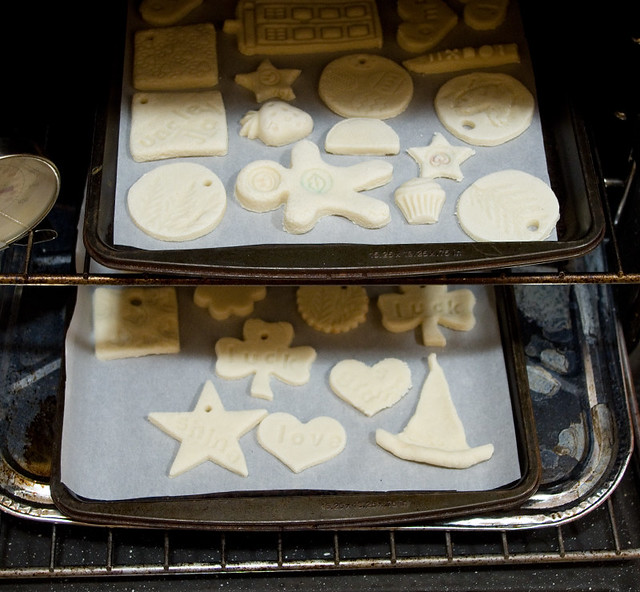
Which you then knead together to create a stiff dough. You then cut out/shape your designs and lay them on parchment paper on a cooking tray. Advanced creations can take a long time, a lot of skill, and a great attention to detail. However, when you’re making crafts with younger children, quick and easy cookie cut-outs are the name of the game! As a bonus, since the dough is so cheap to make and is 100% biodegradable, if the kids proclaim themselves done after having made very few cutouts, it’s not too big of a deal.

Salt Dough 2//embedr.flickr.com/assets/client-code.js

After shaping, you put the salt dough creations in the oven at 200°F (93°C) for… Well, that’s where directions vary. I think it all really depends on the thickness of the final pieces. I’ve seen it anywhere from two to eight hours, so I kind of guessed at three, which worked out okay. I think that what everyone agrees on is that you don’t want to bake or brown the dough, you just want to remove all the moisture.

Then the cut-outs need to be cooled on a cooling rack, which doesn’t take all that long, really, since they weren’t terribly hot in the first place. We left them overnight to hopefully remove the last of the moisture. It’s not like you have to worry about them going stale, after all.

Then it was time for paint! I have what seems like a million colours of acrylic and many different paint brushes, all from the dollar store. If you don’t have a stash of paint and want to keep costs low, stick with red, yellow, blue, black, and white. The kids can mix any colours they want with the primary ones, and it’s a good lesson in colour theory.

To be honest, my girls ran out of patience with the fiddly details, so the painting will have to be completed another day. Since I had to make dinner, I didn’t get a chance to finish painting the ones that I made either, so we’ll have to sit down and do them all together tomorrow. I really liked how the ones with the impressions turned out, though. The girls used rubber stamps, carved rolling pins, and even leaves of plants to create textures.

Of the ones that I painted, I am particularly happy some of the simplest: the Easter bunnies, made using a cookie cutter and a little ball of dough for the tails.

The next step is to seal salt dough, which I’d prefer to do with spray-on acrylic, so that will probably have to be done out in the garage once it warms up a bit. I’m told it can also be done with Mod Podge or PVA glue, both of which I own, but I’d like to test them first to see how badly they smudge. Then the ones with holes will become ornaments, and the ones without holes will have a magnet (also from the dollar store) glued on the back to become fridge magnets.

Cat-Proof Tree

A friend of mine, who owns three very mischievous cats, posted a link to a Facebook post about Genius People Who Found A Way To Protect Their Christmas Trees From Asshole Cats And Dogs back in November, and it gave me some ideas. Specifically, the picture of the little tree in the gigantic lantern.

You see, I’d salvaged this 3.5-foot-or-so decorative lantern a while back and, although I’d filled it with orange lights as a Halloween decoration, I didn’t have any real idea what I wanted to do with it once the holiday was over. I’d thought I might spray paint silhouettes on the inside and turn it into a permanent addition to my Halloween decoration collection, but I didn’t have any concrete plans. However, I thought that my friends might like a tree that their cats couldn’t destroy, so I started working on the lantern.

The lantern had been discarded for a reason; it needed repair. It required a good cleaning, some glue in spots and a couple of coats of paint, not to mention some new hardware. Unfortunately, I couldn’t find matching replacement hardware, so the rusty stuff was just going to have to do. I also had to find a short enough tree and some small embellishments (which I kept to a neutral white and silver motif to hopefully go with the decor on any floor of their house, and any decorations they would want to add).

I was quite happy with the final product, which looked nice in a lit room…

…but really was at its best in low to no light.


Photo by Karen Turnbull.

My friends seem to be quite happy with their Christmas gift. Although the cats were quite interested at first, the fact that they couldn’t reach the branches, lights, or ornaments meant that they lost interest pretty quickly — which was perfect. The tree in the lantern is pretty heavy, so the cats can’t knock it over. And as a bonus, the tree doesn’t even have to be taken down after the Christmas season is over unless my friends want to use the lantern for something else. A plastic garbage bag over the top would keep the whole thing dust-free in storage until they want to use it next year.

I really liked how my Christmas tree in a lantern turned out. A bit of Googling has made me realize that lanterns are great for protecting all kinds of decorations from pets and young children. I’ve seen them filled with glass balls, tiny dioramas, seasonal knickknacks, paper or painted silhouettes (usually with frosted glass), greenery arrangements, and live plants. I have so many ideas now that I think I’ll be keeping my eye out for more lanterns to salvage and decorate.

Ditto

Taffy Lane in Orleans (a suburb in the east end of Ottawa) is well known throughout the city for its possibly-excessive number of Christmas lights. Traffic moves slowly on this residential street almost every evening throughout December as people walk and drive to check out the decorations. They’ve been doing this for over thirty years! My children and I love this street and make a point of visiting at least once a season — preferably after the snow flies, because the light reflected off of the snow makes everything that much more sparkly.

This year I forgot to bring along my good camera, but I had to snap a few photos of these two front yards:

1092 Taffy Lane, which is my kids’ favourite, and not only because of Santa in the outhouse.

And then 1094 Taffy Lane. Gotta love that sense of humor.

I hope everyone had a happy and healthy holiday!

Happy Halloween!

One of my absolute favourite things is people who go all-out to decorate for the holidays. Halloween is probably my favourite, but Christmas is another big one, especially because its decorative lights enliven the darkest days of the year. When it comes to Halloween, if you trick-or-treated as a child, to me you have filled an unwritten social contract if you keep your porch light on and hand out candy. If you carve a pumpkin or put up a few mass-market decorations, so much the better. But it’s those houses that go all-out that you remember long after you’re too old to ask for candy door-to-door. When I was a kid, our entire block did Halloween big time, which is probably why I’m still such a fan as an adult. My favourite was the neighbour who built three witches and a cauldron in his driveway, closely followed up by the people who dressed as dummies and jumped out at you, and the people who made spooky mazes on their lawns or in their garages.

Here are some of my nominations for “coolest house” this year (keeping in mind that I had to take these photos before Halloween itself, since I post so early in the morning, so some houses don’t have their decorations up/lighted):


This house had projections in the left window of ghosts and silhouettes, which is hard to catch on a long exposure for nighttime lighting, but it was still really cool.

I hope everyone has a safe and happy Halloween! May you bring home lots of your favourite candy, and may your feet and hands not get too cold. (It’s supposed to dip below freezing here, but in this climate we try to plan costumes that you can fit a snowsuit underneath.)

Spooky Glowing Skulls

I’m decorating for my Halloween party this coming weekend, and I dug out a bunch of crafts I’d done from previous years in the process. One of the ones I’m most fond of is the spooky glowing skulls that I made using Epbot’s tutorial. Epbot always has great (and inexpensive) Halloween crafts, along with detailed instructions and photographs. I really want to make some DIY skull sconces, but I doubt I’ll have time before the party. Maybe next year?

I think my biggest challenge to making these glowing skulls was finding the proper materials. Epbot is based in the States, and we just have a totally different range of dollar store craft supplies than they do down there. I couldn’t find a sturdy enough frame with a fancy border; there were lots of fake photo frames for Halloween, but they were such cheap plastic that they bent with the slightest pressure from the fabric. I ended up using IKEA RIBBA 8″x10″ frames.

With the matting and simple wooden frames, my glowing skulls didn’t really look all that much like the ones from the tutorial, but I think that they worked out okay. They actually go pretty well in my house because I use RIBBA frames all over the place for day-to-day picture framing anyway, so the skulls kind of fit in.

I enjoyed making the small skulls so much that I stepped up my game with a huge foam skull (I couldn’t find a translucent plastic one that size), fabric from the fabric store, and a freebie second-hand frame that I spray-painted black. The skull already had lights, but I didn’t like the colour or placement, so I ripped them out and started fresh with a brand new blue string. I think this is my favourite of all of the glowing skulls I made; it’s definitely the most striking. It kind of reminds me of the Evil Queen’s mirror crossed with the old Frighteners movie poster.