Chicken Breast Stuffed With Feta & Asparagus on Coconut Rice

The other day there was a fantastic special at the grocery store on marinated chicken breasts stuffed with feta and asparagus. It was a dish fresh from the butcher section and I thought it would make a lovely treat for the family. As a bonus, although this type of meal has a reasonably long cooking time, it’s not cooking that has to be supervised all that much, so it’s good for busy school nights.

I served the chicken on a bed of coconut rice made in the Instant Pot, using the ridiculously easy technique of substituting the water required 1:1 for light coconut milk. This kind of rice is currently the favourite of Thing 1, and it’s a regular request that I find I can easily acquiesce. The whole meal was ready in about 45 minutes, start to finish. I think it’s one that I’d like to make again, even if I do have to take the time to marinade and stuff the chicken breasts myself. I’m thinking that it might be nice to prepare them in bulk and then freeze them for easy meal prep on busier days. I don’t know if the texture of the veggies would suffer, though, so I think I’d have to give it a test run first.

Lactose-Free Grilled Cheese

I’ve felt 1000% better since cutting lactose out of my diet, but cheese is the thing that I miss the most. I can do with vegan milk substitutes most of the time, and there are a number of recipes where dairy really isn’t necessary at all, but cheese is one place that I haven’t found a good substitute. To that end, I’ve been experimenting with all kinds of lactose-free versions, and surprisingly the store and bargain brands seem to be catering most to my needs, which I didn’t expect because they’re also some of the cheapest.

Since the lactose-free pizza turned out so well, I thought that I should try another dish with the new-to-me PC Lactose Free cheese. This time I chose the Lactose-Free Triple Cheddar Shredded Cheese Blend, which I figured would be tangier than the mozzarella. And I have to say that it turned out perfectly. I don’t know what this brand is doing differently than the other lactose-free cheeses I have tried, but this cheese melts well and stays properly gooey as it cools (I find a lot of them end up with a plastic-like consistency unless they’ve melted just moments before). It was a real pleasure to eat and I know I’ll be back for more. And now I really want to try the triple cheddar in Mom’s Homemade Macaroni & Cheese — also using lactose-free milk and margarine instead of butter, of course.

Of course, a good grilled cheese isn’t all about the cheese, although I’d say that it’s more than 50% of the quality of the final product. This grilled cheese was also made on fresh homemade bread — well, bread machine bread, but that still counts! Thing 1 made us some white bread (page 66, Bread Machine: How to Prepare and Bake the Perfect Loaf (Jennie Shapter (2002)). We’ve really had to keep close tabs on the bread machine lately because the cold, dry weather has meant that we generally need up to a quarter cup more liquid per loaf. Basically, when the machine sounds like it’s struggling to knead, it’s time to add more liquid! This has meant that we’ve had to pay attention (and not go out) instead of the usual set-it-and-forget-it, but it’s worth it for easy, fresh bread.

Lactose-Free Pizza

A friend of mine who also has to avoid lactose told me that she’d found a great new product from President’s Choice: Lactose-Free Pizza Mozzarella Shredded Cheese (and they also have a cheddar blend). I was able to find it at a nearby store, too! Then the other day a different friend reminded me that I could use my bread machine to make pizza dough, so I figured that the world was conspiring to have me make some pizza.

Since I’d already tried the Betty Crocker pizza dough recipe, I thought I’d try something different to compare it to. This time I went with the dough from Tomato and Prosciutto Pizza on page 108 of Bread Machine: How to Prepare and Bake the Perfect Loaf (Jennie Shapter, 2002), and I think I like this one better. It’s more of a thick crust and it definitely makes a greater quantity. I’d run out of homemade sauce, so I picked up a jar of Classico Traditional Pizza Sauce, which I had also never tried before and ended up quite liking. Not only did it taste much better than the canned kinds, it also was enough for two pizzas with some left over. I topped the pizza with bacon and ground beef, at Thing 1’s request. And I really liked how it all turned out! I was especially impressed with the lactose-free mozzarella, which remained gooey and stringy even as it cooled. I find that a lot of lactose-free cheeses melt just fine, but they start turning a disturbing plastic-like consistency very quickly. But not this one! This is definitely a dish I’m going to be making again, especially since my pizza dough tossing technique needs a lot of practice.

English Muffins Take 2

My husband has been bugging me to make homemade English muffins again since I last made them about a year ago. But my new stove meant that I didn’t have the griddle attachment anymore, and I hadn’t bought a stand-alone version in the meantime. I also hadn’t found a local source for proper silicone English muffin rings, which is what I thought would have really helped create a better muffin than last time.

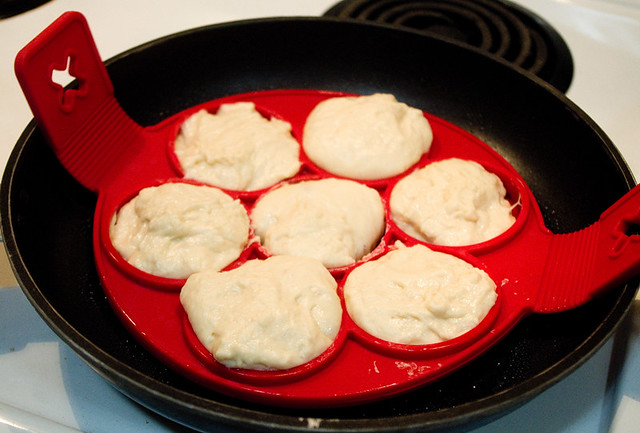
However, I had found a Flippin’ Fantastic pancake maker at a thrift store, so after a good wash I thought I’d give it a try instead. I discovered that if you want perfectly-round English muffins, this really isn’t the right tool. It’s great when they’re first starting out, but the rings need to be deeper, so once they started to rise they ended up being irregularly-shaped anyway. Not only that, but despite a good coating of non-stick spray, the batter stuck really badly to the silicone, making for a messy clean-up.

I also tried to use the flipper for the eggs that were going to go in the muffin sandwiches, and that was an unmitigated disaster. Eggs are a lot more liquid than English muffin batter, and they just leaked out the bottom of the flipper to create a single, solid mass of egg that I then had to break up with a spatula. Online reviews point out that this exactly the same thing that happens with pancake batter, so I don’t think that this product works as advertised. What a shame.

All that being said, the flavour and texture of the English muffins themselves was great despite the flipper not working out. I used Alton Brown’s English Muffin Recipe, which turned out lighter than my other attempt. I discovered that while this mixture is too liquid to mold like a bun, it can just be spooned out onto a pan without rings at all. The resulting muffins will be lopsided, but they will taste just as good! This time I served the muffins as sandwiches with bacon, egg, and cheddar cheese (lactose-free for me), with slices of navel oranges on the side. It was a hit!

Salmon Cheese Tamagoyaki & Rice

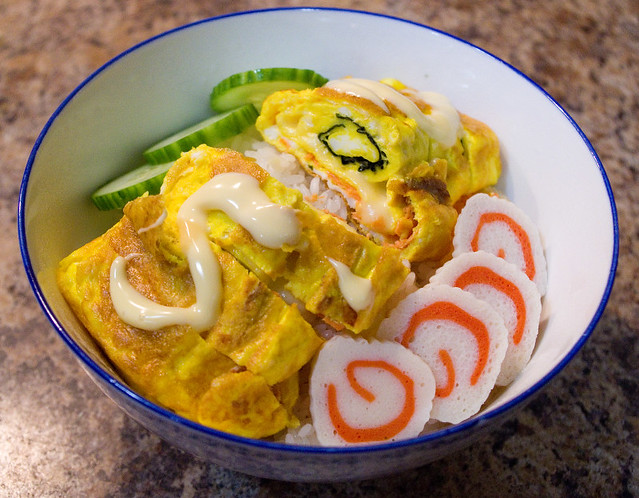
This past Saturday I had what seemed like a houseful of people over for dinner. Okay, there were seven people in comparison to our normal four, not exactly a party, but still more than usual. I didn’t have anything taken out of the freezer, I decided to make everyone tamagoyaki on rice. Ever since I got my Japanese omelet pan for Christmas, they’ve become a go-to meal when I want something relatively simple and healthy.

This time I had smoked salmon in the fridge, so I added ingredients between each layer of egg: nori, cheese, and smoked salmon. The kind of salmon that I had automatically comes sliced in very thin, flexible sheets, so it’s perfect for this kind of thing. I really liked this addition and I think I will do it again in the future! I served the omelets with slices of naruto fish cake and cucumbers on the side, and a squirt of Japanese mayonnaise on top (if the diners wanted these additions).

Should I do this again, though, I’ll have to plan at least a little bit better. I didn’t make enough rice the first time so I had to make a second batch, and I realized that I was short of eggs about halfway through and had to send my brother-in-law out to get some. And if I’m planning on making this many tamagoyaki in a row again, I’m definitely going to have to pick up a second pan!

Leveling Up the Mac and Cheese

Believe it or not, I’m still trying to use up the Christmas leftovers, although at this point I’m left with the stuff that keeps well like cold cuts and hard cheeses. Last night I decided to continue using up some of those leftovers by making a batch of Mom’s Homemade Macaroni & Cheese.

Now, it may look a bit anemic because I didn’t use a cheddar that was dyed orange, but taste-wise it was anything but! The cheese was one of my personal favourites, Balderson Royal Canadian (2 Year) Cheddar. This brand has the added bonus of being relatively local; their original factory was in Lanark County, although they’re now owned by Parmalat. Although this mac and cheese can be made with just about any cheddar or other sharp, hard cheese (and I think I’ve used them all over the years), including cheap store brands, it really shines with something with a bit more flavour. Despite making an entire batch, after last night’s meal there were no survivors leftovers, which is the ultimate compliment to the cook.

As an addendum, I’ve discovered that there is lactose-free milk and lactose-free cheddar, so if you’re like me and are lactose-intolerant, you can still make this dish. Unfortunately, so far as I know Balderson doesn’t make an official lactose-free cheese yet. However, according to Life Hacker, grocery chain Wegman’s says:

An easy way to check for lactose in cheese is to look at the Nutrition Facts under “Sugar”. Since the sugar in cheese is lactose, you can easily see how much lactose the cheese contains. If the sugar is listed as zero, then the cheese contains no more than half a gram of lactose per ounce. Compare to 12 grams of lactose in an 8 ounce glass of milk.

According to the Balderson Royal Canadian (2 Year) Cheddar official nutritional information, the sugar content is 0g, so if a lactose-intolerant person is going to treat themselves to cheese, this would be a good choice. So, like me, you could combine lactose-free milk and this delicious sharp cheddar (although you may be a bit paranoid and want to take some Lactaid in advance just in case).

Nori Cheese Tamagoyaki & Rice

Since the stew the night before took a while to prepare — not so much the cooking, but all of the chopping and cutting — I thought that last night I would make something a bit more simple. I wanted to continue testing out (okay, playing with) my new Instant Pot, so I used it to make a batch of basmati rice. I used the instructions for rice that I found on page 51 of The Ultimate Instant Pot Cookbook (Coco Morante, 2018). I’ve made basmati rice about a million times on the stove and I’ve got it pretty much down to a science, but I wanted to see how the new cooker would compare. I don’t think it takes any less time once you take into account the preheating and the recommended-for-best-results ten minutes on Keep Warm after cooking, but it is pretty darned easy. Unlike the stove top version, I can more or less just set it and forget it, so I can see why a lot of people like this feature. I think I need to test it with some of the trickier varieties, like wild rice or sticky rice, before I am 100% convinced.

The topping for the rice was another attempt at Nori Cheese Tamagoyaki (video here). While this dish invariably comes out tasting excellent, I’m still working on the technique. I find that rolling the nori and egg are fine, but the cheese makes it tricky and it wants so badly to fall apart. Ah well, practice makes perfect. This time I topped it with Japanese mayo and masago (seasoned capelin caviar), as per the recipe, and I think that this transforms the omelette flavour-wise from a breakfast to a supper dish. Given the family’s rave reviews, this is definitely going to be a regular part of our diet, so I think that I’ll get all the practice I need!

Eggs

I thought that yesterday would be a good time to start trying out Christmas presents, and I used up almost a dozen eggs doing so.

First I had to try out my tamagoyaki pan. I used the fillings from Tasty’s Nori Cheese Tamagoyaki recipe (video here), but I wanted to see how it would taste without the mayonnaise and tobiko toppings. I only ended up using one sheet each of nori and dairy-free havarti cheese because I was having a hard enough time rolling it as it was. I think I made each layer too thick, so I’ll try it with less egg per layer next time. Despite the loose, messy look of the omelet, my husband and children thought it was delicious! I rather liked it as well. As you can see in the picture, the cheese inside was nice and gooey, which I think was a big selling point. I think I’ll have to make it as a proper meal in the near future. I’ll need to practice with a basic, filling-free tamagoyaki for sushi as well.

Next I broke out the Instant Pot, first to read the instruction manual, and then to give it an initial test run as per the instructions. I was a little nervous to use it at first, since it is indeed a pressure cooker, and as I’ve stated before I find them a bit intimidating. It’s that evil sound of steam hissing out of them at velocity, I think, and photos like this one of what happens when a pressure cooker doesn’t vent properly. I found that the Instant Pot is much quieter and less scary than my traditional pressure cooker, which is enormous and I generally only use for canning things anyway.

I did take a tip from BuzzFeed and popped a half dozen eggs into the pot while I was doing the initial test run. With a two minute cook time (plus preheat) and a quick pressure release once the timer was done, the eggs turned out perfectly cooked! So this tip is definitely confirmed. Now, my usual method is directly from the Joy of Cooking: put large eggs in a pot, cover with cold water, bring to a boil, then remove the pot from the heat and let it sit covered for 17 minutes. While this has unfailingly yielded perfect hard-boiled eggs, the Instant Pot is definitely faster, even with preheating time. I am pretty darned impressed.

I guess I need to make a proper meal using my Instant Pot soon then, don’t I?

Christmas Breakfast

Yesterday I hosted Christmas breakfast at our house, which is generally a cold meal with a lot of selection. There were a variety of cheeses (including two kinds of Balderson cheddar, a couple that were actually lactose free, and a spreadable goat cheese), smoked salmon, crackers, Nan’s pan rolls, mini banana muffins, Cookie Monster’s Famous Cookies, cold cuts, an assortment of crackers, and Little Shop of Lobsters’ crab and lobster mousses. To drink there was milk or juice, or the more festive apple cider or eggnog.

This meal is generally served buffet-style, everyone munching away while we open gifts in the living room beside the Christmas tree. This meal represents the last of my cooking for about a week, since I’ve gone into overdrive to get everything ready — not just for breakfast, but for my contributions to Christmas Eve dinner, Christmas dinner, festive baking, and Christmas parties the week before. This spread isn’t just meant to feed us for the day; the leftovers will become meals in their own right for the week to come, so we can all relax a bit and play with our new toys.

Faster Than Takeout

This weekend we found Candy Cane sleighing down the side of the staircase:

And petting the reindeer in the Little People Christmas train:

This morning we found her taking pictures of the family as they walked down the stairs:

Yesterday was a very busy day filled with Christmas visits, Christmas shopping with a good friend, and knitting (I’m finally on Stocking #3). All that didn’t leave me with much time to cook, but I didn’t want to eat out, so I compromised with some quick fixes from the grocery store.

That’s pork schnitzel from the butcher section; I’ve had schnitzel before, even had it in Germany, but I’ve never had the pre-made pork version from the grocery store. I didn’t have high hopes, but it wasn’t half bad! In an effort to keep in quick and simple, I served it with eggs over easy and a prepackaged spinach salad with clementine wedges, strawberries, cucumber, goat cheese crumbles, and sliced almonds. Overall, it was quicker than ordering takeout, and also both cheaper and healthier!