Kitchen Gifts

Of course, because my friends and family know that I enjoy spending time in the kitchen, a lot of my Christmas gifts this year centered around that.

One of my friends gifted me with some delicious Chex Party Mix and a lovely loaf of Makivnyk (a Ukrainian style poppy seed tea roll) from the Black Walnut Bakery. Oh, and Thing 1 gave me the Chocolate Chip Cookie Mix In A Jar that she’d made, thus ensuring that she would get to eat some of them too.

I also acquired a number of cookbooks over the holidays, some as gifts, others from thrift stores or as bargain books.

The Perfect Pie Book by Anne Marshall, 1984 (thrifted)
Hershey’s 1934 Cookbook, Hershey Chocolate Company, 1971 (thrifted)
Anita Stewart’s Canada by Anita Stewart, 2008 (thrifted — and I’ve wanted my own copy for quite a while)
Bread! Simple and Satisfying Recipes for Your Bread Machine by Kathrun Hawkins, 2006 ($4.00 at Dollarama)
Pumpkin Butternut & Squash by Elsa Petersen-Schepelern, 2000 (gift)

My parents gave me an Instant Pot and a handmade apron, my brother gave me a copy of Jamie Cooks Italy (since I’m a huge Jamie Oliver fan), and a friend gave me a Paderno tamagoyaki pan.

I can’t wait to try out all of my new toys!

Chestnut Roasting Fail

This morning we found Candy Cane hiding in with the Christmas stuffies:

While I’m still spending most of my time trying to finish up the Christmas knitting, we still have to eat! On a recent grocery store expedition, Thing 1 insisted that we purchase some chestnuts to roast at home — then promptly forgot about them. So I figured I should do something about that.

Now, around here we tend to think of roasted chestnuts as kind of quaint and old-timey, mostly because of the Christmas carol. But when I was in Istanbul some years ago, fresh-roasted chestnuts were sold on every second corner in the old city, alongside roasted corn on the cob and stacks of chewy pretzels. One of my big regrets is that I never tried any while I was there, despite their tantalizing aroma!

So I Googled how to roast chestnuts in the oven, and while everyone seemed to have a slightly different take, all of the methods seemed pretty simple. I more or less used the Howcast method. Basically, I preheated the oven to 375°F, rinsed and dried the chestnuts, and tried to make an X incision on the skin of the nut. It was here that I started to realize that things may not be going to according to plan, since if I’d used anything smaller than a butcher’s knife I would have snapped the blade.

Then I baked the chestnuts in the oven on a cookie sheet, and followed that by taking them out of the oven and putting them in a casserole dish, which I covered with a towel and let rest for ten minutes. At this point I was pretty sure that there was something not working, since the BBC says the skins should open and the insides should be tender — and the skins remained defiantly closed.

When I tried to peel them, my suspicions were confirmed. The shells were hard and the nutmeat was even harder; an experimental taste test threatened to chip a tooth. They were hard as a rock.

So either I got the wrong kind of chestnut for roasting (and in my inexperience I don’t know the difference), or the ones I bought were ridiculously old and dried out. I’d like to try this again, because I still regret not eating the ones in Istanbul, but where can I be sure to buy the right kind and age of chestnuts around here?

Graveyard Five-Layer Dip a.k.a. Wacko Taco Dip

Every year for our family Halloween party, Thing 2 gets really excited when I tell her that I’m going to make what she calls “Graveyard Dip”. It’s really just a basic five-layer dip that I learned how to make from my cousin, decorated a bit to fit the Halloween theme. My cousin calls it “Wacko Taco Dip”, which is what we call it the rest of the year when I bring it to parties without the “gravestones”. It’s really quick and simple to make, and can be made the night before (or even a few nights before) if you’re well-prepared, or immediately before an event if you’re not. It will taste just as good either way. The measurements of the recipe may seem kind of arbitrary at first glance, but they’re made to be the size of a single package of that ingredient. If you’re doling out the ingredients from larger containers, don’t be too worried that your measurements are totally precise, since this recipe is very forgiving.

When I discovered that I was lactose intolerant, one of the reasons I was sad was that I couldn’t have this dip any more. However, I’ve discovered that it’s now possible to buy lactose-free cream cheese, lactose-free sour cream, and lactose-free cheddar cheese. I substitute them in equal quantities for their counterparts in the recipe and it doesn’t bother my tummy at all!

Graveyard Five-Layer Dip a.k.a. Wacko Taco Dip
Yields one 9″ X 13″ pan of dip

Ensuring that it is broken into small pieces, fry until lightly browned and cooked through:
450g lean or extra lean ground beef
Pour off fat. Line a plate with paper towels. Put ground beef on paper towels to soak up any residual fat.
In a small mixing bowl, mix until smooth:
250mL sour cream
227g cream cheese
Spread mixture evenly on the bottom of a 9″ x 14″ pan. Glass is preferable for looks alone; plastic or metal work just as well.
Sprinkle cooked ground beef evenly over the mixture as the second layer.
For the third layer, spread evenly over the contents of the pan:
650mL salsa
For the fourth layer, spread evenly over the contents of the pan:
320g Tex Mex shredded cheese
For the fifth layer, spread evenly over the contents of the pan:
227g shredded iceberg lettuce

If making Wacko Taco dip, the dish is complete! Serve alongside a bowl of your favourite tortilla chips.

If making Graveyard Five-Layer Dip, take:
10 to 12 round tortilla chips
On each of them, write “RIP” with a:
black, fine-tipped edible marker
Push each of these chips into the dip halfway so that the “RIP” is visible on the top. Now you have your gravestones. Serve alongside a bowl of your favourite tortilla chips.

Pumpkin Spice Muffins & Cheerios

It’s no secret that I love pumpkin spice. A lot of people joke that it’s a flavouring made specifically for white women, and there may be some substance to that. After all, it does smell distinctly like the pumpkin pie that was a treat in my family around Thanksgiving and Christmas, so I’m guessing that other people of a similar background have similar nostalgia. They say that smell has a great deal of power when it comes to memory, at any rate.

When I was growing up, though, pumpkin spice wasn’t in everything come fall. Pumpkin pie and pumpkin bread, if you were lucky, and that was about it. The popularity of Starbucks’ pumpkin spice latte is what really got the ball rolling, at least around here. I’m not a coffee drinker, so I was later than many about hopping on the bandwagon. I really rather liked the Oreos and the Kahlua. That being said, I firmly believe that some things really don’t need to be pumpkin spice flavoured, or have been poorly done, so I like to try out a few new dishes every autumn as a kind of experiment.

The first dish that I tried this week was pumpkin spice muffins baked from Krusteaz Pumpkin Spice Quick Bread Mix, which I bought from Costco on a recent trip. The box says that you can make loaves, pancakes, cookies, and muffins, but I was feeling lazy so I just made the muffins. They rose nicely and looked great in the pan, but they fell and became rather overly moist once they left the oven, despite being cooked through. Even so, they were fairly tasty; the kids especially liked them.

For my part, I think I will stick to the Joy of Cooking‘s Pumpkin Bread recipe for this kind of muffin. I’ve had better luck with this recipe in the past. However, I do wonder, in the case of the mix, if it’s trying to do too many things — or if a different preparation might suit the mix better? At any rate, I have three more packages of mix to cook, so I should be able to try them all out.

I also tried some Pumpkin Spice Cheerios. These are definitely a sweet cereal, which to me isn’t suited to breakfast at all. Actually, I found them quite cloying in (unsweetened almond) milk. However, they’re not half bad dry, and make quite a nice snack. However, if I’m going for a sweet Cheerio, I much prefer Apple Cinnamon Cheerios. They came out in 1988, so they have a place in my heart as being a special treat from my childhood (we weren’t allowed sugary cereal except on special occasions). Also, I just find that they taste less sweet and cloying, which is funny because according to the nutrition info, pumpkin spice has 8g of sugar per serving, and apple cinnamon has 9g. Maybe it’s how it’s cooked, or just the spice mixture? It’s even stranger when you realize that one of the major components in pumpkin spice is actually cinnamon. At any rate, I still like Apple Cinnamon Cheerios better.

Seasonal School Snacks

I mentioned in my last post that since it’s in season, I wanted to do more cooking with maple syrup over the next little while. Well, after reading a book about kids learning to cook, Thing 1 has been bugging me to make fruit leather with her. Since fruit leather is just pureed fruit that has been dried, I figured why not? Also, it’s a great way to use up an overabundance of fresh fruit (not really a problem here in the spring) or the fruit that you’d forgotten about in the freezer (more of an issue of mine right now).

My parents actually used to make fruit leather and dried fruit for my brother and I when we were kids. This was the era of the Fruit Roll-Up, but my brother’s sensitivity to corn (and hence corn syrup) made most versions of this store-bought snack inadvisable. Actually, the dehydrator that I’m using now is exactly the same one we used when I was a kid; my parents let me have it when they realized they hadn’t used it since my brother and I moved out.

The instructions for the dehydrator recommend that if you’re going to use a sweetener when making fruit leather, you should “use corn syrup, honey or fruit juice instead of granulated sugar which tends to crystallize”. We’ve discovered that maple syrup actually makes a great, all-natural sweetener for fruit leather that does not crystallize — and it adds a lovely flavour as well.

As an aside, if you don’t have a dehydrator, you can make fruit leather in the oven by drying it out at 200°F (93°C) for eight hours or so… But a dehydrator is a much smaller machine and uses a lot less electricity, so if you’re going to make fruit leather often, I’d recommend buying a purpose-built machine.

This is also the week leading up to Easter, which in our family means at the very minimum it’s time to dye some eggs! The kids like to take hard-boiled eggs to school in their lunches, so I made up a dozen for the week.

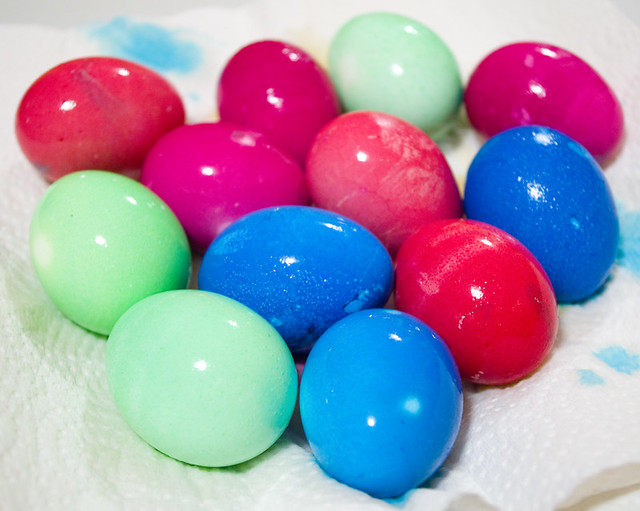
I used food colouring to dye the eggs vibrant, food-safe colours. There are all kinds of kits out there for dyeing and decorating Easter eggs, but a lot of them aren’t intended for consumption afterwards, so I like to stick with food colouring. The kids may decorate more eggs over the long weekend, though, and those will probably be with paint and glitter. They might be old enough to blow out the eggs to create permanent ornaments this year. Well, I know that Thing 1 is, but Thing 2 is not always as gentle as her big sister… And empty eggshells are mighty easy to smash.

The nice thing about blowing out eggs for decorating is that you can save the yolks and whites and make lovely scrambled eggs, or breakfast burritos, or tamagoyaki (either by itself or in sushi), or egg drop soup. This way, no part of the egg would be wasted. I have to admit, wasting food is a pet peeve of mine. Sometimes it can’t be avoided, but all efforts should be made not to, you know?