The Nightmare Before Christmas Garage

Halloween is all over but for the consumption of vast quantities of candy. Due to rainy weather, we didn’t get as many trick-or-treaters as I thought we would this year, so we have boxes of full-sized candy bars on top of what the kids accumulated. I think I’m going to have to Google “things to make with leftover Halloween candy”.

Of course, after Halloween there’s also lots of cleaning up and packing away to do, but before I get to that I’d like to share my favourite part of this year’s decorations: the Nightmare Before Christmas garage.

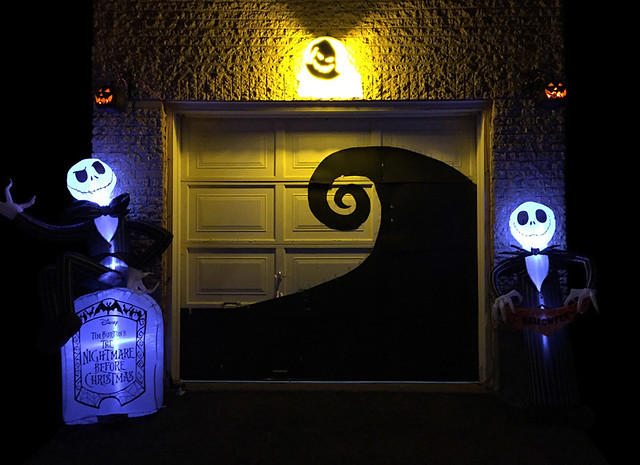
You see, this year marks the 25th anniversary of one of my favourite movies (and Thing 2’s all-time fave so far), The Nightmare Before Christmas. I thought that part of my outdoor decor should definitely reflect this fact. I purchased the little Jack Skellington inflatable on the right, and the larger one on the left was a generous gift from a friend. I made the Oogie Boogie “moon” light cover out of a plastic platter, a black Bristol board cut-out, and a yellow light bulb. The “hill” on the garage door was just more Bristol board taped on and cut out in the desired shape, with breaks and slight overlaps between the panels so I could still open and close the door. Honestly, it wasn’t terribly difficult, but I was really happy with it all in all.

As for actual costumes the day of, I wore my Robin Hood: Men in Tights costume during the day, and my Discworld Death to take my kids trick-or-treating at night. Death was very well received by most, although he did frighten a few little ones (he’s enormous, after all). I really did enjoy chasing the teenagers. The kids wore their Borderlands 2 costumes, and they were thrilled when a few people even knew who they were supposed to be.

I’d say that it was a pretty great Halloween.

Shabby Chic Tea Light Holders

At Russell Flea this past Saturday, I was able to debut my latest work with upcycled items: shabby chic tea light holders made with vintage spoons.

They look pretty simple, but I honestly didn’t think I’d get them done in time. It turns out that drilling through stainless steel — some of which was 4mm thick depending on the design — with my old hand drill was very, very difficult. I snapped two bits, dulled at least three more, and almost burned out my drill’s motor. At no point was the work ever quick; it seemed to take forever to make a single hole.

Despite the difficulties, in the end I was quite satisfied with how the first pale pink ones turned out, so I made two more in pale green. My favourite is the one made from the intricate little sauce ladle (which of course was the one with the thickest handle and gave me the most difficulty).

In addition to adding these new pieces to my lineup, I also remembered to purchase some lovely dark maple syrup from McCannell Craftwork. Laurie McCannell and I had stalls that abutted each other this week, so it was hard to forget! We had a chance to chat about yarn and a whole host of other subjects between customers while she spun yarn at her wheel and I knit. It was lovely.

I also got some great news this weekend! I’ve been accepted to 613flea for Saturday, April 21st. For those not familiar, 613flea is a monthly market held at Aberdeen Pavilion in Lansdowne Park. There’s always so much to see there, and so many fantastic finds and delicious food. So feel free to pop by between 10:00am to 4:00pm in two weeks — as always, admission is free!

Saint Patrick’s Day Thrifting

This past Saturday I spent the day with a good friend of mine down in the Glebe. We started with a Saint Patrick’s Day lunch at Patty’s Pub, where we had great food and conversation while we listened to the live band playing Irish folk music. Then we headed out to 613flea (a great urban flea market) just up the road in the Aberdeen Pavilion in Lansdowne Park. When we finished there, we browsed the Ottawa Antique Market, and then we rounded out our day by perusing a second-hand charity shop. I know it’s not the kind of thing that everyone’s into (heaven knows my husband has no interest whatsoever), but my friend and I had a fabulous time!

Of course, I did return home with a few treasures. I think my favourite one of the bunch is a copy of the 1889 (seventieth edition) printing of the 1877 volume The Home Cook Book, which was compiled by the Ladies of Toronto and Chief Cities and Towns in Canada as a fundraiser for the Sick Kids Hospital. From what I understand, this is the very first Canadian cookbook that was compiled by an organization to be sold in order to raise funds. It’s such a common thing to do these days (especially as it gets easier and easier to self-publish inexpensively) that most of us who like to cook have at least one of these in our collection — and have probably contributed to a few.

I’m really looking forward to diving into this book and trying to recreate some of the recipes. It’s going to be interesting, because the instructions are sparse and often vague as so many old cookbooks often are, since they assume a great deal of previous experience on the part of the reader. The book also refers to culinary techniques, measurements, and ingredients we don’t use any more. I mean, what is a quiet oven? Or a quick oven? Do we even grow Spitzenberg or Greening apples any more in Canada? When they talk about currants, do they mean dried or fresh? How much does a wineglass hold? Or a teacup? I’m going to be doing a lot of Googling, I tell you.

Now, I love the feel and smell of old books, but this is the digital age after all and the book is well out of copyright. It was actually archived online by the University of Toronto and the Toronto Public Library; you can check it out in all its glory here. Or if you’re like me and you don’t want your old books contaminated by kitchen spatter, when you’re cooking you can always pull up the digital version on your phone or tablet.

The fantastic old cookbook wasn’t my only find, though! I picked up an 8×10″ print of Carabara Designs‘ hand-lettered print of the “Do you want ants?” quote from the TV show Archer. I am constantly amazed by my kids’ capability to utterly destroy the kitchen with two pieces of toast, so I’ve been thinking this a lot lately.

The print has pride of place on the side of the cupboard above the kitchen counter peninsula, hopefully where the kids will see it. But kids being kids, they probably won’t even notice. Ah, well. I think it’s perfect, and it even matches the paint job. Now all I need is a coordinating print to go underneath.

Last but not least, I picked up some Fuzzy Navel Jam from Tastes of Temptation. This jam tastes just like summer, which is exactly what I need right about now. Honestly, I liked everything they had on offer, but this was the one that made me smile the most. Spread on a piece of fresh homemade bread, it makes a divine snack with a cup of tea!

Teacup Pin Cushion Tutorial

My kids are learning to sew, so I thought that it was time that they had pincushions of their own. I’ve seen teacup pin cushions around at flea markets and craft fairs, so I thought we’d make a go of whipping up some of our own. They’re really easy and right up the kids’ alwy, patience-wise.

Teacup Pin Cushion

Materials:
– 1 teacup (saucer optional)
– 1 square of cotton or cotton-blend fabric, about 3X as wide as the teacup’s top
– polyester fiberfill
– thread

Supplies Needed:
– fabric scissors
– needle
– hot glue gun & glue
– pins

1. It all starts with a teacup — but none of Grandma’s fine china! We bought ours for about $2.00 at a local charity thrift shoppe. If you’re not into tea, a coffee or espresso cup works well, or an egg cup, or even a sake glass. We even made one using a miniature terracotta pot (picked up for about $0.75 at a gardening supply store). Basically, it has to be an opaque container that you like the looks of that’s about the size of an old teacup, or smaller. You will also need to pick out a piece of coordinating fabric that’s about three times as wide as the mouth of your vessel.

1.B. OPTIONAL STEP: If you’re very crafty, you can embroider a design on your fabric at this stage.

2. Using a pair of fabric scissors, cut your fabric into a circle about three times as wide as the opening of your teacup. It doesn’t have to be perfect, since this end will be hidden inside the bottom of the cup where nobody will ever see it.

3. Using a running stitch, stitch around the outside edge of the circle, about 1cm from the edge. Use a sturdy thread, but don’t worry about the colour, since this will be hidden as well. Tie a knot at each end of the thread, but do not stitch that knot into the fabric.

4. Making sure that the fabric is inside-right, pull the thread taut to gather the fabric, but do not tie a knot. This will make a little pouch.

5. Stuff the pouch firmly with fiberfill.

6. Draw the thread as taut as possible and tie it off securely. This will create a small cushion.

7. Stuff the cushion into the teacup, making sure that the end with the stitching and the gathering is at the bottom of the cup.

8. Affix the cushion inside the cup using hot glue. I found that I got the neatest results by pushing the fabric down below the edge of the cup, and then running a bead of hot glue quickly about 0.5cm lower than the edge of the cup. Then I carefully released pressure on the cushion until it sat at the height I wanted, holding it in place while the glue dried. Otherwise, the cushion kept trying to puff much too far out of the cup.

9.B. OPTIONAL STEP: Using hot glue or by sewing, decorate the pin cushion. You can add a border of ribbon or trim around the edge of the cup to conceal the glue. Buttons, lace, small pompoms, googly eyes, felt cutouts, silk flowers… If you’re so inclined, this is a great time to be creative.

And that’s really all there is to it!

As for our last March Break craft, Thing 2 went with a more contemporary look.

Whereas I made mine in a little flower pot. I created the floral element by sticking sewing pins through little fabric flowers bought in a confetti-like pack from the dollar store.

And Thing 1 used the fabric flowers slightly differently, pinning them into place with her pincushion’s pins.

Cat-Proof Tree

A friend of mine, who owns three very mischievous cats, posted a link to a Facebook post about Genius People Who Found A Way To Protect Their Christmas Trees From Asshole Cats And Dogs back in November, and it gave me some ideas. Specifically, the picture of the little tree in the gigantic lantern.

You see, I’d salvaged this 3.5-foot-or-so decorative lantern a while back and, although I’d filled it with orange lights as a Halloween decoration, I didn’t have any real idea what I wanted to do with it once the holiday was over. I’d thought I might spray paint silhouettes on the inside and turn it into a permanent addition to my Halloween decoration collection, but I didn’t have any concrete plans. However, I thought that my friends might like a tree that their cats couldn’t destroy, so I started working on the lantern.

The lantern had been discarded for a reason; it needed repair. It required a good cleaning, some glue in spots and a couple of coats of paint, not to mention some new hardware. Unfortunately, I couldn’t find matching replacement hardware, so the rusty stuff was just going to have to do. I also had to find a short enough tree and some small embellishments (which I kept to a neutral white and silver motif to hopefully go with the decor on any floor of their house, and any decorations they would want to add).

I was quite happy with the final product, which looked nice in a lit room…

…but really was at its best in low to no light.


Photo by Karen Turnbull.

My friends seem to be quite happy with their Christmas gift. Although the cats were quite interested at first, the fact that they couldn’t reach the branches, lights, or ornaments meant that they lost interest pretty quickly — which was perfect. The tree in the lantern is pretty heavy, so the cats can’t knock it over. And as a bonus, the tree doesn’t even have to be taken down after the Christmas season is over unless my friends want to use the lantern for something else. A plastic garbage bag over the top would keep the whole thing dust-free in storage until they want to use it next year.

I really liked how my Christmas tree in a lantern turned out. A bit of Googling has made me realize that lanterns are great for protecting all kinds of decorations from pets and young children. I’ve seen them filled with glass balls, tiny dioramas, seasonal knickknacks, paper or painted silhouettes (usually with frosted glass), greenery arrangements, and live plants. I have so many ideas now that I think I’ll be keeping my eye out for more lanterns to salvage and decorate.

Spooky Glowing Skulls

I’m decorating for my Halloween party this coming weekend, and I dug out a bunch of crafts I’d done from previous years in the process. One of the ones I’m most fond of is the spooky glowing skulls that I made using Epbot’s tutorial. Epbot always has great (and inexpensive) Halloween crafts, along with detailed instructions and photographs. I really want to make some DIY skull sconces, but I doubt I’ll have time before the party. Maybe next year?

I think my biggest challenge to making these glowing skulls was finding the proper materials. Epbot is based in the States, and we just have a totally different range of dollar store craft supplies than they do down there. I couldn’t find a sturdy enough frame with a fancy border; there were lots of fake photo frames for Halloween, but they were such cheap plastic that they bent with the slightest pressure from the fabric. I ended up using IKEA RIBBA 8″x10″ frames.

With the matting and simple wooden frames, my glowing skulls didn’t really look all that much like the ones from the tutorial, but I think that they worked out okay. They actually go pretty well in my house because I use RIBBA frames all over the place for day-to-day picture framing anyway, so the skulls kind of fit in.

I enjoyed making the small skulls so much that I stepped up my game with a huge foam skull (I couldn’t find a translucent plastic one that size), fabric from the fabric store, and a freebie second-hand frame that I spray-painted black. The skull already had lights, but I didn’t like the colour or placement, so I ripped them out and started fresh with a brand new blue string. I think this is my favourite of all of the glowing skulls I made; it’s definitely the most striking. It kind of reminds me of the Evil Queen’s mirror crossed with the old Frighteners movie poster.