It Has Begun!

Today is the vernal equinox and first day of spring, which is encouraging for those of us who like to garden despite the fact that it still looks like winter outside. However, it has been peeking above freezing off and on for the last week, and things are finally starting to melt a bit. While my driveway is still a skating rink, I can finally see a bit of the back deck close to the house.

I find myself rather envious of the people further south (or back in Madrid) where spring flowers are already pushing out of the ground and fruit blossoms are covering the trees. Ah well, our time will soon come!

With the seasonal change comes the reminder that Ottawa ComicCon is only 50 days away — and I have to get cracking on costumes! Yesterday I popped out to purchase some fabric, although I haven’t found all of what I will need yet. (Today it’s all in the washer being pre-shrunk.) The purple and white fabric will mostly become Vio from The Legend of Zelda: Four Swords Adventures for Thing 1. I also need to purchase fabric for our other family costumes: Thing 2’s Sheik from The Legend of Zelda: Ocarina of Time and my Ganondorf from The Legend of Zelda: The Wind Waker. For group costumes on the weekend I also need to make a R.O.U.S. costume from The Princess Bride (I’m hoping to find a kigurumi pattern that I can modify) and a 1950’s version of Marrow from the X-Men comics. Over the weekend I also plan on wearing my Men in Tights costume again, which is the only one I don’t have to make this year. So that’s a total of five costumes I still have to sew, but at least there are no big builds this year?

Disney Princess/Star Wars Mash-Up Photos

I remain astounded by this, but I managed to finish the costumes for Thing 1 and Thing 2 in time for Ottawa Comiccon: Holiday Edition this past Sunday. The costumes were supposed to coordinate with last year’s Frozen/Star Wars Mash-Up so that my friends and I didn’t have to make new costumes. So may I present to you:

Thing 2 as Jedi Tinkerbell! I made her robe using McCall’s M6184: Children’s/Boys’/Girls’ Karate and Scrubs Costumes, but I used green broadcloth as the fabric. I also added two tabards and an obi/sash, which were basically tubes of fabric turned inside out and sewn closed at the end. The tights were Mondor dance tights that I purchased at a steep discount at the Audrey’s Costume Castle fire sale; the wings were from Value Village Halloween stock. I re-used the boots from Thing 1’s Astrid costume, and stuck pompoms on the toes with hot glue. The sparkly pink belt was from the kids’ wardrobe. Oh, and the knockoff “space swords” were cheapies from Walmart.

Thing 1 as Jedi Ariel! Her robe was made using a larger size of the same pattern as Tinkerbell, but in different colours of broadcloth; the tabards and obi were also made the same way as the first costume. I ordered the mermaid scale leggings off of Amazon since I couldn’t find any the right colour in town, and I was extremely lucky when they arrived this past Friday despite the postal strikes (the very last day they could have been in time). The half boots were from Joe on clearance, and the belt came from the kids’ closets. The wig was an inexpensive one from the Walmart Halloween section, and it was the only part of the costume that I was really disappointed with. It didn’t come out of the package looking anything like the picture on the front. Despite trying to style it to look Jedi-ish, it continued to look extremely cheap. I pinned it in about a million spots and it still wouldn’t stay looking halfway decent. I think Thing 1 only wore it for an hour before she gave up on it, and I honestly don’t blame her. Her real hair looked much better anyway.

So here was our Disney Princess Jedi group for this mini con: Tinkerbell, Anna, Ariel, and Elsa. I’m hoping that we can convince more people to join us next year for a group cosplay! It was a lot of fun and the kids especially enjoyed a very enthusiastic reception.

I also took the opportunity at the con to have one of my fave local artists, Emily Griggs of Sweet Ingenuity, do sketches of my girls in their costumes. I almost invariably buy something at her booth at every con I see her at, since her art is so much fun! I was really glad she was taking commissions at this con and had the time to draw my kids. I gotta say, they couldn’t have been more thrilled to see themselves in cartoon form. This art will take pride of place on my wall.

My only regret about this con is that we forgot to go and get pictures outside in the snow! Oh well, we’ll just have to schedule a photo shoot sometime.

The Nightmare Before Christmas Garage

Halloween is all over but for the consumption of vast quantities of candy. Due to rainy weather, we didn’t get as many trick-or-treaters as I thought we would this year, so we have boxes of full-sized candy bars on top of what the kids accumulated. I think I’m going to have to Google “things to make with leftover Halloween candy”.

Of course, after Halloween there’s also lots of cleaning up and packing away to do, but before I get to that I’d like to share my favourite part of this year’s decorations: the Nightmare Before Christmas garage.

You see, this year marks the 25th anniversary of one of my favourite movies (and Thing 2’s all-time fave so far), The Nightmare Before Christmas. I thought that part of my outdoor decor should definitely reflect this fact. I purchased the little Jack Skellington inflatable on the right, and the larger one on the left was a generous gift from a friend. I made the Oogie Boogie “moon” light cover out of a plastic platter, a black Bristol board cut-out, and a yellow light bulb. The “hill” on the garage door was just more Bristol board taped on and cut out in the desired shape, with breaks and slight overlaps between the panels so I could still open and close the door. Honestly, it wasn’t terribly difficult, but I was really happy with it all in all.

As for actual costumes the day of, I wore my Robin Hood: Men in Tights costume during the day, and my Discworld Death to take my kids trick-or-treating at night. Death was very well received by most, although he did frighten a few little ones (he’s enormous, after all). I really did enjoy chasing the teenagers. The kids wore their Borderlands 2 costumes, and they were thrilled when a few people even knew who they were supposed to be.

I’d say that it was a pretty great Halloween.

Geeking Out in Red Bank

Not only am I sick now, but so is the entire rest of my family, so there won’t be too much cooking going on for a bit. So I guess I will continue to regale you with tales of my trip to New Jersey since that was, if not an exotic location, definitely a fun one.

At a friend’s suggestion, I drove out to Jay and Silent Bob’s Secret Stash in Red Bank. For those not in the know, it’s a comic book store owned by Kevin Smith, who is the writer/director/actor of the View View Askewniverse movies (Clerks, Mallrats, Chasing Amy, Dogma, Jay and Silent Bob Strike Back, etc.) — among many other things. Honestly, it’s just a comic book store, which is something I am eminently familiar with back home; after all, I worked in one for a while back in high school. My main reason for visiting this particular store was a) the owner, and b) the movie ephemera from Smith’s movies that are displayed in glass cases on site. You see, Jay and Silent Bob Strike Back was the movie that my husband and I watched on our first date, so I kind of had to go check out the Secret Stash.

Of course, I had to get a selfie with Buddy Christ from Dogma. I don’t usually take selfies, but I made a special exception here.

On my way out of the shop, I discovered that it is also a Pokéstop in PokémonGo, to my complete and utter lack of surprise — most comic book stores and geek-related places are.

On my walk back to my car, I stumbled upon YESTERcades of Red Bank; with all of its windows open on that warm day, the sounds of the vintage video games drew me in. I discovered that instead of paying by the game, there you pay a flat hourly fee or buy a day pass, and you can play as many times as you want. At $8.75 per hour or $25 per day, that’s a lot less than I would have paid when I went to the arcade as a kid… What can I say, I like video games, but I die a lot. Honestly, if they had one of these in town, I know where I’d be taking my kids for their next birthdays!

They had a wall of pinball games, more modern games with flat screens and couches, as well as a party room in the back.

I’m pretty sure I recognized 95% of the games there and have played 75% of them at least once. My fave find was their TRON cabinet, since it’s definitely the most meta video game I know of.

Site of the New Jersey Shark Attacks of 1916

As I’ve previously mentioned, I’m a big fan of thrillers and horror movies, and 1975’s Jaws was a pioneer of the genre. With its big-name director, iconic movie monster, and unforgettable score, this movie is definitely noteworthy in the history of film. However, what a lot of people forget is that it’s based on a 1974 novel by Peter Benchley, which was itself inspired by the 1916 New Jersey shark attacks. I knew that when I got an opportunity, I absolutely had to visit the location where it all started.

Shark attacks have become somewhat expected in open ocean water, although in reality the likelihood of a shark attack is much lower than the hype would have us believe. However, in the summer of 1916 there was an intense heat wave and a polio epidemic in New Jersey and nearby New York City, which sent those who could manage it out to the seaside to swim and take in the ocean breezes. Perhaps the upsurge of people in the water attracted the sharks — or at the very least gave plenty of targets to the sharks that already lived in the area. Over twelve days in July, four people were killed and one seriously injured off the Jersey shore. Newspapers of the time, sensing a sensation, ran stories about fishermen catching all kinds of “man-eating” sharks, even though many of the photos had been taken long before the attacks. The panic level was high.

The attack of Charles Vansant off of Beach Haven on July 1st and the attack of Charles Bruder off of Spring Lake on July 6th actually occurred in the while the men were swimming in the ocean, although they were very close to shore. However, what stands out the most to me is that the July 12th attacks on Lester Stillwell and Stanley Fisher happened in Matawan Creek, which is brackish or even fresh water depending on how far upstream you go. Joseph Dunn, who was was the only person to survive the attacks, was also swimming somewhat up the creek when he was bitten by the shark half an hour after the two fatal attacks there.

I can understand why the 1916 shark attacks gripped people of the time with such terror. After the first one, people were on guard; after the second proved that it wasn’t just a one-time event, most wise people along the ocean eschewed ocean swimming altogether. But no one could have predicted that there would be a shark in the fresh water of Matawan Creek. In the middle of a heat wave and long before the invention of air conditioning, all these poor people wanted to do was cool off.

There is a memorial to the two Matawan shark attack fatalities in the town’s Memorial Park. This park also includes tributes to lives lost in WWI, WWII, and to two poor souls who were unlucky enough to be victims of 9/11. The memorial reads as follows:

The Attack: On July 12, 1916 an eight foot shark enters Matawan Creek. Six boys are swimming at the Wyckoff dock. One of the youngest boys, Lester Stillwell, is attacked by the shark and perishes. Stanley Fisher, a young businessman, gallantly tries to recover the body of the boy and dies.

The Victims: Lester Stillwell, and eleven year old local boy, dies immediately. His body surfaces two days later. Stanley Fisher, a twenty-four year old tailor, dies from his shark wounds the same day as the attack. Both Lester and Stanley are buried in Rose Hill Cemetery in Matawan.

The Legacy: Exceptional courage was shown by local residents during this tragedy. This incident was an inspiration for novels, books and movies.

On July 14th, a 300lb bull shark (which can survive in both fresh water and saltwater) was caught, and when it was dissected 15lbs of human remains were found in its stomach. While that might not have been the only shark to attack a human over this period, there were no further attacks after it was caught.

This is what Matawan Creek looks like today; in all honesty, it’s unremarkable in almost every way, except for its history. This is the section of the creek that is visible from the Main Street bridge over Gravelly Brook; the bridge in the background is Aberdeen Road. The attacks actually happened a bit further east from what you can see from the memorial site, just west of where the Garden State Parkway goes over the water.

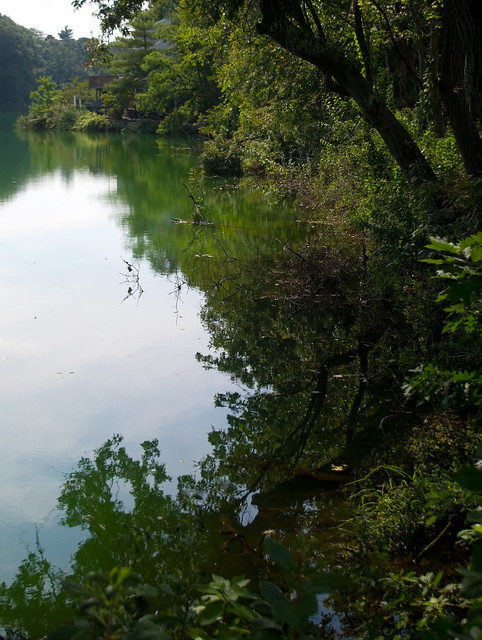
Visually, the only thing that stands out about this area is Lake Matawan, which is the body of water you can see behind the trees in the photo of the memorial. It looks like a bright green lawn that’s visible between the branches, but no, that is actually water. It is a brilliant shade of opaque emerald that I have never seen anywhere else. A bit of research leads me to understand that the lake is quite polluted and has a high copper content, and it is also actually highly acidic, meaning that very little aquatic life survives there except for one particularly brilliantly green variety of filamentous algae. The water here really looks like it should be in a canister labelled “TGRI”.

Not far from Memorial Park is Rose Hill Cemetery where Stillwell and Fisher’s graves are located. The cemetery is easily accessed via Ravine Drive. There are “No Trespassing” signs at entrance, but there are no gates. This seemingly mixed message is because apparently there was vandalism occurring in this graveyard, especially back in the 1970’s. However, polite, respectful guests are welcome to visit (or jog, or walk their dogs) on the property. Keep in mind, though, that this is still an active cemetery — graves were actually being dug while I was there — so if you do make this visit, please steer clear of mourners and leave them in peace. (Luckily there were no mourners onsite for me to disturb during my visit.)

Popular interest in the shark attacks is evident by the mementos left at Lester Stillwell’s grave. Since the poor child died over a hundred years ago, it’s highly doubtful that family or friends who knew him are still visiting his gravestone. While I was the only person in the graveyard other than the gravediggers (do they still call them that?), there had obviously been many visitors recently, probably over the summer, since the items weren’t too faded.

Stanley Fisher was buried in a family plot just up the hill from Stillwell, so the family stone is the most prominent one.

Fisher’s personal marker is a bit behind the stone bearing the family name, and it too shows evidence of recent visits, although not as much so as Stillwell’s. There were also a number of pebbles placed atop the family stone, much like at the Evans/Ellis cemetery.

Now, as for rumours that this is “one of the most haunted cemeteries in the United States”? Don’t believe the hype. Even if I put stock in such things (which I don’t), this is a well-maintained, peaceful, not-at-all-scary cemetery. Tragic stories abound in this old graveyard, true; they don’t start and end with shark attack victims. Some of the graves date back to the 1700’s, and with a long enough history there are inevitably tales to be told. At the very least there are soldiers from the Revolutionary and Civil War buried there. But the reality is that all graveyards contain stories, because stories are how we remember the people who have passed. And sometimes those stories just so happen to be so gripping that they transcend the circle of people that we knew in life and become the basis for a tale that enthralls and terrifies audiences worldwide. I think that’s as close to a haunting as one can reasonably expect.

Ottawa Comicon 2018 Friday Pics

I kind of want to show the pictures of the costumes that I made after the pro photos come in, so that it’s possible to see what they’re supposed to look like before I get into the pictures where my kids aren’t goofing off. (Not that I mind the goofing off, but it does make it difficult to see what’s going on with the costumes.) But there were some other great costumes that we saw on Friday that my kids didn’t pose with.

My kids have no idea who this comic book version of The Wasp is, although I’m guessing many people these days at least have an inkling since the Ant Man and The Wasp trailers have hit. I was very impressed by the fact that although there had to be a lot of structure under the suit to secure the wings, her outfit was smooth and nearly seamless. This is a trick that’s difficult to pull off in real life.

This Gordon Freeman with a headcrab asking about the release of Half Life 3 made me laugh — especially since the headcrab has its own tiny coffee mug.

This tiny little Mega Man couldn’t have been more than four years old, and even so he had full-on armour and a blaster that lit up.

I believe that this was an original steampunk character. I was most impressed with her insanely complicated wig, and her gun that she’d made from scratch out of paper/cardboard!

This daring outfit is Ryuko Matoi’s battle costume from the anime Kill la Kill. Given how much skin is showing, it presents a lot of logistical challenges (and probably uses a lot of body glue).

This Harry Dresden from Jim Butcher’s novel series The Dresden Files was obviously based on the cover art, since he’s wearing a fedora (it’s an in-joke with fans that Harry never wears hats and actually rather dislikes them, but the publishers chose to add a fedora to the character on the covers as a kind of shorthand for a detective). I liked that his wizard’s staff and that Bob the Skull‘s eyes lit up.

And of course where would we be without a great Joker?

Robin Hood: Men in Tights

I’m still suffering from con plague, which in my case seems to mostly be a heavy-duty cold with severe sinus and ear pressure. I spent a good portion of yesterday and today huddled in bed, doped up on Tylenol Cold & Sinus, with the bedroom curtains closed because light hurt my eyes. It’s been miserable. Not surprisingly, sitting in front of the computer with its bright screens was definitely not happening. Hence the late posts.

So, on Sunday a group of us went as Men in Tights from the 1993 parody Robin Hood: Men in Tights. We originally thought we’d only get five or six people to go along with the idea, but in the end there ended up being twelve of us! It was so much fun. We were stopped every couple of minutes at the con so people could take group photos, and we were told that we made many peoples’ day.

Our group was missing some of the main characters, but we did have Blinkin (left), Robin (center), and Will Scarlet (right). And yes, if it’s not already completely obvious, many of our “men” in tights were actually women.

We took a lot of our photos poses from the Men in Tights dance number, such as “dance pose”, “manly men”, and “can-can”.

Oh, and “tight tights”.

The costumes were extremely comfortable, with the only real inconvenience being the pheasant plumes that would regularly poke into peoples’ faces. Exactly where you were poked depended on height difference.

Sunday was also Mother’s Day, so I think it was great that my mother and I were part of the same cosplay group that day.

Of course, we had to have a lunch break.

And then we had to pose as if waiting for the bus.

All of us spent a while in line to attend the Masquerade awards ceremony, where one of the Men in Tights won a Best Mask ribbon in her very first masquerade for her Luna Lovegood Lion Head (which she’d worn the day prior). We are all so proud of her!

Notes on costume construction:

– Tights: Any style from WeLoveColors in hunter green.
– Vest and Hat: Butterick 4574 pattern, using Galaxy Twill in Forest for the hat and Galaxy Twill in Chocolate for the vest (both available at Fabricland). We also added a collar to the vest.
– Shirts: Some people made their shirts from white broadcloth and the shirt pattern in Butterick 4574; others (like myself) ordered the White Jacobite Ghillie Shirt Long Sleeve from UT Kilts.
– Shoes: Since we went from a 5-6 men’s to a 13-14 men’s in size variance, we just went with whatever each individual could find that was close enough in looks (and comfy enough to wear all day on concrete floors).

I have to say, this cosplay was the best time that I’ve had at a con in a long time. It was a lot of fun having people over to work on their costumes, and it was even more fun to invade the con as a group.

And did I mention that I had a photo op with Matt Smith earlier that day? I was still in my costume at the time. When you’re getting your photo taken with a celebrity, you’re in there for like 15 seconds max, but in that time he did smile and say “Robin Hood!” approvingly, then pat me on the back. That was just the icing on the cake.

Weekend Costume Workshop

I spent two full days this weekend holed up with five friends in my basement trying desperately to help them get their Sunday ComicCon costumes finished. I don’t know how I ended up being the “experienced one” in this group, since I’m definitely no pro, but at least I had finished making the same costumes they had to make at least once already. While I coached my friends along, I did managed to get the dress for my Saturday costume sewn — but it still has lots of weathering to go before I consider it finished.

I dug out my face paints and makeup to do a few makeup trials. I’m decent at face-painting, but makeup is a totally different skill and I needed the practice.

It’s not horrible, but I think I can do better. My biggest lesson here is that I need some better eye shadows to create the look I’m going for, something with a lot more pigment. I’m going to have to go shopping this week.

Over the course of the days we had four sewing machines, a serger, a cutting table, an ironing board, and a painting table all in use, often all at the same time.

In the end, I think my friends got their costumes mostly done, or at least to a point where they could figure out most of the rest on their own. Some of my friends are returning tonight to complete their work, and others may be coming back next weekend.

Only 11 days to go…

(Oh, and I didn’t cook a single thing all weekend.)

ComicCon Costume Progress

Exactly two weeks until Ottawa ComicCon, and now is the time to start freaking out! I’m nowhere near done my costumes.

All right, Sunday’s costumes are mostly in the bag. The vests are hung up on the back of the chair here, along with the leggings. The shirts should arrive in the mail later today, and my mom is making the hats. So I think that I can safely stop worrying about that one.

A couple of days ago at Value Village, I even managed to find low shoes for myself and tall boots for a friend of mine who’s going to be in the same group. They were only $10 a pair! So I don’t need to make boot covers, and neither does my friend.

In the first picture, there’s a dress all cut out an ready for sewing on the table. That’s Saturday’s costume, which is showing progress, at least.

For Friday’s costumes for Thing 1, Thing 2, and I, I managed to find some second-hand toy tools and a fake knife that only need a lick of paint to look reasonable.

Really, it’s the Friday costumes I’m most worried about. Mine’s barely started, and Thing 1’s requires sewing with Spandex (which I have very little practice at). Why, oh why did I choose to do costumes that have so many fiddly little details? At least Thing 2’s dress is mostly done, as seen in the photo above… Yes, it’s supposed to look that shabby. I’ll actually have to weather it more than that once the last of the detail sewing is done. And if you can guess what it’s supposed to be, you’re as big of a geek as I am.

Well, I know what I’ll be doing all weekend.

Crumpets and Tea

Back in my old blog I posted all kinds of patterns I had designed, and I’ve been trying to slowly re-post them on this blog so that they can go back into circulation. So here’s en embroidery pattern that I designed back in 2014:

I would have taken new and better pictures, but I gave them away as gifts ages ago!

My younger brother is a huge fan of the 1995 movie Tank Girl. I mean, I loved that movie, but his fandom by far surpasses mine. I am all in favour of sarcastic embroidery, especially when it can be combined with practical objects. (This idea of pretty and practical is not new to me.) It’s not very often that I get a chance to embroider something for my brother –- he’s not generally a huge fan of embroidered items in general, and is often difficult to find gifts for. So for his birthday in 2014 I made him Tank Girl kitchen towels. The quotes are all from the interrogation scene.

These are commercially-made, 100% cotton tea towels (labeled as “premium flour sack tea towels” by Cantina), which I bought at $12.99 for a four-pack at Home Outfitters. They are 61cm X 91cm. I don’t think those specific ones in specific are available any more, but it’s possible to find something similar with a quick Internet search. Each towel that embroidered is actually two: one for the front, and another sewn onto the back to cover the wrong side of the embroidery. I chose the stitching colours of brown and brick red based on my brother’s preferences, trying to be fairly neutral so as to match his kitchen decor.

I also cross-stitched a coordinating fingertip towel for his bathroom, starting with a towel with an Aida fabric panel built in. They are available at most crafting supply stores (or online), and generally cost around $5.00.

So here are the patterns:


Click through for extremely large versions of these images which you can print to scale.

For the tea towels, I ran them through the washer and dryer a couple of times to shrink the fabric. I learned the hard way years ago to do this as it keeps the design from shrinking at a different speed than the stitching — which really sucks when you spent this much time working on something! It’s not as big of a deal with a mounted piece, but something like a towel is going to be washed over and over again. To transfer the pattern onto fabric, I printed them out to the proper scale to fit on my towels, then set the design underneath the fabric and used an embroidery transfer pen with the kind of ink that disappears when you wet it to trace the pattern onto the fabric. Then when I was done stitching, I just washed out the pen marks.

The cross-stitch pattern was transferred via the standard counting method instead of inking in the pattern first. I won’t go into the details of how to do counted cross-stitch here, but there are loads of resources online to teach you how, including a bunch of YouTube videos if you’re a visual learner like me.

You’re welcome to use these patterns I designed for personal, educational, or small business use! And if you do, please send me a picture. I’d love to see your work.