Tandoori Chicken on Basmati Rice with Glazed Carrots

It has come to my attention of late that there are a few companies out there now that make lactose-free Greek yogurt. This means that there are a couple of dishes that used to be in my regular repertoire that I had to drop when I was diagnosed as lactose-intolerant, but I can now add them back to my regular rotation. The first thing I wanted to try was tandoori chicken thighs. I know that for a proper tandoori dish it should be baked in a traditional tandoor oven, but that’s just not something that I have available. Instead, I combined Pataks Tandoori Curry Paste with some of that lactose-free Greek yogurt to create a marinade, and I left the thighs in in it overnight to absorb the flavour. Then I baked the chicken on a broiler pan in my regular oven.

It was very tasty and packed with flavour, if a little bit sweeter than I’m generally used to. That’s because somehow I didn’t read the yogurt label properly and bought vanilla yogurt instead — and I didn’t realize until after I’d already put the chicken in the marinade. I’m actually rather surprised that it still tasted pretty good, but it did!

I served the chicken over steamed basmati rice and alongside glazed carrots. I steamed the carrots in the microwave and then tossed them with a bit of my carrot jam, just enough to coat the veggies. Carrot jam is really great as a glaze on steamed or baked root vegetables, and it’s also surprisingly good used to glaze pork roast.

Golden Berries

A while back, just in time for my annual Halloween party, I was shopping for fruits and veggies from Costco to include on some platters. On a whim, I picked up a box of golden berries, which I honestly thought I’d never seen before. After a little bit of research at home, I discovered that they’re also called “ground cherries” or “husk cherries”, which I’d actually seen at the farmers’ market, and I’d seen the plants at the garden center. Despite the names, they’re not cherries at all; they’re part of the nightshade family, and are more closely related to tomatoes. The berries grow inside of paper husks that strongly resemble Chinese lantern plants. Apparently they’re pretty common to grow (varieties are native throughout the US and Mexico), but aren’t sold commercially here very often, which is why I wasn’t familiar with them.

I discovered that golden berries are a strongly sweet/tart flavour that is really hard to describe, except to say that they are delicious! They have a texture similar to a very meaty tomato, something like a less-juicy Roma. I served them as-is, but later I went back to the store for more and included them sliced in half in salads, and blended into smoothies. When garden planning season rolls around next year, I think I will try to add a few golden berry plants to see how they like my soil. I’ve had good luck with tomatoes and satisfactory harvests of potatoes, but my peppers haven’t fared nearly as well, so who knows how this new nightshade-family plant will fare. I’ve read that they can even be perennials, but sadly that’s for Zone 8 and above; it gets much too cold here in the winter.

What I’d really like to do is make golden berry jam next fall, since I found the fruit’s flavour to be a refreshing change to the usual fare around here. I mean, I could do it with store-bought fruit this year, but at $5.99 for 340g (which might maybe make a single jar), making a batch is a tad out of my budget.

Saint Patrick’s Day Thrifting

This past Saturday I spent the day with a good friend of mine down in the Glebe. We started with a Saint Patrick’s Day lunch at Patty’s Pub, where we had great food and conversation while we listened to the live band playing Irish folk music. Then we headed out to 613flea (a great urban flea market) just up the road in the Aberdeen Pavilion in Lansdowne Park. When we finished there, we browsed the Ottawa Antique Market, and then we rounded out our day by perusing a second-hand charity shop. I know it’s not the kind of thing that everyone’s into (heaven knows my husband has no interest whatsoever), but my friend and I had a fabulous time!

Of course, I did return home with a few treasures. I think my favourite one of the bunch is a copy of the 1889 (seventieth edition) printing of the 1877 volume The Home Cook Book, which was compiled by the Ladies of Toronto and Chief Cities and Towns in Canada as a fundraiser for the Sick Kids Hospital. From what I understand, this is the very first Canadian cookbook that was compiled by an organization to be sold in order to raise funds. It’s such a common thing to do these days (especially as it gets easier and easier to self-publish inexpensively) that most of us who like to cook have at least one of these in our collection — and have probably contributed to a few.

I’m really looking forward to diving into this book and trying to recreate some of the recipes. It’s going to be interesting, because the instructions are sparse and often vague as so many old cookbooks often are, since they assume a great deal of previous experience on the part of the reader. The book also refers to culinary techniques, measurements, and ingredients we don’t use any more. I mean, what is a quiet oven? Or a quick oven? Do we even grow Spitzenberg or Greening apples any more in Canada? When they talk about currants, do they mean dried or fresh? How much does a wineglass hold? Or a teacup? I’m going to be doing a lot of Googling, I tell you.

Now, I love the feel and smell of old books, but this is the digital age after all and the book is well out of copyright. It was actually archived online by the University of Toronto and the Toronto Public Library; you can check it out in all its glory here. Or if you’re like me and you don’t want your old books contaminated by kitchen spatter, when you’re cooking you can always pull up the digital version on your phone or tablet.

The fantastic old cookbook wasn’t my only find, though! I picked up an 8×10″ print of Carabara Designs‘ hand-lettered print of the “Do you want ants?” quote from the TV show Archer. I am constantly amazed by my kids’ capability to utterly destroy the kitchen with two pieces of toast, so I’ve been thinking this a lot lately.

The print has pride of place on the side of the cupboard above the kitchen counter peninsula, hopefully where the kids will see it. But kids being kids, they probably won’t even notice. Ah, well. I think it’s perfect, and it even matches the paint job. Now all I need is a coordinating print to go underneath.

Last but not least, I picked up some Fuzzy Navel Jam from Tastes of Temptation. This jam tastes just like summer, which is exactly what I need right about now. Honestly, I liked everything they had on offer, but this was the one that made me smile the most. Spread on a piece of fresh homemade bread, it makes a divine snack with a cup of tea!

Valentine’s Day Sweets

Yesterday was Valentine’s Day, which for me meant that the day before was spent in the kitchen baking. Okay, well, not the whole day; some of my time was spent in the kitchen dealing with a leaking dishwasher. That slowed things down immensely. Luckily, the issue was a slightly-clogged drain pipe and dirt in the door seal that kept it from being watertight, and a good cleaning of the machine fixed the leak. If your dishwasher is going to leak, a fix without having to purchase expensive parts is best, really. Also, there wasn’t enough water that came out to cause much damage. The basement ceiling is a drop ceiling and the walls and floor are only half-finished, so there’s not much there for the water to damage anyway.

When I did get to bake, the first thing I tried was a double-batch of White Layer Cake found on page 110 of Essential Cooking Basics: The New Cook by Mary Berry & Marlena Spieler (1997). I used crab apple jelly that I’d made back in the fall as filling. This recipe was very nicely illustrated and easy to follow. It yielded lovely cupcakes that had a crumbly, buttery texture, which were similar to a good cornmeal muffin on top but with a softer middle. The recipe does call for self-rising flour, which I’ve come to realize is a really common ingredient in British recipes, but isn’t something the average cook would have in the pantry around here. Heck, not all grocery stores carry it. Fortunately, it’s easy enough to make with all-purpose flour, baking powder, and salt: directions here.

As I discovered, a single batch only yields about a dozen cupcakes, and I wanted to make 48 (half for Thing 1’s Guide troupe, and half for Thing 2’s Sparks troupe). By the time I’d figured this out, I’d run out of a few ingredients; this recipe takes a lot of eggs. I was getting a bit pressed for time, so I dug out a package each of IKEA Muffinsmix Choklad and Muffinsmix Citron (just-add-water chocolate and lemon cake mix, respectively). Thing 1 got the IKEA cupcakes and Thing 2 got the Mary Berry ones, and I honestly think that Thing 2 got the better end of the deal by a long shot.

Next came the treats for the treats for the girls’ homeroom classes at school. I’d planned on making orange sugar cookies for which I’d found a vintage Bake King recipe sheet tucked into an old cookbook, but those required the dough to be chilled and I had simply run out of time. I fell back on a recipe that I’d used successfully in the past for Fudgy Pumpkin Coffee Brownies (minus the coffee, since the intended audience was children). This recipe can be found on page 222 of Purely Pumpkin by Allison Day (2016). Once again, I substituted whole wheat flour for einkorn or light spelt flour, and even with this change, the brownies turned out great. This recipe invariably yields moist, rich brownies with just the right level of sweetness. As a bonus, I got to use up some of the Halloween pumpkin puree that’s still in my freezer. And none of the brownies came back home, so I figure that at least some of the kids (and/or the teachers) liked them.

Pear & Honey Jam Recipe

As I wrote about before, I had a lot of cooking pears that needed to be used up recently. All of this excess meant that I had a chance to experiment with making a jam of my own devising. Pears are a naturally acidic fruit, which makes them perfect for hot-water-bath canning with a bit of sugar. It took me a couple of tries to get this recipe right, since since I didn’t want to use like ten cups of sugar (with would generally produce and easily firm set), since I wanted to taste the fruit and the spices more than the sweetness. In the end, I had something that I am quite proud of. Next year, when pears come into season, I think that I will make this the main pear jam (although I did really like the Spiced Pear Jam with Pineapple found on page 935 of the Joy of Cooking (2006 edition, Rombauer & Becker), or on the app). Maybe next year I’ll have a yield of more than four pears off of my baby pear tree, and I’ll be able to make more things from fruit I’ve grown myself!

Pear & Honey Jam
Yields six 250mL (1 cup) jars

Prepare and sterilize six 250mL (1 cup) jars (or twelve 125mL (1/2 cup) jars) and matching lids as per manufacturer instructions. Keep jars and lids warm until it is time to fill them.
In a Maslin pan or other non-reactive, heavy-bottomed pot, combine:
1.5 Kg (3.3 lbs) ripe/slightly overripe pears, peeled, cored, and roughly chopped
350 mL (1.5 cups) honey*
700 mL (3 cups) sugar
60 mL (1/4 cup) lemon juice
2.5mL (1/2 tsp) ground allspice
5 mL (1 tsp) ground cinnamon
2.5mL (1/2 tsp) ground cloves
2.5mL (1/2 tsp) ground nutmeg
2.5mL (1/2 tsp) ground ginger
Bring to a boil over medium-high heat, stirring constantly to prevent burning. Boil for 10 minutes. Remove from the heat. Run the mixture through a blender or food processor until it reaches a smooth consistency, being extremely careful as the ingredients will be very, very hot. Return the mixture to the pot and bring it back to a boil.
Add:
one 85 mL (2.9 oz) package of liquid pectin
Bring mixture back to a boil. Stir constantly as mixture boil hard for an additional minute.
Ladle the jam into the prepared jars, leaving a 5mm head space. Wipe jar rims with a clean, damp cloth or paper towel. Top jars with lids and screw metal rings into place until fingertip tight. Place jars on top of a canning rack inside a boiling water canner, being sure that none of them touch the sides of the pot or each other. Jars should be covered by at least 2.5cm (1″) of water, so add hot water if necessary. Bring to a rolling boil and process for 15 minutes, starting your timer once the water is boiling.
Remove jars from canner and place them on a cooling rack, not touching each other. Let them rest for 24 hours before touching. Label if desired. Jams may take up to 48 hours to set, so do not open them until this time has passed.
This jam may be kept in a cool, dark area for up to one year.

*It’s really not worth it to use unpasteurized honey here, since all the additional benefits are lost when the honey is cooked.

Not-So-Silent Night

Last night was one of those nights where it seemed like all I did was run from pillar to post and back again. It started as soon as the kids got home from school. There was snacks, then showers, then finding all of the parts of their Guiding uniforms (or, in Thing 1’s case, a matching set of PJ’s for her unit’s holiday pajama party), then the kids making their lunches while I whipped up dinner…

Dinner was what I think might very charitably be called deconstructed shepherd’s pie. I had taken the meat out earlier in the day to thaw, but by the time dinner prep time came around I knew I’d never have time to bake it as a casserole. So I prepped the meat as I would for my usual shepherd’s pie (with a few extra mushrooms thrown in because that’s what I had in the fridge), boiled up some baby potatoes, and microwaved some corn. Instead of layering it into a casserole, I just served it as is. The kids ate all of theirs without complaint, and I found it almost as tasty (if not as creamy) as the real thing, so it worked out okay.

Then I had to wrap Christmas thank-you gifts for my girls’ Guiders. Guide leaders are volunteers, and I think it’s important that they know how much my children and I appreciate all of their hard work. Without Guiders, there would be no Girl Guides. I couldn’t do what they do (despite having two children that I adore, my patience levels with children is not great), which is why I try to support them in other ways.

Although the bags look slightly different, that’s mostly because I ran out of white tissue paper near the end. They’re all identical inside, containing Amaretto Cherries and Cinnamon-Scented Parsnip Pear Jam. I am very quick at gift wrapping, having worked the wrapping station in a number of retail jobs over the years, which comes in handy when I have ten gift bags that I’ve forgotten to put together until the last minute. I could have sworn Thing 1 and Thing 2 had one more meeting before the holiday break, but obviously I was mistaken.

Then I had to rush out the door to drive the kids through a snowstorm to their respective Guiding activities for the evening — Thing 1 to her pajama party and Thing 2 to sing Christmas carols at a retirement home. Of course, I got stuck spinning my tires on a patch of ice as I left my driveway, and luckily my husband arrived home just in time to help push the car. Then it was a very slow, cautious drive to the girls’ activities, then another slow and cautious drive to my parents’ place to help them put up their Christmas tree, then back to pick up the girls and get them home and in bed for the night, despite the huge amounts of sugar they had consumed.

When all that was over, I had to relax a bit. I poured myself a lovely glass of rum and eggnog (okay, Earth’s Own Almond SoFresh Almond Nogg, which isn’t a half-bad substitute for the lactose intolerant). I had a real tree twinkling with lights in the living room. And, at least for a few hours, I tried to ignore the fact that I had less than two weeks to go to get everything done before Christmas.

Pumpkin Butter

I wrote last week about finally canning my Halloween pumpkins. So far I have done two of the four. For one of them I simply froze all of the pumpkin puree that I created by roasting the gourd and then running the flesh through a food processor. The other pumpkin I turned into pumpkin butter.

Way back when I started making preserves, I burned an entire batch of fruit butter by trying to cook it too quickly on the stove. Ever since then, I make my fruit butters in a slow cooker, for the most part. I don’t have a recipe as such, more of a technique. For the purpose of posterity, this time I measured everything out. I used a six-litre slow cooker, but I didn’t fill it to the brim because fruit butters tend to have big bubbles, so there needs to be some space under the lid. For this batch, I used:

20 cups (4.75L) pumpkin puree
3 cups (710mL) honey
4 Tbsp cinnamon
3 Tbsp ginger
2 Tbsp nutmeg
1 Tbsp cloves

Then I cook it with the lid a bit ajar so the steam can escape (some newfangled crock pots have a vent, but mine is probably older than me so it does not) for about 24 hours, or until the butter thickens. If it doesn’t reach the desired thickness in this amount of time, sometimes I will cook it a bit on the stove, since I find that leaving it longer than that in the crock pot can make it taste burnt. When it is ready, it will have changed from orange to a deep, nutty brown.

Now, I’d been making pumpkin butter for years using this recipe and then hot-water-bath canning it, and I never had any problems. I was using what I thought were USDA-approved recipes — and, indeed, they used to be! But the rules have changed over time, and now it’s no longer recommended to can pumpkin butter (or even pumpkin puree, which is less dense) at home. So once this pumpkin butter is complete, it’s going right in the freezer — which is the approved process. I use wide-mouthed mason jars to avoid cracking as much as possible, I don’t fill them all the way, and I make sure they’re totally cool before I freeze them. I still will lose a few every year to cracked glass. Of course, you can always buy plastic freezer jam containers and avoid cracked jars, but I like to give my preserves as gifts, and I find the glass jars to be much more attractive.

Now I’m a little bit paranoid about the whole thing, and I don’t want to make anyone sick, so I do pressure-can my pumpkin butter first. I process it for an hour (being careful not to let the canner boil dry), and when the cans come out of the cooker I can still feel butter boiling inside the jar. In addition to making the pumpkin butter safer, I find that pressure cooking it for this long also changes the texture. I wonder if this is because it is guaranteed to reach the jelling point (220°F to 222°F)?

(As an aside, the instructions for my pressure canner, which is only about four years old, specifically states that pumpkin puree can be pressure canned safely in this device.)

I have to admit that I find pressure canning more than a little terrifying. The steam hisses out at irregular intervals and constantly makes me think I’m going to end up with some disaster like this. In reality, that hissing means that the pressure is venting properly — what’s really a problem is if it stops (if you haven’t turned off the heat underneath first). That means that your steam vent has clogged and the pressure inside is building up disastrously.

In the end, I ended up with fourteen 250mL jars and one 125mL jar of pumpkin butter. Now all they need are labels, and they’ll be ready for the freezer!

Canning Pears

A while back, a friend of mine brought me a box of cooking pears from his neighbour’s tree, which was producing an overabundance. Not too long after that, he brought me a second box full. I’m told that these boxes of fruit kept appearing in front of his house under not-so-mysterious circumstances; apparently that neighbour was getting really tired of being beaned in the head by falling fruit. This week I finally had the chance to tackle this mass of pears. I’ve been cooking with them for over a month, but my rate of attrition was much too slow, and some of the fruit was starting to turn.

First I made a double batch of Cinnamon-Scented Parsnip Pear Jam, from page 407 of Preserving: The Canning and Freezing Guide for All Seasons by Pat Crocker (2011). As interesting as this combination appeared at first glance, I found the final result much too sweet; it uses twice as much sugar as fruit by volume, which is a very high ratio even by jam standards. It would still be nice on Dad’s Biscuits, fresh bread, or toast, but I guess I was hoping for more of a flavour punch given my success with this book’s carrot jam. However, I do agree with the book’s assessment that this jam, when mixed with a bit of orange juice, would probably make a lovely glaze in which roasted root veggies could be tossed.

I well and truly overestimated how much fruit & veg to prepare to make this recipe, even doubled; I honestly thought I’d be able to get at least a quadruple batch in, but with all of that sugar, my pots just weren’t big enough. So I had a whole bunch of peeled, cut up pears (left) and parsnips (right) after this attempt.

The parsnips became part of our dinner last night, roasted in the oven with a sprinkle of salt, pepper, rosemary, and olive oil. I served them with baked pork chops coated in dried onion soup mix, which is a dish from my childhood that I’ve been making a lot lately once I was reminded of it. It’s just so easy! I probably have enough parsnips left for another three dinners like this one, but I think that would get old fast. I’ll need to research another recipe.

For my next recipe, I took a chance and tried peeling my ginger with a spoon, which is a kitchen hack I’ve seen floating around the Web for a while. I was quite satisfied with how this worked, actually. Not all cooking hacks are worth your time, but I found that this was honestly easier than a veggie peeler or a knife, and it wasted much less of the root.

The next step was to break out the candy/deep fry thermometer and bring the next jam up to the jelling point. (As an aside, am I the only one who feels like they need a shield as their jam/jelly gets thicker and it starts spitting huge globs of boiling-hot sugar and juice out of the pot?) This time I made Spiced Pear Jam with Pineapple found on page 935 of the Joy of Cooking (2006 edition, Rombauer & Becker), or on the app.

I was much happier with this jam than the previous one. I could definitely taste the fruit, and it wasn’t too sweet (it has a much lower sugar-to-fruit ratio). I have to admit that I couldn’t really taste the pineapple; the citrus note is definitely the strongest part of this jam, which isn’t necessarily a bad thing, although it does end up tasting more like a marmalade.

I probably still have enough chopped pears to make one more batch of jam. What kind should I make? I still haven’t decided. I have a lovely old recipe for pears poached in red wine and then canned, but that’s really intended for whole pears. These cooking pears needed to be chopped up to remove imperfections, so they’re sadly not really suitable to such a dish.

Crab Apple Jelly

A while back a friend of mine offered to let me pick crab apples from trees just outside of her back yard, on land that is owned by her community association. She has been picking apples from those trees for years in order to make crab apple jelly, as have a number of other neighbours who are inclined to make preserves. These totally wild, untended trees produce an overabundance of fruit every year, and the canners in the neighbourhood only make a tiny dent in that. I’d never made jelly before, but I figured sure, why not? I love cooking with ingredients that I can harvest locally, especially when that harvest is free!

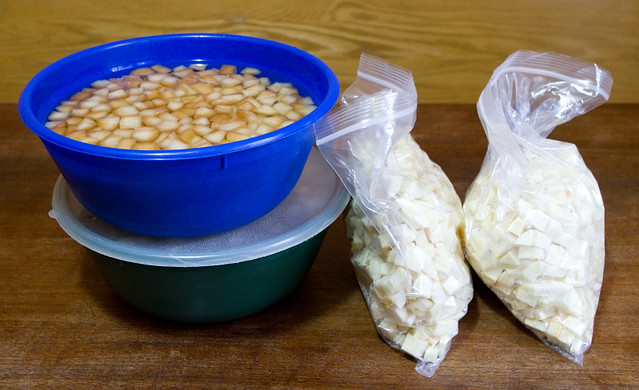
The first thing that I realized is that making jelly is a lot more difficult than making jam. After washing all the tiny little apples and making sure to remove all leaves and stems, you have to cut them all in half. Sometimes the fruit can be wormy or rotten inside even though the outside is pristine, and cutting it in half means that you can check every single one. Then you have to cook the fruit, strain it through a jelly bag (being careful not to squeeze the bag so that the jelly will remain clear), boil the resulting juice along with sugar and any additional ingredients until set, and then finally can it.

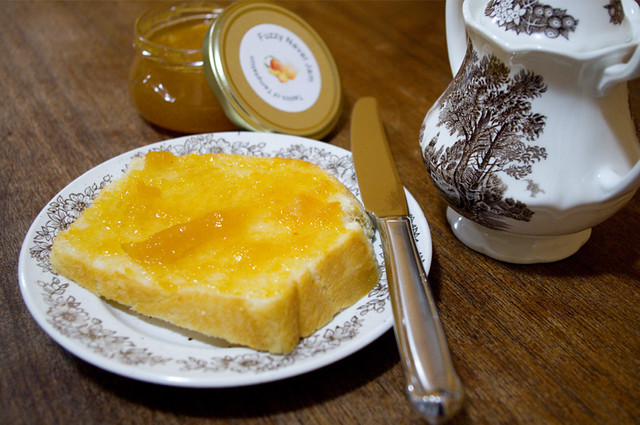
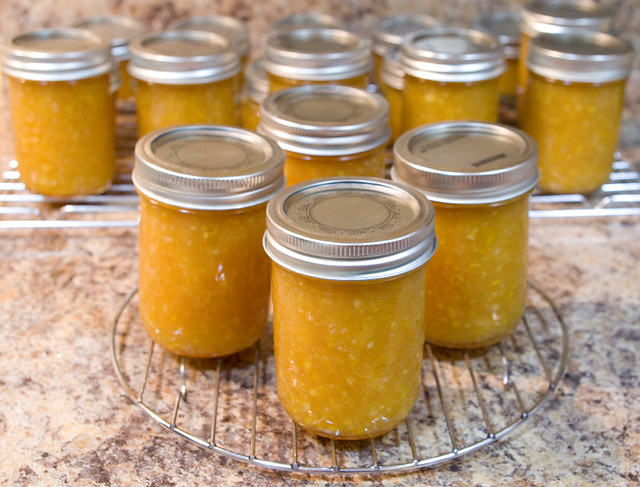
After all that work, I was really happy that I liked the end result. Crab apple jelly is packed with tart flavour, even with all of the added sugar. I’m definitely going to make more next year. I’ll be sure to pick twice or even three times as much fruit. It’s not like the neighbourhood wildlife will miss the relatively small quantities that I will use.

One of the things that I was surprised about regarding crab apple jelly is how many of my preserving cookbooks don’t have a recipe for it. Not only that, but some of them don’t even consider crab apples to be a fruit worth canning. I find that odd because a) they’re very tasty, b) they are winter hardy in northern climes, and can even grow wild, and c) they’re often planted in orchards among the larger apple trees because it helps with pollination. They’re also a very popular ornamental tree, so it’s not like crab apples are hard to come by, either. The books that I have that included a crab apple jelly recipe are, in no particular order:

Joy of Cooking page 932, or on the app (Irma S. Rombauer, Marion Rombauer Becker & Ethan Becker, 2006 edition)
Pickles & Preserves page 58 (Love Food, 2012)
The Complete Preserving Book page 92 (Canadian Living, 2012)
The Good Cook: Preserving page 94 (Time-Life Books, 1981)
Preserving page 166 (Oded Schwartz, 1996)

Although there are many variations when it comes to additional ingredients such as lemon juice, lime juice, or in one case hot peppers, all of the recipes seem to agree on a ratio of 1:1 of volume of strained juice to white sugar.

As an aside, if you’re interested in harvesting unused fruit from local sources and aren’t up to approaching homeowners/tenants on your own (although if you’re shy, a politely-worded letter is often well-received), you could volunteer for an organization here in Ottawa called Hidden Harvest. The group harvests fruits and nuts that would otherwise go to waste on public and private property. When the bounty is harvested, one quarter goes to the homeowner, one quarter goes to the volunteer harvesters, one quarter goes to the nearest food agency, and one quarter goes to Hidden Harvest. The portion kept by Hidden Harvest goes to their sponsors, who in turn help pay to run the organization. Last year alone the group harvested almost 4,500lbs of fruit and nuts, and donated almost 2,000lbs of that to charity.

In my case, I’m a homeowner whose apple tree drops hundreds of pounds of fruit every year, and I’d love to be able to have Hidden Harvest come and take most of the fruit away. I don’t need nearly so much. However, I’ll have to deal with that poor tree’s apple scab first. And my poor little pear tree‘s harvest of four pears this year isn’t worth volunteering. Perhaps when it grows a little bigger. Next year I’m seriously considering becoming a volunteer harvester, though. As for this year, I understand that apples with apple scab can actually make a better hard cider, so if any cider-makers want to clean the rest of the apples off of my tree, they’re welcome to them.

Maybe one of these days I should just buy/make a cider press.

Carrot Jam

I’ve been looking for creative ways to preserve the carrots from my garden, since there are only so many carrot-based dishes that I can eat in a row. Yes, I could freeze some of them, but my freezer is getting awfully full of soups and sauces and broths (this happens every autumn), so something shelf-stable is what the doctor ordered. I also wanted a recipe that disguised the unusual shapes of my homegrown carrots (which I combined with store-bought orange ones for a bit of visual interest), since I know that ugly food tends to be eaten less enthusiastically than pretty food, even if it tastes identical.

So I browsed through my cookbooks and found a recipe for Carrot Jam on page 206 of Preserving by Pat Crocker (2011). I had never heard of carrot jam before, but there’s a similar recipe for Carrot Orange Marmalade on page 142 of Prizewinning Preserves by Yvonne Tremblay (2001), which apparently earned a red ribbon for best marmalade at the 2000 Royal Agricultural Winter Fair. I guess it can’t be that unheard of. However, the Prizewinning Preserves marmalade was missing the intriguing spices of Preserving‘s carrot jam, which cinched my decision to make the latter recipe.

Preserving suggests letting the jars sit for a few weeks before opening for best flavour, but the cooking jam smelled so darned good that I opened up my first jar the very next day. I am so glad that I did. I baked up a quick batch of Dad’s Biscuits upon which to spread the jam, and then I was in seventh heaven. If these preserves get even better with age, I can’t imagine how delicious they will be. Suggested uses for this jam are as follows (Preserves, page 207):

Carrot jam can be used as any other fruit jam, but I particularly like it on quick bread nut loaves and with savoury meat pies or wraps. Use it as a glaze for cooked vegetables: toss grilled or steamed vegetables in up to 1 cup (250mL) of the jam while hot, just before serving. This is also a flavourful topping for fresh yogurt, or you can add a couple of tablespoons (25mL) to a Vinaigrette Dressing or Salsa Verde.

I can’t wait to try carrot jam in all of these ways! I think it would also make a lovely glaze for roast pork or chicken. I love this recipe so much that I think I will grow carrots again next year specifically to make them into this jam. Maybe I’ll even grow those red and/or purple heirloom carrots just so that the jam is even more visually interesting.