Carrots

I love both cooking with and eating carrots, so I’ve been planting them in my garden for a couple of years. I haven’t had great success, though. Last year, one of my carrots looked like this:

(That’s a dime for size reference.)

So when I planted my carrots this year, I didn’t have any great expectations. Instead of growing them from seeds like I’d tried in previous years, I bought pre-started seedlings from Laporte Gardens. I hoped I’d get a few decent-sized carrots and probably some finger-sized ones as well. Little did I know that I was growing MONSTERS.


Thing 1 helping me harvest the carrots.

I left lots of space between each planted seedling (so I never had to thin them), made sure they got lots of water (not a problem this year) and that they weren’t being eaten alive by pests or crowded out by weeds. I also fertilized the entire garden with sheep manure compost early in the spring. And that was all I did. I’d learned the hard way that you really just have to leave root vegetables alone for as long as possible so that they develop fully. Um… Mission accomplished, I guess?

(Yes, I know now that I probably should have re-buried the carrots as they began to poke out of the ground so they didn’t discolor, but I didn’t know that back when it mattered. My carrots have never before grown so large.)

So yeah, that’s Thing 1 holding up one of the carrots/carrot clusters that she pulled up for me. It’s almost as big as her head.

Instead of the roots growing long and straight, they looped back upon themselves multiple times, creating gnarled, mutant bunches. Even in the spots where there was only one top, the roots looked like this.

These are creampak carrots, by the way. They’re supposed to be yellow instead of the more common orange.

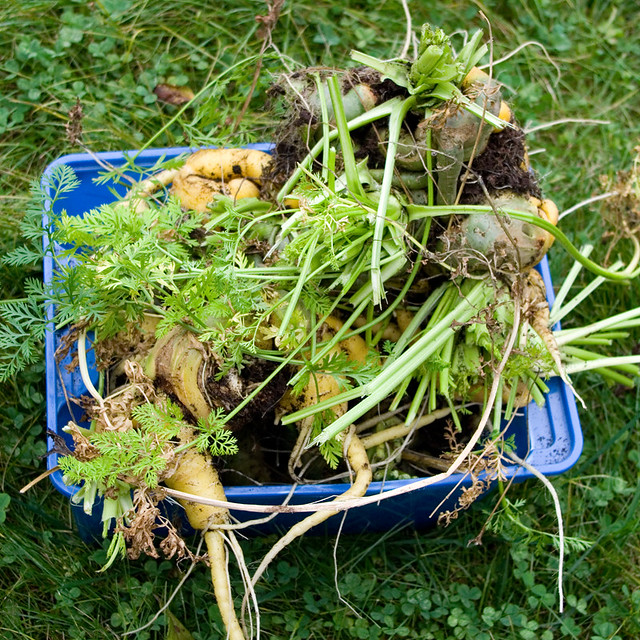
All in all, my small planting of carrots yielded a root harvest that overfills a 11″ x 15″ x 7¾” IKEA GLES box.

Washed and untangled, the carrots looked more like the vegetables I’m used to. The photo above is of only one of the root balls. I kept giggling as I washed and separated, since it all seemed so absurd to me. This is honestly the funniest plant I have ever grown… And I have grown some weird-looking plants.

Thing 1 washed and cut up some of the smaller bits, then harvested a few cherry tomatoes from the garden to make her own carrot and tomato salad. I was very proud of her for taking the initiative to make a dish out of the food she’d helped harvest. She insisted that I photograph her creation and put it on “the blog”.

I included part of the harvest in yesterday’s dinner, which was steamed carrots, whipped potatoes (which are Prince of Orange potatoes and almost the same colour as the Creampak carrots when cooked), and maple & cinnamon sausages. After spending the afternoon in the garden, the whole family cleaned their plates.

Ice Cream Parlours

It’s been unseasonably hot here this past week or so, and it is forecast to be so for the next few days. By “unseasonably hot” I mean temperatures reaching 32°C (89.6°F), with a humidex of 42°C (107.6°F) every day since Saturday, and not much cooler than that the week before. This is honestly the closest to Christmas that I ever remember running my air conditioner. Now, southerners will probably laugh at my objection to the temperature, but please remember that the week before this started we had frost warnings and had to dig out the lightweight toques and mittens.


Brooklyn Place, 359 Rue Main, Shawville, QC, (819) 647-6522

So I guess it should come as no surprise that I’ve been thinking a lot lately about cool desserts. I have a particular fondness for ice cream parlours, especially the ones I visit in small towns when I go on trips with the family.


Brooklyn Place interior.

One such place that I have taken the kids to often is Brooklyn Place in Shawville, Québec. It’s a lovely little spot to beat the heat, and the staff is unfailingly cheerful and courteous.


Brooklyn Place ice cream; that’s their smallest sized cone.

They serve Nestlé ice cream, which is a big name brand and many flavours can be bought in your local grocery store. However, this place is nice enough to make it worth a stop in anyway. If the weather is fine and you have kids that need to run off some energy, Mill Dam Park on Clarendon (just north of Highway 148) is a great spot to wander over to, ice cream in hand.


The Scoop, 33 Main Street, Cobden, ON, (613) 647-1568.

Another great spot I have stumbled across is The Scoop, which attached to (and run by the same people as) The Little Coffee Shop in Cobden, Ontario. The ice cream parlour is only open during the summer to cater to the influx of people from the whitewater region cottages and summer homes. I believe that the coffee shop may be open all year ’round. There’s nowhere to eat ice cream inside, but they have built a lovely little patio in the alley beside the shop, and it’s almost always in the shade (which is great if you’re like me and melt in the heat). The gelato is made in store; the hard ice cream and soft serve come from local dairies. There’s also a bulk candy section. I have to admit that I grab myself a few orange cream Livewires candies whenever I go in.


Downtowne Ice Cream Shoppe, 165 St. Lawrence Street, Merrickville, ON, (613) 269-2168. This is an old photo — the munchkin in the middle is Thing 1 when she was about three years old. My mom is on the left, my aunt is on the right.

Last but most definitely not least is the Downtowne Ice Cream Shoppe in Merrickville, Ontario. This is probably my favourite ice cream parlour ever. They make all of their own ice cream and gelato on site, and I haven’t yet tried one that wasn’t delicious. My first pick, if they have it, is always the one with the bits of crumbled sponge toffee throughout. Mouthwatering! Even if your tastes are much different than mine, The Shoppe has developed over 150 flavours so far, so you’re bound to find something you like.


Thing 1 desperately wanted the brilliantly pink gelato. It ended up being Grapefruit Zinger, and I was dubious that she would like it as most kids don’t like grapefruit, but she ate it all. Of course there had to be sprinkles, which I don’t think go with grapefruit at all, but what do I know?

Honestly, the food at the Downtown Ice Cream Shoppe is so good that it’s worth making a special trip from Ottawa for. If you want to make a day of it, there are all kinds of nice shops to browse in town as well, including a rather nice antique shop and a Christmas shop that’s open all year round. If you’re there for the sights, it’s also worth checking out the Merrickville Lockstation and the Merrickville Blockhouse. All of this is within easy walking distance of the ice cream parlour.

Dad’s Birthday Dinner

This past weekend began with my dad’s birthday on Friday. September is a busy birthday month in my family, with my brother’s birthday near the start of the month, and then my mom’s just over a week later, and then my dad’s about a week after that. Before she passed away, we celebrated my Nan’s birthday right at the end of the month as well. This meant a lot of birthday parties and dinners, although as we got older, more of the latter than the former.

Dad’s request for his birthday dinner was much more traditional for my family than my mom’s, given both the region in which we live and our cultural heritage. Dad requested baked beans and biscuits, followed by butter tarts for dessert. Baked beans are generally considered to be a Québec specialty, but they are extremely popular in Ontario and New Brunswick as well (both provinces have a proportionately large French-Canadian population, especially where they share a border with Québec). My father fondly remembers my grandfather making baked beans for the family; it was probably one of the recipes he learned while working as a lumberjack. The baking soda biscuits are definitely Granddad’s recipe, passed down to me by my father. And butter tarts are a quintessentially English Canadian dish, although it’s not one passed down to me by my grandparents; so far as I know, Granddad wasn’t much for fancy baking, and Nan never mastered the art of pie crusts.

All that being said, I’d never made baked beans by myself before — that had always been Mom’s job! So I needed to look up a recipe. The Maple baked Beans With Apples on page 151 of The Canadian Living Cookbook (Carol Ferguson, 1987). I adapted the recipe to cook predominantly in the crock pot, since I didn’t want to run the oven for hours and hours on such a hot day. I basically tossed all of the ingredients that would have been baked in the first stage in the crock pot for about 16 hours. Then I ladled it all into a Dutch oven, topped with sliced Granny Smith apples, brown sugar, and butter, and baked it all together uncovered for an hour. It turned out absolutely fabulous, enough so that my parents asked me for the recipe!

The biscuits, of course, were Dad’s Biscuits. I rolled out the dough and cut it with a cookie cutter instead of going with the easier drop-off-a-spoon version, since formed biscuits hold up better to dunking or spreading with baked beans. I asked Dad if it was weird to have his own recipe made for him, and although he agreed that it was an odd feeling, he wasn’t complaining.

Served last were the raisin butter tarts. I used the same recipe as I did for the potluck dinner a month ago: page 234 of The Canadian Living Cookbook. However, I substituted an equal volume of golden raisins for the walnuts that the recipe called for, which tasted delicious. I kind of overfilled the tarts though, so they boiled over when they baked and hence look a mess. They tasted good anyway, although the stickiness of the overflowed filling meant that they were a pain to remove from the pans.

So happy birthday to my dad! Love always to the man who taught me through his automatic acceptance that people can do whatever they put their mind to, no matter what traditional gender roles in our society may dictate.

Dealing With the Autumn Harvest

Yesterday I spent most of the day and well into the evening trying to use up some of the produce from my garden before it went bad. This time of year can be a real challenge when everything needs to be harvested, cleaned, prepared, and often canned or frozen all at once. And I haven’t even started dealing with my root vegetables, which are starting to pop out of the soil they’re getting so big!

I harvested the four pears that were growing on my tiny little pear tree. The three on the left were of one type, and the one on the right is another. The tree has four different kinds of pears grafted onto the main trunk, but I stupidly removed the labels and now I can’t remember what varieties there were. I’m pretty sure the odd one out on the right is a Bartlett, though. I considered trying to bake something with the pears, but my kids claimed them for their lunches.

My black sweet pepper plants only yielded one black pepper; unfortunately, the others all died or turned out to be green peppers. I really only grew these as an experiment anyway, since I’m not a huge pepper fan, so I gave them to my mother.

My apple tree is starting to drop its fruit; sadly, the poor tree suffers from a nasty case of apple scab despite my care, and a lot of the fruit aren’t good to eat. Apple scab itself is safe (although it’s ugly), but it does mean that the fruit often ends up cracked and rotting on the tree, or creates areas where it’s easier for pests to crawl inside. Even so, I have lots of apples to use up in recipes — this variety is very tart, so it’s best cooked.

I’m still harvesting a lot of tomatoes; although I feared frost a few weeks ago, this past week has been one of summer-like heat, so my tomatoes are actually still flowering! What fruit is on the vine is ripening nicely, so I may not have too many green tomatoes to deal with this year (even though I have a few great recipes for those too). Last night I made up another batch of Blender Salsa from page 92 of Preserving by the Pint: Quick Seasonal Canning for Small Spaces (Marisa McClellan, 2014), since my husband likes that version so much. The above photo was taken immediately after removing the jars from the hot water canner.

The basil plant in my mom’s garden needed to be cut back for the season, so she let me have all of the leaves in exchange for some of the pesto I made with them. Pesto is one of my favourite sauces to make because it’s so darned easy and can be made with so many leafy greens. I’ve made pesto before out of beet leaves, nasturtium leaves, and garlic scapes. The one that I made last night was the most common type: basil, garlic, olive oil, and Parmesan cheese.

Before I made the salsa and the pesto, I set aside two large tomatoes and a tablespoon of basil so that I could bake Fresh Tomato and Basil Loaf. The recipe is found on page 156 of Bread Machine: How to Prepare and Bake the Perfect Loaf (Jennie Shapter, 2002). This bread is started in the bread machine, which mixes, kneads, and proofs the dough. Then the dough is removed from the machine and additional ingredients are kneaded in by hand, the dough is left to rise in a loaf pan, and then the bread is baked in the oven. The addition of the tomatoes made this dough really sticky and unpleasant to knead, and I made an enormous mess, but it was totally worth it since this bread is delicious. I will definitely be using this recipe again.

Slow Cooker Chicken Tikka Masala

Yesterday ended up being hot and humid, so I wanted to make a dinner that didn’t require heating up the kitchen all that much. Community Table’s recipe for Slow Cooker Chicken Tikka Masala had come across my feed recently, so I thought I’d give it a try. How does cooking something for eight hours not heat up my house? Well, I put the slow cooker out on a table in the garage.


I wish I owned the pretty dishes that they use to serve it in the video.

I had high hopes for this recipe, because a) true to my heritage, I like making easy food where you just put everything in a pot and we boil it for seventeen and a half hours straight, as Denis Leary put it; and b) this dish smelled absolutely fabulous while it was cooking. My garage has never smelled better, to be honest, and sometimes I use my bread maker in there. But when I actually took a bit, the flavour just didn’t live up to the hype. It was just… Bland. There was no depth.

Now, I’m no expert when it comes to Indian cuisine, but if I ever try this recipe again I would change a few things. Instead of just throwing everything in the pot raw, I would first toast the spices, then brown the onions and the garlic in a bit of olive oil, and then brown the chicken. This would pre-cook some of the ingredients, so it probably wouldn’t be necessary to have it in the slow cooker for as long, maybe 4 hours. Instead of chicken breasts, which have a tendency to be dry (even in sauce), I’d use chicken thighs. I’d use fresh tomatoes run through a blender instead of canned tomato sauce for a fresher taste. I’d add a few more veggies chopped up bite-sized; sweet peppers and mushrooms go well in this kind of dish (cooked first on the stove as well in bit of olive oil), but I could probably throw in anything on hand. It’s not like I’m going for authenticity here.

If nothing else, this recipe is in desperate need of salt, which enhances flavour. I added salt after I served the dish and it really did help, but I think it would be so much better if it was done during the cooking process. However, I’m not sure exactly how much salt is required for the whole potful (which feeds my family twice over, by the way). Salting to taste unsafe to do when the chicken is raw, so I’d really have no choice but to pre-cook the chicken anyway, and if I’m doing that I might as well make use of all of the previously mentioned techniques as well.

Mom’s Birthday Dinner

We celebrated my mother’s birthday this past Saturday. At her request, I hosted dinner at my house and made her up some of my ramen — which somehow she had never tried before. The version that I chose to make was Furikake Salmon Ramen (page 82 of Simply Ramen by Amy Kimoto-Kahn (2016)); the recipe is also available online here. This recipe uses a shoyu base (page 8, or online at easypeasyjapanesey.com), which I made up in advance in my slow cooker. I remain rather enamored of this base recipe, but every time I make it I remind myself that sometime I really need to try the tonkotsu base, which is my favourite but appears much more difficult. I used soft-boiled eggs instead of marinated half-cooked eggs, mostly due to time constraints. I also used packaged noodles; one of these days I will make my own, but that really requires a pasta maker, which I don’t own. I didn’t use the kind from the instant soup packages, as I find they get soggy much too quickly, but instead a package of dried noodles on their own for which I unfortunately can’t read most of the label.

The real star of this dish is the salmon. I was lucky enough to find it on special at the grocery store, pre-portioned and ready to go. The furikake topping was delicious even though I used North American mayonnaise instead of Japanese-style. There were some leftovers and I really look forward to having them served over rice in the next few days. I think that this topping is going to become part of my regular dinner roster; it would probably be good on other pink, oily fish like sea trout.

In our family, there’s always dessert with a birthday dinner, even if you’re stuffed from the meal itself — that just means that you take a breather and have the treat later in the evening. This year I made apple pie using fruit that I’d grown on my own tree in the back yard. For the chocolate lovers, Dad made brownies with chocolate icing, which were delicious and, if you know my dad, a very special treat, since he rarely bakes. We served it all up with whipped cream and/or vanilla ice cream (and dairy-free alternatives thereto). Oh, and candles! I was thrilled to find that it’s possible to get the candles that burn with coloured flame at the dollar store these days. I used to have to go downtown to a specialty store to buy them.

So happy birthday to my mom! Love always to the woman who helped shape me into the person that I am (whether that’s a good thing or not is a matter of opinion).

Onion Soup Pork Chops & Baked Panko Zucchini Sticks

In an attempt to use up the zucchini I received this weekend, I made another round of Baked Panko Zucchini Sticks for dinner last night. Enough for my entire family only uses up about a quarter of one of those giant summer squash. Of all of the recipes that I have for zucchini, this one uses the most in one go. It may end up being a contest to see which gives out first, my supply of zucchini or my kids’ ability to consume it. To be fair, the girls were really happy to see the zucchini on their plates last night, and that’s two suppers in a row where I didn’t have to fight with them to get them to eat their vegetables.

However, the real star of dinner wasn’t the zucchini sticks, although my kids may argue otherwise. The best part to me was the pork chops that I baked as the entree. I found these 1″ thick slabs of pork on sale for less than the cheap cuts, so I stocked up and planned on a few for dinner. I greased a broiler pan, lay the chops flat on top, and then covered them with a thick coating of dry onion soup mix. Then I baked them at 275°F (135°C) for about two hours. They were a very fatty cut, but the low, slow bake made them moist, tender, and not too greasy. Honestly, they couldn’t have been much easier. Now, if only I’d planned a meal cooked entirely in the oven for a day that wasn’t 30°C (86°F).

I was inspired to cook the meat this way after reading The I Hate To Cook Book (Peg Bracken, 1960). On page 12, the author writes about Sweep Steak, which is “[s]o-called because a couple of seasons ago this recipe swept the country“. Basically, it’s beef coated with dry onion soup mix and roasted in the oven.

Now, this cookbook predates me, but I distinctly remember dry onion soup mix being a staple of the kitchen when I was growing up. It was used to coat steak, to bread pork chops and chicken, and to season meatloaf. In our house, it was most commonly mixed with sour cream to become chip dip — which is referred to as Classic California Dip on page 84 of The I Hate To Cook Book, so I guess this combination predates me as well. I remember doing groceries with my parents and there was a whole assortment of dried soups along an aisle. But when I went to pick up some mix for this dish, the dried soups took up only part of one tiny shelf, most of which was taken up by Cup-A-Soup. There are probably a hundred or more types of canned and tetra-packed soup, not to mention the refrigerated stuff in the deli section, but apparently the dried kind is no longer popular. I guess that’s to be expected with the popularity of fresh ingredients being back on the rise. I certainly hadn’t bought any dried soup mix in years. Still, it came as quite a surprise to me to see the selection so limited.

Autumn Produce & Baked Panko Zucchini Sticks Recipe

A friend came by this past weekend to hang out and chat, and also to gift me with some of the excessive produce from his family’s garden. Apparently zucchini has really liked this year’s rainy summer, and tomatoes weren’t far behind in the production department.


Zucchinis and tomatoes in cardboard boxes from my friend’s garden; tomatoes and cherry tomatoes from my garden in the green bowls.

I didn’t try to grow zucchinis this year, but my tomatoes are ripening up nicely as well, so I ended up with much more fresh garden produce this weekend than we could eat before it went bad. So I’ve found myself spending the majority of the last few days in the kitchen, cooking as much of these fruits and veggies as I can.

Since my freezer is getting pretty full so I wanted something shelf-stable, and my husband (the main salsa consumer in our house) really likes the Blender Salsa from page 92 of Preserving by the Pint: Quick Seasonal Canning for Small Spaces (Marisa McClellan, 2014), making another big batch was a no-brainer. Once my hubby had snacked on some of the lovely cherry tomatoes, I cooked up the remainder into about four liters of salsa. That’s not nearly enough to get us through the winter, but there are still more tomatoes on the vine to ripen, after all.

I baked a loaf of Chocolate Zucchini Bread (page 104 of 125 Best Quick Bread Recipes by Donna Washburn & Heather Butt (2002)). This is a heavy, rich bread that is satisfying either as a dessert or as a snack. I opted for semi-sweet mini chocolate chips, which makes this dish almost bitter, since it doesn’t include all that much added sugar. You can also use dark chocolate chips for an even deeper flavour, or switch it up with butterscotch, raspberry, or white chocolate chips. I was a little worried about the texture that the grated zucchini might have created, so I used the same technique as when I rebaked the chocolate fudge zucchini cookies and precooked the zucchini, then ran it through the blender. This added a bit of extra moisture to the bread, so I omitted the vegetable oil entirely. I was quite happy with how it turned out, both in flavour and in texture.

For dinner yesterday I also made baked chicken with my usual sprinkling of parsley, sage, rosemary, thyme, garlic powder, summer savoury, and salt as topping. As a side I made baked zucchini sticks, which my kids couldn’t get enough of, so I think I’ll be making them a few more times until I use up all of this zucchini (there’s still lots left). Instead of the more common (around here) seasoned bread crumbs, I went with panko, which is a much lighter style of Japanese bread crumb. I also baked the sticks instead of the more traditional deep-frying, for health reasons and because I just don’t particularly enjoy deep-frying. Here’s the very simple recipe that I used:

Baked Panko Zucchini Sticks
Serves 4 as a side dish

Preheat oven to 425°F (220°C).
Wash and slice into thick sticks, leaving peel on:
400g zucchini
In a small mixing bowl, beat:
1 large egg
In a second small mixing bowl, combine:
3/4 cup panko
1/4 tsp salt
1/8 tsp black pepper
1/4 tsp garlic powder
4 Tbsp Kraft 100% Parmesan grated cheese*
Grease a cookie sheet lightly with olive oil or cooking spray.
Dry the zucchini on paper towel, then dip it into the egg until coated, then into the panko mixture until coated. Place the coated zucchini sticks in a single layer on the greased cookie sheet. Sticks will cook most evenly and be most crunchy if they are not touching.
Bake the zucchini sticks for 15-20 minutes, or until topping is golden brown.
Serve plain, or with ranch dressing or marinara sauce as a dipping sauce.

*Parmesan cheese may be omitted, but if so, double the amount of salt.

Salmon Puff

Keeping with this week’s rather unintentional theme of preparing dishes from old cookbooks, last night I tried a dish from 100 Tempting Fish Recipes. This book (well, at 56 pages, it’s more of a pamphlet) was issued by the Department of Fisheries (Ottawa, Canada) in 1939, although I have a 1949 reprint. It’s well out of print now and I haven’t found any copies for sale on the Web, but a digital copy is available online at Early Canadiana Online if you have a membership (which I do not). The site does have a free 18-page preview.

You can get a general idea of the age of this book just by the typography. Another dead giveaway of its age are the sometimes-vague cooking directions. For example, the recipe that I used was the Salmon Puff on page 23, and the baking directions were “Place in a buttered casserole, dot with butter and bake in a moderate oven until brown.” The term “moderate oven” is used a lot in this book and could, I think, denote a number of temperature settings. The timing is also vague; these days, you’d get an instruction along the lines of “Bake in an oven preheated to 350° until brown, about 20 to 30 minutes.” Not that older recipes can’t be precise, but newer ones generally give much more detail. I think that part of this is because the authors expected the reader to have a background of knowledge that would make what the author meant obvious. It’s probably also due to the fact that publication costs went down over time, so it was possible to be wordier (and include photographs of the final product) when every word didn’t carry as much financial weight at printing time. Heck, even between in my 1949 copy 100 Tempting Fish Recipes and the 1960 The I Hate To Cook Book by Peg Bracken (which is still in print), there’s a notable shift toward more precise instructions. The author actually bemoans this in the introduction:

…[T]hey’re always telling you what any chucklehead would know. “Place dough in pan to rise and cover with a clean cloth,” they say. What did they think you’d cover it with?

This terrible explicitness also leads them to say, “Pour mixture into 2 1/2 qt. saucepan.” Well, when you hate to cook, you’ve no idea what size your saucepans are, except big, middle-sized, and little. Indeed, the less attention called to your cooking equipment the better. You buy the minimum, grudgingly, and you use it till it falls apart.

Back to yesterday’s recipe. It’s what I would consider to be a “pantry casserole”, i.e. a dinner that, with a reasonably-stocked Canadian pantry and fridge, one is likely to have all of the ingredients already at home. The salmon, which would normally be the ingredient most easily spoiled, is canned. You’d think that with a pound of salmon in there, the dish would at least have a bit of a pink tinge, but potatoes make up the bulk and leach it of all colour. I think that this is a good metaphor for the dish overall, actually. It’s just very… Beige. Not great, not bad; edible, but uninspired. Even a sprinkling of paprika as garnish would liven it up a little. Peg Bracken has great things to say about garnish on page 15 of The I Hate to Cook Book:

The reason for these little garnishes is that even though you hate to cook, you don’t always want this fact to show, as it so often does with a plateful of nude food. So you put light things on dark things (like Parmesan on spinach) and dark things on light things (like parsley on sole) and sprinkle paprika on practically everything within reach. Sometimes you end up with a dinner in which everything seems to be sprinkled with something, which gives a certain earnest look to the whole performance, but it still shows you’re trying.

(Seriously, though, I highly recommend this book, even if you hate to cook. Especially if you hate to cook. It’s a fun read.)

The salmon puff would have benefited greatly from a side of steamed vegetables or a salad, both to enhance the presentation and the nutritional values. Surprisingly, I think I may use this recipe again in the future specifically because it is an easy pantry casserole. Heaven knows some winter days I just don’t want to brave the roads for more exciting ingredients. Also, it would be a great way to use up leftover mashed potatoes. I mean, everyone in my family ate their dinner, nobody complained, and some even had seconds. Nobody had anything great to say about the dish, but when it comes to feeding kids, a lack of complaints is pretty high praise.

Honey Curry Chicken

Sometimes the food that I make can take hours, even days, to prepare. Other times I have to make a rushed meal between activities. This dinner was definitely one of the latter.

I made the Honey Curry Chicken from page 126 of The United Churches in Canada: Let’s Break Bread Together (September 1988 edition). The flavour of the final dish reminded me of nothing so much as dipping McDonald’s chicken nuggets into honey, which is incredibly low-brow but recalls happy childhood memories. At least this is nominally healthier, since the chicken isn’t breaded and there are actually vegetables!

The honey curry sauce is very quick to make and can be as mild or as spicy as suits your tastes, depending on the kind of curry powder that you choose to use. I used Irresistibles Mild Curry powder which adds flavour but absolutely no heat, which is exactly what I’m looking for when cooking for my children or my parents. (My husband and I prefer more spice.) Instead of baking the chicken in the oven, as the recipe called for, I went the quicker route of chopping it small and frying it in its own juices on the stove top. I didn’t use raisins in the sauce (they were optional anyway and didn’t really seem to go). As the recipe dictated, I served it over fluffy rice (Suraj Basmati). I served it with peas as we didn’t have any beans, and no toasted slivered almonds as a topping since we didn’t have any of those either. Despite all of the changes, it turned out absolutely lovely and I will definitely make this dish again.