A Taste of Summer

Over the weekend two of my friends celebrated their birthdays together — the same two friends that I baked birthday pies for around this time last year. I asked them if they would like pies as gifts again this year, and they seemed to think that this was a marvelous idea! One of my friends even requested the same type of lemon meringue pie as last year, since it went over so well.

I don’t think the meringue was as fluffy this time, but I was much happier with the level of browning on the top — which I think can be accounted for by the oven, which we replaced in the meantime. I find that while it does have its own challenges (it runs pretty consistently 50 degrees F hot), it provides a much more even heat overall.


Photo by Karen Turnbull.

Sadly, the meringue topping got a little bit mangled in transit, but I’m assured that it still tasted fine! Once again, I used half of a crust recipe from page 73 of The All-New Purity Cook Book (Elizabeth Driver, 2001), the lemon meringue filling from page 687 of the Joy of Cooking (Rombauer & Becker, 2006 edition), and Soft Meringue Topping #1 on page 798 of the Joy of Cooking.

My other friend requested a change-up from last year with a fruit crumble instead of a pie. He really wanted rhubarb, and he was lucky that I still had some left over in the freezer from last summer’s harvest, because it’s well out of season around here. I mixed the rhubarb with some strawberries and green apples for added flavour and texture, and I did add a cup of sugar to the fruit because rhubarb is so very tart. To make this dish I used the Apple or Fruit Crisp recipe on page 392 of the Joy of Cooking. The final product kind of looked a mess, but I find that most crumbles do! I got to taste a bit of this one and I was quite happy with how it turned out as well. It was like a little bit of summer stuck smack dab in the cold and snow of February.

Birthday Dinner Woes

Yesterday was my husband’s birthday, so at his request I cooked him a special birthday dinner. I’d say that overall it was a learning experience.

The dinner itself was one of his favourites: chicken thighs marinaded in Pataks Tandoori Curry Paste and coconut milk, cooked on the smoker grill (which is finally fixed). Despite appearances, it wasn’t actually burned, although it was definitely overcooked. Now that it’s running properly, the grill heats up better and faster than before, and I failed to take that into account. As sides I toasted some garlic naan bread on the barbecue, and we also had steamed butternut squash with butter and salt. I know I’ve prepared this meal better in the past, but it was still tasty.

The difficult part — and the greatest learning experience — of my husband’s birthday dinner was actually the dessert: a frozen lemon torte. We’d had this dish at a barbecue hosted by my husband’s boss a couple of months ago, and we both really liked it. Sadly, I could only have a mouthful, as it was filled with whipping cream. As we were leaving the party I requested the recipe from my husband’s boss’ wife, and she made sure to send along a copy a few days later. Sadly, I have no idea what recipe book it comes from, since she just sent me a photocopy of the one page.

The challenge for me was making this dish without the use of cow’s milk. I was sure that I should be able to make it with coconut milk instead; internet research indicated that it is possible to make an imitation whipped cream from coconut milk. Strike 1 against me was that the milk hadn’t separated after I’d placed the can in the fridge overnight; most instructions for whipping the cream call for using only the solids from the can. I’m not sure if it’s a canning/processing technique or an added ingredient, but my coconut milk didn’t separate. Further Googling told me that I could probably make whipped cream even with non-separated coconut milk, but I would have to whip it longer (15+ minutes), use a thickening additive, and it would still only form soft peaks. Well, mine didn’t even get that thick. I whipped it with a hand mixer for almost half an hour and just got slightly fluffier milk. By this time it was almost two in the morning and I was exhausted, so I combined all of my ingredients, threw the pan in the freezer, and hoped for the best.

I was really worried about removing the springform pan after dinner, which is why I took photos in advance just in case it all fell apart without support. It wasn’t quite that bad, but it did get mushy really quickly. I’d say that the lemon layer, which was supposed to have a mousse-like texture, was a lot more like ice cream. I mean, that wasn’t bad overall, but it wasn’t what I was hoping for. Also, the lady finger bottom crust, which should have been held down by the mousse, actually floated to the top of the too-liquid lemon mix, and then froze that way. After adding the meringue on top, the cookies ended up being more of a central layer than a crust.

In the end, the torte ended up being more of an ice cream cake with a meringue topping — but at least I could eat it! I really want to have a go at this recipe again, with less of a time limit and more than one brand of coconut milk to try whipping. Actually, I noticed on a grocery store trip today that there is a brand that sells full-fat coconut cream, so that may be the next thing I try. If I ever get the non-dairy version working to my satisfaction, I will post the recipe, I promise!

Double Chocolate Triforce Cake

Thing 1’s birthday was over the weekend, which of course meant that we had to bake a cake. Since, in my experience, kids love baking cakes, Thing 1 and Thing 2 helped. I also believe that even if it doesn’t turn out perfectly, kids really do benefit from cooking with their parents.

Thing 1 requested a “chocolate Zelda cake with chocolate icing”. Since I am not known for my beautiful cakes (my 16th birthday cake being a great example of my skills), I decided to keep it as simple as possible. We used the tried-and-true Amelia Bedelia’s Sheet Cake recipe, which is found at the back of the story book Amelia Bedelia Bakes Off (Herman Parish, 2010). (You can also find the recipe via Desktop Cookbook.) This makes a very rich, moist, dark chocolate cake — which, as a bonus, is tree-nut and peanut free, and can be made vegan (which is great when you have to make cupcakes for school, FYI).


It’s dangerous to go alone! Take this.

The kids had gone to bed by the time the cake was cool enough to ice, so it was my turn. I used the Chocolate Satin Frosting recipe from page 796 of the Joy of Cooking (Rombauer & Becker, 2006 edition). This recipe is ridiculously easy — since it’s mostly made in a blender or food processor, it’s only slightly more difficult than cracking open a can of pre-made frosting from the grocery store. It’s also a very dark chocolate icing, almost bitter, which is perfect for my little chocolate lover.

I made the Triforce design using a stencil. I went low-tech and drew the pattern with a pencil and ruler on a piece of card stock, then cut it out with scissors. Then I simply held the stencil very closely over the icing and sprinkled on the sugar. The result wasn’t completely perfect, but Thing 1 knew what it was supposed to be. As an added bonus, the coloured sugar added a lovely crunchy topping.

So happy birthday to my fabulous firstborn! I love you so much.

Birthday Gifts

I haven’t been blogging for the last week because my illness finally caught up with me. It took me over two weeks to get over the con plague cold — which nobody else caught, which tells me that I really let my immune system get depressed through a combination of working too hard, eating crappy food, and not getting enough sleep. After a week of feeling like crap, I just had no reserves left.

Time marches forward, though, so while I was sick I celebrated a quiet birthday. Two of my friends had already bought me a rotary cutter as an early gift, but I got the gifts from my family over the weekend. My husband contributed to the “I need a new bike” fund (I got my old one more than fifteen years ago, and it has seen some heavy use). Thing 1 got me a hanging basket of flowers, pictured above.

Thing 2 got me a couple pots of annuals for my garden.

The two of them together got me Turtles Minis chocolates and some fun brightly-coloured yarn.

My parents contributed to the new bike fund, as well as buying me a new belt sander (I’d worn my old one out), a fish clamp small enough to fit in my tackle box, a guide to the essential foods of Italy, a gas mask (since I always seem to need more of them for costuming purposes), and the above-pictured camera-print pillows, which now reside in my living room. All in all, a fun birthday haul.

I plan to get back into the swing of blogging, now that I’m feeling somewhat better. Over the next week or so I hope to fill in the blanks where I wasn’t able to write, adding some backdated posts as time permits. Hopefully my energy levels will soon return to normal and I’ll be able to continue to write on my regular schedule.

A Piece of Pie

Recently, my husband and I were playing Borderlands 2 online with another couple who are good friends of ours. At one point I had to take a brief AFK break to take a pie out of the oven, causing our friends to jokingly lament that they didn’t have pie too. At that time, their birthdays were swiftly approaching, so I promised them that I’d make them pies for their birthday. Well, their joint birthday celebration (their birthdays are only a couple of days apart) was this past Friday, so on Thursday night I had to make their pies.

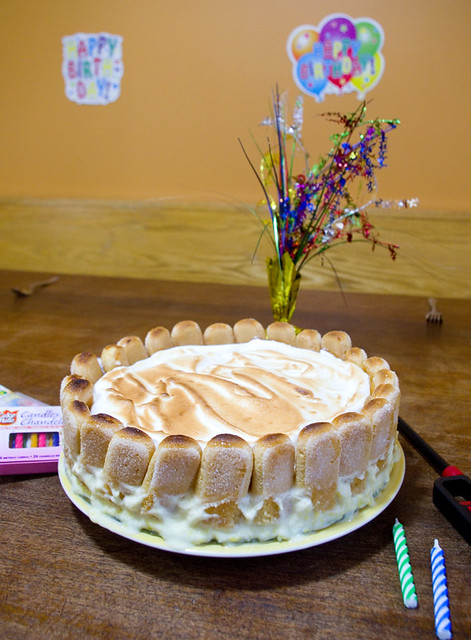
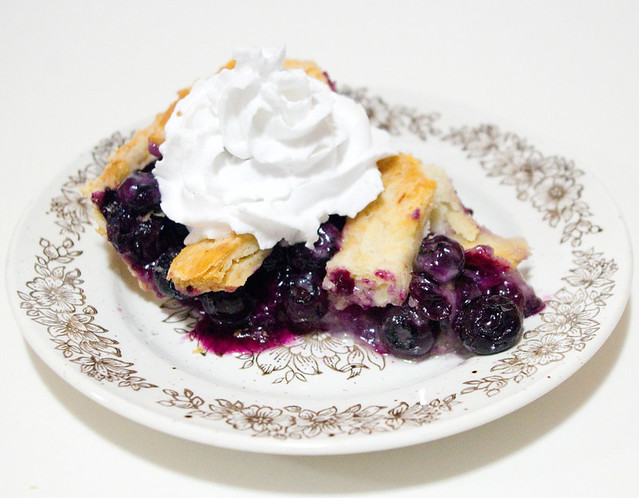
I decided to make two totally different kinds of pies, and I started with a lemon meringue. I used the crust recipe from page 73 of The All-New Purity Cook Book (Elizabeth Driver, 2001), the filling from page 687 of the Joy of Cooking (Rombauer & Becker, 2006 edition), and Soft Meringue Topping #1 on page 798 of the Joy of Cooking. I’ll confess right now that I had never made lemon meringue pie before, even though I quite like it. I’d only tried a meringue once before and that failed spectacularly. I don’t know what I did, but no matter how hard I whipped it, the meringue never formed peaks at all, it just stayed runny. I was really worried that it wouldn’t turn out right.


Photo by Karen Turnbull.

In the end, I’m quite proud of my first lemon meringue pie, even though I singed the topping a bit. I have got to remember that my oven heats unevenly and that I need to check on my baked goods more often. I mean, I set a timer for the minimum time recommended and then checked it with five minutes to go, and it was still a rather dark brown (I was aiming for a toasted gold). If I’d left it in five minutes longer, it would have been burnt. Luckily, the colour was only on the surface, and my friends said it tasted just fine. They served it up to their gaming group when playing D&D on Sunday night, and everyone liked it, even one person who generally doesn’t like lemon meringue. I’m wondering if that’s because I used fresh lemons and lemon zest when I made the filling from scratch, instead of using canned filling.

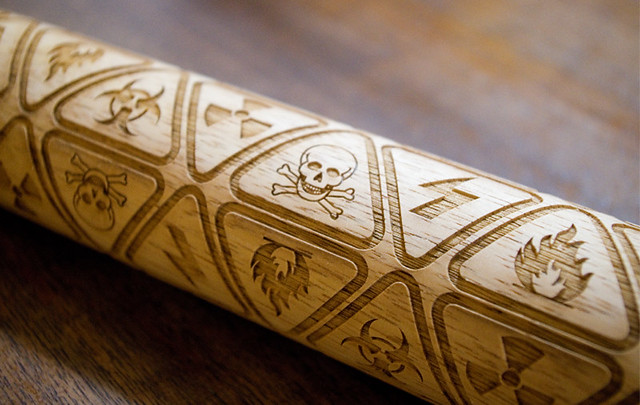
For the second pie I went with a fruit-filled pie, which something I’ve done successfully a million times before, just in case. I mean, given the disaster with the bitter pumpkin pie at Christmas, experience doesn’t always mean mistake-free. But I’m fairly confident that it will taste fine (especially since you can honestly completely omit sugar in most fruit pies and it’ll still be palatable). For kicks, I rolled the top crust using a laser-engraved rolling pin that I received as a gift a while back. It features the hazard symbols for poison, ionizing radiation, high voltage, and biological hazards. Something tickles me about using this on food.

What with a fruit pie crust never baking flat, it’s hard to see the design, but it is there. I also vented the crust using a 8-Piece Pie Divider for the first time, which was a gift from another friend. It is honestly the weirdest-looking gadget in my kitchen, but it works quite well. The recipe for apple-strawberry pie that I used can actually be found on the back of its packaging box — although I did use the same Purity Pastry crust for both pies, since it’s just easier to whip up one big batch instead of multiple small ones. I used leftovers of that crust, along with some extra fruit from the fridge, to make the fruit tarts that night as well.

Honestly, I’m kind of hoping that this baking-as-a-birthday-gift idea becomes a regular thing. As my friends and I get older, I find it harder to shop for presents, since I know the things that they really want is way out of my budget, and we all have more clutter than we really need. But food is a necessity of life. And just maybe on our birthdays we deserve to be able to elevate a basic need to something a little more special.

Dad’s Birthday Dinner

This past weekend began with my dad’s birthday on Friday. September is a busy birthday month in my family, with my brother’s birthday near the start of the month, and then my mom’s just over a week later, and then my dad’s about a week after that. Before she passed away, we celebrated my Nan’s birthday right at the end of the month as well. This meant a lot of birthday parties and dinners, although as we got older, more of the latter than the former.

Dad’s request for his birthday dinner was much more traditional for my family than my mom’s, given both the region in which we live and our cultural heritage. Dad requested baked beans and biscuits, followed by butter tarts for dessert. Baked beans are generally considered to be a Québec specialty, but they are extremely popular in Ontario and New Brunswick as well (both provinces have a proportionately large French-Canadian population, especially where they share a border with Québec). My father fondly remembers my grandfather making baked beans for the family; it was probably one of the recipes he learned while working as a lumberjack. The baking soda biscuits are definitely Granddad’s recipe, passed down to me by my father. And butter tarts are a quintessentially English Canadian dish, although it’s not one passed down to me by my grandparents; so far as I know, Granddad wasn’t much for fancy baking, and Nan never mastered the art of pie crusts.

All that being said, I’d never made baked beans by myself before — that had always been Mom’s job! So I needed to look up a recipe. The Maple baked Beans With Apples on page 151 of The Canadian Living Cookbook (Carol Ferguson, 1987). I adapted the recipe to cook predominantly in the crock pot, since I didn’t want to run the oven for hours and hours on such a hot day. I basically tossed all of the ingredients that would have been baked in the first stage in the crock pot for about 16 hours. Then I ladled it all into a Dutch oven, topped with sliced Granny Smith apples, brown sugar, and butter, and baked it all together uncovered for an hour. It turned out absolutely fabulous, enough so that my parents asked me for the recipe!

The biscuits, of course, were Dad’s Biscuits. I rolled out the dough and cut it with a cookie cutter instead of going with the easier drop-off-a-spoon version, since formed biscuits hold up better to dunking or spreading with baked beans. I asked Dad if it was weird to have his own recipe made for him, and although he agreed that it was an odd feeling, he wasn’t complaining.

Served last were the raisin butter tarts. I used the same recipe as I did for the potluck dinner a month ago: page 234 of The Canadian Living Cookbook. However, I substituted an equal volume of golden raisins for the walnuts that the recipe called for, which tasted delicious. I kind of overfilled the tarts though, so they boiled over when they baked and hence look a mess. They tasted good anyway, although the stickiness of the overflowed filling meant that they were a pain to remove from the pans.

So happy birthday to my dad! Love always to the man who taught me through his automatic acceptance that people can do whatever they put their mind to, no matter what traditional gender roles in our society may dictate.

Mom’s Birthday Dinner

We celebrated my mother’s birthday this past Saturday. At her request, I hosted dinner at my house and made her up some of my ramen — which somehow she had never tried before. The version that I chose to make was Furikake Salmon Ramen (page 82 of Simply Ramen by Amy Kimoto-Kahn (2016)); the recipe is also available online here. This recipe uses a shoyu base (page 8, or online at easypeasyjapanesey.com), which I made up in advance in my slow cooker. I remain rather enamored of this base recipe, but every time I make it I remind myself that sometime I really need to try the tonkotsu base, which is my favourite but appears much more difficult. I used soft-boiled eggs instead of marinated half-cooked eggs, mostly due to time constraints. I also used packaged noodles; one of these days I will make my own, but that really requires a pasta maker, which I don’t own. I didn’t use the kind from the instant soup packages, as I find they get soggy much too quickly, but instead a package of dried noodles on their own for which I unfortunately can’t read most of the label.

The real star of this dish is the salmon. I was lucky enough to find it on special at the grocery store, pre-portioned and ready to go. The furikake topping was delicious even though I used North American mayonnaise instead of Japanese-style. There were some leftovers and I really look forward to having them served over rice in the next few days. I think that this topping is going to become part of my regular dinner roster; it would probably be good on other pink, oily fish like sea trout.

In our family, there’s always dessert with a birthday dinner, even if you’re stuffed from the meal itself — that just means that you take a breather and have the treat later in the evening. This year I made apple pie using fruit that I’d grown on my own tree in the back yard. For the chocolate lovers, Dad made brownies with chocolate icing, which were delicious and, if you know my dad, a very special treat, since he rarely bakes. We served it all up with whipped cream and/or vanilla ice cream (and dairy-free alternatives thereto). Oh, and candles! I was thrilled to find that it’s possible to get the candles that burn with coloured flame at the dollar store these days. I used to have to go downtown to a specialty store to buy them.

So happy birthday to my mom! Love always to the woman who helped shape me into the person that I am (whether that’s a good thing or not is a matter of opinion).

Birthday Dinner

Yesterday was my husband’s birthday, and the tradition at our house is that you get to eat whatever you want (within reason) on your birthday. This often involves going out to a restaurant, but this year my husband asked me to make his dinner instead. His choice of dinner necessitated a special trip to T&T Supermarket for ingredients, which was, as usual, an event in itself. Every time we go, we have a meal in the cafeteria, and then the kids have to check out all of the samples and go watch the live fish and seafood in their tanks. We also have to peruse the produce and packaged goods sections for food we’ve never tried before, and for ingredients for new recipes we’d like to try. There is no such thing as a quick trip to T&T with my family.

The main meal that my husband requested was California Ramen from page 86 of Simply Ramen (Amy Kimoto-Khan of easypeasyjapanesey.com, 2016). My copy of the book was actually a birthday gift to me from my husband a few months back, and I feel this may have been a not-so-subtle hint on his part. This dish is based California roll sushi, with toppings of avocado, cucumber, and crab. The recipe recommends fresh Dungeness crab, but I had never cooked live crab before, and I have to admit that I chickened out and used frozen crab instead. I distributed one package of frozen crab meat out around our family of four, but I admit that I probably could have used half as much crab and been just as happy. I also ended up using soft-boiled eggs instead of the marinated half-cooked eggs recommended, mostly because I misread the directions and didn’t realize they had to start marinading two days before the dish was to be made. Whoops.

The standout flavour of this dish, though, was the shoyu base broth. I’d never made it before, but it was both delicious and very simple. It packed a huge amount of flavour and tasty aroma into what I would have thought is just another slow-cooker broth. The recipe calls for dashi granules and soy sauce (both of which are high in sodium) and salt, but I had to take into account my family’s tastes. I left the salt out, and I am glad I did. The broth was just fine without it. In addition to the broth, I ended up with a lovely cooked chicken and melt-in-your-mouth oxtail (both of which are supposed to be discarded after being strained out of the base), so that’s two meals in one, really. All in all, it was a 10/10 recipe, and I will definitely make it again after I use up the leftovers that I froze! Now I want to try all of the bases in this book, especially the tonkotsu — my absolute favourite when I go to a ramen restaurant.

Of course, no birthday in our house is complete without dessert, and as my husband is not a big fan of sweet dishes, I made him up a fresh reduced-sugar blueberry pie. I cut down the sugar from the recipe by a third, but the blueberries were so sweet by themselves that I could probably have reduced it by a half or more. Once again, I used the Purity Pastry crust from page 73 of the Purity Cookbook (2001 edition), and the fresh fruit pie filling formula on page 228 of The Canadian Living Cookbook by Carol Ferguson (1987). I made a latticework crust, which turned out pretty well considering that a) it was only my second time making one, and b) Thing 2 somehow managed to step on the edge of uncooked pie while I was showing it to her, and I had to totally reassemble it. If you’re pondering the logistics of that, be aware that there was a stool involved so she could see what I was working on at the counter, and that the pie’s innards all fell out onto a clean baking sheet.

As many of my pies do, the blueberry one did not stand up well to a serving knife… It kind of crumbled and fell apart. I figure that’s not so bad because that means that the crust is nice and flaky. And yes, I did keep thinking of The Frantics’ A Piece of Pie while I was making this dessert. “Great big blueberries!”

Link’s Tunic

My eldest daughter’s birthday is coming up, so I wanted to make her something extra-special as a gift. When we went to ComicCon this year, Thing 1 kept spotting foam replicas of Link’s Master Sword (from The Legend of Zelda series) out on the sales floor, and she asked me if she could have one every time she found one. My response was that it was too expensive; I had given the girls a budget of $20 each to buy something, and the swords usually came in between $30 and $35. Instead she came away from the con with a chain necklace with a pendant shaped like a Golden Snitch, which also lit up from inside with a tiny LED, and she seemed quite satisfied.

However, I had two days at the con without the kids along, and in my browsing I managed to find a competitively-priced Master Sword, along with a cheap plastic Hylian Shield. I stashed the sword and shield away for a few months to save them for her birthday. But I also figured that I could take the gift up a notch and make her a play costume to go along with the pre-made items.


McCall’s M6224

To me, a play costume is one that I don’t spend a huge amount of time or money on because there’s a good chance it won’t last all that long, since my kids are allowed to wear play costumes whenever they want and to do whatever they want in them. This is why most of their play costumes are second-hand finds, hand-me-downs, or bought on the 90%-off sales after Halloween. To that end, I used McCall’s pattern M6224, which I already had in my stash from ages ago. (Although I didn’t use this specific pattern to make the girls’ ComicCon costumes this year, I should note that one-piece pajama patterns are great to adapt into costumes.)


Cutting the pattern.

This time I didn’t use the one-piece pajamas and instead went for option C, which is a short-sleeved pajama top reminiscent of the scrubs one would wear for working in a hospital. I lengthened the top a bit to make it more of a tunic than a shirt, which will eventually be belted into place. I used fabric from my stash as well, which was the remnants of a dark green sheet that I’d used parts of for some craft or other years ago.

As the pattern envelope promised, the pattern was really easy to make. I think it only took me about two hours from unpacking the pattern to ironing the final product. Now, it looks a little big to me, but pajamas and tunics both are meant to fit loosely, and anyway it will be belted in. If worst comes to worst, I can always take it in. Strangely, my biggest worry is that the neck hole may not be large enough; the fabric has absolutely no stretch whatsoever, and Thing 2 has a massive noggin, just like both of her parents.

Die-hard Zelda fans probably are looking at the tunic and thinking, “Isn’t that supposed to have lacing, and a collar?” Yes, I suppose it is, if I was going for true accuracy. I kind of went for a look between adult Link in Ocarina of Time (what with the length of the sleeves, not to mention the sword and shield) and Four Swords Link (with the V-neck tunic). As much as I love 100% accurate costumes, I didn’t think it was necessary to play dress-up at home. Also, generally the more accurate the costume, the more time and money it takes, neither of which I wanted to spend on something that would probably get food and dirt smeared all over it.

The next step is to get a belt and a long-sleeved shirt to go underneath, as well as to make Link’s cap. Hopefully I’ll get it all done in time!