Finger Foods

Yesterday Mother Nature decided to prove, once again, that she reigns supreme by throwing a rare (but not unheard-of) snowstorm at us a good week into April. I feel very lucky that I hadn’t had the snow tires taken off of my car yet — unlike my poor parents. I was so happy the other day when I realized that I could see grass peeking through the snow in the back yard, making progress even from last week when I broke out the barbecue. As of halfway through yesterday afternoon, the view out my back door looked like this:

It did continue snowing throughout the rest of the day, although it was only lightly and hence didn’t accumulate all that much. I feel so much worse for my friends and family in Atlantic Canada who are supposed to get double the snowfall that we did! There’s a reason that we don’t plant our gardens here before the Victoria Day weekend at the end of may, and it isn’t just fear of frost.

In addition to the depressing weather, I still am suffering from a nasty cold, so yesterday’s supper had to be warm, filling, and easy. I thought that some tasty finger foods were in order. Much to my surprise, there was a great deal at one of the nearby grocery stores on zucchini this week, which doesn’t usually happen quite this early. I am left to surmise that places further south that have actually progressed through spring are having a bumper crop this year. So I decided to make some baked Panko zucchini sticks, which the kids love but haven’t had since the end of last summer. I thawed some Costco chicken wings and threw them in the oven, and while the were baking I threw together the zucchini sticks. Since the two dishes are cooked at the same temperature, for the last 15 minutes or so of cooking time I transferred the chicken to the top rack and cooked the zucchini on the bottom. This way both dishes were done at exactly the same time and could be served right away.

I think I’m about done with winter, by the way. It’s only two weeks until Easter; will Santa have to ferry the Easter Bunny to us in his sleigh?

Tandoori Chicken & Rice

The other day my kids had what I thought was a gastro bug, but in retrospect may have been a mild case of food poisoning, mostly because I haven’t caught anything. Generally, if the kids catch something, so do I, since I’m the one who will have to nurse them back to health. If it was food poisoning, it can’t be because of anything I had cooked, because I ate all of the same foods as them that day and was perfectly fine. However, we did grab some cheap takeout that night for dinner, and I had a different dish than the one they shared. That was probably the culprit.

So food was a low priority for a couple of days. Instead of writing about that experience in any kind of detail (because nobody really wants that), I’ll tell you about a meal that I made a few days previous.

I went through my fridge and realized that I still had a half a jar of Pataks Tandoori Curry Paste, so I just had to make up some tandoori chicken. It’s one of my husband’s favourite dishes; in fact, he’s the one who introduced me to it. Apparently Pataks brand is very popular in the Netherlands, where he did a work placement for half a year during university. He was very happy to discover that a few places here in Ottawa carried it when he returned, although a dozen years on it’s become much more common.

This particular recipe calls for marinating in a sauce of yoghurt mixed with the tandoori paste. I’ve really appreciated that a number of brands of yoghurt have started to make a lactose-free variety so that I can enjoy dishes like this! Other than the chicken, which was simply baked in the oven after being marinaded overnight, I just had to cook up some rice and dinner was done. I probably should have included a veggie or two, but somehow I forgot until right as dinner was to be served. Ah, well. So long as we’re all getting enough fruits and vegetables overall, it doesn’t matter too much that we’ve missed it at one meal.

Valentine’s Day Baking

Yesterday was Valentine’s Day, and while we’re not terribly into big romantic gestures in our household, the kids really do love celebrating this holiday at school. Everyone ends up with a little mailbox full of Valentines, and some sweets to bring home, and often parents send in some nice snacks for the kids to munch on throughout the day. So of course I had to get the girls to help me with some baking to bring along to class.

At Thing 1’s insistence, I made a chocolate sheet cake with chocolate icing for her class. Since she loved her Triforce Cake so much, I used the same recipe: Amelia Bedelia’s Sheet Cake, found at the back of the story book Amelia Bedelia Bakes Off (Herman Parish, 2010), or online via Desktop Cookbook. This time, though, I actually made buttercream icing from scratch — my very first time trying it! I used the Joy of Cooking (Rombauer & Becker, 2006 edition) recipe for Chocolate Buttercream found on page 793. Honestly, the icing was more difficult to make than the cake, but it turned out so well! I used really dark chocolate and my munchkin appreciated it. She isn’t actually a big fan of the thick layers of super-sweet icing that are commonly found on commercial cakes, and to be honest, neither am I. I decorated the icing with a dusting of icing sugar over some heart-shaped cookie cutters, and then I removed the cutters to lay down a heart made of Smarties. I know it wasn’t symmetrical, but the kiddos didn’t seem to care.

Thing 2, however, really wanted to make mini banana muffins for her class. I went back to the trusty recipe in the Joy of Cooking and we together we made the Banana Bread Cockaigne on page 628. There’s a lot of teaching that goes along with baking with a child of that age, especially since they haven’t started learning fractions yet! Even so, this recipe is very forgiving (if you read my blog regularly, you’ve probably noticed that it’s a favourite), and it turned out really well. There were only three left over after she shared them with her friends, and those were promptly snatched up by her grandparents. Not that I begrudge them, because if they didn’t eat them, I would.

I hope you all had a lovely Valentine’s Day and were spoiled with some of your own favourite treats!

Bread Machine Malt Bread Recipe

A while ago, when I first started baking bread, I ran across a recipe that called for malt. It’s not a common ingredient around here, and in my search I learned a lot. The first thing you have to know is that “malt” can mean a number of different things:

Barley Malt Syrup: a thick syrup that greatly resembles molasses in appearance, which is extracted from sprouted (malted) barley. (Pictured above.) In Canada, this can be found in specialty or high end food stores like Whole Foods. In England, I’m told that it’s as common as molasses is here, and that children will often sneak spoonfuls of the stuff from the pantry.

Malt Extract Powder: An ingredient often used in home brewing, malt extract powder can be derived from sprouted (malted) barley or wheat. (Light dried wheat malt extract pictured.) This can be procured quite cheaply from home brewery supply stores and brew-your-own small breweries.

Malted Milk: A combination of malted barley, wheat flour, and evaporated whole milk, this is the main ingredient that differentiates a “malted” from a “milkshake”. (Not pictured.)

While all of these are all derived, at least in part, from the same process, they are all distinct ingredients in their own right and it will greatly change the outcome of a recipe if you use the wrong one. The problem is that a number of recipes I’ve come across (and ingredient lists on packaging, for that matter) sometimes use the blanket term “malt” for any of the three. This becomes increasingly concerning in the case of allergies/food intolerances or trying to eat strictly vegetarian/vegan.

So I learned all of this but still wasn’t able to find a local source for barley malt syrup. Not long later (but after I’d pretty much given up), a friend of mine came across some at a specialty grocery store and picked it up for me. Sadly, I had moved on to non-malt-based recipes by then, and the malt sat in my fridge for quite some time. Skip ahead to last week, when I cleaned out my fridge and realized that my malt was still there — and still good! (I believe it’s like maple syrup in that it’ll last years under ideal conditions.) I put together a bread machine recipe and tested it out a few times, to my family’s happiness. The malt creates a slightly darker loaf and adds a hint of sweetness (but not so much so it’d be called a truly sweet bread).

Side note: This bread can be made vegan, if you use a vegan margarine instead of butter, and use the correct style of malt, which is the barley malt syrup kind, in this case.

Bread Machine Malt Bread
Yields one 2lb loaf

A note about bread machines:
Every bread machine comes with an instruction booklet (most of which are also generally available online) that will specify the order that ingredients should be added. Mine says that liquids should be added first, then flour, then yeast. When preparing this recipe, the instructions for your specific bread machine should take first priority, so if your manual says to add the ingredients in a different order, do so.

Into the bread machine pan, pour:
1 ½ cups water
2 Tbsp barley malt syrup
Over the liquids, pour evenly:
4 cups flour
Into one corner of the pan spoon:
2 Tbsp butter or margarine
Into the other corner of the pan, spoon:
2 tsp salt
Make a divot at the center of the flour. Into the divot, put:
2 tsp yeast

Set the bread machine to the basic/normal/white setting, with a light or medium crust to your preference. Press start. Running this cycle should take about three to four hours, depending on your machine.

Enjoy!

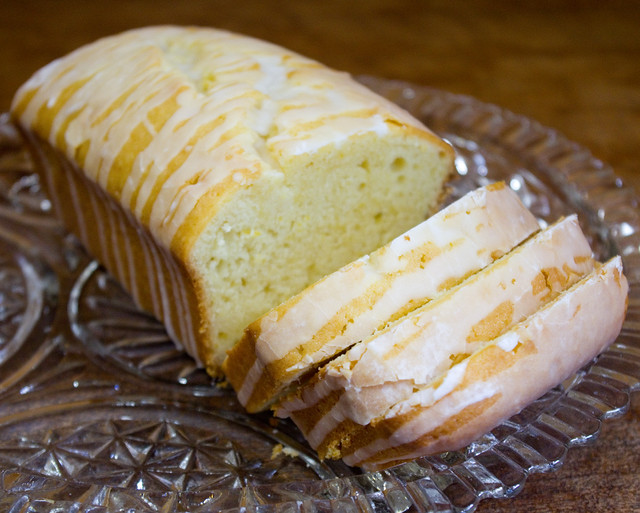
Glazed Lemon Loaf

I don’t know why, but I’ve been craving glazed lemon loaf lately. I think it may be because one of my favourite coffee shops has it in the pastry case every once and a while, and I do sometimes succumb to temptation. When I was grocery shopping with the family the other day, I thought that I might pick one up, but they were nowhere to be found! So I Googled a recipe, bought a lemon, and baked a loaf myself — despite the fact that I usually try not to turn on the oven in this heat.

I’m happy to report that it turned out exactly as I had hoped! Moist (but not doughy) in the center, with just a little tang of lemon in the glaze… Perfect. I found the Glazed Lemon Pound Cake Loaf recipe on Seasons & Suppers: The Summer Edition. The writeup for the recipe stresses that it must be made just so, with butter and eggs at room temperature, sour cream removed from the fridge fifteen minutes before adding, and a very specific order of operations. Given that I’ve never made lemon loaf before (lemon poppyseed yes, straight up lemon no), I figured that I should follow the directions as written — at least the first time. Okay, well, I did have to make one small modification to adjust for my dairy issues, and used lactose-free sour cream instead of regular. But it still turned out great!

I think that the only beef I have with this absolutely delicious recipe is that it’s called a pound cake. What I’ve always been taught is that a pound cake calls for a pound each of flour, butter, and sugar. A quick Googling tells me that this translates to approximately 3 1/3 cups all-purpose flour, 2 cups butter, and 2 cups granulated sugar… Which isn’t even close to the proportions in this recipe. I mean, it gets a little bit closer if you halve it so that it’s simply equal weights, but even so, to me, that’s not really a pound cake. Not that this has anything to do with the quality of the recipe itself, mind you. The methodology was correct, and the end results were delicious! And I will definitely make this recipe again. I guess I’m being just a bit pedantic.

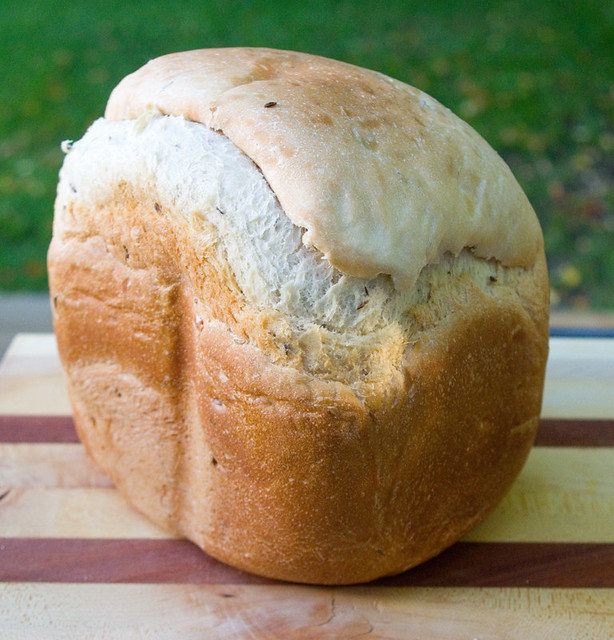
Bread Machine Beer Bread Recipe

I think I’ve finally gotten the beer bread recipe to the point that I feel it’s good enough to share! This bread is customizable based on what kind of beer you choose to use. For this bread I chose to use Lost Craft’s India Pale Ale, which is a nice, light beer with only a 4% alcohol content. But feel free to choose the beer that you like best! A stout will make a much darker, richer bread, while a crisp, light beer will have a much less pronounced taste. You could even use a non-alcoholic beer. Additionally, you can choose to omit the caraway seeds, which do have a strong flavour of their own, so that the beer shines through.

The beer that you choose to use changes what it goes well with. It’s a light fluffy bread no matter the beer, so if you’re going to spread something on top, it’s best to toast it first. With a light ale and caraway seeds, I like it paired with a sharp cheese, deli meats, and/or a touch of mustard. Without the caraway, I have served it with eggs and toast for breakfast, and received quite a few compliments.

Bread Machine Beer Bread
Yields one 2lb loaf

A note about bread machines:
Every bread machine comes with an instruction booklet (most of which are also generally available online) that will specify the order that ingredients should be added. Mine says that liquids should be added first, then flour, then yeast. When preparing this recipe, the instructions for your specific bread machine should take first priority, so if your manual says to add the ingredients in a different order, do so.

Into the bread machine pan, pour:
1 ½ cups India pale ale
2 Tbsp olive oil
Over the liquids, pour evenly:
4 cups flour
Into one corner of the pan spoon:
1 Tbsp sugar
Into the other corner of the pan, spoon:
2 tsp salt
Make a divot at the center of the flour. Into the divot, put:
2 tsp yeast
Over the top of all of the ingredients, sprinkle:
3 tsp caraway seeds

Set the bread machine to the basic/normal/white setting, with a light or medium crust to your preference. Press start. Running this cycle should take about three to four hours, depending on your machine.

It’s as simple as that!

Nasturtium Pesto on Cod

We’ve been getting a lot of rain over the past few days, after getting practically none all summer. This means lots of hot, humid days, with really no chance to cook outside. I mean, I’m all for barbecuing in the rain, but I draw the line at thunderstorms.

So I dug through my freezer (which I am trying desperately to free up so I can defrost it) and found a lovely package of cod that I’d been meaning to use. I baked it in the oven with a coating of nasturtium pesto that I’d made last summer. (I learned last year or the year before that nasturtium leaves are totally edible, and they make a lovely, slightly-peppery pesto.) I paired it with mashed potatoes — the last of the bag that had frustrated me so over the weekend — and steamed carrots. It was a deliciously light meal to eat while watching the sky open up outside.

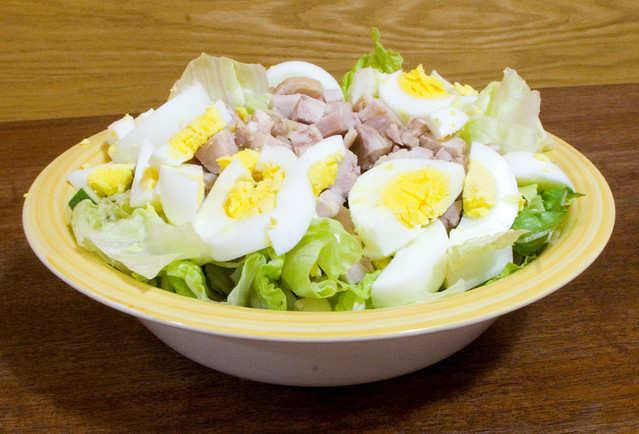
Leftover Chicken Salad

Last night was leftovers night, the day when I try desperately to finish off the last few odds and sods in the fridge to make space for new ingredients. For some reason, there always seems to be a bit of chicken in there when it comes time for a clean-out, either from rotisserie birds from the store or, more commonly, chicken thighs or breasts roasted at home. While chicken bacon quesadillas are generally an option preferred by my kids, I don’t always have tortillas around, so another thing I like to make is leftover chicken salad.

Honestly, it’s one of the simplest things in the world to make. I wash and cut up the lettuce (or spinach, or greens mix — whatever we’ve got), and I’ll wash, peel if necessary, and chop up whatever veggies haven’t yet turned — that means usually some carrots, cucumber, and some avocado if we’re really lucky. I’ll also chop the leftover chicken into bite-sized pieces, and add some slices of hard-boiled egg on top. If we have cheese that needs to be eaten up, we’ll often grate/crumble a bit and add that too. Then everyone adds whatever dressing they like; we usually have Greek tatziki, bacon ranch, zesty Italian, Ceasar, and a couple of homemade vinaigrettes kicking around the fridge. Of course, Thing 1 for some reason hates the texture of lettuce, and hence ends up with a plate of cut up veggies, chopped chicken, and a hard-boiled egg. It’s nothing fancy, but it is a tasty, healthy meal in a pinch!

Crunch Time Chicken

Heading into Ottawa ComicCon cosplay crunch time, I’ve been resorting to some of my tried-and-true dinner dishes to feed my family. Last night I made up baked chicken thighs with my favourite spring chicken spice mixture, served with mashed potatoes and a Caesar salad.

I’m looking for new quick and easy meals for the next month or so (it’s one month away! Eek!), but I don’t have time to do my usual leafing through my cookbooks and browsing the Internet for ideas. I do have a few Crock Pot recipes I’ve been wanting to try that might be perfect. At the very least, I’ll try not to resort to Kraft Dinner and instant ramen…

Chicken Katsudon

Thirteen years ago, I went to Japan for a month-long visit. For most of that time, I was with my friend Michelle, who is a childhood friend from Canada who was teaching there. Together we traveled by train from Saga in the southwest along the coast to Tokyo over the course of three weeks, stopping many times along the way. One of our stops was to visit a young woman named Ayako Koyama and her family. Ayako had stayed with me back in high school as part of an exchange program; she’d also come to visit me as an adult about a year before. On this trip, I had the opportunity to meet her family and to get to know the home and the region where she had grown up.


Ayako, Mrs. Koyama, Mr. Koyama, Ayako’s grandfather, Ayako’s grandmother, and Michelle. Ayako’s brother must have been at work that night.

One evening, Ayako’s mother brought Michelle and I into her kitchen to teach us how to make katsu for dinner. I honestly can’t remember if it was chicken (torikatsu) or pork (tonkatsu) that we breaded and deep-fried, but I do remember the process! I was rummaging through my old photos yesterday and realized that I actually had a photo of us all eating the dinner we’d made (above). It was a lot of fun, although it’s always awkward to cook in someone else’s kitchen — even when there isn’t a language barrier! It remains one of my fondest memories of visiting with Ayako and her family. My one regret is that I wasn’t really into cooking at the time, so I didn’t take the opportunity to learn more from a Japanese home cook firsthand. Such a valuable resource wasted! I guess I’ll just have to go back to Japan someday and learn more.

These memories resurfaced recently when I saw a show on the Food Network that had a segment on some restaurant that makes a chicken katsu burger. I really had developed a liking for it in Japan (you can see one of the commercial meals that I had that included it in my Noodle Soup entry). It’s a real comfort food. Suddenly, I was craving chicken katsudon again. Although I’d made the meat part before and could pretty much remember how to do it without help, I had to Google for how to make the eggs correctly, since they’re not simply scrambled eggs. I used the Chicken Katsudon recipe from Just One Cookbook, and in an attempt to make it a little bit healthier I made Baked Katsudon instead of fried. I was pretty happy with how it turned out, although I know where I made some mistakes. I was running out of time at the end (I had to get the kids fed and out the door to Guiding), so I skipped cooking the chicken in the egg mixture and instead just put it on top, which made it a little bit dry. I think I cooked the egg a bit too long; when I had it in Japan it was just a little bit runny, more like a sauce than a scrambled egg. I also didn’t have any parsley, which would really have made it pop a bit more visually. Also, although I did manage to make up some miso soup, I ran out of time to make a salad, and a meal like this really needs some kind of veggie, even if it’s just a quick pickle. But given that it’s been thirteen years since I’ve attempted this dish, I don’t think it turned out too badly. It did get positive reviews from the family just how it was, so I am encouraged enough to try it again.