Lobster Tails

I went to the grocery store yesterday to pick up eggs and milk (the two perishable foods we go through the fastest in our household), I popped over to the meat and seafood counters to see if anything tempted me for dinner. As it turned out, they actually had rock lobster tails on for a reasonable price — or at least what I’d consider to be reasonable compared to the ridiculous price that beef has gone up to lately. Lobster in my budget is extremely rare, so I had to pick up enough for dinner.

I followed the instructions from Maine Lobster Now and I was impressed with how quick and easy it was. (Most of the lobster I get these days is the much cheaper frozen claws from T&T to make Carribbean lobster bisque.) The girls were a little intimidated by the shell — they’ve had lobster as often as I could afford to serve it, but I don’t think they’d ever had to deal with cracking their own before. I don’t blame them, since even to me the tail looks a heck of a lot like a giant wood louse! Luckily I’ve been to a fair number of lobster boils in my day and, as per the instructions, the meat actually was very easy to remove once it was cooked.

I served the lobster with steamed asparagus, baby-cut carrots, and baby potatoes, all cooked very easily in the microwave. All in all this meal took me about 25 minutes to make, which is good because I was (as usual) running late. One thing I missed out on was garlic butter to drizzle on the lobster, which I do regret, but it was pretty darned good anyway.

Instant Pot Pot Roast

If it seems like I’m relying on my Instant Pot a lot lately, well, it’s because I am. I really like the convenience of being able to whip up what is essentially a weekend meal on a week night. It also lets me turn cheap cuts of meat tasty and tender, and I’m all for both saving money and using all of the animal.

This recipe, however, was not all about a cheap cut of meat, although it wasn’t a particularly expensive one either. Pot roasts are traditionally a great way to slow-cook a lean cut of beef and turn it melt-in-your-mouth tender (which is something that you’d otherwise need some fat marbling to do). I remember reading up on some of the cooking in Europe and that their beef is much less fatty than that in North America, so pot roasts in one form or another are very popular there. Now, I read that so long ago that I can’t cite a source, but if true, it makes a lot of sense.

Since my luck with roasts has been pretty bad in the past (I don’t know how, but my track record with completely tasteless roasts is way too high), I decided to follow a tried and tested recipe exactly. I went with the Rosemary-Dijon Pot Roast on page 224 of The Ultimate Instant Pot Cookbook (Coco Morante, 2018). I’m happy to report that this roast was definitely a success! It was succulent and flavourful despite being extremely lean. I really liked that this pot roast also cooked the potatoes and carrots in the pot roast juices, much like my family did when I was a kid. With the oven pot roast the potatoes and carrots would have gone right in with the meat, but in this recipe I removed the meat to rest and then quickly pressure-cooked the veggies in the juices — it was perfect! This way all the side dishes were taken care of.

There was a bit of leftover beef after dinner, which I sliced thinly to make sandwiches on fresh bread with a bit of mayo and mustard. Even the leftovers were fantastic.

Instant Pot Pulled Pork

My pulled pork method (so simple it’s not even really a recipe) is a personal favourite, but it’s also a slow cooker meal, which means that if you’ve not planned it in advance, you’re not eating it for dinner. I had a kilo of boneless bargain pork chops to use up and no plans for the evening meal, so I thought I’d give it a shot in the Instant Pot. My online research puts pork at about 40min per kilo to pressure cook, so that’s the timing I used. I just dumped the pork chops, barbecue sauce, and 1/4 cup water in the pot, stirred it, and set it to pressure cook on normal (medium) pressure. I let the pot stay on “Keep Warm” for an additional 10 minutes, then released the pressure and removed the lid. I set the pot to sauté and pulled apart the pork with forks in the pot while I let the sauce reduce for about ten minutes, bringing it down from watery to thick and sticky.

All told, the process took me about an hour, which is a far cry from the four plus hours it would have taken in a slow cooker. And honestly, the final result tasted nigh on identical. Now, if I wanted to set up a dish to cook at lunch and and then not worry about it until dinner, I would use the slow cooker method. But the pressure cooker was perfect when I hadn’t thought that far ahead.

As a bonus, the kids and I had fun with the vegetables with this dinner. I’d picked up a carrot curler (essentially a carrot sharpener) in a grab-bag of second-hand kitchen stuff a while back, and I thought it might be fun to use with the last carrots in the fridge. I just piled my shavings haphazardly on my plate, but Thing 1 arranged hers into a rather beautiful carrot flower, much like in the device’s promo photos (although she hadn’t seen them). I think she’s inherently better at food presentation than I am, taking after her paternal grandfather as she does. Perhaps in time I should get her to arrange all of my dishes.

Breaded Chicken Thighs with Baby Potatoes & Miso Greens

I’ve been trying to cut down on food waste in my house, and one of the things that goes to waste a lot of the time is the heels and mis-cuts of my homemade bread. You’d think it would get eaten up since it’s fresh and honestly tastes the same as the rest of the loaf, but the kids especially tend to leave it to go stale or even moldy. What I’ve started to do is take the stale ends and whizz it through the food processor to make bread crumbs, which was suggested by Jamie Oliver in this video. (I know it’s an ad, but it had some good tips!) This go around the crumbs were mostly from a loaf of rosemary Bread Machine Fluffy Herb Bread, which is a great herb to combine with chicken.

To add a bit more flavour, I broke out the Ikea FALKSALT sampler that my husband got for Christmas. I can’t seem to find a listing for it online, but it comes with four blends of sea salt: natural, wild garlic, oak smoked, and wild garlic. I chose the oak smoked for this dish, so I ground up a bit and added it to the bread crumbs. I dipped the chicken thighs in flour, then beaten eggs, and then bread crumbs. Then I baked it all for about half an hour, until the meat was cooked all the way through but still juicy.

To finish the meal, I also boiled up some baby potatoes that I bought over a month ago and had forgotten about in the fridge, and the leftover miso greens from the night before. Truly, this meal was all about avoiding food waste — but it was also delicious! Simple, too.

Instant Pot Beef and Guinness® Stew Recipe

After my success with the Instant Pot Beef Bourguignon, I really wanted to use my new toy to make some Guinness® beef stew for my husband, since it’s one of his favourites. Unfortunately none of the Instant Pot cookbooks that I bought after Christmas (because of course that was one of the first things I bought) contained this recipe. I’ve had fantastic luck with the Chef John’s Beef and Guinness® Stew, which creates a delicious stove-top version of this dish. To try and keep the flavour the same as the version we love, I adapted the preparation method for the Instant Pot. Here’s what I did:

Instant Pot Beef and Guinness® Stew
Serves 6

Cut* into small pieces:
4 slices low-sodium bacon
Peel and dice:
2 medium-sized yellow onions
Turn on the Instant Pot and select the Sauté program. If necessary, press the Sauté key repeatedly to toggle to the Normal setting. Wait until the LED displays “Hot”.
To the inner pot, add:
1 Tbsp olive oil
Stir the bacon and onions into the oil and cook for about 5 minutes, stirring often, until the bacon is cooked and the onions have begun to turn clear.
Add to the pot:
2 1/2 lbs (1.1Kg) boneless beef chuck**, cut into bite-sized pieces
Sprinkle the mixture with:
1 tsp salt
1/4 tsp black pepper
Press the Sauté key repeatedly to toggle to the More setting. Being careful not to burn the onions, cook until meat has browned, about 5 minutes. Stir often.
Press the Sauté key repeatedly to toggle to the Less setting.
To the pot, add:
1 can (440mL) Guinness® or other dark beer
1 cup low-sodium beef stock
5 cloves garlic, minced
1/4 cup tomato paste
4 sprigs fresh thyme OR 1/2 tsp dried thyme
3 carrots, cut into bite-sized pieces
3 stalks celery, cut into bite-sized pieces
1 tsp white sugar
Stir all ingredients together until evenly mixed.
Press Cancel on the cooker.
Place the lid and turn to lock. Turn the steam release handle to the Sealing position.
Select Pressure Cook, High Pressure, and set for 30 minutes. 10 seconds after settings are set, the cooker will beep three times and display “On” to indicate that it has started the preheat cycle.

While the Instant Pot program is running, you may wish to make:
4 cups mashed potatoes (OPTIONAL***)

When the cooking cycle has finished, the cooker will beep and enter the Auto Keep Warm mode. (If the Auto Keep Warm function has been turned off, it can be turned back on at any time.) Once the cooking is complete, allow the pressure to release naturally for 10 minutes, and then turn the steam release handle to the Venting position to let the steam out for a Quick Release. Once the steam is safely released, remove the lid.
Turn the cooker back on to Sauté > Normal and simmer stew until it has thickened somewhat, about 15 minutes. While thickening, stir regularly, and remove the sprigs of thyme, if using fresh.

Serve stew in soup bowls, either as-is or atop a mound of mashed potatoes with a divot in the middle to hold the toppings.

*I find that bacon is easiest to cut up using kitchen shears.
**Most kinds of beef are good in stew, so use whatever is in your budget. The pressure cooking (or slow cooking, in traditional stews) will transform even the toughest cuts into something you can cut with a fork. Whatever the cut, make sure to cut off the worst of the fat, since the texture can become off-putting.
***I prefer this stew served over mashed potatoes to soak up all of the lovely broth, but many people like it plain.

Christmas Dinner

Christmas dinner is traditionally hosted by my parents. It used to be served on Christmas Day, but after the gigantic breakfast that often lasts until lunch, it seemed kind of overkill. A few years ago by consensus we moved it to Boxing Day, and it has just made everything so much more relaxed.

One of the things that I love about Christmas at my parents’ house is how their brilliantly-lit tree fills up the front window. From the street outside, as you’re pulling in to the driveway, it really welcomes you in. While my parents do have lights strung up outside, the tree outshines them all. I’m told that there are 600 or more lights on there. To compare, our tree only has 200 lights, and it seems positively dim by comparison.

Mom is generally the one who is responsible for the roast turkey dinner, although Dad’s specialty is the Yorkshire pudding. They used to only serve Yorkshire pudding with roast beef dinners, but enough pestering by my brother and I (and then by my kids) over the years convinced them that they were appropriate to any meal served with gravy. Mom’s turkey dinner this year included stuffing, whipped potatoes, mashed potatoes almondine, carrots glazed in my carrot jam, squash with orange juice and walnuts, and of course lots of gravy. It was all delicious! My contribution to the meal was dessert: homemade apple and dairy-free pumpkin pies, baked in advance and reheated in the oven. It always seems a shame to me that a meal that takes all day to make can be scarfed down so quickly, but there is always lots of chatting after the meal as we all digest.

Boxty

I was browsing through articles recently about interesting things to do with Thanksgiving leftovers — Canadian Thanksgiving was over a month ago, but the American one was just last week, and it seemed like every cooking blog on the Internet was talking about it. One of the websites (and I’m sorry that I can’t remember exactly which one, but there were so many) suggested using leftover mashed potatoes to make boxty, or traditional Irish potato cakes. The IrishCentral recipe looked pretty straightforward, so I had to give it a try.

Although it’s not something we ever ate at home, my mother has been raving about boxty for years because there’s a local restaurant that serves it. Apparently the version she had is served with roast beef that is marinaded for twenty-four hours in some kind of whiskey sauce — which honestly sounds delicious, but I didn’t have the ingredients at home. Other topping suggestions I found online were butter and sugar, jam, fresh berries, sour cream and chives, butter chicken, creme fraiche and caviar, smoked salmon and whipped cream cheese, whiskey and mushroom gravy… The list goes on. Basically, boxty can be eaten plain or can be used as a base for sweet or savoury toppings, much like rice or potatoes or bread can be. Personally, I think I’d like to try it as the base for an open-faced hot roast meat sandwich with gravy made with leftovers after a traditional Sunday dinner.

Sadly, we didn’t have any roast in the fridge today, so I had to make do with ingredients that wouldn’t take me another day’s worth of cooking to prepare. I served the boxty with eggs sunny-side-up and Andouille sausages. When I tried the boxty dipped in the egg, I discovered that I’d definitely tried this flavour combination before; my husband’s family likes to throw leftover roast potatoes (chopped) into an omelette, and of course that tastes like potatoes and egg, much like the boxty dipped in egg. It seems really obvious when I write it out like this, but it took me a moment to realize why the flavour was so darned familiar!

Everyone in the family really liked the boxty and requested that I make it again. I honestly wish I’d tried it before! The kids especially liked theirs dipped in maple syrup much like a regular pancake, which is a very Canadian way to do it. In the future I think I’ll try making some of the other topping variations. There are so many delicious-looking ones, though, that it’ll be hard to decide which one to try first!

Thanksgiving Dinner

We celebrated our family’s Thanksgiving last night, and this year I hosted. Usually my mother makes Thanksgiving dinner (and all of the big family get-together meals, really), but my parents were supposed to be out of town. Well, plans changed last-minute, so I ended up scaling up my little family’s dinner to accommodate my parents as well. To be honest, when you’re making a meal this big it’s just a matter of throwing a couple of extra potatoes in the pot and doubling the batch of Yorkshire pudding, but still. I’m pretty sure that this was my first time doing the full Thanksgiving dinner all by myself. Mom even remarked how weird it was to come over to my house and watch me cook for everyone!

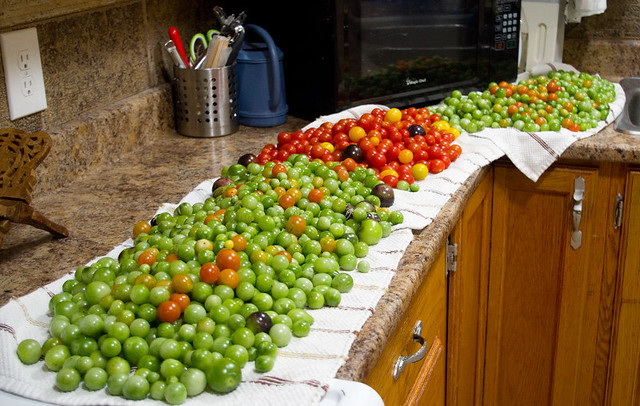
To get everything ready in time, cooking had to begin on Sunday night. The first thing I had to do was make some room in my fridge, which meant making up a big batch of Green Tomato Salsa (page 106, Preserving by the Pint by Marisa McClellan (2014), as well as a smaller batch of Blender Salsa (page 92, also Preserving by the Pint). Six and a half liters of salsa out of the way and I finally had a bit of room in my fridge — although I still have two large containers of green tomatoes to cook up.

Preserves out of the way, I got to the baking. I made my usual combination of the Purity Pastry crust (page 73, The All New Purity Cook Book by Elizabeth Driver, 2001) and the Pumpkin or Squash Pie filling (page 686, Joy of Cooking 75th Anniversary Edition, Rombauer & Becker, 2006). This time I was very careful not to forget the sugar.

Last thing that night, I ripped up two loaves of cheap grocery store bread and left it on the counter to dry out. One of the things my mother has taught me is that if you want good stuffing, you can’t start with fresh bread or it’ll become soggy once it’s baked in the bird. It’s actually better to start with stale bread, which will soak up the cooking juices and become quite flavourful without getting squishy.

When I seasoned my bread for stuffing, I used my mother’s traditional parsley, sage, rosemary, and thyme… And summer savoury. I had Scarborough Fair in my head for about two days.

The next day I stuffed the turkey as densely as possible, shoved pats of butter under the skin, and put it in the oven. I was so afraid that it wouldn’t turn out well; the only other time I cooked a whole turkey, it was extremely dry.

However, I think it turned out really well! I had to take a picture before I scooped out the stuffing for serving.

Another trick I learned from my mother is that because everyone like stuffing (or at least everyone to whom we’ve served dinner), it’s a good idea to make extra stuffing in a casserole dish, and then mix it all together. This also helps alleviate the potential moisture problem; the stuff cooked outside the bird will be dryer, but mixed together it helps absorb the excess moisture from the other kind.

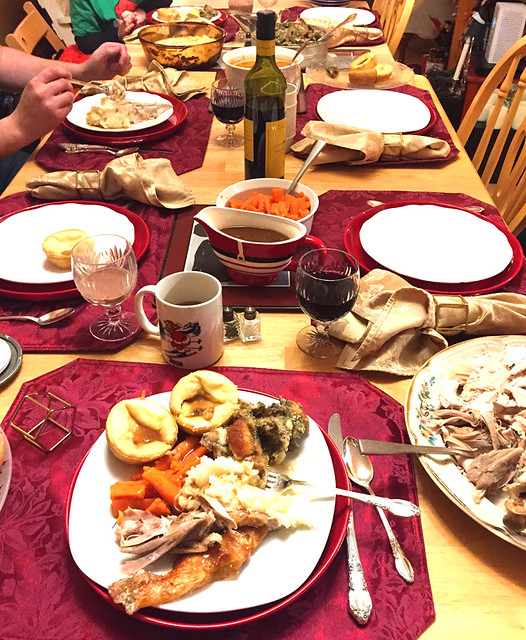
On top of the bird, there were all kinds of side dishes! Circling clockwise, that’s stuffing, Yorkshire pudding, turkey, gravy, potatoes, carrots, asparagus (which ended up being quite bitter, sadly), fresh bread (Bread Machine Fluffy Herb Bread, but with no herbs), and of course more gravy.

In the end, except for the asparagus, I’m really happy with how dinner turned out! I hope that you and yours had a lovely Thanksgiving as well — or that you will have one in November, if that’s when you celebrate.

Last Harvest of the Fall

Yesterday I spent a number of hours out in the back yard bringing in the last of the harvest from my garden. My mother popped by and was nice enough to help out for the low, low payment of some cherry tomatoes. Canadian Thanksgiving happens this coming weekend, which is usually a good marker for when the harvest should be in. Also, we’ve had one light frost already, and I didn’t want to leave the tomatoes out in that. The root vegetables would have been fine, but frost can totally ruin a tomato crop.

I filled one half of my double kitchen sink with tomatoes — mostly green or otherwise unripe ones, true. (The black tomatoes ripen from green, to green and black, and finally to red and black or all black, so they’re often hard and unripe event though they may be mostly darkly-coloured.) It took me ages to wash all of them, but it was worth it! The ripe ones will become the last batch of salsa, while I have a few recipes for the green tomatoes, which include green tomato chutney.

I also harvested a whole bunch of potatoes, enough that when they were washed and stacked they barely fit into my potato bin. I planted two different kinds of potatoes this year — a purple-skinned variety, and a white-skinned variety — but heaven forbid that I wrote down their exact names. Record-keeping was one of the things that this blog was supposed to help me accomplish, but I guess it doesn’t always work out.

I also harvested four good-sized eggplants (not bad considering I only had a few plants), as well as two plants-worth of Jerusalem artichoke tubers. I’ve never eaten these tubers before, so I’ll just have to see if they are any good — and if they agree with my stomach!

Taking advantage of the day’s harvest, last night I made everyone bacon, cheese (cheddar for the others, lactose-free Edam for me), and tomato sandwiches. It would have been much nicer if I’d actually thought of this for dinner earlier in the day, in which case I would have had time to make some fresh bread. But given that bread takes a minimum of three hours to make, I had to send my husband out to the grocery store instead. I asked him to pick up “a loaf of nice bread”, which he interpreted as “a loaf of whole-wheat Dempsters”. I’d say his idea and mine of “nice bread” differ quite strongly…

Too Many Tomatoes

It’s that time of year again when everything seems to be ripe at once and it’s physically impossible to eat it all before it goes bad. Case in point: my tomatoes. I grow predominantly cherry tomatoes, although a friend did give me one black tomato plant that has done very well this year. I just find cherry tomatoes to be more flavourful than most of the larger varieties. And I plant tonnes, since I know that I’ll want to include them in a number of preserves come fall.

Case in point: this is what I brought in from the garden the other day. I think that these tomatoes, and probably the onions as well, will soon become spaghetti sauce. I might even go for the healthy veggie tomato sauce I made last year, and include the eggplant that should be ripe in a few days. (I had a lovely huge one ready to go, and then an animal go to it. Figures.)

At the same time, I had a few small radishes, the last of the cucumbers (the vines were starting to die back), and a few potatoes that were beginning to poke through the surface of the dirt. Something needs to be done with all of this produce before it rots!

The first step for me is to make at least one dinner with the fresh ingredients. I barbecued some chicken thighs with my usual spice mix (parsley, sage, rosemary, thyme, garlic powder, and sea salt), and cooked up some of the potatoes on the grill at the same time. I know that they look very similar post-grill, but the difference was immediately apparent once they were cut open. I added some cherry tomatoes and sliced radishes as a veggie once everything else was cooked. It was a very simple meal, but it was both tasty and easy to prepare — which I needed after spending a couple of hours in the garden!