Thai Coconut Curry Recipe

I’m trying to broaden my culinary horizons further, not only because I love eating new things, but also because I get bored of cooking the same things all the time. To that end, I’ve been perusing cookbooks and browsing YouTube cooking videos to find inspiration. One of the channels that I discovered was Brothers Green Eats (and I say I discovered because they’ve been posting cooking videos for about four years, but they’re new to me). I’ve really been enjoying working my way through their videos, and they’ve given me some great ideas.

This past Saturday I cooked up some coconut curry based on their Cooking “Cheat Codes” – Make Anything Taste Delicious tutorial, with the relevant bits about curry paste and coconut milk starting at about the 5:00 mark). This recipe is customized according to the ingredients that were available locally and seasonally, as well as to suit the tastes and dietary issues of my family. However, it is a very flexible technique that can be used with a wide variety of ingredients. You don’t have to use the brands that I did, either, but I thought it was necessary to note what worked well for me. This dish is dairy-free, and can easily be made vegetarian or vegan by omitting the meat; since it’s added more or less at the last step, the meat doesn’t have a huge amount to do with the development of the flavour. I should note right now that the curry paste that I used is not vegetarian or vegan, but I’m sure you could find one that is, or make one of your own to suit your personal dietary requirements.

I have a feeling that I will be making this recipe over and over again — especially since there are almost infinite variations available.
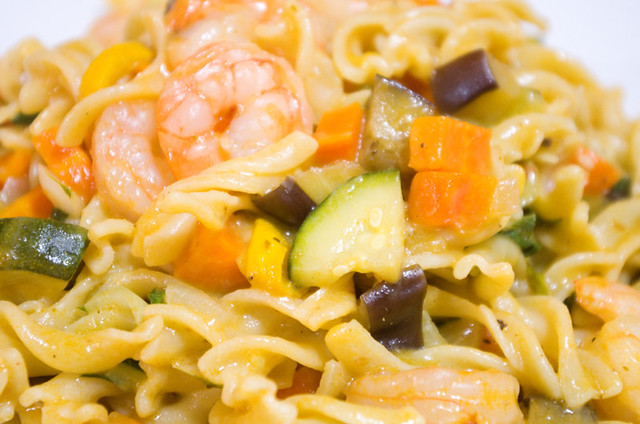
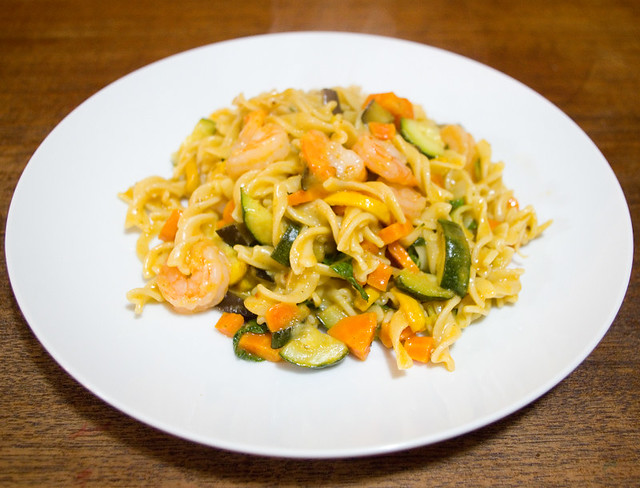
Thai Coconut Curry
Serves 4-6

Preheat oven to 350°F (175°C).
Please note: weight measurements for the vegetables in this recipe are taken after peeling and removing inedible portions like leaves and stems.
Wash and slice:
1 small onion (60g (2oz))
1 small yellow zucchini (200g (7oz))
1 small green zucchini (200g (7oz))
2 medium carrots (200g (7oz))
1 small eggplant (200g (7oz))
On a baking sheet, spread evenly:
2 Tbsp olive oil
1/4 tsp salt
1/8 tsp pepper
Add the sliced vegetables to the baking sheet. Mix them by hand or with a spatula until the vegetables are evenly coated with the oil and spice mixture.
Roast the vegetables in the oven at 350°F (175°C) for between 40 and 60 minutes, turning the veggies in the pan halfway through that time. The vegetables are done when they are tender but before they start to fall apart.
In the last 20 minutes or so of the roast vegetables’ cooking time, steam and drain:
150g (5.25oz) chopped baby bok choy
According to the package directions, cook until al dente and drain:
340g (12oz) medium egg noodles
In a large, deep, non-stick frying pan or non-stick wok, heat on medium heat:
1 Tbsp olive oil
Add to the oil:
3 Tbsp Blue Dragon Thai Red Curry Paste*
Cook for 1 minute, stirring regularly to prevent burning and sticking.
Add to the pan:
one 398mL (13.5fl oz) can A Taste of Thai Lite Coconut Milk
Stir until ingredients in pan smoothly combined.
Add the roast vegetables, baby bok choy, and medium egg noodles to the pan. Stir until all solid ingredients are evenly coated. Add to the pan:
250g (9oz) peeled, cooked shrimp**
Stir until ingredients are heated and coated evenly.
Serve, optionally topping each dish with:
a sprinkle of toasted sesame seeds

* Or curry paste of your choice.
**Or an equal amount of cooked chicken chopped into bite-sized pieces.

Ugly Bread

Ever have one of those days where it doesn’t seem to matter what you do, what you’re working on refuses to turn out quite right? Well, I had one of those days the other day. I made German beer Bread from page 19 of World Breads: From Pain de Campagne to Paratha (Paul Gayler, 2006), which I have made (and adored) many times before and, well…

It turned out ugly. I know I didn’t have a loaf pan to bake it in at the in-laws’ cottage, but I didn’t expect it to turn out so unappealing-looking. I mean, the marbled pesto bread turned out just fine. Maybe this kind of bread really needs a mould to keep it from going so weird. Maybe I used too much flour, or the day was too damp. I don’t know. But I have to say that this is the most unattractive bread that I’ve ever baked.

It still smelled heavenly, and it tasted great slathered in butter and served alongside smoked salmon and sautéed veggies for dinner. Looks aren’t everything, after all. If I had to choose between food that looks good or tastes good, I’d take taste any day of the week. But if I’m going to put that much effort into something, I’d also like it to look at least a little appetizing!

Cottage Bread

While at the cottage, I decided that I should make the bread that everybody would be eating. I started off with a few loaves of crusty white breadmaker bread (yes, I brought the breadmaker to the cottage, we weren’t roughing it by any means). Then I got tired of that and decided to whip up some marbled pesto bread from page 142 of Bread Machine: How to Prepare and Bake the Perfect Loaf (Jennie Shapter, 2002).

I made this bread a little while back and it was an instant hit, so I had to bake it again. This time I cut back the salt on the topping from 2 tsp to 1/2 tsp, which produced a flavour I much preferred. I also didn’t have an appropriately-sized loaf pan at the cottage, so I had to improvise and use a large roasting pan, which the loaf sat inside with room to spare, never touching the sides. This is how I ended up with a more “cottage loaf” look. It still cooked through properly and tasted great, which is what really matters.

The filling I used this time was nasturtium-leaf pesto, which isn’t quite as oily as garlic scape pesto, and has a slightly peppery kick. It was a different flavoring, but very tasty.

As a treat, I whipped up some banana chocolate chip bread while the pesto bread was rising. I just added a bag of semi-sweet chocolate chips to the banana bread cockaigne recipe from the Joy of Cooking app. I baked it in a silicone bundt pan that belongs to the cottage, and though I wasn’t terribly happy with the heat distribution in the pan, it still turned out rather tasty. The kids are it up as fast as I’d let them.

Breakfast With a View

I spent the weekend at my in-laws’ cottage, which is built uphill from a lake and hence commands beautiful views from one side.  (The other sides look into the woods, which is quite pretty, but definitely isn’t expansive.) I love that the side overlooking the lake has a screened-in porch where we can eat meals undisturbed by mosquitos and, in the evenings, moths attracted by the lights. I would love a screened-in porch outside of my patio door, despite the fact that I would only overlook my own back yard. I think that almost every summer meal would be eaten out there.

Breakfast on Sunday was two eggs over-easy, a slice of buttered crusty white bread fresh from the bread maker, a grilled chicken burger patty left over from the previous night’s dinner, and a banana.

And of course, then there was The View. What a fantastic way to start the day.

Clean-Out-the-Fridge Food

A coworker of a friend had a rhubarb plant that was trying to take over the world, so my friend was nice enough to claim the excess stalks for me and then meet up with me so I could get them. Since I knew I wasn’t going to have the chance to use up all of the rhubarb before it went bad, I washed it, chopped it, and divvied it up into portions for the freezer. However, I did set a bit of it aside so that I could make up another batch of rhubarb muffins (125 Best Quick Bread Recipes by Donna Washburn & Heather Butt (2002), page 22).

These muffins are a real hit around my house, and most of the batch of twelve was gone before the end of the day. I didn’t have any oranges or orange juice around the house (and I didn’t want to go out), so I omitted the orange zest and juice from the recipe. Instead I put 3 Tbsp lemon juice and 3 Tbsp sugar into a measuring cup, then added enough water to bring the level up to 2/3 cup. This gave me the proper amount of liquid, but with a bit of acidity and sweetness. The recipe is also for a loaf instead of muffins, but I just greased my muffin tin and filled the twelve sections with the batter, and baked it at the recommended temperature for about 25 minutes. Despite all of the changes, this recipe turned out really well!

Then it was time to make dinner. Once again, I didn’t want to hit the grocery store, so it ended up being a “use up the food in the fridge” kind of day. I thawed some chicken broth that I had made previously, chopped up some leftover chicken and peeled some carrots, then brought that all together to become chicken noodle soup. I even had a chance to use up some of my excess Canadian Eh? Shapes Pasta. I served the soup alongside tabbouleh (the Joy of Cooking (2006 edition), page 362), which was made with parsley and mint from my garden. The bread was day-old improvised white bread which has a whole story of its own behind it, but that tale will have to be told another day. All in all, I was very satisfied with this clean-out-the-fridge meal!

Dill Pickles

By now I am well into seasonal canning mode. Two weeks ago I started with my first batch of strawberry rhubarb butter, and last week I found a great sale on mini cucumbers in bulk, so I had to make dill pickles. We were on the last jar from the batch that I made right before Christmas anyway, and fresh pack dill pickles must rest for at least a month in a cool, dark place before eating to develop flavour. I mean, they’re safe to eat right away, but they taste better after some time.

This is what my canning setup looks like, with some adaptations depending on what food I’m preparing. For large batches or large cans, I tend to have two hot water baths boiling at the same time. The largest pot on the right is actually my pressure canner, but it works quite well as a large hot water canner if I don’t clip the lid closed. The smaller pot near the front is where I brought my pickling liquid to the boil. I’ll admit it, I take the quick and easy route when I make dill pickles and I use Bernardin Dill Pickle Mix. It means that I can completely skip the typical fermentation stage; I just have to wash and cut up the cucumbers, pack them into hot sterilized jars, pour over the pickling liquid, seal, and then process the jars in a hot water bath. This means that I can make up a huge batch of pickles in a matter of a few hours (as opposed to about five days with the fermented method).

This year I tried out a type of jar I’d never used before, ones that have a vintage-look green tint. Normally these jars are about twice the price of the standard clear glass jars of the same size, but I was lucky enough to find a whole bunch of them at $4.00 for a six pack ($0.66/jar) at, of all places, Dollarama. I bought out that location’s entire stock. I mean, a twelve pack of the same size regular jar at Canadian Tire currently goes for about $12.99 ($1.08/jar), so it was definitely a bargain.

One of the reasons that coloured jars used to be considered better for canning purposes is that they allow less light to pass through the glass, and hence the food stayed good longer. Exposure to sunlight can cause canned goods to decompose faster and/or to discolour, which is why historically most food storage is in a cool, dry, dark place. The coloured glass is just one more way to help. These days, though, it’s mostly a fashion thing, a hearkening back to the old-fashioned canning jar look. I personally think that the green-tinted jars are great for pickles (or any other green preserve), but that they’d sadly make different-coloured foods look like they’d gone off in the jar. Even if the food was fine, it might not be eaten just because of its looks. I mean, have you ever tried to eat green eggs and ham? I know that even when I make the eggs myself and am sure that they are safe, I can have a difficult time choking them down because my brain is telling me that they’ve gone off because of the colour. So I think that I will stick to using the green jars for cucumber pickles, or for crafts or storage where the colour doesn’t matter.

Maple Rhubarb Crisp & Maple Leaf Cookies

I was trying to be as Canadian as possible this week and made maple rhubarb crisp from the recipe on page 116 of Sweet Ontario Pure Maple Syrup: Our favourite Maple Recipes, which is published by the Ontario Mable Syrup Producers’ Association. I picked up a copy of this cookbook this past weekend at the Cumberland Farmers’ Market, which is where I also picked up the rhubarb for the recipe. I didn’t purchase any good Ontario maple syrup at the time, but only because I already had two big jugs in my fridge. Can’t get much more local than that!


Maple rhubarb crisp topped with non-dairy whipped topping

I was really happy with how this recipe turned out. The crisp was the perfect blend of sweet and tart. I’m really looking forward to trying other recipes in this cookbook, such as the french toast casserole and maple BBQ chicken.

Of course, I had to check out some of the Canada-150-themed foods that are being sold in preparation for the big day. The above cookie was from a two-cookie decorating kit that retails at Walmart for $1.50. They aren’t half bad, given the price! My kids are going to decorate their own tomorrow. For an American company, Walmart carries an awful lot of Canadiana. But as the Arrogant Worms quipped in The Mountie Song:

“Where would you get a tank?”
“Walmart.”
“Oh.”

Speaking of the Arrogant Worms, here’s their song Proud to be Canadian, from the album Live Bait.

I hope you all have a safe and happy Canada Day!

Ketchup Chip Chicken & Canada Day Rice Krispies Squares

It’s a hectic time of year, what with the kids’ end of school and all of the events that that entails, and all of the preparation for Canada’s 150th. So last night I focused on easy, stress-free food.

For dinner I whipped up some ketchup chip chicken, rice, and sliced gala apples. I’d read somewhere that it’s possible to use crushed potato chips as breading, and apparently ketchup chips are only available in Canada, so I combined the ideas for this celebration-themed meal. To bread the chicken thighs, I first dredged them in flour, then dipped them in beaten eggs, and then finally rolled them in ketchup chip crumbs. About 40min in the oven at at 350°F (175°C) on an oiled broiler pan, and it was done. While the chicken was cooking, I steamed my rice and chopped up my apples, and dinner was complete.

Not surprisingly, if you use potato chips as a breading, the final product ends up tasting like the flavour of chips you choose. The smell of this chicken strongly reminded me of hot dogs; perhaps the smell I associate with hot dogs is really that of warm ketchup and vinegar. The chips provide a nice crunch that I think would work equally well on the barbecue or, if you’re feeling really decadent, deep fried.

I also had to make up treats for my kids’ school Canada Day celebration, so I went with the time-honoured last-minute classic of Rice Krispies Squares using the microwave version of the recipe found on the box (and online). I used maple-flavoured marshmallows instead of regular ones for a more Canadian twist.

To make the treats look more appropriate for the holiday, I sprinkled them with red and white sprinkles. The presentation wasn’t all it could have been, but I wanted to use recyclable dishes so that I didn’t have to worry about the kids breaking them or not bringing them home. After making these squares, I kind of felt like the woman in the old Rice Krispies commercial, except I definitely haven’t had the chance to indulge in a good book!

Poutine & Cupcakes

Continuing this week’s pre-Canada-150 lead-up, I’d like to start with some iconic Canadian music: The Log Driver’s Waltz. The song became an integral part of art culture in Canada in 1979, when an became the soundtrack of arguably the most popular animated short in the Canada Vignettes series released by the National Film Board. The short, along with the other Vignettes, was aired on the CBC (Canadian Broadcasting Corporation) between programs as filler, so it was very possible to catch this song multiple times a day throughout the 1980’s. There is also a French-language version entitled La valse du maître draveur. The chorus of the English version is as follows:

For he goes birling down and down white water
That’s where the log driver learns to step lightly
Yes, birling down and down white water
The log driver’s waltz pleases girls completely

Birling, by the way, isn’t a word in common parlance even in Canada (at least not anymore), but it according to the the Free Dictionary, it is “a game of skill, especially among lumberjacks, in which two competitors try to balance on a floating log while spinning it with their feet. Also called logrolling.”

The timber trade in general is a huge part of the history of Canada as a whole, and the Ottawa area in particular. The trade blossomed in the early 1800’s, with log rafts and booms being a common sight on the Ottawa River for over a hundred years. Related trades played a large part in the development of the city, with a large number of local trades becoming part of the cultural landscape in the sawmills and their later cousins the pulp and paper mills.


Homemade poutine

The timber industry was dominated by backbreaking labour, what would now be called blue-collar work, and in a similar vein, the famous French-Canadian dish of poutine is considered a very blue-collar dish (although honestly everyone eats it, no matter their level of wealth). Poutine would probably have been appreciated by log drivers, but it didn’t come into being until the 1950’s, when the local trade was on its last legs. Poutine is a mouth-wateringly delicious pub grub combination of french fries, cheese curds, and gravy. The one that I made yesterday, pictured above, also had chunks of the ground beef that I used to make the gravy from scratch. I made the fries using the Baked French Fries I recipe on Allrecipies — although I set the oven to 400°F (205°C) instead of the higher temperature in the directions, as per suggestions in the comments. Poutine may look like a hot mess, but it tastes fantastic, and it’s particularly good while/after a few drinks.


Strawberry cupcake with buttercream icing & a maple-leaf-shaped strawberry gummy

Of course, you have to follow a meal of meat and carbs with dessert, right? My family ate these strawberry cupcakes with buttercream frosting following the poutine (I don’t know how they had any room left). The cupcakes were Sprinkles’ Strawberry Cupcakes from Martha Stewart. They came out looking great, but I was a little disappointed in the flavour; I’d hoped they would taste more like the strawberry puree that was in the batter, but mostly what I could taste was vanilla. Originally I had planned to make a maple buttercream frosting, but I don’t know what I did wrong and the frosting separated as soon as I stopped mixing. I was so disappointed! I ended up using store-bought Duncan Hines buttercream frosting (which contains neither butter nor cream), which was a blow to my pride, but at least my friends with milk allergies could eat it. And hey, the cupcakes looked red and white for Canada Day!

Vegan Mac ‘N’ Cheese: Canadian Edition

A friend of mine sent me a link to the Gotta Have It Vegan Mac ‘N’ Cheese recipe from Tasty (video available here), since they know of my love for macaroni and cheese, but I’m currently forgoing dairy. I gave it a try the other day, and I have to say it was actually pretty good. As I’ve found with so many dairy-free or vegan versions of other recipes, it was a little bit off from what I’m used to, but this one was tasty enough that my kids asked for seconds, which is a pretty good recommendation in our house.


Vegan mac ‘n’ cheese in the “proper” macaroni and cheese casserole dish.

One thing that I found was that the “cheese” had a problematic texture. Even when I got it to the proper consistency, it thickened really quickly as soon as it started to cool. The vegetable puree was just starch on top of the starch of the noodles, with no fat or oil to smooth it out and make it flow. I think that the addition of an oil of some kind (olive or canola) would greatly improve the texture of the sauce. Additionally, this sauce could be used as the start of a number of different kinds of casseroles. I think adding cooked vegetables (for the vegans) or canned salmon/tuna would add some variety and flavour.


Vegan mac ‘n’ cheese with a side of steamed sugar snap peas drizzled with Heinz Sweet Teriyaki & Ginger Vegetable Sauce.

I think the reason I keep wanting to add things to this recipe is that the base flavour was incredibly bland. When I made this recipe for my family, I used the seasoning ideas in my mom’s homemade macaroni & cheese recipe and added 1/2 tsp Worcestershire sauce and 1/2 tsp table mustard. Also, I didn’t find that I needed an onion and onion powder; just the fresh onion would have sufficed. I think that the flavour of the sauce could have been boosted by using a clove of fresh garlic instead of garlic powder.

So would I make this recipe again? Most likely, but with all the modifications I’ve previously mentioned. I mean, there are a dozen changes and versions that have been made to my family’s mac ‘n’ cheese recipe, so don’t take it as a bad thing that I would do the same to someone else’s dish.


Canadian Eh? Shapes Pasta

Now, what made this vegan mac ‘n’ cheese particularly Canadian? I used Canadian Eh? Shapes Pasta, which is available at Bulk Barn. The shapes are a bear, a maple leaf, and a moose. Sadly, the shapes were mostly obscured by the “cheese” sauce; I think these noodles would work better in soups if you want to see the shapes. However, they tasted just fine! I have extra that will probably make their way into my lunch for the Canada Day weekend. Oh, and they’re also all-vegetable, if you’re trying to keep your pasta dishes vegan.

Oh, and on a semi-related pre-Canada-Day note, I present you with the Arrogant Worms and their “anthem” called Canada’s Really Big. Enjoy!