Sick Day Part 2

I’m at the tail end (hopefully) of recovering from my cold, and unfortunately my kids have caught it too. Well, they might have been the ones to bring it home in the first place, elementary school being the wretched hive of scum and villainy that it is. At any rate, I kept the kids home from school yesterday in an attempt to speed up their recovery.

I gave the kids the option of homemade chicken noodle soup for dinner, since it’s a traditional kind of food to eat when you’re not feeling well. They vetoed this idea, and I was willing to be vetoed, as I hadn’t actually started cooking anything yet. At first they voted for instant mac-and-cheese, which I said no to. I can’t tell you how much it frustrates me that it doesn’t matter how many original and tasty meals I prepare, they’d live off of 99¢ dried pasta with powdered cheese sauce, given half the chance. Next they argued between themselves between bacon and eggs and trout with teriyaki sauce over rice. A quick trip to the grocery store brought the decision firmly down to bacon and eggs, since trout was not on special.

So our family dinner last night was eggs over easy, reduced-salt bacon, freshly baked Light Wholemeal Bread (Bread Machine: How to Prepare and Bake the Perfect Loaf (Jennie Shapter, 2002), page 69), and a side of sliced strawberries with a sprinkle of sugar. The girls were even up to hulling and slicing the strawberries. All in all, not a bad dinner for a house full of sickies!

Halloween Party Leftovers

After about a week of junk food and candy, I thought it was about time to start making some healthy food again. I needed (and still need) to use up some leftover food from the Halloween party on the weekend before it goes bad, so dinner planning for the last few days has been centered on that.

On Monday night I improvised some sushi bowls, which contained garlic shrimp (from my freezer), smoked salmon (leftover), lumpfish caviar (which I had meant to put on the deviled eggs and then completely forgot about), avocado slices, and steamed Swiss chard (from my garden) in a drizzle of teriyaki sauce. I was looking for a better way to serve Swiss chard that my kids might actually eat, and although this wasn’t horrible, I don’t think it was all that great either. I need to experiment more.

Last night’s dinner was French toast and apple slices. I think that French toast looks absolutely hilarious when it’s made with Voodoo Bread. I mean, it tasted just like normal Nan’s Pan Rolls bread dipped in eggs and fried, but the colours definitely made it much more fun. My kids are really into this “rainbow bread”, as they call it. Perhaps I could make it in different colours for other holidays, even if I can’t quite get it into the proper swirl.

Halloween Party Food

I hosted our family’s annual Halloween party this past Saturday, and of course that meant lots of food. I put out bowls of chips, Cheetos (the “Bag of Bones” kind that are shaped like dismembered skeletons), pretzels, cheese & crackers, a shrimp ring, a meat tray, a veggie tray, and fruit. And then I added the food that I’d actually cooked.

Salsa and guacamole served with black corn chips are a perennial favourite, but I had fun with the presentation this year. I got the idea to use the “puking” pumpkin from a BuzzFeed 7 Terrifying Halloween Food Ideas video. The guacamole was store-bought, but the salsa was the Blender Salsa (page 92, Preserving by the Pint: Quick Seasonal Canning for Small Spaces (Marisa McClellan, 2014)) that I’d canned earlier this season. I did want to try the “Rotten Deviled Eggs” from the same BuzzFeed video, but I ran out of time and just ended up making normal deviled eggs instead. They went over well anyway, and disappeared quickly.

I did a huge amount (at least for me) of baking in the days leading up to the party so that I could serve a wide variety of sweets. I made Applesauce Cake (page 720, Joy of Cooking by Irma S. Rombauer et al, 2006 edition) into cupcakes, which I iced with Quick Brown Butter Icing (page 794, Joy of Cooking). When I was preparing the batter for the cupcakes, I put the margarine (which I had substituted for butter) in the microwave to soften it… And then I forgot about it. I didn’t realize I’d left it out of the batter until the cupcakes were already baking in the oven. They turned out okay anyway, but they were a little drier than I’d have liked.

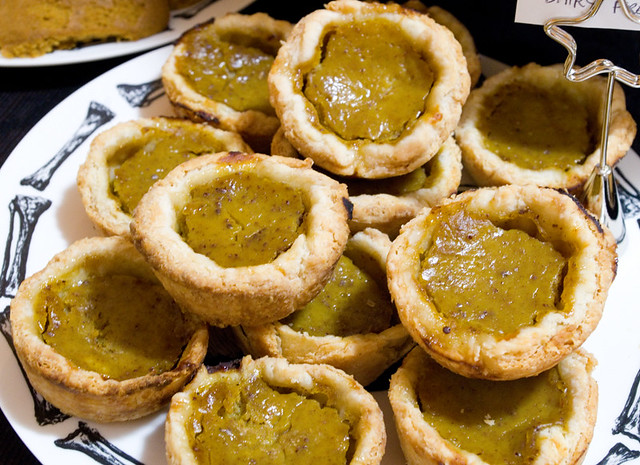
I made pumpkin pie tarts using the Purity Pastry crust (page 73, The All New Purity Cook Book (Elizabeth Driver, 2001)) and Pumpkin or Squash Pie filling (page 686, Joy of Cooking). To make the pie dairy-free, I used canned coconut milk instead of heavy cream or evaporated milk. I wasn’t the only person who was going to be at the party who has issues with dairy, so I tried to avoid it whenever possible when cooking this time.

I forgot to include this find when I wrote about thrifting a while back, but I did find a cookie press for about $4.00. I’ve always loved spritz cookies; they were a favourite when I went to bake sales and bazaars, but I couldn’t make them at home since I didn’t have the appropriate tools.

I guess most people would associate this kind of cookie with Christmas rather than Halloween, but there’s nothing saying they can’t be eaten any time, really. I used the Spritz Cookies recipe from page 248 of The Canadian Living Cookbook (Carol Ferguson, 1987), which calls for butter, but I substituted margarine. Not surprisingly, the cookies weren’t as buttery as they could have been, but they were still pretty darned good.

Some time ago I asked one of my friends for her all-time favourite cookie recipe, and she said it was Elevator Lady Spice Cookies on page 99 of The I hate to Cook Book (1966 edition). I’d been looking for an excuse to try them out. Given the powdered cloves and ginger in the recipe, these cookies remind me a bit of a ginger snap in flavour, but with a less brittle texture. As a bonus, this recipe doesn’t contain any dairy in the first place, so I didn’t have to make any substitutions (like many older recipes it uses lard instead of butter as the fat, since it is cheaper).

I made these soft, moist cookies using the Pumpkin Cookies recipe from the Canada Agriculture and Food Museum. To make them dairy-free, I substituted margarine for butter and almond milk for cow’s milk. These were a big hit and a number of my friends asked if they could take a few home with them!

I splurged at the dollar store and bought some mini muffin tins so that I could make some miniature Double Chocolate Zucchini Muffins. Since there is milk in the chocolate chips and these wouldn’t be the same without them, I didn’t even try to make this recipe dairy-free. They’re still a fan favourite; out of three dozen mini muffins, I only had three left over after the party, which all mysteriously disappeared first thing the next morning.

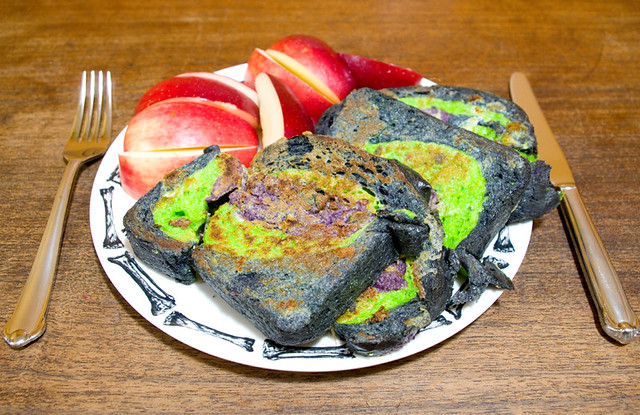
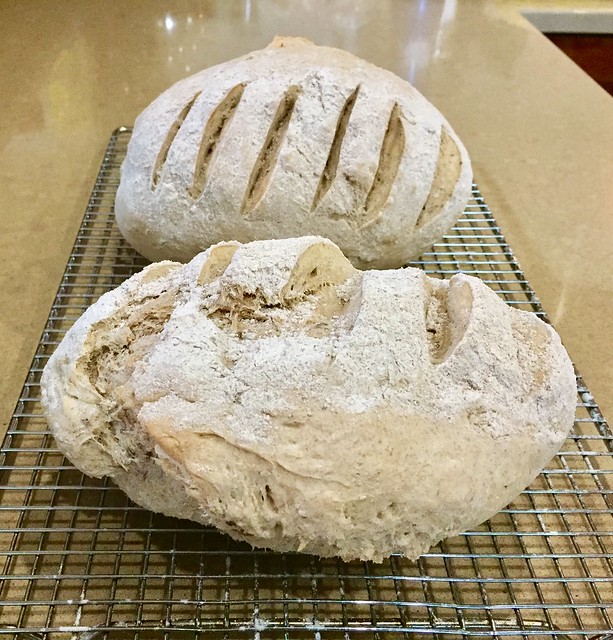
At my friends’ request, I made up another loaf of Voodoo Bread. I learned from my mistakes and used gloves when I kneaded the bread this time. I still didn’t get the well-defined swirl that I was looking for, but it was still a really cool-looking bread.

Not pictured because I forgot, I also had three bread machines going at the same time and made three different kinds of bread, all from Bread Machine: How to Prepare and Bake the Perfect Loaf (Jennie Shapter, 2002):

– Egg-Enriched White Loaf (page 67), where I substituted equal amounts of olive oil for the butter in the original recipe.
– Light Rye and Caraway Bread (page 75), where I substituted canola oil for sunflower oil (I have a friend who is violently allergic to sunflowers), and I omitted skimmed milk powder, simply adding 1 Tbsp water.
– Golden Pumpkin Bread (page 167), where I made a lot of changes because I was missing a bunch of the ingredients called for in the recipe. I substituted whole wheat flour for cornmeal, maple syrup for golden syrup, almond milk for buttermilk, and I omitted the pumpkin seeds. Despite all of the changes, it still turned out great!

Last but not least, I made up a batch of Cookie Monster’s Famous Cookie Dough, which is a favourite recipe of mine since my childhood. I used margarine instead of butter, but the recipe calls for either, so it still tastes nigh on identical to what I remember. With my parents’ help, my kids rolled out the dough, cut it out, and then painted it with a glaze made of egg whites/yolks (depending on the colour) mixed with food colouring. Even with all of the different dishes that I put out for this party, the Cookie Monster Cookies were my favourite. All of the other food was good, but you can’t beat nostalgia.

Another dish I would like to try, but I ran out of time, was Tasty’s Peek-A-Boo Pound Cake. Perhaps I could make something similar for Christmas with a different shape inside?

Halloween Bread Trials

A friend who knows me really, really well recently sent me a link to the Necro Nom Nom Nomicon — more specifically, to the instructions for how to make Brimstone Bread. This is totally up my alley, especially this time of year. The photos are spectacular, and the instructions seemed pretty clear, so I knew I had to at least try this recipe for my upcoming Halloween party. That being said, I also thought it would be the better part of valour to give the recipe a try before I depended on it on the day of the party. That’s never a good time to experiment with new dishes.

I was really happy with how the finished rolls looked! I didn’t have any instant bread mix, so I whipped up some of the dough for Nan’s Pan Rolls, which I have baked so many times now that I find them extremely simple. I only made up half of the recipe, since this was just a test, and then I divided the dough in half again to try the Brimstone Bread alongside a second recipe. I found the bread tasted pretty good (not surprising since I rather like Nan’s Pan Rolls), but I wasn’t terribly fond of the taste of the blackened crust. I’m wondering if it would taste better as a sweet roll, like an apple cinnamon roll with a sweeter, spiced topping. I think I need to experiment more on this one for the flavour, but the technique is sound.

The kids loved this roll, and were thrilled to see that the colour was part of the bread and not just an icing or some such. I will probably be making this bread again for the party if only for this reason.

My husband pointed out to me that the dough, when thoroughly saturated with food colouring, strongly resembles PlayDoh. I have to say that I agree. However, PlayDoh doesn’t rise, and it’s a lot easier to shape than a well-kneaded bread. The latter likes to snap back to its original shape.

Another thing to keep in mind when working with high concentrations of food colouring is that it will stain your hands and nails. Most of the colouring wore off within a day or so, but if you have to make a first impression after making these breads, wear gloves. The black dye is especially potent — this photo was taken after thoroughly scrubbing my hands. To protect your clothes, I’d suggest wearing an apron as well, or just wearing clothes that you don’t care if they get stained.

On the other hand, once the dye is worked into the dough and baked, it doesn’t rub off onto everything and stain. This is the complete opposite of coloured icing. It’s a great argument for serving dyed bread at a party when it can be pretty much guaranteed that one of the guests will spill something somewhere, usually on the one surface that you can’t easily clean and yet will show every stain.

The second half of Nan’s Pan Rolls dough went into making a miniature loaf of Voodoo Bread. I was a little worried that the crust might end up being too tough after changing the formula a bit with the dye, but it just ended up being a tiny bit more crispy.

I think I really should have made a full-sized loaf of this one, actually, to show off the internal swirls. There just wasn’t enough dough to do a proper roll. Even so, I am very satisfied with this recipe and I plan to make it for the party. My youngest is even more enthused with the Voodoo Bread than the Brimstone Bread, partly, I think, because she calls it Rainbow Bread. I think that I might try making this bread in different colours for special occasions once I have mastered the swirl technique. Also, I think I’ll use a lighter purple dye for the Halloween party loaf.

Harvest Garden Bread Recipe

Last week Thing 1 and I tried our hands at making Confetti Bread (page 67 of The Complete Guide to Bread Machine Baking from Better Homes and Gardens (1999)). While in general I really like this book and I have found its recipes to be quite reliable, this loaf did not turn out as planned. It looked like this:


Failed Confetti Bread

The poor, sad thing just didn’t rise. The loaf was much too dense and wasn’t even baked the whole way through. The cookbook even warns that you might have to add additional flour to the dough after the first knead (which I did), and it still fell flat. I think that this is because a bread machine recipe just can’t predict the moisture content of the vegetables, and bread machines need very precise measurements because they just can’t compensate for change on the fly.

However, the loaf smelled absolutely delicious when it was baking, and the flavour of the bread backed up that smell. Well, except for the red pepper part, but that’s probably just my preference (I’m not a real fan of sweet peppers). I was inspired to try to create a similar loaf by hand to get all of those flavours that I liked, but I wanted it to be a nice fluffy loaf with a crisp crust. As a bonus, this recipe includes both zucchini and carrots, which many gardeners have an overabundance of this time of year. (If you don’t garden, these veggies are also cheap in stores in the fall.) I was very happy with the result.


Successful Harvest Garden Bread

So here’s the recipe:

Harvest Garden Bread
Yields one loaf

Line two small bowls with paper towel or clean dish towels.
Grate separately:
3/4 cups carrots
2/3 cups zucchini
Place the carrots into one bowl and the zucchini into the other. Leave them in the bowls so that the towels absorb excess moisture while you perform the next steps.
In a large bowl, mix together:
1 cup warm water
2 Tbsp olive oil
1 egg yolk
1/4 cup finely sliced green onions OR chives
In another large bowl, mix together:
4 cups all-purpose white flour
1 1/2 tsp white sugar
1 tsp salt
3/4 tsp dried thyme OR 2 1/4 tsp minced fresh thyme
2 tsp quick-rise instant yeast
Squeeze the zucchini and the carrots in their towels to remove excess moisture. Add the vegetables to the bowl containing the liquids and stir.
Gradually mix the dry ingredients into the wet ingredients. When mixture becomes too difficult to stir with a spoon, turn it out onto a lightly floured surface and continue to incorporate the ingredients by kneading.

Once all ingredients have been kneaded in, the dough may be too moist, sticking to both your hands and the kneading surface. If so, you may need to gradually add:
up to 1/2 cup all-purpose white flour
This additional flour will compensate for the moisture of your vegetables. If the dough is still too sticky once the additional flour has been kneaded in, continue to add flour one tablespoonful at a time until the desired consistency is reached.

Oil a large mixing bowl. Form the dough into a ball and place it in the bowl. Cover the bowl with a clean, damp tea towel. Place the bowl in a warm, dry area with no drafts. Allow the dough to rise until double, about 2 hours.

Punch down the dough. Grease a 9.5″ X 5.5″ loaf pan. (A slightly smaller loaf pan may be used, but you will end up with a more mushroom-shaped loaf.) Shape the dough into a loaf to fit the bottom of the pan. Cover the pan with a clean, damp tea towel and allow to rise again until double, about 1 hour.

Preheat your oven to 400ºF (204ºC).
While oven is preheating, mix together:
1 egg white
1 Tbsp cold water
Brush the top of the dough evenly with the egg & water mixture to create a glaze.
Bake loaf for 30 to 40 minutes, until top of loaf is lightly browned and the loaf sounds hollow when removed from the pan and tapped on the bottom.

If you try out this recipe, I’d love it if you’d leave a comment and let me know what you think! And if you make any changes or if you find any errors, I’d love to know that too.

Oven-Baked Oatmeal Wheat Bread Recipe

Out of sheer curiosity, back in May I tried out the recipe for Microwave Oatmeal Wheat Bread (page 128, Basic Microwaving by Barbara Methven, 1978). The loaf ended up having a heavy, hard, and, chewy without actually being crunchy. It wasn’t horrible, but I didn’t see myself ever cooking it in the microwave again.

I did promise myself that eventually I’d try to recreate this dish in the oven, and this week I finally got around to it. As I had suspected, the issue with the texture had nothing to do with the ingredients and everything to do with the cooking method. When I prepared this loaf the standard way for an oven, it was still dense — but that is to be expected when you use ingredients like whole wheat flour, oatmeal, and molasses. However, it was not chewy at all; it was lighter in the middle with a thin, crisp crust. The dark flavour of the bread went well with roast meats, deli meats, and cheeses — or just on its own with butter.

Without further ado, here’s how I made this bread in the oven:

Oven-Baked Oatmeal Wheat Bread
Yields one loaf

In a large mixing bowl, stir together:
1 cup whole wheat flour
1/2 cup rolled oats (not instant)
1 package (7g) quick-rise instant yeast
1 tsp salt
1 Tbsp sugar
Add to dry ingredients:
1 cup warm water
1/3 cup cooking molasses*
1/4 cup lard, melted
Stir wet ingredients into dry ingredients until they are evenly mixed. Gradually mix in:
1 1/2 to 2 cups all-purpose flour
After the majority of the flour is added, transfer the dough to a floured surface and start kneading. Gradually knead in the remainder of the flour. If the dough starts to become difficult to knead, stop adding flour. When flour is fully incorporated, dough should be smooth and elastic, but not sticky. If dough is sticky, add all-purpose flour 1 Tbsp at a time until stickiness abates.

Knead for an additional five minutes, until dough is smooth. Oil a large mixing bowl. Form the dough into a ball and place it in the bowl. Cover the bowl with a clean, damp tea towel. Place the bowl in a warm, dry area with no drafts. Allow the dough to rise until double, about 1 1/2 to 2 hours.

Punch down the dough. Grease a cookie sheet. Shape the dough into a ball, then flatten it into a thick, circular loaf. Put the dough on the center of the greased pan. Cover the pan with a clean, damp tea towel and allow to rise again until double, about 1 1/2 hours.

Preheat your oven to 375ºF (190ºC). Bake loaf for 15 minutes. Turn heat down to 350ºF (177ºC) and bake for about 15-20 minutes more. Check to see if the bread is done by removing it from the cookie sheet and tapping it on the bottom. When cooked through, it should make a hollow sound. Remove the bread from the pan immediately and place it on a wire cooling rack. Slice and serve immediately, or allow to cool thoroughly before wrapping in plastic to be eaten later.

*Fancy molasses may be substituted for cooking molasses, but if you do so, omit the sugar.

Potluck Dinner

Last night I attended a potluck dinner held in honour of a members of my husband’s extended family visiting all the way from Germany. For the occasion, my in-laws rented the party room in their friends’ posh apartment building, which was the fanciest location in which I have ever attended a potluck. However, the view of the Rideau River and Rivierain Park were gorgeous coming up onto sunset. (I’m assuming the views of downtown at sunrise would be equally spectacular, but at by evening the sun was too much in our eyes to appreciate it.)

Given that the guests of honour were international, I went all out and cooked up a storm of dishes to bring along. I wanted them to get a taste of the favourite Canadian dishes that I grew up with.

On the far left is the fancy version of my mother’s potato salad (recipe here). At the center is maple pecan butter tarts, using the recipe found on page 234 of The Canadian Living Cookbook (Carol Ferguson, 1987). Despite these being one of my absolute favourite desserts ever, this was my first time ever baking them. I think they turned out rather well, although the filling did overflow the crust a little bit. Lastly, I made up a batch of my Nan’s Pan Rolls.

I always worry that my cooking won’t hit the right note with the guests at a party, but this time every last bit of food I brought was consumed. I actually should have made a double batch of the potato salad, because a number of people came back for seconds and were audibly disappointed when there was none left. I got quite a few compliments on the rolls and tarts, too, but I think the potato salad was the biggest hit. The German grandmother hunted me down and made sure to make it clear, in her few words of English and copious hand gestures, that she absolutely loved it. I couldn’t be more pleased.

IKEA Market Food

I headed out to IKEA the other day to pick up some cheap picture frames. Of course, I bought the wrong size and now I have to make a return trip, but that’s another story. As I often do, I browsed the “market” on the way out for new foods I have yet to try, and I was not disappointed.

The first thing I found that was new to me was Brödmix Flerkorn multigrain bread baking mix. I had previously made their lemon muffin mix and chocolate muffin mix, which are packaged similarly in a milk-carton-like container. Like the muffins, the bread mix is a “just add water” type, but this time the instructions specify warm water (to activate the yeast). This mix is vegetarian/vegan, which makes sense as it’s easier to keep foods without eggs, dairy, or milk shelf stable.

The bread mix turned into a lovely, heavy loaf that pairs well with cheese, sliced meats, and eggs. The bread is very dense as it is filled with sunflower seeds and contains rye flour and barley malt in addition to wheat flour. This was honestly the easiest bread I have ever baked: just add water, shake, pour into a greased pan, allow to rise, and bake. No kneading! Even if you’ve never baked bread before in your life, you’d be able to make this stuff.

The second item I picked up was Kalles Kaviar, which is a creamed smoked fish roe from Sweden. I’ve seen this in the fridge at IKEA many times, but I’d never gotten around to trying it until now. I like all kinds of fish roe, so I figured that I would like this. And overall it was pretty good, with that lightly fishy taste that I’ve come to expect from fish roe… But it was also really, really salty. Possibly too salty for me.

Not to be deterred by a first experience, I Googled to find the typical way that Kalles is eaten. Apparently the most common way to eat it is with dark rye bread with seeds (which I oh-so-conveniently had just made) and eggs for breakfast. Now, I made my eggs sunny side up instead of soft-boiling them, but I figured the flavour would be pretty similar. And do you know what, just a little bit of the kaviar with a mouthful of toast and eggs is a great combination. It’s still awfully salty, though, so if you’re not used to it, I recommend eating it only in small quantities.

Bread and Soup

I wasn’t feeling super-adventurous yesterday, so I stuck with a few recipes that I knew generally go well. First was a poppy seed loaf (Bread Machine: How to Prepare and Bake the Perfect Loaf (Jennie Shapter, 2002), page 138). Much to my surprise, my husband, who generally doesn’t cook much, actually is getting into this whole breadmaker thing; he whipped up this loaf a couple of times before I tried the recipe myself. This loaf is light and fluffy, but the seeds add a lovely crunch, and the crust is golden and crispy even when cooked on the “light crust” setting.

One thing we’ve learned about cooking from this book is that my bread machine (the Black & Decker All-In-One Deluxe Horizontal Breadmaker) is really a medium-sized machine according to this book, while I had thought it was a large. A medium-sized machine is defined as ones that “make loaves using 450-500g/1lb 2oz/4-4 1/2 cups of flour” (page 7, Bread Machine). Now, you see, I would have known that if I’d been paying enough attention, but for some reason I assumed my machine had a larger capacity than it does, and I directed my husband to make the largest version of the white bread recipe (page 66) for his first try at breadmaker baking. Well, while the bread was rising it expanded so much that it pushed the lid open and the dough started oozing out of the bread machine. My husband punched the dough down and cut some of it out, and that seemed to be the solution until the start of the baking cycle, when the dough pushed the lid open again once the temperature increased. At that point we were worried that the dough might continue to grow and slide down the side of the pan and onto the heating element, possibly resulting in a fire. So my husband rescued the dough and I prepped two small loaf pans, and we finished up the bread in the oven. Because the bread had started to cook a little in the breadmaker, the consistency was a little off, but it was still edible (and a darn sight better than some store-bought bread I have tried). Since this fun episode, we’ve been using the recipe for a medium-sized bread machine and we have yet to have any problems.

Yesterday I also went back to my old standby of udon noodle soup for dinner, which always uses the same technique but ends up slightly different every time. I used homemade chicken broth seasoned with a dash of soy sauce and a tiny bit of dashi granules. The toppings were soft-boiled egg, precooked shrimp, raw enoki mushrooms, steamed bok choy, steamed carrots, nori, seasoned capelin caviar, and raw chopped green onions. The rest of my family also had fish balls in their soup, but I’m not a huge fan.

Ugly Bread

Ever have one of those days where it doesn’t seem to matter what you do, what you’re working on refuses to turn out quite right? Well, I had one of those days the other day. I made German beer Bread from page 19 of World Breads: From Pain de Campagne to Paratha (Paul Gayler, 2006), which I have made (and adored) many times before and, well…

It turned out ugly. I know I didn’t have a loaf pan to bake it in at the in-laws’ cottage, but I didn’t expect it to turn out so unappealing-looking. I mean, the marbled pesto bread turned out just fine. Maybe this kind of bread really needs a mould to keep it from going so weird. Maybe I used too much flour, or the day was too damp. I don’t know. But I have to say that this is the most unattractive bread that I’ve ever baked.

It still smelled heavenly, and it tasted great slathered in butter and served alongside smoked salmon and sautéed veggies for dinner. Looks aren’t everything, after all. If I had to choose between food that looks good or tastes good, I’d take taste any day of the week. But if I’m going to put that much effort into something, I’d also like it to look at least a little appetizing!