Vegan Cheese

My friends know that I’ve been looking for dairy alternatives lately because, as I have mentioned before, I love dairy, but it doesn’t love me back. One of my friends send me a link to the Vegan Cheese recipe and tutorial video by The Buddhist Chef. The video makes it look really simple, so I thought hey, why not give it a shot?


Vegan cheese molded in a bowl instead of a ramekin, hence the dome shape.

My first hurdle was sourcing the ingredients (although I had many of the basics at home). My local Bulk Barn carries roasted, unsalted cashews, and nutritional yeast. The agar agar powder, on the other hand, was difficult to find. Bulk barn didn’t carry it, and most of the health stores I tried normally carried it, but were experiencing supply issues. I finally found the powder at Kardish, at about $12 for 57g (smallest package size available), so about $21.05 per 100g. For comparison, 28g of Knox unflavoured gelatin (the animal product that agar powder is supposed to replace) is $3.29 for 28g, or $11.75 per 100g. Since I’m not a vegan, I may try this recipe with gelatin instead of agar agar powder if I make it again, just to save some money.

The recipe did come together as promised by the recipe; it was actually fairly easy to make, once I had the ingredients. Flavour-wise, I unfortunately can’t say that this dish tastes much like cheese. However, it is a tasty spread in its own right. I would put it on a bagel or a pita bread, or serve it with crackers at a party. But it can’t really be mistaken for dairy cheese. Darn it.

Also, when made in a bowl instead of a flat-bottomed ramekin, this vegan cheese visually reminds me of “chicken cutlet” silicone breast enhancers that are inserted into a bra. Possibly not the best choice on my part, aesthetic-wise, but it did make me laugh.

Super Rapid Italian Herb Bread

I have been testing out the recipes for my breadmaker recently, because I want to move on from recipes in the instruction manual to the cookbook Canada’s Best Bread Machine Baking Recipes (Donna Washburn & Heather Butt, 1999) that I picked up for a song second-hand. I have a Black & Decker All-In-One Deluxe Horizontal Breadmaker, and I feel it needs to be put through its paces before I start experimenting. To that end, I tried out the recipe for Super-Rapid Basic White bread that can be found on page 21 of the manual.

Physically, it turned out well; it was shaped properly, and it smelled great. However, I wasn’t terribly satisfied with the texture. I found this bread to be very dense, with few pockets created by air bubbles. I think that this is because of the super rapid bake function, which makes a loaf of bread in just over an hour (the regular loaves take about four hours). It just didn’t give the bread the chance to rise and get fluffy like a longer rising period will do. I will have to make a few more of the super rapid bake recipes to see if my theory is correct.

That being said, the bread was definitely edible. It reminded me of the cheap white bread loaves that are available at the grocery store, albeit with more flavour from the herbs. It toasted up nicely and went well in sandwiches and alongside sunny-side-up eggs.

I discovered that the denseness of the bread made for particularly good French toast. It soaked in the eggs without falling apart, which made it much easier to cook up than a lighter loaf. The herbs in the bread also went surprisingly well with butter and syrup, probably because it was only lightly flavoured. I think I would make this recipe again, but only if I had an end dish in mind in which to use the bread, not to eat it on its own. I have a feeling it would also make a lovely grilled cheese.

Pumpkin Pancakes

I have a tendency to clip interesting recipes out of magazines, file them away in a recipe box, and then forget that they are there. Yet somehow recently when I thawed some homemade pumpkin puree for a pie that I didn’t end up making, I actually remembered that I had a recipe in my stash that might be useful. I thought I’d taken this recipe from an old Food & Drink, but a quick Google showed that it was actually from the October 2004 edition of Martha Stewart Living. The recipe was for Pumpkin Pancakes, and although heaven knows it probably wasn’t also available online back when it was first published, it is there now.

My pancakes weren’t Martha Stewart perfect, of course, but they did taste awfully good. They were light and fluffy and delicious, and the pumpkin and spice flavours were subtle enough that they went well with most sweet toppings. The pancakes were simple enough to make, with just a few additional ingredients added to a basic recipe. I’ll definitely be making this dish again — and perhaps with practice my pancakes will be a bit more symmetrical.

Building A Garden

As part of my commitment to growing at least some of my own food (because heaven knows I can’t grow enough food to feed a family of four on the amount of land we own), I’ve planted a vegetable garden in my back yard. It’s been a bit of an exercise in trial and error, because I never had a successful garden of any kind before. Until the last few years, I didn’t have the land — but I also didn’t have enough interest. I can’t pinpoint a particular event that changed my point of view, but I think it has been a gradual thing. That being said, my house didn’t come with a conveniently prepared garden plot, so it ended up being being both a mental and physical commitment to working outdoors.

I scoured my old photos for a picture of my old deck, but I hated it so much that it’s not in very many of them. The deck came with the house, and it was very poorly built — and then they painted it with interior paint, which of course didn’t last and led to it rotting out even quicker than it would have in the first place. However, we couldn’t afford to replace the deck right away, so we kept it as long as possible. The plan is to put in a small patio by the patio door sometime in the next year or two beside the garden, since what’s currently there is clay — otherwise known as very slippery mud when it rains.

However, after last year’s spring thaw, my husband and I started stepping through rotten boards on the old deck. That was the last straw for me, so I started taking the old deck apart. It was worse than I thought; the deck had been directly attached to the house wall and siding had been removed to do so. This meant that there was rot that had to be removed, new boards put in, and new siding put up. Also, the basement window under the deck had never been finished properly on the outside.

It was great to get all the boards out, but then I had to take out all of the concrete supports, which I could barely lift and definitely couldn’t carry. I ended up using a trolley to do the lifting and lugging. I also had to remove a huge random chunk of concrete that had been hidden under the deck. It was almost three feet long and a foot and a half wide, and weighed more than I did. That was a fun exercise of digging and lever use to get it out of the ground. Not only that, but it served no purpose that I could see, since there were no holes in the top where something had once been mounted.

Then I fixed up the wall of the house, and my husband helped me clear the sod where I wanted the garden to be. It was ridiculously difficult to get even the small amount of sod out that I needed for the size of garden I wanted. The seed had been planted directly in the local clay, and that stuff, when dry, is really, really hard.

I lugged in probably 2,000 liters of soil for the garden all by hand. Otherwise, nothing would grow in my garden except weeds. The soil is so poor out here. I also added a copious quantity of sheep manure compost.

I added a plastic border around the garden and planted it for the season.

With regular watering (last year was a dry summer), the garden grew really well.

I mean, it grew REALLY, really well. (I’m in the photo for scale.)

Then of course came the harvest, and then winter… By spring, the snow had collapsed my garden border, and the spring rains (which were pretty severe here, even where there was no flooding) started washing out my garden soil. Ambitious weeds started taking root before the planting season began.

Last week I built a cedar border around the garden to hold the soil.

Last year my root veggies were short and stubby, and started poking above the surface of the garden instead of growing down because they were thwarted by the hard clay under the garden soil. So this week I lugged in another 1,500L of garden soil to build up the garden, as well as another 350L of sheep manure fertilizer.

Then I planted the garden. It’s been rainy enough that I haven’t had to water it myself yet. I hope that we don’t get so much rain this year that it destroys crops. Although the way things are going right now, that is a distinct possibility. I have my fingers crossed.

Quinoa Bread Recipe

At the suggestion of a friend of mine, I bought some red quinoa a while back included a small portion in a fruit salad. Well, I discovered very quickly that I don’t like it with fruit; actually, despite all of the hype and how healthy it is, I don’t care for it much at all. Use it instead of rice! Add it to your salads! Yuck, yuck, yuck. But I still had most of a bag of quinoa to use up, and I would be darned if I was just going to compost it, so I decided that I’d try making quinoa bread. And it ended up being delicious! Not just to me, either. My kids ask for seconds and my husband, who generally loathes quinoa with the fire of a thousand dying suns, actually likes it. So even if you’re not a fan of this ancient grain, I suggest that you try this bread — and don’t write off all baked goods containing quinoa (like I almost did) until you try them.

This is a heavier bread, with a density a little closer to a banana or pumpkin bread than a traditional white or whole wheat loaf. The flip side of the heaviness — mostly caused by the water in the grains — is that this bread stays moist and tender inside for quite a long time. Even when stale, it doesn’t get hard like a crusty bread can, and can still be quite good toasted or in a grilled cheese sandwich.


This loaf was made in a 9.5″ x 5.5″ loaf pan, which is why it is so low and wide.

Quinoa Bread
Yields 3 loaves

In a large pot, bring to a boil:
500mL water
1 Tbsp canola oil
1 tsp salt
To the boiling liquid, add:
1 cup red quinoa*
Bring back to a boil. Turn heat down to low and cook for 20 to 25 minutes, uncovered. When cooked, the quinoa will become transparent and a white ring will appear in the ancient grain. Remove from heat, drain, and allow to cool.
In a large bowl, mix together:
2 1/2 cups all-purpose whole wheat flour
1 1/2 tsp salt
14g (2 packages) quick rise instant yeast
Stir in:
2 1/2 cups warm water
Once contents of bowl are mostly smooth (it doesn’t have to be perfect), add the cooked, cooled quinoa. Stir until mixed.
Gradually add:
4 cups all-purpose unbleached white flour

Depending on how much water the quinoa absorbs when cooking, slightly more or less white flour will be required. The dough should be soft and the slightest bit sticky, but should not flow like a batter.

Turn out dough onto a lightly floured surface and knead by hand for about 10 minutes, dusting kneading surface, hands, and dough lightly when necessary to prevent sticking.

Oil a large mixing bowl. Form the dough into a ball and place it in the bowl. Cover the bowl with a clean, damp tea towel. Place the bowl in a warm, dry area with no drafts. Allow the dough to rise until double, about 1 1/2 to 2 hours.

Punch down the dough. Grease three 8.5″x4.5″ loaf tins. Divide the dough into two equal-sized portions. Cover the pans with a clean, damp tea towel and allow to rise again until double, about 1 1/2 to 2 hours.

Preheat oven to 400ºF (205ºC). Bake loaves for 10 minutes. Turn heat down to 350ºF (177ºC) and bake for about 20 to 25 minutes more. Check to see if the bread is done by removing a loaf from the pan and tapping it on the bottom. When cooked through, it should make a hollow sound. Remove all loaves from the pans immediately and place them on a wire cooling rack.

Slice and serve immediately, or wrap in a clean plastic bag once loaves are cool; they will last about five days before going stale.

*Any colour quinoa may be used, but red quinoa makes the most attractive visual contrast in the loaf.

Slow Cooker Clam Chowder Recipe with Dairy-Free Options

I’m taking a break today from ComicCon recap to post a recipe that a few people have asked for: my slow cooker clam chowder. I developed this recipe for two reasons: 1) I love dairy, but it doesn’t love me back, so if I want clam chowder I have to make it for myself with a dairy substitute, and 2) I had packages of frozen clams in my freezer that I’d bought on sale and I had no idea what I wanted to do with them. I Googled for ideas, and for the most part the consensus seemed to be that frozen clams are gross and tough, so don’t buy them in the first place. Well, in the past I’ve learned that simmering tough cuts of meat in liquid for a really long time can make just about anything palatable, and that technique works well with cheap frozen clams. As a bonus, all of the ingredients can be prepped the night before, and then most of them are thrown into the slow cooker as you get ready for work. This chowder really only needs attention in the last hour or so, and even then not much.

A note regarding dietary requirements: I make my clam chowder dairy-free using almond milk, and nobody can tell the difference. If you’re allergic to nuts, try soy milk or rice milk instead. If you prefer dairy, use 2% milk. Also, clam chowder can’t really be made vegetarian or vegan — all you’d be left with is potato soup (which can be good, but is no longer clam chowder). However, if you don’t eat pork, turkey bacon may be substituted, although it will change the flavour somewhat.


Slow cooker clam chowder, served here with microwave oatmeal wheat bread and corn on the cob.

Slow Cooker Clam Chowder (Dairy-Free)
Serves 8-10
Total cooking time: 8 hours

Thaw as per package directions:
2 packages of frozen clams (340g each)
In a frying pan, cook until crispy:
1 package reduced-salt bacon (375g package)
Place cooked bacon on a plate that is covered with a few pieces of paper towel; dab the bacon lightly to remove excess grease.
In the frying pan, reserve:
1 Tbsp bacon grease
Discard any additional bacon grease. In pan in which the bacon was cooked, in reserved grease, fry gently until soft and lightly browned:
2 yellow onions (approx 175g)
While onions are frying, chop into bite-sized pieces:
bacon cooked in previous steps
2 cups celery (approx 225g)
Peel and chop into bite-sized pieces:
6 cups white-fleshed potatoes (approx 1100g)
Peel and mince:
1 clove garlic
When onions are done cooking, add them and all previous ingredients to slow cooker. In addition, add:
6 bottles clam juice (236mL each)
1 tsp salt
1 tsp fresh thyme*
1/2 tsp pepper
1 Tbsp dried parsley
Cook in slow cooker for 7hrs on high, until potatoes are tender**.
In a large measuring cup or mixing bowl, whisk together:
4 cups almond OR soy OR rice OR 2% milk
4 Tbsp corn starch
Stir in the milk and corn starch into the mixture in the slow cooker. Cook until it reaches the desired thickness, about 1 additional hour.
I serve this soup immediately and freeze the leftovers; it also refrigerates well. If you are planning on serving this at a gathering, it can be prepared in advance and reheated immediately prior to serving.

*1/2 tsp dried thyme may be substituted for fresh.
**If you have an older slow cooker, you may need to adjust cooking times, as older slow cookers (pre-1980 or so) do not get as hot. If you’ve cooked it for the required time and the potatoes still aren’t tender, the recipe may be finished on the stove, being careful not to boil or scald the liquid.

Lobster Rolls

The weather is finally changing to something vaguely resembling summer, and this is the time of year that I start thinking about all the summer trips to the Maritimes that I made as a child, and then again as an adult. We would drive there from Ontario, and it seemed that as soon as you crossed the border between Québec and New Brunswick, the food culture changed from land to sea. Just pop into a New Brunswick fast food restaurant in order to compare: McDonald’s in New Brunswick serves (very poor) lobster rolls, and Subway serves a (reasonable) seafood sub. The culinary transition is rather abrupt, because it’s not like the terrain and agriculture of eastern Québec and western New Brunswick are at all different. But New Brunswick is a maritime province, and this is reflected in the culture and the cuisine. Which isn’t to say that there isn’t a strong agricultural foundation in the province as well; with an area almost the size of Ireland with one sixth the population, there is room for multiple local industries.


Golden Fry, Shediac, New Brunswick.

Most people who visit New Brunswick head for the coast. The best value for money as a tourist is generally to rent a cottage within walking distance of the sea, or if that’s not possible, to stay in an inn or B&B within a short drive of the beach. The town of Shediac (the self-proclaimed Lobster Capital of the World) has capitalized on its proximity to the gorgeous Parlee Beach Provincial Park and has, over the years, become somewhat overdone, over-hyped and overpriced. The town almost shuts down except for the months of July and August. There are some good seafood restaurants there during tourist season — but some of the best food in town can be found at the Golden Fry (560 Main St, Shediac).


Lobster roll and fries at the Golden Fry.

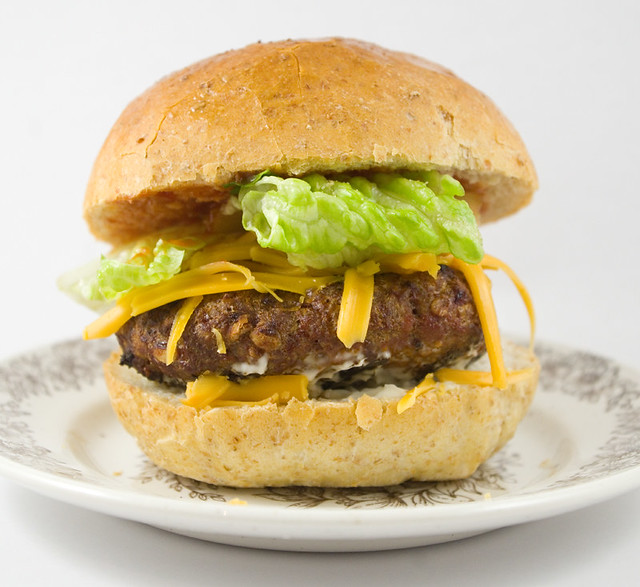
The place doesn’t look like much; it’s just a small building off the side of the road, with a gravel parking lot and some plastic tables and chairs out front. It’s takeout, pure and simple — it makes me think that a french fry truck grew roots and decided to stay in one place. But oh my goodness, their food is so good! Take the lobster roll, for example. It’s a toasted, buttered New England roll stuffed to bursting with chunks of fresh, cold lobster meat. Their their fries are fresh-cut, their poutine uses real cheese curds, their fried clams are crisp on the outside, soft in the center… A lot of the fancier restaurants in town could take lessons from this place, especially since “lobster roll and fries” is a standard menu item in the area no matter where you dine.


Bouctouche Beach.

To me, though, Shediac has been done to death. The town is packed to the gills during tourist season, the traffic can be gnarly, everything is overpriced compared to the same things just out of town, the cottages are so close they’re practically town houses… For my seaside vacation, I prefer something a little calmer. This is why I’ve fallen in love with the town of Bouctouche, which is a short drive up Highway 11. Like Shediac and Pointe-du-Chêne (which also has some lovely beaches), it is on the Northumberland Strait, and as such boasts some of the warmest ocean water temperatures on the Atlantic coast north of Virginia. Unlike Shediac, it hasn’t become a tourist trap, although Bouctouche does boom in summer. It’s a little further away from Moncton, and hence from the Moncton airport, so people aren’t as likely to make the effort.


Irving Eco-Center, La Dune de Bouctouche boardwalk.


Irving Arboretum.


Irving Arboretum.

The town of Bouctouche has benefited from being where James Dergavel Irving founded J.D. Irving Ltd. (the company most well-known these days for Irving gas stations) in 1882. The company/family has funded a big chunk of the most beautiful spots in town, like the Irving Arboretum, which is packed with scenic walking and biking trails, and the Irving Eco-Centre, La Dune de Bouctouche, which contains the local saltwater beach as well as a boardwalk and hiking trails.


Buctouche river.

In addition to the coastal attractions, the Buctouche river flows through Bouctouche and neighbouring towns, emptying into Buctouche Bay in the Northumberland Strait. This means that the town also has freshwater angling, boating, and scenery.


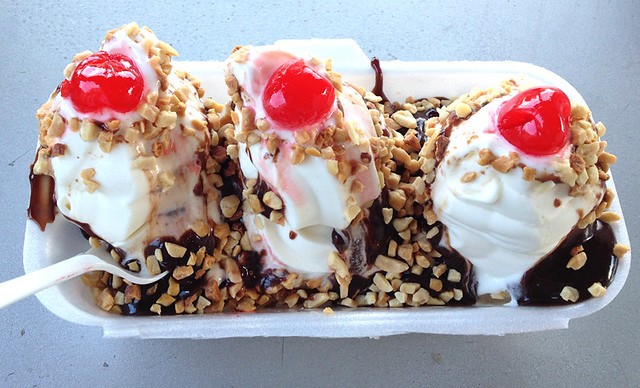
Banana split at Le Petit Crèmier, Bouctouche, NB.

One of my kids’ favourite places in Bouctouche was Le Petit Crèmier (103 Irving Blvd), which is the local ice cream parlour. Once again, it’s take-out only, but their ice cream is great, their portions generous, and the sheer variety of what they serve is mind-boggling. It’s totally worth a stop on a hot day (or, if you’re like me, any day).


Pirate de la Mer restaurant, Bouctouche, NB

The hidden gem of Bouctouche, food-wise, is Pirate de la Mer (10 rue Industrielle, across the street from the small mall containing the Co-Op and the liquor store). There’s nothing much to the restaurant when you see it from the outside. It’s in a plain red industrial building, with a couple of picnic tables out front, and a gravel parking lot. But if you head there on the weekend or at dinner time, be prepared for up to a half an hour wait in line just to place your order, with another half hour before your food is made. The place is popular with the locals and with tourists. It is not uncommon for there to be not enough seating for everybody, which is why a good portion of their clientele orders their food to go. The amply-sized parking lot gets full fast, with overflow parking on the road. After my first visit, I would order my food a half an hour in advance or so, giving them lots of time to prep while I headed over and then waited in line. This way the food was hot and ready to go as soon as I paid.


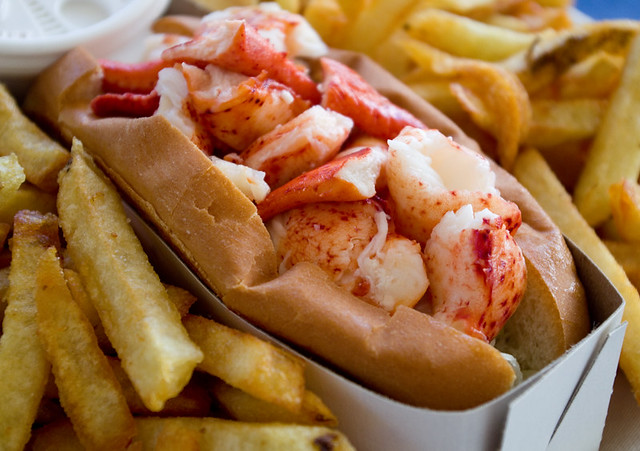
Double lobster roll, fries & coleslaw at Pirate de la Mer.

The lobster rolls at Pirate de la Mer are mouth-watering — enough so that I make a special trip to Bouctouche to order them, even when I’m not staying in town. Their fries are crispy deliciousness, and I’m told that their coleslaw is first rate (I don’t like coleslaw). In addition, they make their own tartar sauce – they’ll give you the option between their version and pre-made Kraft stuff. Go with their version. It’s definitely not a fancy restaurant, but I haven’t had better seafood at anywhere that charges four or five times more for “gourmet” and “ambiance”. If you want to eat somewhere prettier, you can always get your food to go and head up the road to the Arboretum or the beach.


Lobster roll at Pirate de la Mer.

There is no excuse for visiting the Maritimes without indulging in seafood. Unless you hate the stuff, I guess. Or are allergic. Or vegetarian. Or your religion prohibits it. Other than that, though, there is no excuse. If you can afford to travel, then you can afford at least one seafood meal — especially since, in New Brunswick, a lot of seafood dishes are on par or cheaper than any other kind of meat. So indulge! You won’t regret it.

Quick Dinners

With ComicCon prep taking over my life, I have been resorting to quick, improvised dinners to feed my family lately. Here are a few of them:

A quick trip to the grocery store yielded a refrigerated rotisserie chicken and cheese-and-spinach-stuffed pasta, both at 50% off. I reheated the chicken in the oven; boiled & drained the pasta and added some cream cheese, sour cream, and cooked spinach; and peeled & chopped a few carrots which I boiled in the microwave. Prep time for this meal was twenty minutes at most, leaving me more time to work on my costumes.


Leftover soup with bok choy and rice.

One of my favourite things to do lately is throw leftover vegetables and/or meat into some home-made broth (of which I have copious amounts in the freezer), add a bit of leftover rice or small pasta, and then boil it all together for a few minutes. With a bit of salt and pepper, this becomes a healthy soup that takes only about ten minutes to prepare.

At the kids’ request, I did make up rice bowls this week, but of a simplified kind. While the rice was cooking, I peeled and nuked the carrots, chopped and microwaved the bok choy, and cooked up some frozen corn. I also grilled the shrimp — I love shrimp when I am short of time because it takes so little time to cook — and scooped out some avocado. No special shopping or all of the burners used this time for a rice bowl meal! I just used whatever I had in the fridge, freezer or pantry. It took about 35 minutes to make this meal, including prep work. Not bad for something so fresh and tasty.

Fish Tacos

With all the prep work for ComicCon that I’m cramming into this week, I’ve had to cut down on the amount of time and effort I spend cooking. But I still want to eat well! So I thought I’d try something I’d never made before: fish tacos. They’re fast, easy, and healthy (so long as you don’t drown them in cheese and sauce).

I used the spice mixture from the Grilled Fish Tacos recipe from Eating Well, but I cooked the fish a frying pan instead of on the grill, since with all the rain lately my yard is a morass of mud. The kids snapped up the tortillas first, so I had my taco on whole-wheat pita instead. I topped mine with leftover avocado tartar sauce (which is perfect with this dish), romaine lettuce, tomato, shredded old cheddar cheese. This was such a simple, delicious, and healthy meal to make that I’ll definitely make it again.

A Healthier Burger Recipe

Last night I took advantage of the gap between spring rain storms to make up some burgers on the barbecue for the family dinner. My family absolutely adores burgers, so I’ve been looking for a way to make them healthier. Sure, tonnes of grease tastes good once in a while, but it’s not something that we should be eating regularly. Moderation in all things, including moderation. So I came up with a tasty recipe that combines lean ground beef (for flavour) with ground turkey or chicken (to reduce the fat). I also use oatmeal instead of the more traditional bread crumbs to bulk up the burgers and absorb moisture; oatmeal is full of healthy fiber and, as a bonus, has an incredibly long shelf-life. This means that these burgers are wheat and gluten free, so long as you pick the appropriate brand of sauce.

To add a bit of extra healthiness, I made the buns from scratch using the whole wheat variant of Nan’s Pan Rolls Recipe. To make hamburger buns, shape the buns individually and place them with lots of room between them on greased baking sheets between the first and second rise. The recipe makes about 24 hamburger buns.

Now, even a healthier burger isn’t a hundred percent healthy. If you really want a healthy burger dinner, you’ll have to serve it with a salad.


A healthier burger with ketchup, mayonnaise, shredded cheddar cheese, and romaine lettuce.

A Healthier Burger
Makes 10-12 small burgers

In a large bowl, thoroughly mix together with your hands:
500g (1.1lb) lean ground beef
500g (1.1lb) ground turkey OR chicken
1 egg
3/4 cup plain uncooked oatmeal (not instant)
2 Tbsp Worcestershire sauce OR barbecue sauce of choice
1 tsp garlic powder
1/2 tsp salt
1/4 tsp pepper
Divide the mixture into 10-12 portions*. Roll each portion into a ball, then shape the portion into a patty shape with your hands.
Preheat your grill** to about 400°F (204°C). Cook until browned evenly on both sides (with a bit of char) and until center of burger is no longer pink. (Do not serve these burgers rare because they contain poultry.)
Serve on whole wheat hamburger buns with your choice of toppings such as ketchup, mustard, relish, mayonnaise, pickles, cheese, or avocado.

*Larger burgers may be made, but cooking times should be adjusted.
**Burgers may be fried on a flat top or in a frying pan, but they taste best on a grill.