…from the bottom of my heart!

Although I generally don’t buy Christmas decorations for myself, I picked up this cute little set a few years ago at a local craft sale. It’s by Jocelyn Jenkins Pottery; you can reach her at jocelynjenkins1@gmail.com

…from the bottom of my heart!
Although I generally don’t buy Christmas decorations for myself, I picked up this cute little set a few years ago at a local craft sale. It’s by Jocelyn Jenkins Pottery; you can reach her at jocelynjenkins1@gmail.com
We’re right smack dab in the middle of Christmas prep around here, dashing from hither to yon to prep for school spirit days, family events, and hosting over the holidays. Of necessity, suppers have been quick and easy; I think tomorrow I will be breaking out the slow cooker just to make dinner that much easier.

Last night, though, I rummaged through the freezer and turned up with some rather nice basa fillets. I dredged them in flour, sprinkled them with a bit of garlic powder and salt, and lightly fried them in a glug of olive oil in a non-stick pan. (As an aside, when making this kind of dish, does anyone else think about that lightly fried fish fillets meme?) I topped the fried fish with crumbled bacon and served it alongside boiled baby potatoes and steamed carrots.

I still wasn’t feeling spectacularly well last night, so I didn’t get as much prep work done as I wanted to, but the hectic pace around the holidays is one of the reasons I start canning way back in the summer. As planned, I plunged into my shelves of homemade preserves to get gifts together for my kids’ teachers.

As with Guiders, I consider teachers to be especially important to my children and, as such, they are deserving of some nice things around Christmas to show my appreciation. Teachers put in long hours in a job that I, to be completely frank, am vastly temperamentally unsuited to do. Before my children were born, I seriously considered home-schooling, but as time went on I realized that teaching is definitely not one of my gifts. I have the utmost appreciation for those people who can do so, especially while both funding and support are slowly withdrawn from the public school system over the years.

This year, my kids’ teachers are getting amaretto cherries, spiced pear jam with pineapple, handmade cloths, and a box of Girl Guide cookies. (I considered giving the cookies to the Guiders too, but I thought they could probably use a break from this fundraiser by this point.) I hope that the teachers will be able to enjoy these foods over the winter break — or any time after, really, as they’ll last about a year unopened.
I’ve spent a good portion of my last few weekends at craft fairs and flea markets, searching for those elusive perfect gifts for friends and family. Last weekend I visited the 2017 Christmas Craft Market at Watson’s Mill in Manotick, the Russel Flea Market, and the Holiday Miracles Handmade Fair. This weekend I attended the Fisher Park Christmas Craft Sale (always a good one, held the first Saturday of December every year at 250 Holland Avenue), the Christmas Bazaar at the Parkdale United Church (also a lovely yearly event, at 429 Parkdale Avenue), and my favourite of them all, 613Christmas at the 613Flea Market.

The 613Christmas flea market filled up the entire field house at Carleton University, which is a 58m x 49m indoor turf field. Not only was it a huge space packed to the brim with vendors and customers, but the artificial turf was much more comfortable underfoot than most places’ concrete and tile (or occasionally hardwood).

There were stalls with a plethora of interesting finds. I took quick pics of the ones that were the most interesting to me, but there was a lot more variety than that.

The booths with vintage kitchenware were my favourites. I drool over Thoroughly Modern Vintage‘s stuff every time I see her at an event.

Although I do have a soft spot for stuffies like the ones from Truly Charlotte.

Of course, there were all kinds of vintage Christmas finds at a market this close to the holidays (although I’m not sure I’d trust the old lights not to overheat or have broken-down wiring).

I have a special soft spot in my heart for all of the super-sparkly and super-fragile glass bulbs that are just like the ones my mother and grandmother hung on their trees. I especially favour the ones with a concave indent to catch the light, like the one that you can just see in the top left of this photo.

The highlight of my day was meeting Charles de Lint at 613Flea. This local author was there promoting his latest novels and signing autographs. I’ve been reading his novels since I was a kid and I especially like the urban fantasies set in the Ottawa area. I loved Greenmantle, Memory and Dream, and Jack, the Giant Killer, just off of the top of my head, although I have read so many more. (Although could I remember the titles when I was chatting with him, oh heavens no, I just stood there um-ing and aw-ing as if I didn’t have two brain cells to rub together.) We even studied one of his books in high school, and despite my teacher’s best efforts to study it to death, I still came out of that class enjoying his work — which is more than I can say for other authors I studied. To contrast, I would rather stab myself with a knitting needle before I read Shoeless Joe, Heart of Darkness and Lord of the Flies again.
So I bought a copy of the beautifully-illustrated The Cats of Tanglewood Forest (2013) and asked Mr. de Lint to personalize it for Thing 1. I really hope that she will grow up to be as big of a fan as I am.
The paint is currently drying in my kitchen, which means cooking is being kept to a minimum for the moment. Instead, I’ve finally found the time to edit the rest of the photos from Ottawa Comiccon: Holiday Edition! All of the photos were taken by Ian Walton, I just played with them a bit.
We started by taking photos indoors by the big windows at the front of the convention center for the best lighting — and look who we found!
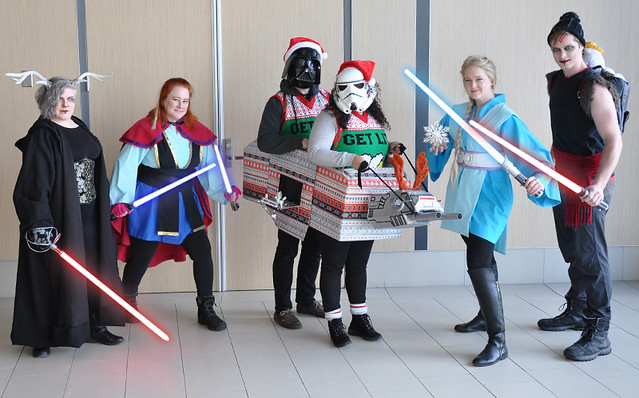
Left to right: Darth Sven, Jedi Anna, Darth Vader, Stormtrooper, Jedi Elsa, and Darth Kristoff.
Christmas Darth Vader and the Stormtrooper in their holiday AT-AT were probably the most awesome (and seasonally-appropriate) costumes we saw all day.

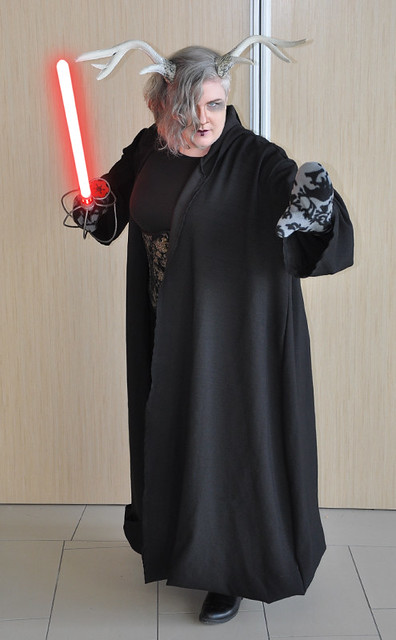
I discovered that I need to learn how to pose better in this costume. Also, I need to trim (or re-position) the white streak in my hair, which was a clip-in (the rest is my real hair dyed with Féria C74 Power Copper), so that it’s a matching length.

Elsa’s Force snowflake pops against the indoor backdrop, although it was hard to see outside. I was really happy with how Elsa’s costume turned out, because she made it herself and it was her first time sewing anything so complicated. She put so much hard work into it and she ended up with a great final product!
I absolutely love Sven’s antlers! And yes, the reindeer does have reindeer mittens.

Kristoff’s fantastic makeup was done by the fabulously talented Jessica Harkonnen.

This is probably my favourite photo of the entire day.
Then we moved outside to freeze for our art:


The cold may not bother Elsa, but it definitely bothers Anna.

I hope to use this costume again for the regular ComicCon in May, and this mini-con was a great chance to try it out and figure out what needs to be changed, what can be done better. I definitely want to add some more detail to it with embroidery or maybe paint. I want to alter the obi so that it’s stiffer and has more structure. And I need a better lightsaber, preferably one that lights up on its own. I may have convinced my kids to join in on the group as well, so that’s more costumes to make — but that won’t start until much closer to the date, since there may be some growth spurts in the meantime and I don’t want to have to make the costumes twice.
I finally started to get into the Christmas spirit a little bit this weekend, probably because on Friday afternoon my yard looked like this:

And by Sunday it looked like this:

Many of my friends and family bemoaned the precipitation and freezing temperatures, but I always like a bit of snow before Christmas. A green Christmas just isn’t very Christmas-y to me. That being said, it’s supposed to go up to 9°C (48.2°F) on Tuesday, so it’s not like this is going to last.

It really put me in the mood for Christmas shopping, though. Unlike in the States, where the holiday buying season appears to officially start as soon as the clocks strike midnight the day after American Thanksgiving, we don’t really have a traditional time to begin. Some people shop all year ’round. Some companies put out their Christmas merchandise at the same time as they’re building their Halloween displays (which is a little early to me, but oh well). For me, all of the Halloween debris has to be cleared away and there has to be some snow on the ground for me to feel like shopping for gifts — although I have been known to pick things up six months in advance if the opportunity arises at a great price.

I went with my mother, Thing 1, and Thing 2 to a number of craft fairs on Saturday, but one of my perennial favourites was the one held at Cairine Wilson High School. It’s a huge fair; it packs full the big gym, the little gym, the hallways, and the cafeteria. Given the number of booths, I’m bound to find something that I know someone will like.

But even if I don’t find the perfect gift for someone, it’s a lot of fun to check out the wares of local craftspeople. This is one of the few times of year that a lot of these people make their work available to the public; many craftspeople work all year by themselves to make enough stock for one or two holiday shows.

After hitting a few craft fairs, we rushed home so that the kids could get changed into their uniforms and we could drive out to Epiphany Anglican Church where the Girl Guides’ Holiday Tea is held every year. Since I’d gone to all of the effort of baking brownies for the tea, I pretty much had to attend. It’s always a lovely time, with such cheerful little servers and so many delicious treats on which to nosh.

I may have kind of taken a picture of some of the sweets for our table after I’d already nabbed the chocolate ones. Just maybe. I think that the next to go was that shortbread on the bottom right, since I’m a sucker for those too.
Some friends of mine had these great mash-up Halloween costumes this year, and they’d mentioned at a party this season that they’d like to upgrade them for a mini convention coming up this month. I’d like to say that they dragooned me into cosplaying with them, but I kind of volunteered. I’d made a similar costume before, how hard could it be, right?

I’m adapting two McCall’s patterns: M7225 (Misses’/Men’s Cape and Tunic Costumes) and M7229 (Men’s/Misses’ Nativity Scene Costumes). I don’t want to come out and say what it’s going to be just yet, because I’m not a hundred percent sure that I’m going to get it done in time. What I will definitely say is that it’s definitely not what the pattern designers had in mind.

I’ll be re-using some stencils from a few years ago and, if you know the movie that part of this costume is based on, these motifs might give it away. Even so, I’d be surprised if anyone can guess exactly what this mash-up costume will be. (No giving it away for those I’ve already told in person!)

At any rate, I think that this view will be my life for the next few days. I really hope that this costume turns out well; if so, I might be able to persuade my kiddos to do a group with me for the next ComicCon. Right now they’re talking Legend of Zelda instead, which I totally approve of, but it would be so much easier if I already had one of the costumes done this far in advance.
I’m decorating for my Halloween party this coming weekend, and I dug out a bunch of crafts I’d done from previous years in the process. One of the ones I’m most fond of is the spooky glowing skulls that I made using Epbot’s tutorial. Epbot always has great (and inexpensive) Halloween crafts, along with detailed instructions and photographs. I really want to make some DIY skull sconces, but I doubt I’ll have time before the party. Maybe next year?

I think my biggest challenge to making these glowing skulls was finding the proper materials. Epbot is based in the States, and we just have a totally different range of dollar store craft supplies than they do down there. I couldn’t find a sturdy enough frame with a fancy border; there were lots of fake photo frames for Halloween, but they were such cheap plastic that they bent with the slightest pressure from the fabric. I ended up using IKEA RIBBA 8″x10″ frames.

With the matting and simple wooden frames, my glowing skulls didn’t really look all that much like the ones from the tutorial, but I think that they worked out okay. They actually go pretty well in my house because I use RIBBA frames all over the place for day-to-day picture framing anyway, so the skulls kind of fit in.

I enjoyed making the small skulls so much that I stepped up my game with a huge foam skull (I couldn’t find a translucent plastic one that size), fabric from the fabric store, and a freebie second-hand frame that I spray-painted black. The skull already had lights, but I didn’t like the colour or placement, so I ripped them out and started fresh with a brand new blue string. I think this is my favourite of all of the glowing skulls I made; it’s definitely the most striking. It kind of reminds me of the Evil Queen’s mirror crossed with the old Frighteners movie poster.
So I started up another Brick Stitch Dishcloth yesterday, this time in Christmas colours instead of Halloween. The variegated yarn contrasted so beautifully with the solid colour in the pattern’s photos that I was inspired to use red yarn alongside red/white/green multicolour yarn.
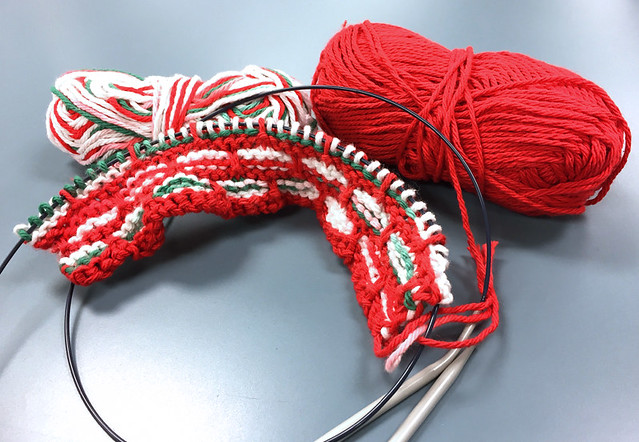
Well, that didn’t look nearly as nice as the pattern’s photos. It looked a hot mess, really, with the red from the variegated yarn blending into the solid red and confusing the pattern. I think that the operative word for a piece like this is “contrast”, i.e. the two yarns should not contain any of the same colours, although they should be complimentary.
I know a lot of people are probably thinking right now, “Who cares? It’s just a cloth. It will be used for wiping up messes and will probably be stained five minutes after it is first used.” That’s probably true. But I still care, I can’t help it. Perhaps I am too much of a perfectionist when it comes to knitting. I am the kind of knitter who will frog way back to a mistake even if it’s imperceptible to anyone but me — even if it’s “just” a cloth I’m knitting. (One of my absolute favourite bloggers, the Yarn Harlot, is this way, so I do not feel quite so alone.) I figure it could have been much worse, since I decided that I hated the colours/patterns together fairly early on in the project. Ah, well. Lesson learned.
I’ve been laid up a bit lately, and I had to do something with my hands before I lost my mind. To that end, I picked up a bunch of Bernat Handicrafter Cotton Yarn in a variety of colours so that I could make some cloths. I love to make these to give away at Christmas; I figure that while they’re not terribly fancy, they’re a very practical gift — and you can never have too many.

I started with Bella Coco’s How To Crochet the Waffle Stitch tutorial. I cast on 34 stitches and worked the waffle pattern from there. I used, top to bottom in the photo above, Lemon Swirl Ombre, Poppy Ombre, Pale Yellow, and then Poppy Ombre again. I haven’t crocheted for years, but I found the tutorial laid everything out very clearly. The waffle pattern makes a nice, scrubby texture in this yarn that will be great for cleaning dishes.

I also knit some cloths using the free pattern on the back of the yarn ball band that’s also available for free online: the Brick Stitch Dishcloth. I’d never done this pattern before either, but I loved how it turned out. Now that the leaves are starting to change, I thought it would be fun to make some cloths in Halloween colours. They’ll probably be Christmas gifts too, but many of my friends would prefer these combinations anyway. I used Black Licorice with (from top to bottom) Hot Green, Hot Orange, Hot Purple, and Red.
My eldest daughter’s birthday is coming up, so I wanted to make her something extra-special as a gift. When we went to ComicCon this year, Thing 1 kept spotting foam replicas of Link’s Master Sword (from The Legend of Zelda series) out on the sales floor, and she asked me if she could have one every time she found one. My response was that it was too expensive; I had given the girls a budget of $20 each to buy something, and the swords usually came in between $30 and $35. Instead she came away from the con with a chain necklace with a pendant shaped like a Golden Snitch, which also lit up from inside with a tiny LED, and she seemed quite satisfied.
However, I had two days at the con without the kids along, and in my browsing I managed to find a competitively-priced Master Sword, along with a cheap plastic Hylian Shield. I stashed the sword and shield away for a few months to save them for her birthday. But I also figured that I could take the gift up a notch and make her a play costume to go along with the pre-made items.

McCall’s M6224
To me, a play costume is one that I don’t spend a huge amount of time or money on because there’s a good chance it won’t last all that long, since my kids are allowed to wear play costumes whenever they want and to do whatever they want in them. This is why most of their play costumes are second-hand finds, hand-me-downs, or bought on the 90%-off sales after Halloween. To that end, I used McCall’s pattern M6224, which I already had in my stash from ages ago. (Although I didn’t use this specific pattern to make the girls’ ComicCon costumes this year, I should note that one-piece pajama patterns are great to adapt into costumes.)

Cutting the pattern.
This time I didn’t use the one-piece pajamas and instead went for option C, which is a short-sleeved pajama top reminiscent of the scrubs one would wear for working in a hospital. I lengthened the top a bit to make it more of a tunic than a shirt, which will eventually be belted into place. I used fabric from my stash as well, which was the remnants of a dark green sheet that I’d used parts of for some craft or other years ago.

As the pattern envelope promised, the pattern was really easy to make. I think it only took me about two hours from unpacking the pattern to ironing the final product. Now, it looks a little big to me, but pajamas and tunics both are meant to fit loosely, and anyway it will be belted in. If worst comes to worst, I can always take it in. Strangely, my biggest worry is that the neck hole may not be large enough; the fabric has absolutely no stretch whatsoever, and Thing 2 has a massive noggin, just like both of her parents.

Die-hard Zelda fans probably are looking at the tunic and thinking, “Isn’t that supposed to have lacing, and a collar?” Yes, I suppose it is, if I was going for true accuracy. I kind of went for a look between adult Link in Ocarina of Time (what with the length of the sleeves, not to mention the sword and shield) and Four Swords Link (with the V-neck tunic). As much as I love 100% accurate costumes, I didn’t think it was necessary to play dress-up at home. Also, generally the more accurate the costume, the more time and money it takes, neither of which I wanted to spend on something that would probably get food and dirt smeared all over it.
The next step is to get a belt and a long-sleeved shirt to go underneath, as well as to make Link’s cap. Hopefully I’ll get it all done in time!

.png)