Personal Pizza

I’ve been craving pizza lately, which is pretty much a no-no because of the issues that my digestive tract has with dairy. However, to my everlasting joy, I’ve discovered that I can eat lactose-free cheese so long as I don’t go overboard, since cheese is also quite greasy, especially when melted. Since none of the pizzerias around here carry lactose-free cheese as an option, I thought that a “make your own pizza” evening was in order.

It didn’t look spectacular because I put the toppings under the cheese, but it tasted great! I started with the dough from the Two-Cheese Pizza recipe on page 170 of Betty Crocker’s Best Bread Machine Cookbook (1999). This made enough for one 12″ pizza or four 4″ or so thin-crust-ish pizzas. (Next time I do this, I’m doubling the recipe.) You can’t actually cook pizzas in the bread machine, so I rolled out the dough into individual crusts and everyone topped their own. I used Healthy Veggie Tomato Sauce that I had in the freezer as the sauce, although I did simmer it a little to reduce it a little bit. I topped my pizza with ground beef and crumbled bacon, along with a few cremini mushroom slices. The rest of the family had theirs with more traditional mozzarella, but since cheddar was the only kind I could get lactose-free, I went with that.

I’ve tried Jamie Oliver’s Quick Family Pizza in the past, and although the kids liked it, one of the things I discovered about myself is that I’m not a big fan of the taste of self-rising flour. I think it’s just a little too salty for me. At any rate, I like the yeast dough a great deal more, and it’s just as easy as the quick bread version if I use the bread machine. So I think I’ll stick with this kind of dough for future pizza iterations.

Smelly Socks Pattern

Way back when Thing 1 was only three years old and not reading by herself yet, her favourite book for quite some time was Smelly Socks by Robert Munsch (2004). I must have read that book to her a thousand times. I was raised on Munsch classics like The Paper Bag Princess Love You Forever, so I didn’t really mind.

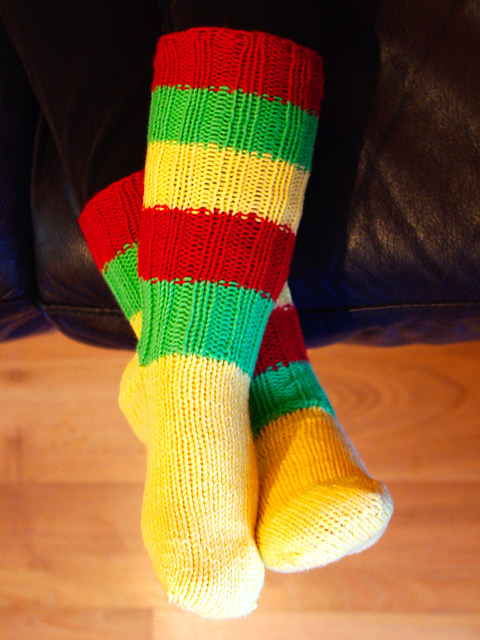
Smelly Socks tells the tale of a girl named Tina who begs her grandfather to take her across the river to a big sock store to buy some fancy socks. She finds herself the perfect pair of red, yellow and green socks, and she cries, “Socks! Socks! Wonderful socks! I am NEVER going to take them off!” Of course, the longer Tina wears the socks, the smellier they get, until her friends get fed up and drag
her down to the river to give those socks a good washing.

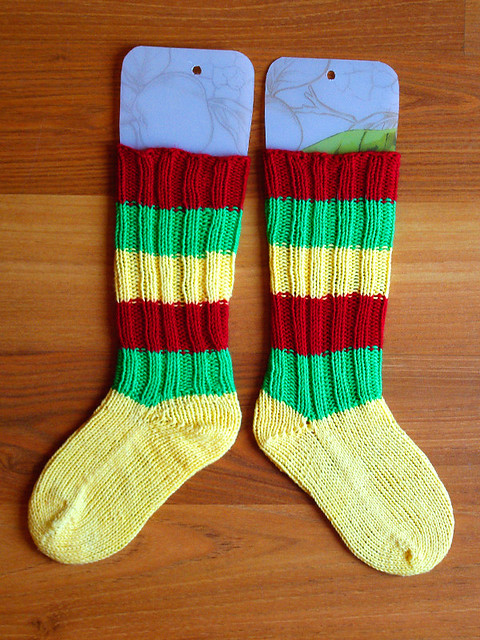
Thing 1 wanted Smelly Socks of her very own, so I just had to knit her some. (You can see the titular socks on the cover of the the book.) Over the years, those socks were worn by both of the girls, and they still never wore out! Since they’re much too small for either kiddo any more, they’re currently stored in a box of keepsakes. I thought I would share my old pattern for the socks so that other people can make keepsakes of their own.

Smelly Socks
Preschooler size; approximately children’s size 8 CDN/US

Materials:
– one ball Mandarin Petit in Yellow 2004 OR Goldenrod 2315
– one ball Mandarin Petit in Cardinal 4418
– one ball Mandarin Petit in Green 8017
– one set of 3.25mm (US 3, UK 10) circular knitting needles in a length comfortable for the magic loop method (I prefer 120cm/47″ or longer)

Each ball of Mandarin Petit is by Sandnes Garn of Norway is 100 % Egyptian 4ply cotton, weighs 50g (1.764oz), measures 180m (196.85’), and is machine-washable (air dry flat). A different yarn of the same gauge may be substituted to yield the same results.

Gauge:
– 16 stitches and 20 rows in stockinette stitch = 5cm x 5cm (2″ x 2″) square on 3.25mm (US 3, UK 10) needles

Instructions:

Cast On:

– Using the YELLOW yarn and the magic cast-on for toe-up socks technique, cast on 24 stitches divided onto two needles (12 stitches per needle).
– Knit one round. Warning: Using the magic cast-on, the cast-on loops on your second needle will be twisted. To untwist, knit the stitches on this needle through the back of the loops on the first round only.

Shape toe:
– Round 1: On each needle, K1, M1, K to within last stitch on the needle, M1, K1.
– Round 2: Knit
– Repeat these two rounds until there are 40 stitches on your needles (divided 20-20).

Make instep:

– Knit every stitch in the round until sock measures 11cm from cast-on edge to end
to the last knit stitch.

Arrange heel stitches:

– Knit across 1st needle. The heel will be turned on the 20 stitches of the 2nd needle.

Set up short row heel:

– 1st row: (RS) K19. Move working yarn as if to purl. Slip 1. Turn.
– 2nd row: (WS) Slip 1. This will wrap the yarn around the first, slipped stitch. P18. Move working yarn as if to knit (“wrap”). Slip 1. Turn.
– 3rd row: (RS) Slip 1. K17. Wrap. Turn.
– 4th row: (WS) Slip 1. P16. Wrap. Turn.
– 5th row: (RS) Slip 1. K15. Wrap. Turn.
– 6th row: (WS) Slip 1. P14. Wrap. Turn.
– 7th row: (RS) Slip 1. K13. Wrap. Turn.
– 8th row: (WS) Slip 1. P12. Wrap. Turn.
– 9th row: (RS) Slip 1. K11. Wrap. Turn.
– 10th row: (WS) Slip 1. P10. Wrap. Turn.
– 11th row: (RS) Slip 1. K9. Wrap. Turn.
– 12th row: (WS) Slip 1. P8. Wrap. Turn.

This should yield 6 wrapped stitches, 8 “live” (unwrapped) stitches, and 6 more wrapped stitches, for a total of 20 stitches on the 2nd needle.

Turn short row heel:

– 1st row: (RS) K8. Pick up (PU) the wrap and next stitch and knit them together. Wrap the next stitch so that it now has two wraps. Turn.
– 2nd row: (WS) SL1 (double-wrapped) stitch. P9. PU wrap and next stitch and purl them together. Wrap the next stitch so that it now has two wraps. Turn.
– 3rd row: (RS) SL1 (double-wrapped) stitch. K10. Pick up (PU) the wrap and next stitch and knit them together. Wrap the next stitch so that it now has two wraps. Turn.
– 4th row: (WS) SL1 (double-wrapped) stitch. P11. PU wrap and next stitch and purl them together. Wrap the next stitch so that it now has two wraps. Turn.
– 5th row: (RS) SL1 (double-wrapped) stitch. K12. Pick up (PU) the wrap and next stitch and knit them together. Wrap the next stitch so that it now has two wraps. Turn.
– 6th row: (WS) SL1 (double-wrapped) stitch. P13. PU wrap and next stitch and purl them together. Wrap the next stitch so that it now has two wraps. Turn.
– 7th row: (RS) SL1 (double-wrapped) stitch. K14. Pick up (PU) the wrap and next stitch and knit them together. Wrap the next stitch so that it now has two wraps. Turn.
– 8th row: (WS) SL1 (double-wrapped) stitch. P15. PU wrap and next stitch and purl them together. Wrap the next stitch so that it now has two wraps. Turn.
– 9th row: (RS) SL1 (double-wrapped) stitch. K16. Pick up (PU) the wrap and next stitch and knit them together. Wrap the next stitch so that it now has two wraps. Turn.
– 10th row: (WS) SL1 (double-wrapped) stitch. P17. PU wrap and next stitch and purl them together. Wrap the next stitch so that it now has two wraps. Turn.
– 11th row: (RS) SL1 (double-wrapped) stitch. K18. Turn.
– 12th row: (WS) SL1 (double-wrapped) stitch. P19. Turn.
– 13th row: (RS) K20. Pick up one stitch from the gap between Needle 1 and Needle 2.

Set up body of leg:

– Return to knittng in the round.
– 1st round:
– 1st needle: Pick up 1 stitch from the gap between Needle 2 and Needle 1. K20. Pick up a stitch from the gap between Needle 1 and Needle 2. (22 stitches on Needle 1.)
– 2nd needle: Pick up 1 stitch from the gap between Needle 1 and Needle 2. K10. Switch to GREEN yarn. K9. K2 tog. (21 stitches on Needle 2.)
– 2nd round (you are now using GREEN yarn):
– 1st needle: K2 tog. K18. K2 tog. (20 stitches on Needle 1.)
– 2nd needle: K2 tog. K19. (20 stitches on Needle 2.)

Knit body of leg:
– K2, P2 on each needle until green stripe measures 3.5cm (1.4″) high. Switch to RED yarn.
– K2, P2 on each needle until red stripe measures 3.5cm (1.4″) high. Switch to YELLOW yarn.
– K2, P2 on each needle until yellow stripe measures 3.5cm (1.4″) high. Switch to GREEN yarn.
– K2, P2 on each needle until green stripe measures 3.5cm (1.4″) high. Switch to RED yarn.
– K2, P2 on each needle until green stripe measures 3.5cm (1.4″) high. Cast of loosely, or using a stretchy bind-off.

Repeat pattern in full to yield a second sock. Voila!

As usual, should you note any errata in this pattern, please let me know so that I can fix it. I don’t exactly have a bevvy of test knitters to help me catch mistakes.

Toad in the Hole

I’ve been wanting to try to make toad in the hole for ages. I have vague memories of my Nan serving it, or at least something similar, although I couldn’t remember the name… I Googled “pigs in a blanket” and “bubble and squeak” before I finally figured out what the name was of the dish that I remembered. Basically, toad in the hole is sausages baked in Yorkshire pudding batter — with regional and temporal variations, of course. Although the photos I’ve found online use thick sausages for the most part, I distinctly remember the version from my childhood containing smaller breakfast sausages, so that’s what I was determined to make.

The first time I tried it, I wasn’t very happy with the results. I used the Yorkshire pudding recipe from the Joy of Cooking (page 637, 2006 edition, Rombauer & Becker), which was recommended by my father. I doubled the recipe and doubled the size of the pan, which I thought would work just fine, but the sausages were just too small to compensate for all that batter. Also, although the edges of the casserole rose and puffed up quite nicely, it didn’t cook evenly through the center, leaving it a stodgy mess. I mean, the texture was firm enough to be edible, but it wasn’t very appetizing.

I tried to learn from my mistakes the second time around. This time I whipped up only a single batch of the batter, which greatly improved the ratio of batter to meat, at least for sausages this small. I cooked it all in a pan that was half the size, which allowed it to rise more thoroughly. Also, I used a metal pan instead of a glass one, which I find in general allows for a crispier edge to baked dishes.

I was really happy with how it turned out. The pudding rose beautifully, so fluffy in the middle that in many spots it was completely hollow. The crust was nice and crisp without being hard. The sausages were perfectly done. Now, if only I’d remembered to grease the pan, since to serve it I almost had to destroy it. You’d think I’d know better by now.

I served my toad in the hole with a side Ceasar salad and some sliced avocado, which my Nan would never have done (she’d have paired it with boiled or baked veggies). But I thought we needed some fresh greens with a main dish that doesn’t contain a single vegetable. The family ate it all up and asked me to make it again soon, which tells me that it was a success.

Spiced Pancakes with Apples & Caramel Syrup Recipe

Last night I had a very specific idea of what I wanted to make for dinner, and I really didn’t want to head out of the house again to buy ingredients, especially dragging the kids with me. It’s not really that big of a deal to get groceries with my kids, but it inevitably takes twice as long — or more — than shopping on my own. I looked at a couple of pancake recipes in my cookbooks, but nothing was exactly what I was craving. I wanted to make some kind of spiced pancake that paired well with chopped apples, which were the only fruit I had left in the fridge. Apples are a staple around here, since they winter well and can last months if kept properly. For those reasons, they’re also relatively inexpensive all year long. (Berries, which I generally prefer, get ridiculously pricey in the winter since they all have to be imported, and they begin to spoil after only a few days.) I started by combining about four different recipes; I made so many changes after a while that I knew if I didn’t write it all down, I’d never be able to duplicate my results.

In the end, I’m extremely happy with what I came up with: Spiced Pancakes with Apples & Caramel Syrup. We had it for dinner, but it would make an equally tasty breakfast or even a dessert. The pancakes are also great on their own and can be served with the more traditional butter/margarine with syrup (preferably maple), honey, or jam, or fruit butter (apple butter would be divine).

Here’s the recipe:

Spiced Pancakes with Apples & Caramel Syrup
Yields 10 to 12 five-inch-diameter pancakes (approx.)*

In a large bowl, mix together:
1 1/2 cups flour
3 Tbsp granulated sugar
2 1/2 Tbsp baking powder
1 tsp salt
1/8 tsp ground cloves
1/4 tsp ground nutmeg
1 tsp ground cinnamon
In another large bowl, combine:
1 1/2 cups plus 2 Tbsp 2% cow’s milk OR almond milk OR soy milk**
3 Tbsp plus 1 tsp canola*** oil
1 egg, beaten

Whisk together wet ingredients until they become a smooth mixture. Add wet ingredients to dry ingredients. Beat mixture with an electric or hand mixer until batter is smooth, scraping the sides of the bowl occasionally with a rubber spatula to remove lumps.

Cooking the spiced pancakes uses the same technique as my buckwheat pancakes. Lightly coat the cooking surface of a heavy, non-stick frying pan with cooking spray. Place the pan on the burner, turn the heat on to just a little bit higher than medium heat, and immediately pour a single ladle-full of batter directly into the center of the pan. (Never preheat an empty nonstick pan.) The batter will spread out without help to its optimal thickness. Watch the cooking pancake carefully for bubbles to appear on its surface. When the bubbles pop and leave little craters behind that don’t immediately refill in with batter, it’s time to flip the pancake. Have patience when cooking pancakes; better that they be cooked on a low temperature and finish slowly than to have them burn. Once the batter has started to solidify, you can peek underneath the pancake to check its colour. Cook each side until it is golden brown.

While the pancakes are cooking, core and roughly chop:
4-5 medium-sized eating apples****
Place the apples in a bowl to serve alongside your pancakes, if they are to be topped at the table. Beside the apples, place:
caramel syrup*****
whipped cream (optional)******
finely chopped walnuts

When the pancakes are cooked, serve immediately or stack on a warm plate which is covered by another warm plate when not being dished onto. To keep the pancakes warm, it helps to cover the top plate and edges with a tea towel or two.

My preferred way of plating the pancakes is to place one or two on a plate, mound with chopped apples, (optionally) dollop on a bit of whipped cream, and drizzle with caramel syrup. Lightly sprinkle each dish with chopped walnuts for added crunch and flavour.

Enjoy!

*This recipe can easily be doubled (or more) to serve a larger crowd. My family of four generally eats about a batch and a half of pancakes, and the leftovers go in the fridge to be reheated the next day.
**I used almond milk.
***Canola oil may be replaced by another light oil such as sunflower or vegetable oil.
****My favourites are Ambrosia and Honeycrisp, but whichever you like is fine. Use your best judgement about the size of the apples and how much the people you’re serving are likely to eat; my family likes their pancakes loaded with fruit, as pictured, but yours may differ. Since the apples are a topping and not a baking ingredient, having an exact quantity is not as essential.
*****Store-bought is fine, but you can also make your own. I got my recipe from the Joy of Cooking (page 849, 2006 edition, Rombauer & Becker), but you could just as easily use the Caramel Syrup Recipe from Martha Stewart, as they are virtually identical. They’re both essentially cooked sugar and water. Optionally, you can add a splash of vanilla for additional flavour. I’d recommend preparing this in advance, since it takes a while to cool down enough to eat. Also, I burned my first batch because I was trying to do too many things at once and forgot about it for about twenty seconds. That was all it took to make it completely inedible. The second batch was supervised nonstop and turned out well. Please learn from my mistakes!
******Real whipped cream, canned whipped cream, and non-dairy whipped cream substitutes are all grand.

Spectacularly Ugly Gnocchi

I’ve been getting a lot of my kitchen inspiration from Tasty lately, probably because they’re constantly showing up on my Facebook dash. In an effort to widen my online cooking exposure, I subscribed to a few other feeds today; if anybody has any in particular that they’d recommend, do drop me a line!

Anyway, the one that I tried over the weekend was Easy Homemade Gnocci. I have to say, this dish was anything but easy. It was disaster after disaster, really. I don’t know how much of that was the fault of the recipe and how much of it was my own, but nothing seemed to go right.

First of all, I prepared the potatoes exactly the same way as the video showed, but my mashed potatoes ended up being a gluey mess. They were either too moist to start or I should have prepared them differently; they definitely weren’t overcooked, since the center of the larger ones were still a little raw (I discarded those pieces). After perusing the video comments, I learned that some people bake their potatoes instead of boiling them to prevent excess moisture. Also, many people recommend a potato ricer instead of a masher, as it keeps the potatoes from turning gluey. As a bonus, if you cut the unpeeled potato in half and press it through the ricer, you don’t even have to peel anything — it kind of works like a giant garlic press or a modified of food mill.


My homemade gnocci served with baked herbed chicken thighs and corn.

I’m pretty sure that the potatoes were too moist, but I think they were also too large. The recipe calls for 3 to 4 small or medium russet potatoes, but that’s very subjective. Since vegetables can come in all different sizes, I much prefer a measurement by weight or at least by volume, as I’ve talked about before. Due to the moisture, I had to use twice as much flour as the recipe calls for just to get the dough even close to firm enough — and I think I really could have used more. I’d read online that too much flour can make the gnocci heavy and stodgy, and I was trying to avoid that… I don’t think I succeeded. The gnocci that I made did not hold their shape for long after forming and were much too floppy for the fork method to work at all. I made the mistake of letting the noodles touch before boiling them and they just congealed back into a large mass of dough, so I had to form them again. The dough was so stretchy that they didn’t keep their shape in the water.

In the end, I liked the flavour of the gnocci fried up in butter and sage, even if the pasta was misshapen and stodgy. I think I’d like to try this recipe again with modifications until I get it right. For that reason, I don’t think that this recipe is an easy beginner dish — I think that the original article misrepresented it as such. But it could eventually be quite nice, with practice. Perhaps I can find an Italian nonna who is willing to teach me the finer points of this dish, if only to keep me from massacring a tradition so badly next time.

Holiday Sweets

It seems like I have spent most of the last few days either cooking or driving around town to deliver Christmas presents, with a bit of housecleaning and last-minute decorating mixed in. On one of those gift deliveries, I received my very first gift of the season!

That’s three types of homemade fudge, all cooked up by my friend and her daughter, and then wrapped prettily. Thing 1 and Thing 2 keep asking me to share, but I have selfishly been hoarding it all for myself. (They’ve been on the receiving end of many other treats, so I don’t feel too bad.) I have a weakness for fudge.

One of Thing 2’s Sparks leaders has organized gifts to bring to one of the local retirement homes. Parent volunteers baked cookies and squares, which the leader will package into gift bags. One of the baked goods that I contributed was mini lemon cupcakes, which is actually just IKEA Muffinsmix Citron baked into tiny IKEA Snodriva paper liners (now discontinued). Is it a bad thing that I don’t always make things from scratch?

I did bake these Fudgy Pumpkin Coffee Brownies (page 222, Purely Pumpkin by Allison Day (2016)) completely from scratch, though. These also went to the retirement home gift bags. I used some of the Halloween pumpkin that I’d roasted, too! I really liked how moist these brownies ended up, courtesy of the pumpkin puree inside. I successfully substituted equal amounts of whole wheat flour for einkorn wheat, which I couldn’t find around here (and honestly had never heard of until I read this recipe). I did use a dairy-free chocolate chip, but I think I may go for a standard kind next time — I hear that they’re even making a dark chocolate chip now that’s available in most grocery stores.

Christmas Prep

We’re right smack dab in the middle of Christmas prep around here, dashing from hither to yon to prep for school spirit days, family events, and hosting over the holidays. Of necessity, suppers have been quick and easy; I think tomorrow I will be breaking out the slow cooker just to make dinner that much easier.

Last night, though, I rummaged through the freezer and turned up with some rather nice basa fillets. I dredged them in flour, sprinkled them with a bit of garlic powder and salt, and lightly fried them in a glug of olive oil in a non-stick pan. (As an aside, when making this kind of dish, does anyone else think about that lightly fried fish fillets meme?) I topped the fried fish with crumbled bacon and served it alongside boiled baby potatoes and steamed carrots.

I still wasn’t feeling spectacularly well last night, so I didn’t get as much prep work done as I wanted to, but the hectic pace around the holidays is one of the reasons I start canning way back in the summer. As planned, I plunged into my shelves of homemade preserves to get gifts together for my kids’ teachers.

As with Guiders, I consider teachers to be especially important to my children and, as such, they are deserving of some nice things around Christmas to show my appreciation. Teachers put in long hours in a job that I, to be completely frank, am vastly temperamentally unsuited to do. Before my children were born, I seriously considered home-schooling, but as time went on I realized that teaching is definitely not one of my gifts. I have the utmost appreciation for those people who can do so, especially while both funding and support are slowly withdrawn from the public school system over the years.

This year, my kids’ teachers are getting amaretto cherries, spiced pear jam with pineapple, handmade cloths, and a box of Girl Guide cookies. (I considered giving the cookies to the Guiders too, but I thought they could probably use a break from this fundraiser by this point.) I hope that the teachers will be able to enjoy these foods over the winter break — or any time after, really, as they’ll last about a year unopened.

Ginger Shakin’ Beef

A NTD Taste Life video for Ginger Shakin’ Beef came across my Facebook feed recently, and the recipe looked both simple and delicious. A bit of digging for the actual recipe (which wasn’t posted with the video) made me realize that the original source was Jamie Oliver’s 5 Ingredients Quick & Easy Food (2017). The recipe itself is available on Jamie Oliver‘s website. I’ve been meaning to pick up a copy of this book, but it’s a recent addition to my list of cookbooks I’d like, and anyway, it’s not a great idea to buy things for yourself before Christmas.

My plating sadly never looks as good as that found in Jamie Oliver’s books, but the taste of the dish was lovely. My kids had their meat over rice instead of bok choy since they’re not a huge fan of this veggie (although I did make them have a bit on the side). I loved the combination of the miso and the honey to make a simple sauce. It was delicious! However, I wasn’t too sold on the ginger and beef fat. I found that the fat, despite frying until crispy, really didn’t have much flavour and didn’t add much to the dish. The ginger, while it looked pretty, was very strong — my kids just picked all of theirs out. I think it would have been better mixed in with the main meat and sauce, maybe lessened in quantity a bit and chopped fine to mix throughout the dish. All that being said, I will definitely make this dinner again in the future (albeit with some slight variations to adjust for my family’s palate). It was both easy and tasty, and it is great for school nights when time is at a premium, so that’s a win in my book.

The Last of the Canning — Maybe

It looks like I have finally made it through my not-inconsiderable list of foods that I wanted to put up for the winter. I mean, I still have two pumpkins left to roast, but the puree is just going in the freezer, which doesn’t take nearly as long as hot water bath canning or pressure canning. If I don’t have to lug my canning rigs and bunches of jars out of the basement, it doesn’t count.

The last two things to put up were parsley jelly and hot sauce, both of which contained produce grown in my garden. I brought a big pot of parsley in with the first major cold snap about a month ago, and I kept it alive until I could chop it up for the jelly. The peppers for the hot sauce were brought in as they ripened, and then were frozen. This isn’t the greatest solution if you want your peppers crisp, but if you’re just going to run them through a blender or food processor, it doesn’t really matter. This way I was able to cook up a whole season’s peppers at once, instead of using them up individually as they became ripe.

I was curious to try the parsley jelly (from page 298 of Preserving: The Canning and Freezing Guide for All Seasons by Pat Crocker (2011)), since I’d never heard of it before. Mint jelly, sure, but not parsley. Apparently it’s and English thing? This jelly can also be made with sage, thyme, or basil, in addition to the mint that I’m familiar with. Sadly, as good as it looks, the jelly didn’t set despite following the instructions to the letter. That’s why I added a “maybe” to this post title. I mean, I could just give up and chuck the unset jelly, or I could try to re-cook it. I’ve used this technique in the past and it has worked out well. But I am so incredibly busy with the Christmas season at the moment that I might just give up and try again another time.

My hot sauce, however, turned out wonderfully. Since it’s a puree, it’s not like I have to worry about the set. I base my hot sauce on the Essential Habanero Hot Sauce from Genius Kitchen. I got great reviews on the sauce last year. Although the heat of the sauce varies because every summer I grow slightly different peppers, I’m pretty sure that this year’s is at least as hot as last year’s because even just the vapours from cooking it completely cleared my sinuses. Let’s hope the people I am giving it to for Christmas like it as much!

Pear & Honey Jam Recipe

As I wrote about before, I had a lot of cooking pears that needed to be used up recently. All of this excess meant that I had a chance to experiment with making a jam of my own devising. Pears are a naturally acidic fruit, which makes them perfect for hot-water-bath canning with a bit of sugar. It took me a couple of tries to get this recipe right, since since I didn’t want to use like ten cups of sugar (with would generally produce and easily firm set), since I wanted to taste the fruit and the spices more than the sweetness. In the end, I had something that I am quite proud of. Next year, when pears come into season, I think that I will make this the main pear jam (although I did really like the Spiced Pear Jam with Pineapple found on page 935 of the Joy of Cooking (2006 edition, Rombauer & Becker), or on the app). Maybe next year I’ll have a yield of more than four pears off of my baby pear tree, and I’ll be able to make more things from fruit I’ve grown myself!

Pear & Honey Jam
Yields six 250mL (1 cup) jars

Prepare and sterilize six 250mL (1 cup) jars (or twelve 125mL (1/2 cup) jars) and matching lids as per manufacturer instructions. Keep jars and lids warm until it is time to fill them.
In a Maslin pan or other non-reactive, heavy-bottomed pot, combine:
1.5 Kg (3.3 lbs) ripe/slightly overripe pears, peeled, cored, and roughly chopped
350 mL (1.5 cups) honey*
700 mL (3 cups) sugar
60 mL (1/4 cup) lemon juice
2.5mL (1/2 tsp) ground allspice
5 mL (1 tsp) ground cinnamon
2.5mL (1/2 tsp) ground cloves
2.5mL (1/2 tsp) ground nutmeg
2.5mL (1/2 tsp) ground ginger
Bring to a boil over medium-high heat, stirring constantly to prevent burning. Boil for 10 minutes. Remove from the heat. Run the mixture through a blender or food processor until it reaches a smooth consistency, being extremely careful as the ingredients will be very, very hot. Return the mixture to the pot and bring it back to a boil.
Add:
one 85 mL (2.9 oz) package of liquid pectin
Bring mixture back to a boil. Stir constantly as mixture boil hard for an additional minute.
Ladle the jam into the prepared jars, leaving a 5mm head space. Wipe jar rims with a clean, damp cloth or paper towel. Top jars with lids and screw metal rings into place until fingertip tight. Place jars on top of a canning rack inside a boiling water canner, being sure that none of them touch the sides of the pot or each other. Jars should be covered by at least 2.5cm (1″) of water, so add hot water if necessary. Bring to a rolling boil and process for 15 minutes, starting your timer once the water is boiling.
Remove jars from canner and place them on a cooling rack, not touching each other. Let them rest for 24 hours before touching. Label if desired. Jams may take up to 48 hours to set, so do not open them until this time has passed.
This jam may be kept in a cool, dark area for up to one year.

*It’s really not worth it to use unpasteurized honey here, since all the additional benefits are lost when the honey is cooked.