Pumpkin & Sage Pasta Recipe

I did manage to finish Thing 2’s skirt last night, as well as doing a bit of Christmas shopping. That being said, Candy Cane reminded me today of another task that I really have to complete.

It says something about your ability to procrastinate when your Christmas elf can sit on your Halloween pumpkins. The squash are still in good shape because they haven’t been cut, and they have been set on holders off of the ground so that air flow underneath keeps them from rotting. They’re actually more likely to dry out than decompose at this point. I started by cooking the first of the first of my four pumpkins today. I used the same technique described on Elana’s Pantry, but the pumpkin was so large that each half took about an hour and a half to cook. Then I scooped out the roasted pumpkin flesh and blended it smooth it in the food processor. These pumpkins are going to yield a lot of pumpkin puree, but that’s fine by me! It freezes well, and I still have two cookbooks worth of pumpkin recipes to try.

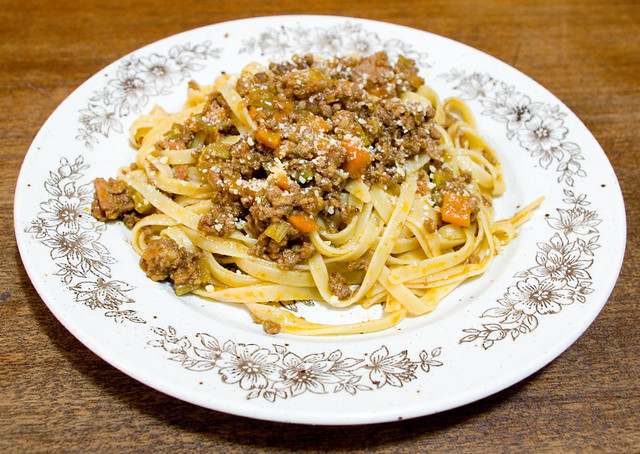
Having all that pumpkin puree on hand meant that I really wanted to incorporate it into dinner. I went with my tried-and-true Pumpkin and Sage Pasta Sauce, which I have modified many times over the years to accommodate both food preferences and allergies/sensitivities. I’m very happy with the latest iteration, as is my family. The sauce tastes more of sage, garlic, and onion than it does of pumpkin (which itself has a rather mild flavour). Instead, the pumpkin is what creates the creamy texture without using any actual cream. These days I make a non-dairy version, but if you prefer it can be made with milk and topped off with a bit of sour cream. Also, if fresh pumpkin puree isn’t available, canned is perfectly fine.

Pumpkin & Sage Pasta
Serves 4 adults

Into a deep saucepan or heavy-bottomed pot, pour:
2 Tbsp olive oil
Preheat the oil, then add:
1 medium white onion (100g peeled), diced
3 cloves of garlic, minced
On medium heat, sweat the onions and garlic in the olive oil, being careful not to let them brown.
Turn up the heat to medium-high and add:
200g ground pork
200g lean ground beef
Fry the meat until it is browned, breaking it up as it cooks so that there are no large lumps. Drain the excess fat/oil.
Add:
2 cups pumpkin puree
250mL chicken broth
60mL 2% milk, almond milk, or soy milk
1 tsp ground sage or 3 tsp fresh sage, chopped fine
1/4 tsp nutmeg
3 Tbsp fresh parley, minced
1 tsp salt
1/4 tsp black pepper
Stir together and simmer gently to reduce slightly for about 10min. While the sauce is simmering, cook as per package instructions:
400g fettuccine*
Drain the pasta, then return it to its cooking pot. ** Pour the sauce over the noodles and stir to mix. Serve, optionally sprinkled with:
grated Parmesan or Romano cheese, to taste

*I’ve found that an equal amount of penne works as well.
**If you want to add sour cream to the sauce, stir it in at this point. You will need anywhere from 1/4 cup to 1/2 cup, depending on your personal taste. I recommending starting with 1/4 cup and seeing how you like it, then adding more if necessary.

Simmered Boiled Meat Sauce Pasta

I follow Tasty Japan on Facebook, and this video popped up yesterday:

I thought it looked like a good weeknight meal, so long as I started it as soon as the kids got home (it requires simmering on low heat for two hours). I ran it through Google Translate and used the recipe for, as it called it, “simmered boiled meat pasta”. I had to laugh at how bad bad Internet translations can be — among other things, this one instructed me to “add red wine to strengthen the fire, fry for 2-3 minutes and fly alcohol”. Granted, the whole reason I used the program is because my paltry Japanese skills aren’t up to translating a recipe, so who am I to judge? I managed to make a really delicious dinner anyway.

If you don’t have the patience Google Translate, check out the original recipe for Ragu Bolognese over on the English version of Tasty, which was posted back in May. Of course I found that version only after I’d made my dinner, but somehow I didn’t manage to mess it up. It has been pointed out online that this recipe is almost identical to Gennaro Contaldo’s Classic Italian Ragu Bolognese, and after watching both videos I have to agree. Although now that I’ve Googled “how to make a bolognese ragu”, all of the recipes are very similar, which stands to reason. I think it’s just because it’s a very classic, well-known dish.

As usual, I had to make a few changes/adjustments to make it work with what I had on hand. My carrot ended up being about 225g, so I used that much celery as well, since some of my homegrown celery stalks were a bit spindly. I also used equal weights of bacon instead of pancetta, since I had bacon on hand and they are very similar anyway. I also used fettuccine instead of tagliatelle, since the grocery store I was shopping at didn’t have tagliatelle. All that being said, I do think that I will be making this recipe again in the future!

Cocktail Party

Last night was the cocktail party for my husband’s work, which I attended as his plus-one. This is a yearly event held early every Christmas holiday season, and the general purpose is for middle- and upper-management to schmooze with clients. In years past it was open to all employees, which I got a kick out of because it was one of the few chances to see a lot of the non-managerial staff dressed in their finest, since so many of them never get more formal than jeans and a T-shirt for the average work day. I do miss that.

Of course, I don’t have anyone that I need to schmooze with; as the spouse of an employee, my role is mostly ornamental, although I am expected to occasionally make polite conversation. Mostly, it’s pretty much understood that I am there for the free food and drink. And boy, does the company put out a spread! This year the event was held at the newly-renovated NAC (National Arts Centre), although for many years prior it was held in a banquet hall at the nearby Westin Hotel.

The cold buffet was splendid. There was a wide array of Quebec cheeses (foreground center and background right), along with a delightfully large selection of sushi and sashimi (background left, where people are serving themselves).

The cold buffet also featured a couple of charcuterie platters (front and center) and, my favourite on the cold buffet, maple whiskey planked Chinook salmon with onion marmalade and caper remoulade.

There was an oyster bar where some of the caterers were shucking oysters fresh all evening. I’m told that there’s a real technique to doing so without slicing the crap out of your fingers; I’m pretty sure I’d rather not give it a try, myself. These oysters were tasty and fresh, and although I know they’re not everybody’s cup of tea, I quite enjoyed them. My husband tried his first oyster on the half shell last night and proclaimed it to be “meh”, mostly because of the slimy texture.

There were also a number of hot food stations scattered throughout the halls. Of course, the portions were tiny so that one could have a bite of this and a bite of that, but there was no limit as to how many each guest could take. There was a take on the traditional roast turkey with dressing, gravy, and cranberry sauce. The plate was garnished with microgreens. (What is it with this microgreen trend lately? They’re everywhere! It’s like how everything used to be garnished with parsley in the 70’s.) This was decent, with the highest point being the flavour of the gravy, but overall it was missing “oomph”.

The lamb was much nicer than the turkey, with a very soft texture and a savoury accompanying sauce (which I believe was polenta-based). And, of course, microgreens.

The funniest dish of the evening was what the servers called a “beef martini”. In each martini glass, starting from the bottom, was mashed potato, roast beef in gravy, tomatoes, microgreens (!), and crispy fried bamboo shoots. Despite the name, the dish is meant to be eaten with a fork, not drunk. The beef was melt-in-your-mouth tender, the tomatoes were perfectly seasoned, and the crispy topping set the rest off in an interesting fashion. There was usually a line at this station throughout the night.

My favourite dish of the evening by far was the seared scallops and jumbo shrimp in Maker’s Mark whisky, on a smear of Gruyere white sauce, with a scattering of microgreens (!!). The seafood was cooked up fresh to order and there was always a line at this station, with people coming back again for more over and over again. The scallops were melt-in-your mouth, and although the shrimp were not as excellent in comparison, they were still very good.

After speeches by the company’s head honchos, the desserts were brought out. There were French macarons, which I had seen many times but I had never actually tried before. I had expected them to be more crispy and wafer-like, but they were actually quite soft.

As always, the chocolate-covered strawberries were a hit.

I didn’t try all of the dessert mouthfulls, but the peach thingies (upper left corner) were quite nice. The brown desserts at the center of the photo were not chocolate like I’d anticipated; they rather surprised me with a strong sour lemon flavour. Once I got over my initial shock, they were quite nice. And the traditional Nanaimo bars on the right hand side of the photo were pretty good too.

All in all, I had a lovely time at the cocktail party. I returned home stuffed to the gills and just a little bit tipsy. I loved the new venue, with its huge windows and views of the Chateau Laurier, War Memorial, and Parliament Buildings. I liked every food I tried, and I even loved a few of them. I do miss a few dishes that were standards at the old venue, like the roast lamb stuffed with rice pilaf (I’m pretty sure they did that same dish every year for over a decade and each time it was cleaned down to the bones). Last year they also served Oka cheese melted raclette style from a half-wheel and spread over something… Bread? Potatoes? I ccan’t remember now, all I remember is that the cheese was delicious and I was really hoping for it again. However, I’d trade the Oka for this year’s scallops in a heartbeat.

Low-Prep Suppers

I kind of have my kitchen back again… Okay, not the whole thing, but the counters and table are clear again, so I can cook properly. I made shepherd’s pie for dinner (but without the cheese topping, to reduce the amount of dairy and make it better for my gut). However, the meal was running late and we dug into it much too fast for me to take pictures. Instead, I have photos of the bread that was cooking while we were eating dinner:

That’s Beer Bacon Bread found on page 44 of Betty Crocker’s Best Bread Machine Cookbook (Betty Crocker, 1999). I used a flat Guinness beer, a package of crumbled circular bacon, and chives from my window garden instead of green onion because that’s what I had on hand. It’s only the second time that I tried out any recipes for this book, and so far so good! There’s a Cottage Dill Loaf on page 152 and Brandied Pumpkin Bread on page 104 that I can’t wait to try.

Earlier in the week I had to make a few easy and quick meals that required little in the way of prep space, so I whipped up a loaf of Sally Lunn bread (page 25, also from Betty Crocker’s Best Bread Machine Cookbook), which I think called for an unreasonable amount of butter in the dough (6 Tbsp!), but I have to admit tasted quite nice. I used it to make grilled cheese sandwiches for the girls, with sides of sliced apples.

Of course I have issues with dairy (and at any rate I’d run out of cheddar), so I fried up a couple of eggs each for my hubby and I, and served it with the Sally Lunn, sliced apples, and mandarin oranges.

Earlier this week I went with a less bread-based meal and baked up some trout with in teriyaki sauce, which I served over rice with a side of asparagus.

I’m really looking forward to having this mini-reno complete so that I can try some new recipes! This hasn’t been nearly as time-consuming an affair as a full gutting of the kitchen (much as I’d love to be able to afford a 100% fresh new kitchen), but it’s still rather disruptive. At least it’s cheap!

Meemaw’s Cookie Recipe

I have a number of friends and family who are huge fans of the television show The Big Bang Theory, and I don’t mind the show myself. I thought that, since Christmas is coming up, I might try to make a show-based recipe that has been floating around the Internet for a while. It’s for a type of cookie purportedly baked by Meemaw (Sheldon Cooper’s grandmother). My Google-fu has failed me and I haven’t been able to find the original source, else I would link back to it to give proper credit.


Sheldon Cooper (played by Jim Parsons) holding a cookie baked using his Meemaw’s recipe, as baked by Amy Farrah Fowler (Mayim Bialik) in The Big Bang Theory, season 8, episode 11.

The recipe I’ve found is a cookie press or spritz cookie, although from the reference photos I’ve found that the final product looks more like something made with a cookie cutter. Or possibly they started with a flat cookie and created the tree design on top using a pastry bag filled with dough? Granted, you don’t see the cookies in the show for very long, and I could totally be wrong. I thought I’d try the spritz version anyway.


Thing 1 and Thing 2 being very serious about getting the cookie dough just right.

Thing 1 and Thing 2 did most of the work this time (okay, mostly Thing 1), so it’s definitely a simple recipe to follow. The kids really like working with the caulking-gun-like cookie press, and they also love to add the sprinkles. Of course, this meant that the final product looked far from perfect, but who cares so long as they had fun and it tastes great?

In the end, I was really happy with this recipe, even though it may not be a hundred percent screen accurate. Here’s what I did:

Meemaw’s Christmas Cookies
Makes about 8 dozen small cookies

Preheat the oven to 375°F (190°C).
Beat together until creamy:
1 1/2 cups unsalted butter, softened
1 cup granulated sugar
1 tsp almond extract*
Beat in, about a third at a time:
3 1/2 cups all-purpose flour
Insert any shape of disk into cookie press (the ones in the show are tree-shaped, but any shape will do). Press dough onto an ungreased cookie sheet one inch apart. Alternately, use a pastry bag with a wide tip to create designs.
Decorate with:
coloured sugar or sprinkles
Bake for 10 to 13 minutes, or until firm and very slightly browned.
Remove from cookie sheet onto a cooling rack. Serve immediately, or place into a container once they are cooled, where they can last up to a week.

*If nuts are a problem, vanilla extract may be substituted (although the flavour will change a little bit).

Steak Ramen

Last night I was searching for something to make for dinner, something that wouldn’t require a special trip to the grocery store. I did finally go get groceries on Monday, so now both the freezer and the fridge are full and I figure that I shouldn’t have to go out again every day for ingredients. At my husband’s request, since he’s fighting off a cold, I decided to make soup.

In the freezer I had some beef broth made with garlic and wild mushrooms, which I thawed as the base for the soup. I boiled up some ramen noodles and topped them with steamed spinach, carrot matchsticks, and soft-boiled eggs. The crowning glory of this particular dish was the steak. It didn’t brown up as nicely as I’d like, to my dismay, but it was very tender. To enhance the flavour, I used a marinade from page 65 of Simply Ramen by Amy Kimoto-Kahn (2016). Now, technically the recipe was for Kobe Beef Tsukemen, but I’ll be 100% honest and tell you that there’s no way I can afford Kobe beef. Instead, I thought I’d just use the marinade on a (much) cheaper steak. The marinade contains lemon juice, soy sauce, sake, and mirin (sweet rice wine), which combined is somewhat salty-sweet with an acidic punch to start breaking down the meat. Also, as per the recipe, I fried up the steak in melted beef suet instead of oil, which I think helped to enhance the flavour. Once I removed the meat from the pan, I added the juices to the soup broth to add extra punch. I was very satisfied with how it all turned out, especially since it made a lower-quality cut of beef quite palatable. Even if I never get the chance to cook Kobe beef, I think that I will definitely revisit this recipe in the future when I have all of the other ingredients on hand to try the dish in full.

Circular Bacon?

I’m trying my darndest to get the costume photos from this weekend edited, but it’s taking much longer than I had hoped, although I do acknowledge that this is mostly because I’m really picky. It would have been much too easy to just crop the photos to size. So it may be another day or two before I have it all done.

In the meantime, I did have to cook dinner last night, which had to be quick because I had to get the kids to extracurricular activities. Thing 2 requested bacon and eggs, which I thought was a perfectly acceptable solution. Earlier in the day I’d put some Milk Loaf (page 65, Bread Machine: How to Prepare and Bake the Perfect Loaf (Jennie Shapter (2002)) on to cook in my bread machine. I just microwaved some bacon (my preferred low-mess way to cook it), scooped out some honeydew melon, fried up some eggs, and buttered some fresh bread for a quick dinner.

You might note that the bacon in the above photo are shaped unusually. It’s not an illusion, the slices are actually more or less circular! They’re actually Presiden’t Choice Naturally Smoked Bacon Rounds, which are described as follows:

A real game changer when it comes to whipping up burgers, breakfast sandwiches and BLTs, bacon rounds make things so much easier. Cut from the pork belly, they’re everything you love about traditional bacon – only rolled prior to smoking and slicing. Not only are they the perfect fit for buns and English muffins, the edges curl up a little while cooking, creating a “cup” for toppings.

Well, my slices didn’t curl up on the edges, but maybe they do so when fried. I have to admit, I’ve never had any problem whatsoever fitting traditionally-sliced bacon into a sandwich or burger, so I think that these bacon rounds have been created to fix a problem that doesn’t really exist. I mean, if your bacon is too big for your bread, it can be broken if crispy or cut if soft. The rounds are more expensive than the same brand’s regularly-sliced bacon, too ($1.60/100g vs. $1.20/100g). I have a feeling that other shoppers agree, since I found my supply in the clearance section at the local grocery store and I haven’t seen them there since. I paid only $0.99 per package (so $0.26/100g if I did my math right), and at that price it was definitely worth it since the rounds taste exactly the same as regular bacon. Without another comparable sale, I can’t see myself buying these again though.

It’s Beginning to Look a Lot Like…

I finally started to get into the Christmas spirit a little bit this weekend, probably because on Friday afternoon my yard looked like this:

And by Sunday it looked like this:

Many of my friends and family bemoaned the precipitation and freezing temperatures, but I always like a bit of snow before Christmas. A green Christmas just isn’t very Christmas-y to me. That being said, it’s supposed to go up to 9°C (48.2°F) on Tuesday, so it’s not like this is going to last.

It really put me in the mood for Christmas shopping, though. Unlike in the States, where the holiday buying season appears to officially start as soon as the clocks strike midnight the day after American Thanksgiving, we don’t really have a traditional time to begin. Some people shop all year ’round. Some companies put out their Christmas merchandise at the same time as they’re building their Halloween displays (which is a little early to me, but oh well). For me, all of the Halloween debris has to be cleared away and there has to be some snow on the ground for me to feel like shopping for gifts — although I have been known to pick things up six months in advance if the opportunity arises at a great price.

I went with my mother, Thing 1, and Thing 2 to a number of craft fairs on Saturday, but one of my perennial favourites was the one held at Cairine Wilson High School. It’s a huge fair; it packs full the big gym, the little gym, the hallways, and the cafeteria. Given the number of booths, I’m bound to find something that I know someone will like.

But even if I don’t find the perfect gift for someone, it’s a lot of fun to check out the wares of local craftspeople. This is one of the few times of year that a lot of these people make their work available to the public; many craftspeople work all year by themselves to make enough stock for one or two holiday shows.

After hitting a few craft fairs, we rushed home so that the kids could get changed into their uniforms and we could drive out to Epiphany Anglican Church where the Girl Guides’ Holiday Tea is held every year. Since I’d gone to all of the effort of baking brownies for the tea, I pretty much had to attend. It’s always a lovely time, with such cheerful little servers and so many delicious treats on which to nosh.

I may have kind of taken a picture of some of the sweets for our table after I’d already nabbed the chocolate ones. Just maybe. I think that the next to go was that shortbread on the bottom right, since I’m a sucker for those too.

Clean Out Your Refrigerator Day

I’m still working away on that last-minute costume. I got so caught up in the process that I stayed up until almost 2:00am without even realizing it! I had absolutely no intention of staying up too late. When I get into problem-solving mode, I hate to stop when I’m on a roll. If I’d been super-frustrated, I would probably have stopped earlier (although there was a large seam that I “sewed” without realizing that the bobbin had run out).

I couldn’t find my meter stick, so I did end up using a wooden prop sword in order to trace a long, straight line on my fabric. My father pointed out afterward that I could have just called and borrowed his, but the sword was only a few feet away from where I was sewing, and it worked out fine!

November 15th is Clean Out Your Refrigerator Day, so I made a dinner entirely out of what I had around the house. This had nothing to do with the fact that I’ve been so engrossed in costume construction that I haven’t gone out to do groceries, I swear. I went with one of the simplest clean-out-the-fridge dishes: stir fry. I cooked up the veggies I had on hand (celery, zucchini, and frozen peas), scrambled in some egg, threw in some cooked rice and shrimp, and gave it all a good drizzle of sesame oil and soy sauce while I cooked it all together for a few minutes. My husband asked for seconds, which I figure means it wasn’t half bad.

After the kids went to bed, I wanted to treat myself to some banana bread, which is pretty much my favourite quick bread. I even had some bananas I’d frozen before they went bad that I needed to use up, so the timing was perfect. I’d seen a Tasty video for 6 Desserts To Make In Your Microwave, so I thought I’d give their individual microwave banana bread a shot. Sadly, as with the microwave oatmeal bread I made a while back, I was disappointed. The more I try it, the less I think that microwaves can be used for half-decent baking.

First of all, there was a recipe in the YouTube transcription of the recipe. If you watch the video, the ingredients include 3 Tbsp brown sugar and 1/2 tsp baking powder, but the recipe under the video calls for 3 Tbsp brown sugar and then another 1/2 tsp brown sugar, with no baking powder. Luckily I noticed that there was no rising agent before I started cooking, but by then I’d already added the extra 1/2 tsp brown sugar, too.

Once the banana bread was cooked, I found it to be largely tasteless. I found that interesting, because it contains basically the same ingredients as the more traditional banana bread in the Joy of Cooking; what really differentiates the two, other than size, is the cooking method. I think that because the Tasty version is made so quickly in the microwave, instead of cooking for an hour or more in the oven, it doesn’t have a chance to develop its flavour, which probably mostly comes from the crust. Microwave cooking, in general, doesn’t create proper crusts. Also, I found the consistency of the microwave banana bread to be less like a quick bread and more like a sponge or a pudding. I cooked it for an extra 30 seconds over the recommended time and tested it with a cake tester for doneness, so I know it was definitely cooked all the way through. Even so, the consistency was more like microwave scrambled eggs than like bread.

Of course, opinions may vary, and you may like banana bread made this way. I think that I will stick to baking in the oven from now on, except perhaps for the occasional experiment.

Progress

I had planned on spending all day yesterday working on my costume, but a power outage until after noon made that highly problematic. I couldn’t even cut out pattern or fabric pieces, since that requires a large, flat surface, and the only spot like that in my house was my basement floor — where there was no power for lights.

Luckily, I had a good portion of the rest of the day to work on the costume, and some progress was made. I am happy to say that at least one element of the costume is complete. I did have to take a break to cook and eat dinner, though.

I didn’t want to make something that took hours of prep work, since I should have been spending that time sewing. I still had one enormous zucchini left to cook (my friends, overloaded with their harvest, kept bringing me more), so I made a big batch of baked Panko zucchini sticks. Normally I wouldn’t peel the zucchini, but this time I did because the squash was huge and old, so the skin was very tough. For meat, I chopped up some chicken, coated it in Golden Dragon Thick Teriyaki Sauce, and fried it up on the stove while the zucchini baked. It all turned out quite well, and it was found acceptable by my friend who came over in the evening to work on her own costume. We were up until well past midnight sewing, and we’re not done yet!