Chicken Bones

Over the weekend I hit one of the local bulk food stores, and while I was there my attention was drawn to what I thought were real Chicken Bones. Okay, not real chicken bones, but the candy named after them. Chicken Bones follow in the grand tradition of naming confections after the parts of animals that they superficially resemble, just like Beaver Tails and bear claws. At any rate, I thought I was getting the Ganong original chicken bone candy, but in retrospect I may have been getting an imitation.

Here’s a video by Ganong about how the real thing is made:

Real or fake, Chicken Bones were an essential flavour of my childhood holidays. Unlike the ubiquitous mint of candy canes, Chicken Bones are a strong cinnamon candy with a touch of dark chocolate at the center. Now, I wouldn’t have known to make this comparison as a kid, but as an adult I can definitely say that they remind me of Fireball whisky.

Chicken Bones are a really Maritime thing, although they’ve made their way to the rest of Canada somewhat sparsely over time. That isn’t to say that they’re universally loved out East; I know a fair number of people who can’t stand them, but they are definitely ubiquitous. My Nan, who was from Britain but lived almost sixty years of her life in small-town New Brunswick, used to buy Chicken Bones around the holidays, along with After Eights and liquorice allsorts. Chicken Bones have a flavour and smell that I most strongly associate with her. Now that she has passed away nobody else around here seems to serve them. So when I saw them at the bulk food store, even if they were imitations, I had to pick up a few. I do miss my Nan around Christmas, since I spent so many of these holidays in her company. But sometimes keeping the little traditions alive helps to bring her back just a little bit, which is especially important this time of year, I think.

Pumpkin & Sage Pasta Recipe

I did manage to finish Thing 2’s skirt last night, as well as doing a bit of Christmas shopping. That being said, Candy Cane reminded me today of another task that I really have to complete.

It says something about your ability to procrastinate when your Christmas elf can sit on your Halloween pumpkins. The squash are still in good shape because they haven’t been cut, and they have been set on holders off of the ground so that air flow underneath keeps them from rotting. They’re actually more likely to dry out than decompose at this point. I started by cooking the first of the first of my four pumpkins today. I used the same technique described on Elana’s Pantry, but the pumpkin was so large that each half took about an hour and a half to cook. Then I scooped out the roasted pumpkin flesh and blended it smooth it in the food processor. These pumpkins are going to yield a lot of pumpkin puree, but that’s fine by me! It freezes well, and I still have two cookbooks worth of pumpkin recipes to try.

Having all that pumpkin puree on hand meant that I really wanted to incorporate it into dinner. I went with my tried-and-true Pumpkin and Sage Pasta Sauce, which I have modified many times over the years to accommodate both food preferences and allergies/sensitivities. I’m very happy with the latest iteration, as is my family. The sauce tastes more of sage, garlic, and onion than it does of pumpkin (which itself has a rather mild flavour). Instead, the pumpkin is what creates the creamy texture without using any actual cream. These days I make a non-dairy version, but if you prefer it can be made with milk and topped off with a bit of sour cream. Also, if fresh pumpkin puree isn’t available, canned is perfectly fine.

Pumpkin & Sage Pasta
Serves 4 adults

Into a deep saucepan or heavy-bottomed pot, pour:
2 Tbsp olive oil
Preheat the oil, then add:
1 medium white onion (100g peeled), diced
3 cloves of garlic, minced
On medium heat, sweat the onions and garlic in the olive oil, being careful not to let them brown.
Turn up the heat to medium-high and add:
200g ground pork
200g lean ground beef
Fry the meat until it is browned, breaking it up as it cooks so that there are no large lumps. Drain the excess fat/oil.
Add:
2 cups pumpkin puree
250mL chicken broth
60mL 2% milk, almond milk, or soy milk
1 tsp ground sage or 3 tsp fresh sage, chopped fine
1/4 tsp nutmeg
3 Tbsp fresh parley, minced
1 tsp salt
1/4 tsp black pepper
Stir together and simmer gently to reduce slightly for about 10min. While the sauce is simmering, cook as per package instructions:
400g fettuccine*
Drain the pasta, then return it to its cooking pot. ** Pour the sauce over the noodles and stir to mix. Serve, optionally sprinkled with:
grated Parmesan or Romano cheese, to taste

*I’ve found that an equal amount of penne works as well.
**If you want to add sour cream to the sauce, stir it in at this point. You will need anywhere from 1/4 cup to 1/2 cup, depending on your personal taste. I recommending starting with 1/4 cup and seeing how you like it, then adding more if necessary.

Busy Night

I had a billion and one things to accomplish yesterday evening, most of which I can’t even write about because they had to do with Christmas gifts for people that I know read this blog. One thing I can mention is that I did get the chance to put the last finishing touches on the Frankensteined gaming PC (made with excess parts graciously donated by our friends) that my husband and I are giving Thing 1 for Christmas. She doesn’t have Internet access yet, so here I can sigh with relief here about having at least one major gift out of the way.

Dinner was a quick one, since I can only do so many things at once, and for a change the kitchen was not calling me. I wanted to eat at least somewhat healthily, so I made up some soft tacos with a pre-packaged spice mix. Well, I say “made up”, but mostly I just prepped all of the ingredients and set them out on the table so that everyone could fill their own tacos. I fixed mine up with spiced ground beef, avocado, lettuce, tomato, mayonnaise, and lactose-free cheddar. Also available on the table were sour cream (which I prefer over mayo, but can’t eat), homemade blender salsa canned earlier this year, and shredded cheddar cheese.

Dinner out of the way, I went on to work on some Christmas crafts. I whipped up my first-ever circle skirt for Thing 1 — which is even easier for a kid than for an adult since there aren’t any seams! A friend of mine recommended the following resources to me, which were invaluable:

Make a circle skirt without a pattern by Costuming Diary
Circle Skirt (and a follow-up instructional video by Made Everyday
The Best Way to Sew Bias Tape by Positively Splendid

I combined the techniques because I wasn’t working with a serger, and because I wanted a finished waistband edge but I also wanted the cute red elastic to show. This skirt will be worn later in the week when the girls go get their pictures taken with Santa. I still have to make a second, smaller one for Thing 2. Hopefully I can make the time tomorrow.

In every spare minute, I’m knitting away on cloths to be given as gifts. I think of this colourway as “Evil Minion“. This is either the last or second-last one, depending on how much yarn I am left with. After that, it’s time to start on knitted owls for my girls’ Guiding leaders.

As we do every year, we have had a guest in our house starting December 1st. Candy Cane will stay until December 25th, at which point she will be whisked back to the North Pole where she will stay until next holiday season. Here she is unpacking all of her copious outfits. I know some people find The Elf on the Shelf kind of creepy, but my kids really love her and look forward to her annual arrival. We’ve never made a big deal of the “reporting back to Santa” aspect of the Elves at our house, so my kids just see her as another piece of Christmas magic.

Vintage Stand Mixer

It’s come up before that I like old things, not just because they’re old, but for reasons that are:

a) stylistic (some of them are just pretty);
b) environmental (why buy new and add to pollution when there are working older versions of the same thing out there?); and
c) budgetary (old/used items tend to be cheaper than new, unless they’re very rare)

So it’s no surprise that when I recently found a really cheap vintage Dormeyer Princess stand mixer from the 1950’s up for sale, I jumped on the opportunity. I took the chance and bought it based only on some pretty bad photos, but I figured the risk was worth it. As I suspected, it needed a bit of work, but nothing I couldn’t handle.

The main part of the mixer needed a bit of cleaning.

However, what I was most worried about was the state of the power cord, which was dangerously frayed. It looked like it had been poorly repaired more than once. So I went out and bought a completely new cord and installed that — a fairly painless process, as it turns out.

When I opened up the main body, it was disgustingly gungy inside. I took it apart as much as possible, washed all the non-mechanical bits in hot soapy water, and wiped down the motor and all electrical/mechanical bits down thoroughly.

Now it’s clean inside and out, the wiring is safe, and it works like a charm!

It’s pretty, too. I think the styling is very reminiscent of an old Chevrolet.

In the end, the total cost to me was about $30, plus an hour or two of work. Not bad when a nice modern KitchenAid stand mixer costs about $600. Apparently there was originally a juicer and a meat grinder attachment for this model, which I’ll keep an eye out for while thrifting. I wonder if I could find a dough hook that would work with it as well? That would be lovely.

Simmered Boiled Meat Sauce Pasta

I follow Tasty Japan on Facebook, and this video popped up yesterday:

I thought it looked like a good weeknight meal, so long as I started it as soon as the kids got home (it requires simmering on low heat for two hours). I ran it through Google Translate and used the recipe for, as it called it, “simmered boiled meat pasta”. I had to laugh at how bad bad Internet translations can be — among other things, this one instructed me to “add red wine to strengthen the fire, fry for 2-3 minutes and fly alcohol”. Granted, the whole reason I used the program is because my paltry Japanese skills aren’t up to translating a recipe, so who am I to judge? I managed to make a really delicious dinner anyway.

If you don’t have the patience Google Translate, check out the original recipe for Ragu Bolognese over on the English version of Tasty, which was posted back in May. Of course I found that version only after I’d made my dinner, but somehow I didn’t manage to mess it up. It has been pointed out online that this recipe is almost identical to Gennaro Contaldo’s Classic Italian Ragu Bolognese, and after watching both videos I have to agree. Although now that I’ve Googled “how to make a bolognese ragu”, all of the recipes are very similar, which stands to reason. I think it’s just because it’s a very classic, well-known dish.

As usual, I had to make a few changes/adjustments to make it work with what I had on hand. My carrot ended up being about 225g, so I used that much celery as well, since some of my homegrown celery stalks were a bit spindly. I also used equal weights of bacon instead of pancetta, since I had bacon on hand and they are very similar anyway. I also used fettuccine instead of tagliatelle, since the grocery store I was shopping at didn’t have tagliatelle. All that being said, I do think that I will be making this recipe again in the future!

Cocktail Party

Last night was the cocktail party for my husband’s work, which I attended as his plus-one. This is a yearly event held early every Christmas holiday season, and the general purpose is for middle- and upper-management to schmooze with clients. In years past it was open to all employees, which I got a kick out of because it was one of the few chances to see a lot of the non-managerial staff dressed in their finest, since so many of them never get more formal than jeans and a T-shirt for the average work day. I do miss that.

Of course, I don’t have anyone that I need to schmooze with; as the spouse of an employee, my role is mostly ornamental, although I am expected to occasionally make polite conversation. Mostly, it’s pretty much understood that I am there for the free food and drink. And boy, does the company put out a spread! This year the event was held at the newly-renovated NAC (National Arts Centre), although for many years prior it was held in a banquet hall at the nearby Westin Hotel.

The cold buffet was splendid. There was a wide array of Quebec cheeses (foreground center and background right), along with a delightfully large selection of sushi and sashimi (background left, where people are serving themselves).

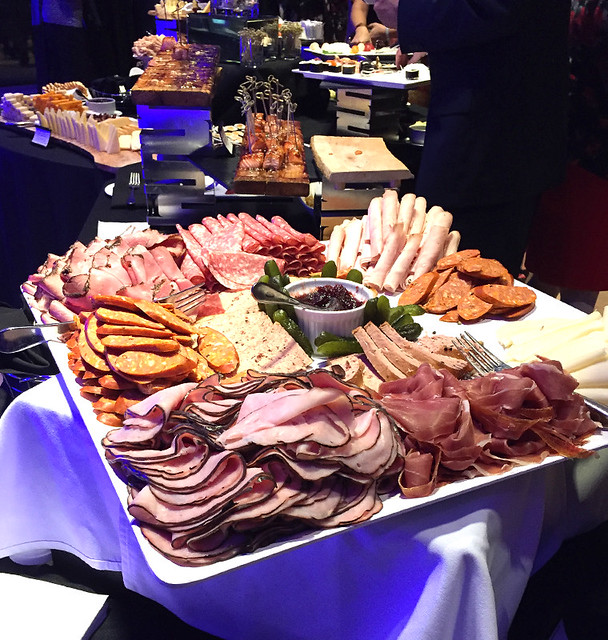
The cold buffet also featured a couple of charcuterie platters (front and center) and, my favourite on the cold buffet, maple whiskey planked Chinook salmon with onion marmalade and caper remoulade.

There was an oyster bar where some of the caterers were shucking oysters fresh all evening. I’m told that there’s a real technique to doing so without slicing the crap out of your fingers; I’m pretty sure I’d rather not give it a try, myself. These oysters were tasty and fresh, and although I know they’re not everybody’s cup of tea, I quite enjoyed them. My husband tried his first oyster on the half shell last night and proclaimed it to be “meh”, mostly because of the slimy texture.

There were also a number of hot food stations scattered throughout the halls. Of course, the portions were tiny so that one could have a bite of this and a bite of that, but there was no limit as to how many each guest could take. There was a take on the traditional roast turkey with dressing, gravy, and cranberry sauce. The plate was garnished with microgreens. (What is it with this microgreen trend lately? They’re everywhere! It’s like how everything used to be garnished with parsley in the 70’s.) This was decent, with the highest point being the flavour of the gravy, but overall it was missing “oomph”.

The lamb was much nicer than the turkey, with a very soft texture and a savoury accompanying sauce (which I believe was polenta-based). And, of course, microgreens.

The funniest dish of the evening was what the servers called a “beef martini”. In each martini glass, starting from the bottom, was mashed potato, roast beef in gravy, tomatoes, microgreens (!), and crispy fried bamboo shoots. Despite the name, the dish is meant to be eaten with a fork, not drunk. The beef was melt-in-your-mouth tender, the tomatoes were perfectly seasoned, and the crispy topping set the rest off in an interesting fashion. There was usually a line at this station throughout the night.

My favourite dish of the evening by far was the seared scallops and jumbo shrimp in Maker’s Mark whisky, on a smear of Gruyere white sauce, with a scattering of microgreens (!!). The seafood was cooked up fresh to order and there was always a line at this station, with people coming back again for more over and over again. The scallops were melt-in-your mouth, and although the shrimp were not as excellent in comparison, they were still very good.

After speeches by the company’s head honchos, the desserts were brought out. There were French macarons, which I had seen many times but I had never actually tried before. I had expected them to be more crispy and wafer-like, but they were actually quite soft.

As always, the chocolate-covered strawberries were a hit.

I didn’t try all of the dessert mouthfulls, but the peach thingies (upper left corner) were quite nice. The brown desserts at the center of the photo were not chocolate like I’d anticipated; they rather surprised me with a strong sour lemon flavour. Once I got over my initial shock, they were quite nice. And the traditional Nanaimo bars on the right hand side of the photo were pretty good too.

All in all, I had a lovely time at the cocktail party. I returned home stuffed to the gills and just a little bit tipsy. I loved the new venue, with its huge windows and views of the Chateau Laurier, War Memorial, and Parliament Buildings. I liked every food I tried, and I even loved a few of them. I do miss a few dishes that were standards at the old venue, like the roast lamb stuffed with rice pilaf (I’m pretty sure they did that same dish every year for over a decade and each time it was cleaned down to the bones). Last year they also served Oka cheese melted raclette style from a half-wheel and spread over something… Bread? Potatoes? I ccan’t remember now, all I remember is that the cheese was delicious and I was really hoping for it again. However, I’d trade the Oka for this year’s scallops in a heartbeat.

Low-Prep Suppers

I kind of have my kitchen back again… Okay, not the whole thing, but the counters and table are clear again, so I can cook properly. I made shepherd’s pie for dinner (but without the cheese topping, to reduce the amount of dairy and make it better for my gut). However, the meal was running late and we dug into it much too fast for me to take pictures. Instead, I have photos of the bread that was cooking while we were eating dinner:

That’s Beer Bacon Bread found on page 44 of Betty Crocker’s Best Bread Machine Cookbook (Betty Crocker, 1999). I used a flat Guinness beer, a package of crumbled circular bacon, and chives from my window garden instead of green onion because that’s what I had on hand. It’s only the second time that I tried out any recipes for this book, and so far so good! There’s a Cottage Dill Loaf on page 152 and Brandied Pumpkin Bread on page 104 that I can’t wait to try.

Earlier in the week I had to make a few easy and quick meals that required little in the way of prep space, so I whipped up a loaf of Sally Lunn bread (page 25, also from Betty Crocker’s Best Bread Machine Cookbook), which I think called for an unreasonable amount of butter in the dough (6 Tbsp!), but I have to admit tasted quite nice. I used it to make grilled cheese sandwiches for the girls, with sides of sliced apples.

Of course I have issues with dairy (and at any rate I’d run out of cheddar), so I fried up a couple of eggs each for my hubby and I, and served it with the Sally Lunn, sliced apples, and mandarin oranges.

Earlier this week I went with a less bread-based meal and baked up some trout with in teriyaki sauce, which I served over rice with a side of asparagus.

I’m really looking forward to having this mini-reno complete so that I can try some new recipes! This hasn’t been nearly as time-consuming an affair as a full gutting of the kitchen (much as I’d love to be able to afford a 100% fresh new kitchen), but it’s still rather disruptive. At least it’s cheap!

Of Pastry Blenders and Biscuits

My house is all topsy-turvy at the moment because I’m doing work on the kitchen. (On the kitchen, as well as in, since I seem to work in the kitchen pretty much every day.) I managed to obtain some additional, second-hand cupboards, which means I’ll soon have new cupboard and counter space eventually. In the short term, this means that half of the contents of my kitchen are currently in the dining room, so we have to eat in the family room, and the day-to-day mess of the family room is pushed into other rooms… I can’t wait to have this mini-reno completed, not just so I can use the expanded kitchen space, but so order is once again returned to my house!

I’ve been trying not to cook anything super-involved, since prep space is currently at a bare minimum, and to me that means making Dad’s Biscuits. My mom picked me up what I think is a Perfect Pie Blender, although it’s branded with the President’s Choice logo, so it may be a knock-off. Or maybe PC has a deal with Kitchen Innovations, I don’t know. I can guarantee you that my mother didn’t pay $40 for it, though. Knowing Mom, she probably found it on clearance for $5 or less.

At any rate, the Perfect Pie Blender is far cry in shape and style from the traditional style of pastry blender that I grew up using. The company claims that it will make perfect pastry in sixty seconds, which is an exaggeration if you ask me, but it is definitely faster than my old method. One reason for this is that the blades are sturdier and the updated shape means that I’m not constantly cleaning food out from between the wires. It’s generally a more ergonomic design, too. Given that I’d been making pie using the old style blender since I was a kid, I thought I’d have a harder time getting used to a new tool, but I’m surprisingly quite happy with the new blender. I’d recommend it — although I definitely wouldn’t recommend spending $40.00 CAD on it like Amazon.ca suggests, especially when you can get it for $12.60 USD on Amazon.com.

The other day I nuked up some IKEA KÖTTBULLAR meatballs while my husband stirred up the ALLEMANSRÄTTEN cream sauce. We’re very sophisticated people, don’t you know. The original plan was to throw on some oven-baked french fries, but I miscalculated the amount we had left in the freezer, so only the kids got fries. My husband and I ate our meatballs with biscuits instead. I added an apple to our meals because there has to be some kind of fruit or veg with every meal, doesn’t there?

Yesterday the kitchen mini-reno had continued apace and we couldn’t even see the dining room table any more, let alone eat at it, so we dined on TV trays in the family room. I made Guinness beef stew based very, very loosely on this recipe, but it was more improvised than not to help me use up what was in the fridge. I still have a surplus of parsnips and celery, which remain fresh and crisp in my fridge, as well as potatoes from my garden, so they had to go in there. To my kids’ delight, I served the stew with biscuits for a nice, hearty dinner. I didn’t even have to argue with the girls to eat their vegetables even though the stew was more veggies than anything else. That’s always a nice change.

Meemaw’s Cookie Recipe

I have a number of friends and family who are huge fans of the television show The Big Bang Theory, and I don’t mind the show myself. I thought that, since Christmas is coming up, I might try to make a show-based recipe that has been floating around the Internet for a while. It’s for a type of cookie purportedly baked by Meemaw (Sheldon Cooper’s grandmother). My Google-fu has failed me and I haven’t been able to find the original source, else I would link back to it to give proper credit.


Sheldon Cooper (played by Jim Parsons) holding a cookie baked using his Meemaw’s recipe, as baked by Amy Farrah Fowler (Mayim Bialik) in The Big Bang Theory, season 8, episode 11.

The recipe I’ve found is a cookie press or spritz cookie, although from the reference photos I’ve found that the final product looks more like something made with a cookie cutter. Or possibly they started with a flat cookie and created the tree design on top using a pastry bag filled with dough? Granted, you don’t see the cookies in the show for very long, and I could totally be wrong. I thought I’d try the spritz version anyway.


Thing 1 and Thing 2 being very serious about getting the cookie dough just right.

Thing 1 and Thing 2 did most of the work this time (okay, mostly Thing 1), so it’s definitely a simple recipe to follow. The kids really like working with the caulking-gun-like cookie press, and they also love to add the sprinkles. Of course, this meant that the final product looked far from perfect, but who cares so long as they had fun and it tastes great?

In the end, I was really happy with this recipe, even though it may not be a hundred percent screen accurate. Here’s what I did:

Meemaw’s Christmas Cookies
Makes about 8 dozen small cookies

Preheat the oven to 375°F (190°C).
Beat together until creamy:
1 1/2 cups unsalted butter, softened
1 cup granulated sugar
1 tsp almond extract*
Beat in, about a third at a time:
3 1/2 cups all-purpose flour
Insert any shape of disk into cookie press (the ones in the show are tree-shaped, but any shape will do). Press dough onto an ungreased cookie sheet one inch apart. Alternately, use a pastry bag with a wide tip to create designs.
Decorate with:
coloured sugar or sprinkles
Bake for 10 to 13 minutes, or until firm and very slightly browned.
Remove from cookie sheet onto a cooling rack. Serve immediately, or place into a container once they are cooled, where they can last up to a week.

*If nuts are a problem, vanilla extract may be substituted (although the flavour will change a little bit).

Canning Pears

A while back, a friend of mine brought me a box of cooking pears from his neighbour’s tree, which was producing an overabundance. Not too long after that, he brought me a second box full. I’m told that these boxes of fruit kept appearing in front of his house under not-so-mysterious circumstances; apparently that neighbour was getting really tired of being beaned in the head by falling fruit. This week I finally had the chance to tackle this mass of pears. I’ve been cooking with them for over a month, but my rate of attrition was much too slow, and some of the fruit was starting to turn.

First I made a double batch of Cinnamon-Scented Parsnip Pear Jam, from page 407 of Preserving: The Canning and Freezing Guide for All Seasons by Pat Crocker (2011). As interesting as this combination appeared at first glance, I found the final result much too sweet; it uses twice as much sugar as fruit by volume, which is a very high ratio even by jam standards. It would still be nice on Dad’s Biscuits, fresh bread, or toast, but I guess I was hoping for more of a flavour punch given my success with this book’s carrot jam. However, I do agree with the book’s assessment that this jam, when mixed with a bit of orange juice, would probably make a lovely glaze in which roasted root veggies could be tossed.

I well and truly overestimated how much fruit & veg to prepare to make this recipe, even doubled; I honestly thought I’d be able to get at least a quadruple batch in, but with all of that sugar, my pots just weren’t big enough. So I had a whole bunch of peeled, cut up pears (left) and parsnips (right) after this attempt.

The parsnips became part of our dinner last night, roasted in the oven with a sprinkle of salt, pepper, rosemary, and olive oil. I served them with baked pork chops coated in dried onion soup mix, which is a dish from my childhood that I’ve been making a lot lately once I was reminded of it. It’s just so easy! I probably have enough parsnips left for another three dinners like this one, but I think that would get old fast. I’ll need to research another recipe.

For my next recipe, I took a chance and tried peeling my ginger with a spoon, which is a kitchen hack I’ve seen floating around the Web for a while. I was quite satisfied with how this worked, actually. Not all cooking hacks are worth your time, but I found that this was honestly easier than a veggie peeler or a knife, and it wasted much less of the root.

The next step was to break out the candy/deep fry thermometer and bring the next jam up to the jelling point. (As an aside, am I the only one who feels like they need a shield as their jam/jelly gets thicker and it starts spitting huge globs of boiling-hot sugar and juice out of the pot?) This time I made Spiced Pear Jam with Pineapple found on page 935 of the Joy of Cooking (2006 edition, Rombauer & Becker), or on the app.

I was much happier with this jam than the previous one. I could definitely taste the fruit, and it wasn’t too sweet (it has a much lower sugar-to-fruit ratio). I have to admit that I couldn’t really taste the pineapple; the citrus note is definitely the strongest part of this jam, which isn’t necessarily a bad thing, although it does end up tasting more like a marmalade.

I probably still have enough chopped pears to make one more batch of jam. What kind should I make? I still haven’t decided. I have a lovely old recipe for pears poached in red wine and then canned, but that’s really intended for whole pears. These cooking pears needed to be chopped up to remove imperfections, so they’re sadly not really suitable to such a dish.