Christmas Breakfast

Christmas breakfast was a big thing at my house when I was a kid. Mom and Dad pulled out all of the stops and bought all kinds of awesome food that we pretty much never had any other time of the year. I associated these foods so strongly with the holidays that it came as a great revelation to me when I moved out that I could buy Havarti cheese with dill or caraway seeds, or Babybel miniature cheeses, or Stoned Wheat Thins all year long.

We’ve been hosting Christmas breakfast at our house since the year that Thing 1 was born. Given that she would have needed to be fed and then probably put down for a nap sometime during the festivities, it just made sense for us to stay home and have the rest of my family come to us. Breakfast is generally served buffet-style, so that everyone can have a little bit of everything and then head over to the Christmas tree to open gifts, often while still munching.

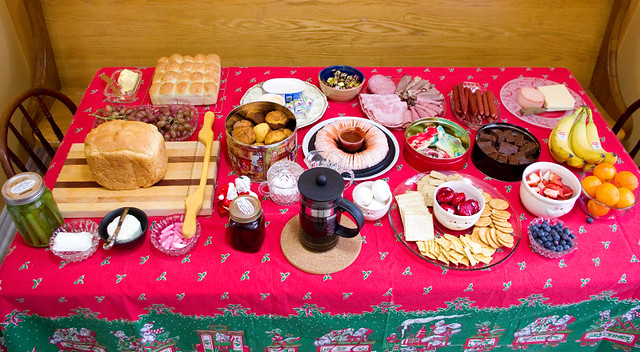
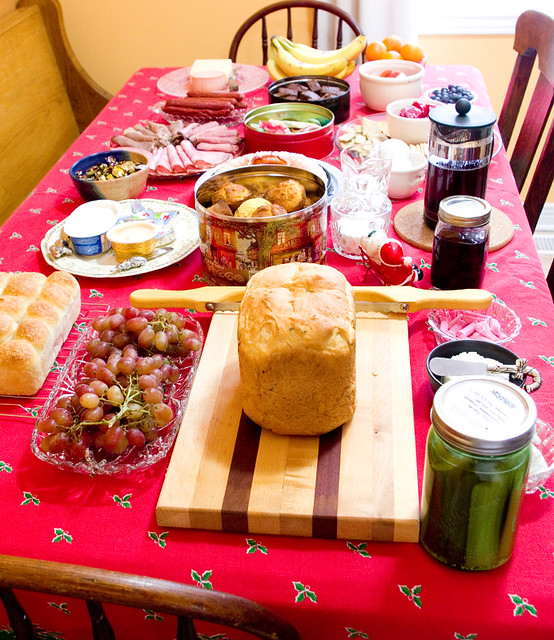
This year I served (working roughly from left to right):

Nan’s pan rolls* with butter
– red grapes
– rosemary bread from the bread machine**
– homemade dill pickles
– Chevrai Original Goat Cheese
– Garlic & Fine Herbs Boursin cheese
Chicken Bones
– Daiya Plain Cream Cheeze Style Spread
– Crème Oka cheese
– Laughing Cow cheese
– my husband’s homemade cornmeal muffins
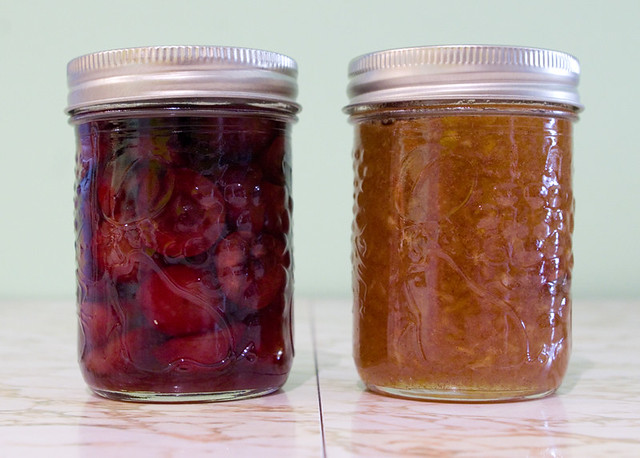
– homemade pickled beets
– coffee & tea with sugar & milk
– chocolate toffees
– meat platter with Hungarian salami, Montreal smoked meat, roast beef, and Black Forest ham
– shrimp ring with cocktail sauce
– Christmas Cookie Monster’s Shape Cookies (made, for the most part, by Thing 1 and Thing 2)
– cold hard-boiled eggs
– Babybel miniature cheeses
– cracker plate with Stoned Wheat Thins, Ritz, Vegetable Thins, and Rosemary & Olive Oil Triscuits
– pepperettes (all-beef by my hubby’s preference and European style for mine)
– Oka and Havarti cheeses
Fudgy Pumpkin Brownies (this time with no coffee)
– bananas
– strawberries
– clementines
– blueberries

In case you’re worried, no, the seven of us did not eat this all in one sitting. This much could have easily fed twice that amount of people, with food to spare! The point of this kind of meal (which only happens once a year) is that everyone can have as much as they like, and then it all gets packed away to become lunches and dinners for the next week or so. There were still a few leftovers as of New Year’s Day, but that was of the kind of thing that takes forever to go bad, like crackers. Some of it will probably even make its way into the kids’ lunches in the new year.

*I discovered that these rolls can be left to do their second rise overnight in the refrigerator, and then just popped into the oven to serve fresh-baked for breakfast. If you’re going to do so, make sure that the pan you use is metal and not glass, as it takes the glass longer to heat up and can make the bottom of the rolls take a little too long to cook. Also, if the top is browning but the bottom isn’t quite done yet, cover the top of the rolls with aluminum foil to prevent them going from “browned” to “burnt”.

**Classic White Bread, found on page 24 of Betty Crocker’s Best Bread Machine Cookbook (1999) — but with half the sugar, olive oil instead of margarine, and about 1/4 cup fresh chopped rosemary added.

Christmas Eve Dinner

The last few days before Christmas were a flurry of cooking activity. On the 22nd, I baked tortière, pumpkin pie, chocolate pumpkin brownies (this time without the coffee), while my husband made bread machine corn bread.


Baking pumpkin pie.

On the 23rd I made my first attempt at German stollen, banana nut muffins, and the ill-fated pumpkin pie; my husband baked corn meal muffins. Of course, we cooked dinner both days as well.


Tortière, corn bread, chocolate pumpkin brownies, and pumpkin pie.

Then, on the 24th, I made Nan’s pan rolls, rosemary bread in the breadmaker, and deviled eggs. I’d planned to make orange-glazed carrots & parsnips, but we forgot to buy carrots and there was no way I was facing the stores on Christmas Eve, so that got written out.

Then we hosted Christmas Eve dinner for our little family, plus my in-laws and my brother-in-law. Usually this dinner is hosted by my husband’s parents, but they are currently between homes, having sold their house in October but with their new condo not being complete until the start of February. So this year it was up to us to make this family tradition happen. This dinner is traditionally consists of (and no one can tell me why) cabbage rolls, which my mother-in-law made this year, and tortière, which I made. I also added the pan rolls, rosemary bread, and deviled eggs with lumpfish caviar.

I tried to honour my mother-in-law’s German heritage by also serving stollen, for which I used the Taste of Home Almond-Filled Stollen recipe and The Spruce’s Easy Almond Paste recipe, since I couldn’t find almond paste in any of the local shops. Sadly, the dish went down like a lead balloon. I mean, I overbaked one loaf (the recipe makes three), but I didn’t serve that one. Even so, only two slices were even eaten with or after Christmas Eve dinner. The bread rose nicely and had a good texture, although I can’t be much of a judge of the flavour because I don’t really like candied fruits (I don’t like fruitcake either for that very same reason). I think I’ll just forego making this bread next year if we host this dinner again. It was a lot of work and nobody seemed to like it. Maybe I’ll just make gingerbread instead; at least that I’ll eat if nobody else does!

Boxing Day

Boxing Day in our family is mostly a relaxing day where we play with our new Christmas toys and then head over to my parents’ place for the traditional turkey dinner. (I would have taken pictures of the food, but we all dug in so quickly that I didn’t have a chance!) Mom’s turkey dinner includes stuffing, gravy, Brussels sprouts, mashed potatoes, butternut squash and apple casserole. Dad makes Yorkshire pudding that we either cover in gravy or spread with butter.

My contribution to the meal this year was my usual pumpkin pie. It’s usually one of my best desserts, but I was really disappointed with it this time. The consistency was good, the crust was reasonable (considering it was in the fridge for two days), but the filling was almost bitter. I distinctly remember putting sugar in the filling, but I doubled the recipe and I think what I did was double everything except the sugar. This also means that I have a second, bitter-tasting pumpkin pie sitting in my freezer that I might just throw out. What a waste. It was almost palatable smothered in whipped cream, but that’s not a ringing endorsement.

See, this is what happens when you bake for three days straight in preparation for a holiday: something’s bound to get messed up. I should have just thawed one of the berry pies that I’d frozen for future use back in the summer. I wanted to be traditional with pumpkin pie, but in retrospect it would have been better to lighten the cooking load a bit. Oh, well. Maybe I’ll have learned my lesson by next year.

Holiday Sweets

It seems like I have spent most of the last few days either cooking or driving around town to deliver Christmas presents, with a bit of housecleaning and last-minute decorating mixed in. On one of those gift deliveries, I received my very first gift of the season!

That’s three types of homemade fudge, all cooked up by my friend and her daughter, and then wrapped prettily. Thing 1 and Thing 2 keep asking me to share, but I have selfishly been hoarding it all for myself. (They’ve been on the receiving end of many other treats, so I don’t feel too bad.) I have a weakness for fudge.

One of Thing 2’s Sparks leaders has organized gifts to bring to one of the local retirement homes. Parent volunteers baked cookies and squares, which the leader will package into gift bags. One of the baked goods that I contributed was mini lemon cupcakes, which is actually just IKEA Muffinsmix Citron baked into tiny IKEA Snodriva paper liners (now discontinued). Is it a bad thing that I don’t always make things from scratch?

I did bake these Fudgy Pumpkin Coffee Brownies (page 222, Purely Pumpkin by Allison Day (2016)) completely from scratch, though. These also went to the retirement home gift bags. I used some of the Halloween pumpkin that I’d roasted, too! I really liked how moist these brownies ended up, courtesy of the pumpkin puree inside. I successfully substituted equal amounts of whole wheat flour for einkorn wheat, which I couldn’t find around here (and honestly had never heard of until I read this recipe). I did use a dairy-free chocolate chip, but I think I may go for a standard kind next time — I hear that they’re even making a dark chocolate chip now that’s available in most grocery stores.

Christmas Prep

We’re right smack dab in the middle of Christmas prep around here, dashing from hither to yon to prep for school spirit days, family events, and hosting over the holidays. Of necessity, suppers have been quick and easy; I think tomorrow I will be breaking out the slow cooker just to make dinner that much easier.

Last night, though, I rummaged through the freezer and turned up with some rather nice basa fillets. I dredged them in flour, sprinkled them with a bit of garlic powder and salt, and lightly fried them in a glug of olive oil in a non-stick pan. (As an aside, when making this kind of dish, does anyone else think about that lightly fried fish fillets meme?) I topped the fried fish with crumbled bacon and served it alongside boiled baby potatoes and steamed carrots.

I still wasn’t feeling spectacularly well last night, so I didn’t get as much prep work done as I wanted to, but the hectic pace around the holidays is one of the reasons I start canning way back in the summer. As planned, I plunged into my shelves of homemade preserves to get gifts together for my kids’ teachers.

As with Guiders, I consider teachers to be especially important to my children and, as such, they are deserving of some nice things around Christmas to show my appreciation. Teachers put in long hours in a job that I, to be completely frank, am vastly temperamentally unsuited to do. Before my children were born, I seriously considered home-schooling, but as time went on I realized that teaching is definitely not one of my gifts. I have the utmost appreciation for those people who can do so, especially while both funding and support are slowly withdrawn from the public school system over the years.

This year, my kids’ teachers are getting amaretto cherries, spiced pear jam with pineapple, handmade cloths, and a box of Girl Guide cookies. (I considered giving the cookies to the Guiders too, but I thought they could probably use a break from this fundraiser by this point.) I hope that the teachers will be able to enjoy these foods over the winter break — or any time after, really, as they’ll last about a year unopened.

Ginger Shakin’ Beef

A NTD Taste Life video for Ginger Shakin’ Beef came across my Facebook feed recently, and the recipe looked both simple and delicious. A bit of digging for the actual recipe (which wasn’t posted with the video) made me realize that the original source was Jamie Oliver’s 5 Ingredients Quick & Easy Food (2017). The recipe itself is available on Jamie Oliver‘s website. I’ve been meaning to pick up a copy of this book, but it’s a recent addition to my list of cookbooks I’d like, and anyway, it’s not a great idea to buy things for yourself before Christmas.

My plating sadly never looks as good as that found in Jamie Oliver’s books, but the taste of the dish was lovely. My kids had their meat over rice instead of bok choy since they’re not a huge fan of this veggie (although I did make them have a bit on the side). I loved the combination of the miso and the honey to make a simple sauce. It was delicious! However, I wasn’t too sold on the ginger and beef fat. I found that the fat, despite frying until crispy, really didn’t have much flavour and didn’t add much to the dish. The ginger, while it looked pretty, was very strong — my kids just picked all of theirs out. I think it would have been better mixed in with the main meat and sauce, maybe lessened in quantity a bit and chopped fine to mix throughout the dish. All that being said, I will definitely make this dinner again in the future (albeit with some slight variations to adjust for my family’s palate). It was both easy and tasty, and it is great for school nights when time is at a premium, so that’s a win in my book.

The Last of the Canning — Maybe

It looks like I have finally made it through my not-inconsiderable list of foods that I wanted to put up for the winter. I mean, I still have two pumpkins left to roast, but the puree is just going in the freezer, which doesn’t take nearly as long as hot water bath canning or pressure canning. If I don’t have to lug my canning rigs and bunches of jars out of the basement, it doesn’t count.

The last two things to put up were parsley jelly and hot sauce, both of which contained produce grown in my garden. I brought a big pot of parsley in with the first major cold snap about a month ago, and I kept it alive until I could chop it up for the jelly. The peppers for the hot sauce were brought in as they ripened, and then were frozen. This isn’t the greatest solution if you want your peppers crisp, but if you’re just going to run them through a blender or food processor, it doesn’t really matter. This way I was able to cook up a whole season’s peppers at once, instead of using them up individually as they became ripe.

I was curious to try the parsley jelly (from page 298 of Preserving: The Canning and Freezing Guide for All Seasons by Pat Crocker (2011)), since I’d never heard of it before. Mint jelly, sure, but not parsley. Apparently it’s and English thing? This jelly can also be made with sage, thyme, or basil, in addition to the mint that I’m familiar with. Sadly, as good as it looks, the jelly didn’t set despite following the instructions to the letter. That’s why I added a “maybe” to this post title. I mean, I could just give up and chuck the unset jelly, or I could try to re-cook it. I’ve used this technique in the past and it has worked out well. But I am so incredibly busy with the Christmas season at the moment that I might just give up and try again another time.

My hot sauce, however, turned out wonderfully. Since it’s a puree, it’s not like I have to worry about the set. I base my hot sauce on the Essential Habanero Hot Sauce from Genius Kitchen. I got great reviews on the sauce last year. Although the heat of the sauce varies because every summer I grow slightly different peppers, I’m pretty sure that this year’s is at least as hot as last year’s because even just the vapours from cooking it completely cleared my sinuses. Let’s hope the people I am giving it to for Christmas like it as much!

Pear & Honey Jam Recipe

As I wrote about before, I had a lot of cooking pears that needed to be used up recently. All of this excess meant that I had a chance to experiment with making a jam of my own devising. Pears are a naturally acidic fruit, which makes them perfect for hot-water-bath canning with a bit of sugar. It took me a couple of tries to get this recipe right, since since I didn’t want to use like ten cups of sugar (with would generally produce and easily firm set), since I wanted to taste the fruit and the spices more than the sweetness. In the end, I had something that I am quite proud of. Next year, when pears come into season, I think that I will make this the main pear jam (although I did really like the Spiced Pear Jam with Pineapple found on page 935 of the Joy of Cooking (2006 edition, Rombauer & Becker), or on the app). Maybe next year I’ll have a yield of more than four pears off of my baby pear tree, and I’ll be able to make more things from fruit I’ve grown myself!

Pear & Honey Jam
Yields six 250mL (1 cup) jars

Prepare and sterilize six 250mL (1 cup) jars (or twelve 125mL (1/2 cup) jars) and matching lids as per manufacturer instructions. Keep jars and lids warm until it is time to fill them.
In a Maslin pan or other non-reactive, heavy-bottomed pot, combine:
1.5 Kg (3.3 lbs) ripe/slightly overripe pears, peeled, cored, and roughly chopped
350 mL (1.5 cups) honey*
700 mL (3 cups) sugar
60 mL (1/4 cup) lemon juice
2.5mL (1/2 tsp) ground allspice
5 mL (1 tsp) ground cinnamon
2.5mL (1/2 tsp) ground cloves
2.5mL (1/2 tsp) ground nutmeg
2.5mL (1/2 tsp) ground ginger
Bring to a boil over medium-high heat, stirring constantly to prevent burning. Boil for 10 minutes. Remove from the heat. Run the mixture through a blender or food processor until it reaches a smooth consistency, being extremely careful as the ingredients will be very, very hot. Return the mixture to the pot and bring it back to a boil.
Add:
one 85 mL (2.9 oz) package of liquid pectin
Bring mixture back to a boil. Stir constantly as mixture boil hard for an additional minute.
Ladle the jam into the prepared jars, leaving a 5mm head space. Wipe jar rims with a clean, damp cloth or paper towel. Top jars with lids and screw metal rings into place until fingertip tight. Place jars on top of a canning rack inside a boiling water canner, being sure that none of them touch the sides of the pot or each other. Jars should be covered by at least 2.5cm (1″) of water, so add hot water if necessary. Bring to a rolling boil and process for 15 minutes, starting your timer once the water is boiling.
Remove jars from canner and place them on a cooling rack, not touching each other. Let them rest for 24 hours before touching. Label if desired. Jams may take up to 48 hours to set, so do not open them until this time has passed.
This jam may be kept in a cool, dark area for up to one year.

*It’s really not worth it to use unpasteurized honey here, since all the additional benefits are lost when the honey is cooked.

Not-So-Silent Night

Last night was one of those nights where it seemed like all I did was run from pillar to post and back again. It started as soon as the kids got home from school. There was snacks, then showers, then finding all of the parts of their Guiding uniforms (or, in Thing 1’s case, a matching set of PJ’s for her unit’s holiday pajama party), then the kids making their lunches while I whipped up dinner…

Dinner was what I think might very charitably be called deconstructed shepherd’s pie. I had taken the meat out earlier in the day to thaw, but by the time dinner prep time came around I knew I’d never have time to bake it as a casserole. So I prepped the meat as I would for my usual shepherd’s pie (with a few extra mushrooms thrown in because that’s what I had in the fridge), boiled up some baby potatoes, and microwaved some corn. Instead of layering it into a casserole, I just served it as is. The kids ate all of theirs without complaint, and I found it almost as tasty (if not as creamy) as the real thing, so it worked out okay.

Then I had to wrap Christmas thank-you gifts for my girls’ Guiders. Guide leaders are volunteers, and I think it’s important that they know how much my children and I appreciate all of their hard work. Without Guiders, there would be no Girl Guides. I couldn’t do what they do (despite having two children that I adore, my patience levels with children is not great), which is why I try to support them in other ways.

Although the bags look slightly different, that’s mostly because I ran out of white tissue paper near the end. They’re all identical inside, containing Amaretto Cherries and Cinnamon-Scented Parsnip Pear Jam. I am very quick at gift wrapping, having worked the wrapping station in a number of retail jobs over the years, which comes in handy when I have ten gift bags that I’ve forgotten to put together until the last minute. I could have sworn Thing 1 and Thing 2 had one more meeting before the holiday break, but obviously I was mistaken.

Then I had to rush out the door to drive the kids through a snowstorm to their respective Guiding activities for the evening — Thing 1 to her pajama party and Thing 2 to sing Christmas carols at a retirement home. Of course, I got stuck spinning my tires on a patch of ice as I left my driveway, and luckily my husband arrived home just in time to help push the car. Then it was a very slow, cautious drive to the girls’ activities, then another slow and cautious drive to my parents’ place to help them put up their Christmas tree, then back to pick up the girls and get them home and in bed for the night, despite the huge amounts of sugar they had consumed.

When all that was over, I had to relax a bit. I poured myself a lovely glass of rum and eggnog (okay, Earth’s Own Almond SoFresh Almond Nogg, which isn’t a half-bad substitute for the lactose intolerant). I had a real tree twinkling with lights in the living room. And, at least for a few hours, I tried to ignore the fact that I had less than two weeks to go to get everything done before Christmas.

Pumpkin Butter

I wrote last week about finally canning my Halloween pumpkins. So far I have done two of the four. For one of them I simply froze all of the pumpkin puree that I created by roasting the gourd and then running the flesh through a food processor. The other pumpkin I turned into pumpkin butter.

Way back when I started making preserves, I burned an entire batch of fruit butter by trying to cook it too quickly on the stove. Ever since then, I make my fruit butters in a slow cooker, for the most part. I don’t have a recipe as such, more of a technique. For the purpose of posterity, this time I measured everything out. I used a six-litre slow cooker, but I didn’t fill it to the brim because fruit butters tend to have big bubbles, so there needs to be some space under the lid. For this batch, I used:

20 cups (4.75L) pumpkin puree
3 cups (710mL) honey
4 Tbsp cinnamon
3 Tbsp ginger
2 Tbsp nutmeg
1 Tbsp cloves

Then I cook it with the lid a bit ajar so the steam can escape (some newfangled crock pots have a vent, but mine is probably older than me so it does not) for about 24 hours, or until the butter thickens. If it doesn’t reach the desired thickness in this amount of time, sometimes I will cook it a bit on the stove, since I find that leaving it longer than that in the crock pot can make it taste burnt. When it is ready, it will have changed from orange to a deep, nutty brown.

Now, I’d been making pumpkin butter for years using this recipe and then hot-water-bath canning it, and I never had any problems. I was using what I thought were USDA-approved recipes — and, indeed, they used to be! But the rules have changed over time, and now it’s no longer recommended to can pumpkin butter (or even pumpkin puree, which is less dense) at home. So once this pumpkin butter is complete, it’s going right in the freezer — which is the approved process. I use wide-mouthed mason jars to avoid cracking as much as possible, I don’t fill them all the way, and I make sure they’re totally cool before I freeze them. I still will lose a few every year to cracked glass. Of course, you can always buy plastic freezer jam containers and avoid cracked jars, but I like to give my preserves as gifts, and I find the glass jars to be much more attractive.

Now I’m a little bit paranoid about the whole thing, and I don’t want to make anyone sick, so I do pressure-can my pumpkin butter first. I process it for an hour (being careful not to let the canner boil dry), and when the cans come out of the cooker I can still feel butter boiling inside the jar. In addition to making the pumpkin butter safer, I find that pressure cooking it for this long also changes the texture. I wonder if this is because it is guaranteed to reach the jelling point (220°F to 222°F)?

(As an aside, the instructions for my pressure canner, which is only about four years old, specifically states that pumpkin puree can be pressure canned safely in this device.)

I have to admit that I find pressure canning more than a little terrifying. The steam hisses out at irregular intervals and constantly makes me think I’m going to end up with some disaster like this. In reality, that hissing means that the pressure is venting properly — what’s really a problem is if it stops (if you haven’t turned off the heat underneath first). That means that your steam vent has clogged and the pressure inside is building up disastrously.

In the end, I ended up with fourteen 250mL jars and one 125mL jar of pumpkin butter. Now all they need are labels, and they’ll be ready for the freezer!