Low-Prep Suppers

I kind of have my kitchen back again… Okay, not the whole thing, but the counters and table are clear again, so I can cook properly. I made shepherd’s pie for dinner (but without the cheese topping, to reduce the amount of dairy and make it better for my gut). However, the meal was running late and we dug into it much too fast for me to take pictures. Instead, I have photos of the bread that was cooking while we were eating dinner:

That’s Beer Bacon Bread found on page 44 of Betty Crocker’s Best Bread Machine Cookbook (Betty Crocker, 1999). I used a flat Guinness beer, a package of crumbled circular bacon, and chives from my window garden instead of green onion because that’s what I had on hand. It’s only the second time that I tried out any recipes for this book, and so far so good! There’s a Cottage Dill Loaf on page 152 and Brandied Pumpkin Bread on page 104 that I can’t wait to try.

Earlier in the week I had to make a few easy and quick meals that required little in the way of prep space, so I whipped up a loaf of Sally Lunn bread (page 25, also from Betty Crocker’s Best Bread Machine Cookbook), which I think called for an unreasonable amount of butter in the dough (6 Tbsp!), but I have to admit tasted quite nice. I used it to make grilled cheese sandwiches for the girls, with sides of sliced apples.

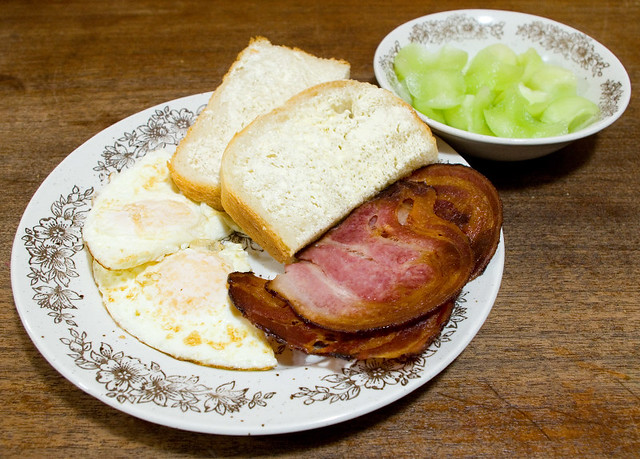
Of course I have issues with dairy (and at any rate I’d run out of cheddar), so I fried up a couple of eggs each for my hubby and I, and served it with the Sally Lunn, sliced apples, and mandarin oranges.

Earlier this week I went with a less bread-based meal and baked up some trout with in teriyaki sauce, which I served over rice with a side of asparagus.

I’m really looking forward to having this mini-reno complete so that I can try some new recipes! This hasn’t been nearly as time-consuming an affair as a full gutting of the kitchen (much as I’d love to be able to afford a 100% fresh new kitchen), but it’s still rather disruptive. At least it’s cheap!

Frozen/Star Wars Mash-Up Photos

The paint is currently drying in my kitchen, which means cooking is being kept to a minimum for the moment. Instead, I’ve finally found the time to edit the rest of the photos from Ottawa Comiccon: Holiday Edition! All of the photos were taken by Ian Walton, I just played with them a bit.

We started by taking photos indoors by the big windows at the front of the convention center for the best lighting — and look who we found!


Left to right: Darth Sven, Jedi Anna, Darth Vader, Stormtrooper, Jedi Elsa, and Darth Kristoff.

Christmas Darth Vader and the Stormtrooper in their holiday AT-AT were probably the most awesome (and seasonally-appropriate) costumes we saw all day.

I discovered that I need to learn how to pose better in this costume. Also, I need to trim (or re-position) the white streak in my hair, which was a clip-in (the rest is my real hair dyed with Féria C74 Power Copper), so that it’s a matching length.

Elsa’s Force snowflake pops against the indoor backdrop, although it was hard to see outside. I was really happy with how Elsa’s costume turned out, because she made it herself and it was her first time sewing anything so complicated. She put so much hard work into it and she ended up with a great final product!

I absolutely love Sven’s antlers! And yes, the reindeer does have reindeer mittens.

Kristoff’s fantastic makeup was done by the fabulously talented Jessica Harkonnen.

This is probably my favourite photo of the entire day.

Then we moved outside to freeze for our art:

The cold may not bother Elsa, but it definitely bothers Anna.

I hope to use this costume again for the regular ComicCon in May, and this mini-con was a great chance to try it out and figure out what needs to be changed, what can be done better. I definitely want to add some more detail to it with embroidery or maybe paint. I want to alter the obi so that it’s stiffer and has more structure. And I need a better lightsaber, preferably one that lights up on its own. I may have convinced my kids to join in on the group as well, so that’s more costumes to make — but that won’t start until much closer to the date, since there may be some growth spurts in the meantime and I don’t want to have to make the costumes twice.

Of Pastry Blenders and Biscuits

My house is all topsy-turvy at the moment because I’m doing work on the kitchen. (On the kitchen, as well as in, since I seem to work in the kitchen pretty much every day.) I managed to obtain some additional, second-hand cupboards, which means I’ll soon have new cupboard and counter space eventually. In the short term, this means that half of the contents of my kitchen are currently in the dining room, so we have to eat in the family room, and the day-to-day mess of the family room is pushed into other rooms… I can’t wait to have this mini-reno completed, not just so I can use the expanded kitchen space, but so order is once again returned to my house!

I’ve been trying not to cook anything super-involved, since prep space is currently at a bare minimum, and to me that means making Dad’s Biscuits. My mom picked me up what I think is a Perfect Pie Blender, although it’s branded with the President’s Choice logo, so it may be a knock-off. Or maybe PC has a deal with Kitchen Innovations, I don’t know. I can guarantee you that my mother didn’t pay $40 for it, though. Knowing Mom, she probably found it on clearance for $5 or less.

At any rate, the Perfect Pie Blender is far cry in shape and style from the traditional style of pastry blender that I grew up using. The company claims that it will make perfect pastry in sixty seconds, which is an exaggeration if you ask me, but it is definitely faster than my old method. One reason for this is that the blades are sturdier and the updated shape means that I’m not constantly cleaning food out from between the wires. It’s generally a more ergonomic design, too. Given that I’d been making pie using the old style blender since I was a kid, I thought I’d have a harder time getting used to a new tool, but I’m surprisingly quite happy with the new blender. I’d recommend it — although I definitely wouldn’t recommend spending $40.00 CAD on it like Amazon.ca suggests, especially when you can get it for $12.60 USD on Amazon.com.

The other day I nuked up some IKEA KÖTTBULLAR meatballs while my husband stirred up the ALLEMANSRÄTTEN cream sauce. We’re very sophisticated people, don’t you know. The original plan was to throw on some oven-baked french fries, but I miscalculated the amount we had left in the freezer, so only the kids got fries. My husband and I ate our meatballs with biscuits instead. I added an apple to our meals because there has to be some kind of fruit or veg with every meal, doesn’t there?

Yesterday the kitchen mini-reno had continued apace and we couldn’t even see the dining room table any more, let alone eat at it, so we dined on TV trays in the family room. I made Guinness beef stew based very, very loosely on this recipe, but it was more improvised than not to help me use up what was in the fridge. I still have a surplus of parsnips and celery, which remain fresh and crisp in my fridge, as well as potatoes from my garden, so they had to go in there. To my kids’ delight, I served the stew with biscuits for a nice, hearty dinner. I didn’t even have to argue with the girls to eat their vegetables even though the stew was more veggies than anything else. That’s always a nice change.

Meemaw’s Cookie Recipe

I have a number of friends and family who are huge fans of the television show The Big Bang Theory, and I don’t mind the show myself. I thought that, since Christmas is coming up, I might try to make a show-based recipe that has been floating around the Internet for a while. It’s for a type of cookie purportedly baked by Meemaw (Sheldon Cooper’s grandmother). My Google-fu has failed me and I haven’t been able to find the original source, else I would link back to it to give proper credit.


Sheldon Cooper (played by Jim Parsons) holding a cookie baked using his Meemaw’s recipe, as baked by Amy Farrah Fowler (Mayim Bialik) in The Big Bang Theory, season 8, episode 11.

The recipe I’ve found is a cookie press or spritz cookie, although from the reference photos I’ve found that the final product looks more like something made with a cookie cutter. Or possibly they started with a flat cookie and created the tree design on top using a pastry bag filled with dough? Granted, you don’t see the cookies in the show for very long, and I could totally be wrong. I thought I’d try the spritz version anyway.


Thing 1 and Thing 2 being very serious about getting the cookie dough just right.

Thing 1 and Thing 2 did most of the work this time (okay, mostly Thing 1), so it’s definitely a simple recipe to follow. The kids really like working with the caulking-gun-like cookie press, and they also love to add the sprinkles. Of course, this meant that the final product looked far from perfect, but who cares so long as they had fun and it tastes great?

In the end, I was really happy with this recipe, even though it may not be a hundred percent screen accurate. Here’s what I did:

Meemaw’s Christmas Cookies
Makes about 8 dozen small cookies

Preheat the oven to 375°F (190°C).
Beat together until creamy:
1 1/2 cups unsalted butter, softened
1 cup granulated sugar
1 tsp almond extract*
Beat in, about a third at a time:
3 1/2 cups all-purpose flour
Insert any shape of disk into cookie press (the ones in the show are tree-shaped, but any shape will do). Press dough onto an ungreased cookie sheet one inch apart. Alternately, use a pastry bag with a wide tip to create designs.
Decorate with:
coloured sugar or sprinkles
Bake for 10 to 13 minutes, or until firm and very slightly browned.
Remove from cookie sheet onto a cooling rack. Serve immediately, or place into a container once they are cooled, where they can last up to a week.

*If nuts are a problem, vanilla extract may be substituted (although the flavour will change a little bit).

Canning Pears

A while back, a friend of mine brought me a box of cooking pears from his neighbour’s tree, which was producing an overabundance. Not too long after that, he brought me a second box full. I’m told that these boxes of fruit kept appearing in front of his house under not-so-mysterious circumstances; apparently that neighbour was getting really tired of being beaned in the head by falling fruit. This week I finally had the chance to tackle this mass of pears. I’ve been cooking with them for over a month, but my rate of attrition was much too slow, and some of the fruit was starting to turn.

First I made a double batch of Cinnamon-Scented Parsnip Pear Jam, from page 407 of Preserving: The Canning and Freezing Guide for All Seasons by Pat Crocker (2011). As interesting as this combination appeared at first glance, I found the final result much too sweet; it uses twice as much sugar as fruit by volume, which is a very high ratio even by jam standards. It would still be nice on Dad’s Biscuits, fresh bread, or toast, but I guess I was hoping for more of a flavour punch given my success with this book’s carrot jam. However, I do agree with the book’s assessment that this jam, when mixed with a bit of orange juice, would probably make a lovely glaze in which roasted root veggies could be tossed.

I well and truly overestimated how much fruit & veg to prepare to make this recipe, even doubled; I honestly thought I’d be able to get at least a quadruple batch in, but with all of that sugar, my pots just weren’t big enough. So I had a whole bunch of peeled, cut up pears (left) and parsnips (right) after this attempt.

The parsnips became part of our dinner last night, roasted in the oven with a sprinkle of salt, pepper, rosemary, and olive oil. I served them with baked pork chops coated in dried onion soup mix, which is a dish from my childhood that I’ve been making a lot lately once I was reminded of it. It’s just so easy! I probably have enough parsnips left for another three dinners like this one, but I think that would get old fast. I’ll need to research another recipe.

For my next recipe, I took a chance and tried peeling my ginger with a spoon, which is a kitchen hack I’ve seen floating around the Web for a while. I was quite satisfied with how this worked, actually. Not all cooking hacks are worth your time, but I found that this was honestly easier than a veggie peeler or a knife, and it wasted much less of the root.

The next step was to break out the candy/deep fry thermometer and bring the next jam up to the jelling point. (As an aside, am I the only one who feels like they need a shield as their jam/jelly gets thicker and it starts spitting huge globs of boiling-hot sugar and juice out of the pot?) This time I made Spiced Pear Jam with Pineapple found on page 935 of the Joy of Cooking (2006 edition, Rombauer & Becker), or on the app.

I was much happier with this jam than the previous one. I could definitely taste the fruit, and it wasn’t too sweet (it has a much lower sugar-to-fruit ratio). I have to admit that I couldn’t really taste the pineapple; the citrus note is definitely the strongest part of this jam, which isn’t necessarily a bad thing, although it does end up tasting more like a marmalade.

I probably still have enough chopped pears to make one more batch of jam. What kind should I make? I still haven’t decided. I have a lovely old recipe for pears poached in red wine and then canned, but that’s really intended for whole pears. These cooking pears needed to be chopped up to remove imperfections, so they’re sadly not really suitable to such a dish.

Steak Ramen

Last night I was searching for something to make for dinner, something that wouldn’t require a special trip to the grocery store. I did finally go get groceries on Monday, so now both the freezer and the fridge are full and I figure that I shouldn’t have to go out again every day for ingredients. At my husband’s request, since he’s fighting off a cold, I decided to make soup.

In the freezer I had some beef broth made with garlic and wild mushrooms, which I thawed as the base for the soup. I boiled up some ramen noodles and topped them with steamed spinach, carrot matchsticks, and soft-boiled eggs. The crowning glory of this particular dish was the steak. It didn’t brown up as nicely as I’d like, to my dismay, but it was very tender. To enhance the flavour, I used a marinade from page 65 of Simply Ramen by Amy Kimoto-Kahn (2016). Now, technically the recipe was for Kobe Beef Tsukemen, but I’ll be 100% honest and tell you that there’s no way I can afford Kobe beef. Instead, I thought I’d just use the marinade on a (much) cheaper steak. The marinade contains lemon juice, soy sauce, sake, and mirin (sweet rice wine), which combined is somewhat salty-sweet with an acidic punch to start breaking down the meat. Also, as per the recipe, I fried up the steak in melted beef suet instead of oil, which I think helped to enhance the flavour. Once I removed the meat from the pan, I added the juices to the soup broth to add extra punch. I was very satisfied with how it all turned out, especially since it made a lower-quality cut of beef quite palatable. Even if I never get the chance to cook Kobe beef, I think that I will definitely revisit this recipe in the future when I have all of the other ingredients on hand to try the dish in full.

Circular Bacon?

I’m trying my darndest to get the costume photos from this weekend edited, but it’s taking much longer than I had hoped, although I do acknowledge that this is mostly because I’m really picky. It would have been much too easy to just crop the photos to size. So it may be another day or two before I have it all done.

In the meantime, I did have to cook dinner last night, which had to be quick because I had to get the kids to extracurricular activities. Thing 2 requested bacon and eggs, which I thought was a perfectly acceptable solution. Earlier in the day I’d put some Milk Loaf (page 65, Bread Machine: How to Prepare and Bake the Perfect Loaf (Jennie Shapter (2002)) on to cook in my bread machine. I just microwaved some bacon (my preferred low-mess way to cook it), scooped out some honeydew melon, fried up some eggs, and buttered some fresh bread for a quick dinner.

You might note that the bacon in the above photo are shaped unusually. It’s not an illusion, the slices are actually more or less circular! They’re actually Presiden’t Choice Naturally Smoked Bacon Rounds, which are described as follows:

A real game changer when it comes to whipping up burgers, breakfast sandwiches and BLTs, bacon rounds make things so much easier. Cut from the pork belly, they’re everything you love about traditional bacon – only rolled prior to smoking and slicing. Not only are they the perfect fit for buns and English muffins, the edges curl up a little while cooking, creating a “cup” for toppings.

Well, my slices didn’t curl up on the edges, but maybe they do so when fried. I have to admit, I’ve never had any problem whatsoever fitting traditionally-sliced bacon into a sandwich or burger, so I think that these bacon rounds have been created to fix a problem that doesn’t really exist. I mean, if your bacon is too big for your bread, it can be broken if crispy or cut if soft. The rounds are more expensive than the same brand’s regularly-sliced bacon, too ($1.60/100g vs. $1.20/100g). I have a feeling that other shoppers agree, since I found my supply in the clearance section at the local grocery store and I haven’t seen them there since. I paid only $0.99 per package (so $0.26/100g if I did my math right), and at that price it was definitely worth it since the rounds taste exactly the same as regular bacon. Without another comparable sale, I can’t see myself buying these again though.

Last-Minute Costume Revealed

Much to my surprise, we all managed to complete our costumes in time for Ottawa Comiccon: Holiday Edition over the weekend. My friends got some really great shots of our group, but they will have to wait until tomorrow because I spent way too long wrestling with the compatibility of unfamiliar camera RAW formats to finish going through them all. It was also my very first time trying to get edit photos of lightsabers so they look like they’re glowing.

The snowy weather provided a perfect backdrop to our group picture:


Photo by Ian Walton.

Left to right, that’s Darth Kristoff (with Olaf on his back), Darth Sven, Jedi Elsa, and me on the far right as Jedi Anna. Yes, we did do a Disney’s Frozen/Star Wars mashup.

I can definitely say that we had a lot of fun wearing these costumes, even for a con as small as the holiday one (which, let’s be honest, is more of a marketplace and less of a con). After all the work I put into this costume, I am determined to wear it on at least one other occasion, though!

It’s Beginning to Look a Lot Like…

I finally started to get into the Christmas spirit a little bit this weekend, probably because on Friday afternoon my yard looked like this:

And by Sunday it looked like this:

Many of my friends and family bemoaned the precipitation and freezing temperatures, but I always like a bit of snow before Christmas. A green Christmas just isn’t very Christmas-y to me. That being said, it’s supposed to go up to 9°C (48.2°F) on Tuesday, so it’s not like this is going to last.

It really put me in the mood for Christmas shopping, though. Unlike in the States, where the holiday buying season appears to officially start as soon as the clocks strike midnight the day after American Thanksgiving, we don’t really have a traditional time to begin. Some people shop all year ’round. Some companies put out their Christmas merchandise at the same time as they’re building their Halloween displays (which is a little early to me, but oh well). For me, all of the Halloween debris has to be cleared away and there has to be some snow on the ground for me to feel like shopping for gifts — although I have been known to pick things up six months in advance if the opportunity arises at a great price.

I went with my mother, Thing 1, and Thing 2 to a number of craft fairs on Saturday, but one of my perennial favourites was the one held at Cairine Wilson High School. It’s a huge fair; it packs full the big gym, the little gym, the hallways, and the cafeteria. Given the number of booths, I’m bound to find something that I know someone will like.

But even if I don’t find the perfect gift for someone, it’s a lot of fun to check out the wares of local craftspeople. This is one of the few times of year that a lot of these people make their work available to the public; many craftspeople work all year by themselves to make enough stock for one or two holiday shows.

After hitting a few craft fairs, we rushed home so that the kids could get changed into their uniforms and we could drive out to Epiphany Anglican Church where the Girl Guides’ Holiday Tea is held every year. Since I’d gone to all of the effort of baking brownies for the tea, I pretty much had to attend. It’s always a lovely time, with such cheerful little servers and so many delicious treats on which to nosh.

I may have kind of taken a picture of some of the sweets for our table after I’d already nabbed the chocolate ones. Just maybe. I think that the next to go was that shortbread on the bottom right, since I’m a sucker for those too.

First Bake of the Christmas Season

I wanted to spend today working on my last-minute costume, but the weather has started to change for the colder, and that meant that I had to make some changes to my house. The Weather Network is calling for rain, freezing rain, and snow over the weekend, so I had to be prepared. First, I had to put up the Christmas lights, since climbing on a ladder in the ice and snow is not a good idea.

Second, I had to clean the garage. I know it may not look like much, but it took me the rest of the day to get my garage this tidy. I really prefer to park under a roof in the winter; the car starts easier, it takes less time to get out the door because I don’t have brush/scrape off snow/ice, and it’s just generally better for the longevity of the vehicle. In warmer weather, however, my garage becomes my workshop-slash-storage-space, and it becomes cluttered and messy, and there’s no way you can get a car in there for about six months. So every fall I have to give it a good clean, and this year I’d let it get bad enough that it took me most of the day.

We still had to eat, of course, so I kept in the same mind-set as yesterday’s Clean Out Your Refrigerator Day — this having nothing to do with the fact that I still hadn’t gone to the grocery store, of course. I made grilled cheese for the family using yesterday’s Light Rye and Caraway Bread (page 75, Bread Machine: How to Prepare and Bake the Perfect Loaf (Jennie Shapter (2002)) and leftover cheese from the cheese-and-crackers tray from the Halloween party, which I think was mostly cheddar and Havarti, possibly Gouda. Sadly, there was just toast for me, since I have yet to find a non-dairy cheese that I actually like. Alongside the sandwiches I served cream of carrot soup that I had made up around Easter and frozen.

This weekend there is an annual fundraiser to send the area Pathfinders on an excursion, for which the younger girls (Sparks, Brownies and Guides) help out. The fundraiser is a holiday tea held at a local church. Parents supply beverages and baked goods, the Pathfinders organize and run the kitchen, the Guides serve the hot drinks, the Brownies serve cold drinks and treats, and the little Sparks just serve treats. The younger girls only work in one-hour shifts and are always given the chance to sit down and have tea and treats afterwards, so they love participating in this fundraiser. Plus, it makes them feel really grown up.

Thing 1 helped me choose and bake the treats we’ll be providing, which after a perusal of my cookbooks Thing 1 proclaimed had to be brownies-without-the-capital-B. She picked the recipe from Cookies: Recipes for Gifting & Sharing (Publications International Ltd., 2016), the classic brownies on page 35. Other than taking longer to bake than the directions specified, they went off without a hitch! Of course, I had to try one of the brownies before I packaged them to drop off tonight, and they’re rich and chocolatey soft, firm on the outside with a soft, moist (but not under-cooked) center. I am definitely pleased with this recipe, and not only because it’s so easy! My only qualm is that it has a bit of dairy inside, so maybe in the future I’ll be able to come up with a non-dairy version.