Christmas Prep

We’re right smack dab in the middle of Christmas prep around here, dashing from hither to yon to prep for school spirit days, family events, and hosting over the holidays. Of necessity, suppers have been quick and easy; I think tomorrow I will be breaking out the slow cooker just to make dinner that much easier.

Last night, though, I rummaged through the freezer and turned up with some rather nice basa fillets. I dredged them in flour, sprinkled them with a bit of garlic powder and salt, and lightly fried them in a glug of olive oil in a non-stick pan. (As an aside, when making this kind of dish, does anyone else think about that lightly fried fish fillets meme?) I topped the fried fish with crumbled bacon and served it alongside boiled baby potatoes and steamed carrots.

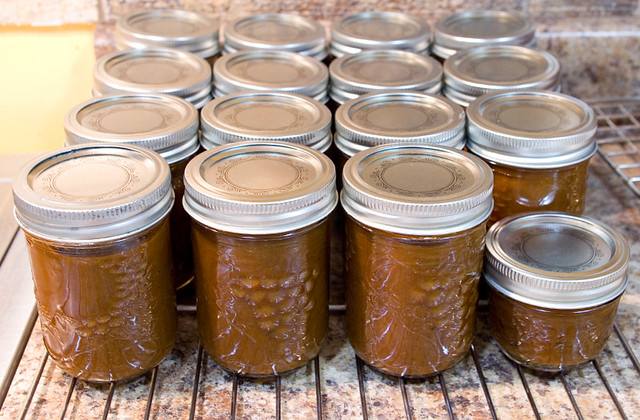
I still wasn’t feeling spectacularly well last night, so I didn’t get as much prep work done as I wanted to, but the hectic pace around the holidays is one of the reasons I start canning way back in the summer. As planned, I plunged into my shelves of homemade preserves to get gifts together for my kids’ teachers.

As with Guiders, I consider teachers to be especially important to my children and, as such, they are deserving of some nice things around Christmas to show my appreciation. Teachers put in long hours in a job that I, to be completely frank, am vastly temperamentally unsuited to do. Before my children were born, I seriously considered home-schooling, but as time went on I realized that teaching is definitely not one of my gifts. I have the utmost appreciation for those people who can do so, especially while both funding and support are slowly withdrawn from the public school system over the years.

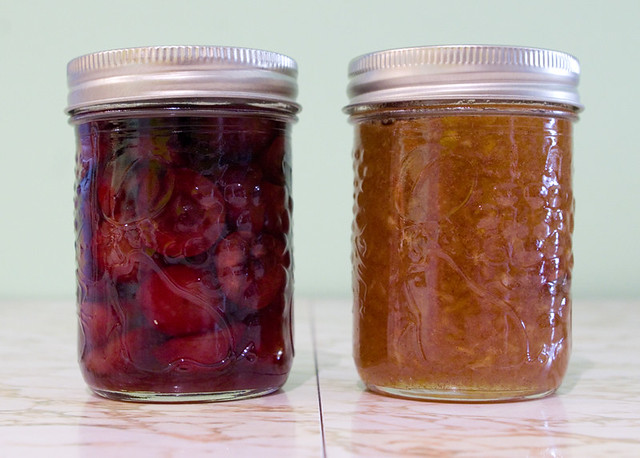
This year, my kids’ teachers are getting amaretto cherries, spiced pear jam with pineapple, handmade cloths, and a box of Girl Guide cookies. (I considered giving the cookies to the Guiders too, but I thought they could probably use a break from this fundraiser by this point.) I hope that the teachers will be able to enjoy these foods over the winter break — or any time after, really, as they’ll last about a year unopened.

Ginger Shakin’ Beef

A NTD Taste Life video for Ginger Shakin’ Beef came across my Facebook feed recently, and the recipe looked both simple and delicious. A bit of digging for the actual recipe (which wasn’t posted with the video) made me realize that the original source was Jamie Oliver’s 5 Ingredients Quick & Easy Food (2017). The recipe itself is available on Jamie Oliver‘s website. I’ve been meaning to pick up a copy of this book, but it’s a recent addition to my list of cookbooks I’d like, and anyway, it’s not a great idea to buy things for yourself before Christmas.

My plating sadly never looks as good as that found in Jamie Oliver’s books, but the taste of the dish was lovely. My kids had their meat over rice instead of bok choy since they’re not a huge fan of this veggie (although I did make them have a bit on the side). I loved the combination of the miso and the honey to make a simple sauce. It was delicious! However, I wasn’t too sold on the ginger and beef fat. I found that the fat, despite frying until crispy, really didn’t have much flavour and didn’t add much to the dish. The ginger, while it looked pretty, was very strong — my kids just picked all of theirs out. I think it would have been better mixed in with the main meat and sauce, maybe lessened in quantity a bit and chopped fine to mix throughout the dish. All that being said, I will definitely make this dinner again in the future (albeit with some slight variations to adjust for my family’s palate). It was both easy and tasty, and it is great for school nights when time is at a premium, so that’s a win in my book.

The Last of the Canning — Maybe

It looks like I have finally made it through my not-inconsiderable list of foods that I wanted to put up for the winter. I mean, I still have two pumpkins left to roast, but the puree is just going in the freezer, which doesn’t take nearly as long as hot water bath canning or pressure canning. If I don’t have to lug my canning rigs and bunches of jars out of the basement, it doesn’t count.

The last two things to put up were parsley jelly and hot sauce, both of which contained produce grown in my garden. I brought a big pot of parsley in with the first major cold snap about a month ago, and I kept it alive until I could chop it up for the jelly. The peppers for the hot sauce were brought in as they ripened, and then were frozen. This isn’t the greatest solution if you want your peppers crisp, but if you’re just going to run them through a blender or food processor, it doesn’t really matter. This way I was able to cook up a whole season’s peppers at once, instead of using them up individually as they became ripe.

I was curious to try the parsley jelly (from page 298 of Preserving: The Canning and Freezing Guide for All Seasons by Pat Crocker (2011)), since I’d never heard of it before. Mint jelly, sure, but not parsley. Apparently it’s and English thing? This jelly can also be made with sage, thyme, or basil, in addition to the mint that I’m familiar with. Sadly, as good as it looks, the jelly didn’t set despite following the instructions to the letter. That’s why I added a “maybe” to this post title. I mean, I could just give up and chuck the unset jelly, or I could try to re-cook it. I’ve used this technique in the past and it has worked out well. But I am so incredibly busy with the Christmas season at the moment that I might just give up and try again another time.

My hot sauce, however, turned out wonderfully. Since it’s a puree, it’s not like I have to worry about the set. I base my hot sauce on the Essential Habanero Hot Sauce from Genius Kitchen. I got great reviews on the sauce last year. Although the heat of the sauce varies because every summer I grow slightly different peppers, I’m pretty sure that this year’s is at least as hot as last year’s because even just the vapours from cooking it completely cleared my sinuses. Let’s hope the people I am giving it to for Christmas like it as much!

Pear & Honey Jam Recipe

As I wrote about before, I had a lot of cooking pears that needed to be used up recently. All of this excess meant that I had a chance to experiment with making a jam of my own devising. Pears are a naturally acidic fruit, which makes them perfect for hot-water-bath canning with a bit of sugar. It took me a couple of tries to get this recipe right, since since I didn’t want to use like ten cups of sugar (with would generally produce and easily firm set), since I wanted to taste the fruit and the spices more than the sweetness. In the end, I had something that I am quite proud of. Next year, when pears come into season, I think that I will make this the main pear jam (although I did really like the Spiced Pear Jam with Pineapple found on page 935 of the Joy of Cooking (2006 edition, Rombauer & Becker), or on the app). Maybe next year I’ll have a yield of more than four pears off of my baby pear tree, and I’ll be able to make more things from fruit I’ve grown myself!

Pear & Honey Jam
Yields six 250mL (1 cup) jars

Prepare and sterilize six 250mL (1 cup) jars (or twelve 125mL (1/2 cup) jars) and matching lids as per manufacturer instructions. Keep jars and lids warm until it is time to fill them.
In a Maslin pan or other non-reactive, heavy-bottomed pot, combine:
1.5 Kg (3.3 lbs) ripe/slightly overripe pears, peeled, cored, and roughly chopped
350 mL (1.5 cups) honey*
700 mL (3 cups) sugar
60 mL (1/4 cup) lemon juice
2.5mL (1/2 tsp) ground allspice
5 mL (1 tsp) ground cinnamon
2.5mL (1/2 tsp) ground cloves
2.5mL (1/2 tsp) ground nutmeg
2.5mL (1/2 tsp) ground ginger
Bring to a boil over medium-high heat, stirring constantly to prevent burning. Boil for 10 minutes. Remove from the heat. Run the mixture through a blender or food processor until it reaches a smooth consistency, being extremely careful as the ingredients will be very, very hot. Return the mixture to the pot and bring it back to a boil.
Add:
one 85 mL (2.9 oz) package of liquid pectin
Bring mixture back to a boil. Stir constantly as mixture boil hard for an additional minute.
Ladle the jam into the prepared jars, leaving a 5mm head space. Wipe jar rims with a clean, damp cloth or paper towel. Top jars with lids and screw metal rings into place until fingertip tight. Place jars on top of a canning rack inside a boiling water canner, being sure that none of them touch the sides of the pot or each other. Jars should be covered by at least 2.5cm (1″) of water, so add hot water if necessary. Bring to a rolling boil and process for 15 minutes, starting your timer once the water is boiling.
Remove jars from canner and place them on a cooling rack, not touching each other. Let them rest for 24 hours before touching. Label if desired. Jams may take up to 48 hours to set, so do not open them until this time has passed.
This jam may be kept in a cool, dark area for up to one year.

*It’s really not worth it to use unpasteurized honey here, since all the additional benefits are lost when the honey is cooked.

Not-So-Silent Night

Last night was one of those nights where it seemed like all I did was run from pillar to post and back again. It started as soon as the kids got home from school. There was snacks, then showers, then finding all of the parts of their Guiding uniforms (or, in Thing 1’s case, a matching set of PJ’s for her unit’s holiday pajama party), then the kids making their lunches while I whipped up dinner…

Dinner was what I think might very charitably be called deconstructed shepherd’s pie. I had taken the meat out earlier in the day to thaw, but by the time dinner prep time came around I knew I’d never have time to bake it as a casserole. So I prepped the meat as I would for my usual shepherd’s pie (with a few extra mushrooms thrown in because that’s what I had in the fridge), boiled up some baby potatoes, and microwaved some corn. Instead of layering it into a casserole, I just served it as is. The kids ate all of theirs without complaint, and I found it almost as tasty (if not as creamy) as the real thing, so it worked out okay.

Then I had to wrap Christmas thank-you gifts for my girls’ Guiders. Guide leaders are volunteers, and I think it’s important that they know how much my children and I appreciate all of their hard work. Without Guiders, there would be no Girl Guides. I couldn’t do what they do (despite having two children that I adore, my patience levels with children is not great), which is why I try to support them in other ways.

Although the bags look slightly different, that’s mostly because I ran out of white tissue paper near the end. They’re all identical inside, containing Amaretto Cherries and Cinnamon-Scented Parsnip Pear Jam. I am very quick at gift wrapping, having worked the wrapping station in a number of retail jobs over the years, which comes in handy when I have ten gift bags that I’ve forgotten to put together until the last minute. I could have sworn Thing 1 and Thing 2 had one more meeting before the holiday break, but obviously I was mistaken.

Then I had to rush out the door to drive the kids through a snowstorm to their respective Guiding activities for the evening — Thing 1 to her pajama party and Thing 2 to sing Christmas carols at a retirement home. Of course, I got stuck spinning my tires on a patch of ice as I left my driveway, and luckily my husband arrived home just in time to help push the car. Then it was a very slow, cautious drive to the girls’ activities, then another slow and cautious drive to my parents’ place to help them put up their Christmas tree, then back to pick up the girls and get them home and in bed for the night, despite the huge amounts of sugar they had consumed.

When all that was over, I had to relax a bit. I poured myself a lovely glass of rum and eggnog (okay, Earth’s Own Almond SoFresh Almond Nogg, which isn’t a half-bad substitute for the lactose intolerant). I had a real tree twinkling with lights in the living room. And, at least for a few hours, I tried to ignore the fact that I had less than two weeks to go to get everything done before Christmas.

Pumpkin Butter

I wrote last week about finally canning my Halloween pumpkins. So far I have done two of the four. For one of them I simply froze all of the pumpkin puree that I created by roasting the gourd and then running the flesh through a food processor. The other pumpkin I turned into pumpkin butter.

Way back when I started making preserves, I burned an entire batch of fruit butter by trying to cook it too quickly on the stove. Ever since then, I make my fruit butters in a slow cooker, for the most part. I don’t have a recipe as such, more of a technique. For the purpose of posterity, this time I measured everything out. I used a six-litre slow cooker, but I didn’t fill it to the brim because fruit butters tend to have big bubbles, so there needs to be some space under the lid. For this batch, I used:

20 cups (4.75L) pumpkin puree
3 cups (710mL) honey
4 Tbsp cinnamon
3 Tbsp ginger
2 Tbsp nutmeg
1 Tbsp cloves

Then I cook it with the lid a bit ajar so the steam can escape (some newfangled crock pots have a vent, but mine is probably older than me so it does not) for about 24 hours, or until the butter thickens. If it doesn’t reach the desired thickness in this amount of time, sometimes I will cook it a bit on the stove, since I find that leaving it longer than that in the crock pot can make it taste burnt. When it is ready, it will have changed from orange to a deep, nutty brown.

Now, I’d been making pumpkin butter for years using this recipe and then hot-water-bath canning it, and I never had any problems. I was using what I thought were USDA-approved recipes — and, indeed, they used to be! But the rules have changed over time, and now it’s no longer recommended to can pumpkin butter (or even pumpkin puree, which is less dense) at home. So once this pumpkin butter is complete, it’s going right in the freezer — which is the approved process. I use wide-mouthed mason jars to avoid cracking as much as possible, I don’t fill them all the way, and I make sure they’re totally cool before I freeze them. I still will lose a few every year to cracked glass. Of course, you can always buy plastic freezer jam containers and avoid cracked jars, but I like to give my preserves as gifts, and I find the glass jars to be much more attractive.

Now I’m a little bit paranoid about the whole thing, and I don’t want to make anyone sick, so I do pressure-can my pumpkin butter first. I process it for an hour (being careful not to let the canner boil dry), and when the cans come out of the cooker I can still feel butter boiling inside the jar. In addition to making the pumpkin butter safer, I find that pressure cooking it for this long also changes the texture. I wonder if this is because it is guaranteed to reach the jelling point (220°F to 222°F)?

(As an aside, the instructions for my pressure canner, which is only about four years old, specifically states that pumpkin puree can be pressure canned safely in this device.)

I have to admit that I find pressure canning more than a little terrifying. The steam hisses out at irregular intervals and constantly makes me think I’m going to end up with some disaster like this. In reality, that hissing means that the pressure is venting properly — what’s really a problem is if it stops (if you haven’t turned off the heat underneath first). That means that your steam vent has clogged and the pressure inside is building up disastrously.

In the end, I ended up with fourteen 250mL jars and one 125mL jar of pumpkin butter. Now all they need are labels, and they’ll be ready for the freezer!

Vintage Stand Mixer

It’s come up before that I like old things, not just because they’re old, but for reasons that are:

a) stylistic (some of them are just pretty);
b) environmental (why buy new and add to pollution when there are working older versions of the same thing out there?); and
c) budgetary (old/used items tend to be cheaper than new, unless they’re very rare)

So it’s no surprise that when I recently found a really cheap vintage Dormeyer Princess stand mixer from the 1950’s up for sale, I jumped on the opportunity. I took the chance and bought it based only on some pretty bad photos, but I figured the risk was worth it. As I suspected, it needed a bit of work, but nothing I couldn’t handle.

The main part of the mixer needed a bit of cleaning.

However, what I was most worried about was the state of the power cord, which was dangerously frayed. It looked like it had been poorly repaired more than once. So I went out and bought a completely new cord and installed that — a fairly painless process, as it turns out.

When I opened up the main body, it was disgustingly gungy inside. I took it apart as much as possible, washed all the non-mechanical bits in hot soapy water, and wiped down the motor and all electrical/mechanical bits down thoroughly.

Now it’s clean inside and out, the wiring is safe, and it works like a charm!

It’s pretty, too. I think the styling is very reminiscent of an old Chevrolet.

In the end, the total cost to me was about $30, plus an hour or two of work. Not bad when a nice modern KitchenAid stand mixer costs about $600. Apparently there was originally a juicer and a meat grinder attachment for this model, which I’ll keep an eye out for while thrifting. I wonder if I could find a dough hook that would work with it as well? That would be lovely.

Low-Prep Suppers

I kind of have my kitchen back again… Okay, not the whole thing, but the counters and table are clear again, so I can cook properly. I made shepherd’s pie for dinner (but without the cheese topping, to reduce the amount of dairy and make it better for my gut). However, the meal was running late and we dug into it much too fast for me to take pictures. Instead, I have photos of the bread that was cooking while we were eating dinner:

That’s Beer Bacon Bread found on page 44 of Betty Crocker’s Best Bread Machine Cookbook (Betty Crocker, 1999). I used a flat Guinness beer, a package of crumbled circular bacon, and chives from my window garden instead of green onion because that’s what I had on hand. It’s only the second time that I tried out any recipes for this book, and so far so good! There’s a Cottage Dill Loaf on page 152 and Brandied Pumpkin Bread on page 104 that I can’t wait to try.

Earlier in the week I had to make a few easy and quick meals that required little in the way of prep space, so I whipped up a loaf of Sally Lunn bread (page 25, also from Betty Crocker’s Best Bread Machine Cookbook), which I think called for an unreasonable amount of butter in the dough (6 Tbsp!), but I have to admit tasted quite nice. I used it to make grilled cheese sandwiches for the girls, with sides of sliced apples.

Of course I have issues with dairy (and at any rate I’d run out of cheddar), so I fried up a couple of eggs each for my hubby and I, and served it with the Sally Lunn, sliced apples, and mandarin oranges.

Earlier this week I went with a less bread-based meal and baked up some trout with in teriyaki sauce, which I served over rice with a side of asparagus.

I’m really looking forward to having this mini-reno complete so that I can try some new recipes! This hasn’t been nearly as time-consuming an affair as a full gutting of the kitchen (much as I’d love to be able to afford a 100% fresh new kitchen), but it’s still rather disruptive. At least it’s cheap!

Of Pastry Blenders and Biscuits

My house is all topsy-turvy at the moment because I’m doing work on the kitchen. (On the kitchen, as well as in, since I seem to work in the kitchen pretty much every day.) I managed to obtain some additional, second-hand cupboards, which means I’ll soon have new cupboard and counter space eventually. In the short term, this means that half of the contents of my kitchen are currently in the dining room, so we have to eat in the family room, and the day-to-day mess of the family room is pushed into other rooms… I can’t wait to have this mini-reno completed, not just so I can use the expanded kitchen space, but so order is once again returned to my house!

I’ve been trying not to cook anything super-involved, since prep space is currently at a bare minimum, and to me that means making Dad’s Biscuits. My mom picked me up what I think is a Perfect Pie Blender, although it’s branded with the President’s Choice logo, so it may be a knock-off. Or maybe PC has a deal with Kitchen Innovations, I don’t know. I can guarantee you that my mother didn’t pay $40 for it, though. Knowing Mom, she probably found it on clearance for $5 or less.

At any rate, the Perfect Pie Blender is far cry in shape and style from the traditional style of pastry blender that I grew up using. The company claims that it will make perfect pastry in sixty seconds, which is an exaggeration if you ask me, but it is definitely faster than my old method. One reason for this is that the blades are sturdier and the updated shape means that I’m not constantly cleaning food out from between the wires. It’s generally a more ergonomic design, too. Given that I’d been making pie using the old style blender since I was a kid, I thought I’d have a harder time getting used to a new tool, but I’m surprisingly quite happy with the new blender. I’d recommend it — although I definitely wouldn’t recommend spending $40.00 CAD on it like Amazon.ca suggests, especially when you can get it for $12.60 USD on Amazon.com.

The other day I nuked up some IKEA KÖTTBULLAR meatballs while my husband stirred up the ALLEMANSRÄTTEN cream sauce. We’re very sophisticated people, don’t you know. The original plan was to throw on some oven-baked french fries, but I miscalculated the amount we had left in the freezer, so only the kids got fries. My husband and I ate our meatballs with biscuits instead. I added an apple to our meals because there has to be some kind of fruit or veg with every meal, doesn’t there?

Yesterday the kitchen mini-reno had continued apace and we couldn’t even see the dining room table any more, let alone eat at it, so we dined on TV trays in the family room. I made Guinness beef stew based very, very loosely on this recipe, but it was more improvised than not to help me use up what was in the fridge. I still have a surplus of parsnips and celery, which remain fresh and crisp in my fridge, as well as potatoes from my garden, so they had to go in there. To my kids’ delight, I served the stew with biscuits for a nice, hearty dinner. I didn’t even have to argue with the girls to eat their vegetables even though the stew was more veggies than anything else. That’s always a nice change.

Meemaw’s Cookie Recipe

I have a number of friends and family who are huge fans of the television show The Big Bang Theory, and I don’t mind the show myself. I thought that, since Christmas is coming up, I might try to make a show-based recipe that has been floating around the Internet for a while. It’s for a type of cookie purportedly baked by Meemaw (Sheldon Cooper’s grandmother). My Google-fu has failed me and I haven’t been able to find the original source, else I would link back to it to give proper credit.


Sheldon Cooper (played by Jim Parsons) holding a cookie baked using his Meemaw’s recipe, as baked by Amy Farrah Fowler (Mayim Bialik) in The Big Bang Theory, season 8, episode 11.

The recipe I’ve found is a cookie press or spritz cookie, although from the reference photos I’ve found that the final product looks more like something made with a cookie cutter. Or possibly they started with a flat cookie and created the tree design on top using a pastry bag filled with dough? Granted, you don’t see the cookies in the show for very long, and I could totally be wrong. I thought I’d try the spritz version anyway.


Thing 1 and Thing 2 being very serious about getting the cookie dough just right.

Thing 1 and Thing 2 did most of the work this time (okay, mostly Thing 1), so it’s definitely a simple recipe to follow. The kids really like working with the caulking-gun-like cookie press, and they also love to add the sprinkles. Of course, this meant that the final product looked far from perfect, but who cares so long as they had fun and it tastes great?

In the end, I was really happy with this recipe, even though it may not be a hundred percent screen accurate. Here’s what I did:

Meemaw’s Christmas Cookies
Makes about 8 dozen small cookies

Preheat the oven to 375°F (190°C).
Beat together until creamy:
1 1/2 cups unsalted butter, softened
1 cup granulated sugar
1 tsp almond extract*
Beat in, about a third at a time:
3 1/2 cups all-purpose flour
Insert any shape of disk into cookie press (the ones in the show are tree-shaped, but any shape will do). Press dough onto an ungreased cookie sheet one inch apart. Alternately, use a pastry bag with a wide tip to create designs.
Decorate with:
coloured sugar or sprinkles
Bake for 10 to 13 minutes, or until firm and very slightly browned.
Remove from cookie sheet onto a cooling rack. Serve immediately, or place into a container once they are cooled, where they can last up to a week.

*If nuts are a problem, vanilla extract may be substituted (although the flavour will change a little bit).